radio FIAT 500L 2015 2.G Owner's Manual
[x] Cancel search | Manufacturer: FIAT, Model Year: 2015, Model line: 500L, Model: FIAT 500L 2015 2.GPages: 148, PDF Size: 3.77 MB
Page 75 of 148
Voice Text Reply
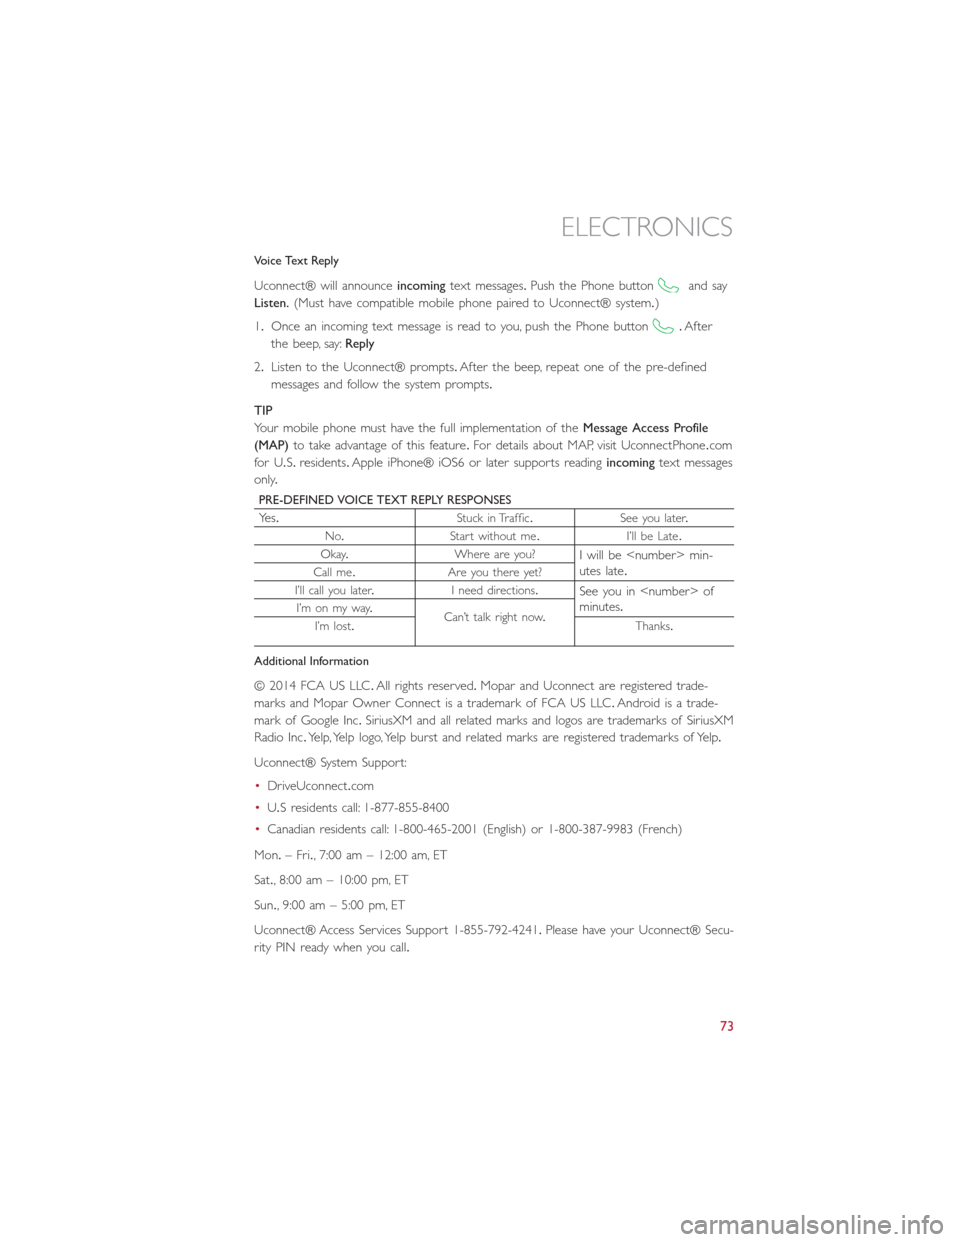
Uconnect® will announceincomingtext messages.Push the Phone buttonand say
Listen.(Must have compatible mobile phone paired to Uconnect® system.)
1.Once an incoming text message is read to you, push the Phone button.After
the beep, say:Reply
2.Listen to the Uconnect® prompts.After the beep, repeat one of the pre-defined
messages and follow the system prompts.
TIP
Your mobile phone must have the full implementation of theMessage Access Profile
(MAP)to take advantage of this feature.For details about MAP, visit UconnectPhone.com
for U.S.residents.Apple iPhone® iOS6 or later supports readingincomingtext messages
only.
PRE-DEFINED VOICE TEXT REPLY RESPONSES
Yes.Stuck in Traffic.See you later.
No.Start without me.I’ll be Late.
Okay.Where are you?I will be
I’ll call you later.I need directions.See you in
Additional Information
© 2014 FCA US LLC.All rights reserved.Mopar and Uconnect are registered trade-
marks and Mopar Owner Connect is a trademark of FCA US LLC.Android is a trade-
mark of Google Inc.SiriusXM and all related marks and logos are trademarks of SiriusXM
Radio Inc.Yelp, Yelp logo, Yelp burst and related marks are registered trademarks of Yelp.
Uconnect® System Support:
•DriveUconnect.com
•U.Sresidentscall:1-877-855-8400
•Canadian residents call: 1-800-465-2001 (English) or 1-800-387-9983 (French)
Mon.– Fri., 7:00 am – 12:00 am, ET
Sat., 8:00 am – 10:00 pm, ET
Sun., 9:00 am – 5:00 pm, ET
Uconnect® Access Services Support 1-855-792-4241.Please have your Uconnect® Secu-
rity PIN ready when you call.
ELECTRONICS
73
Page 78 of 148
Refer to theUnderstand The Features Of Your Vehiclesection of your vehicle's Owner's
Manual on the DVD for further details.
NOTE:
•The Uconnect® Phone requires a mobile phone equipped with the Bluetooth®
Hands-Free Profile, Version 1.0 or higher.
•Most mobile phones/devices are compatible with the Uconnect® system, however
some mobile phones/devices may not be equipped with all of the required features to
utilize all of the Uconnect® system features.
•For Uconnect® Customer Care:
•U.S.residents visit Uconnec tPhone.com or call 1-877-855-8400.
•Canadian Residents visit UconnectPhone.com or call, 1-800-465-2001 (English) or
1-800-387-9983 (French).
Pairing (Wirelessly Connecting) Your Mobile Phone To The Uconnect®
System
Mobile phone pairing is the process of establishing a wireless connection between a cellu-
lar phone and the Uconnect system.
NOTE:
•To use the Uconnect® Phone feature, you first must determine if your mobile phone
and software are compatible with the Uconnect® system.Please visit
UconnectPhone.com for complete mobile phone compatibility information.
•Mobile phone pairing is not available while the vehicle is in motion.
•A maximum of 10 mobile phones can be paired to the Uconnect® system.
Start Pairing Procedure On The Radio
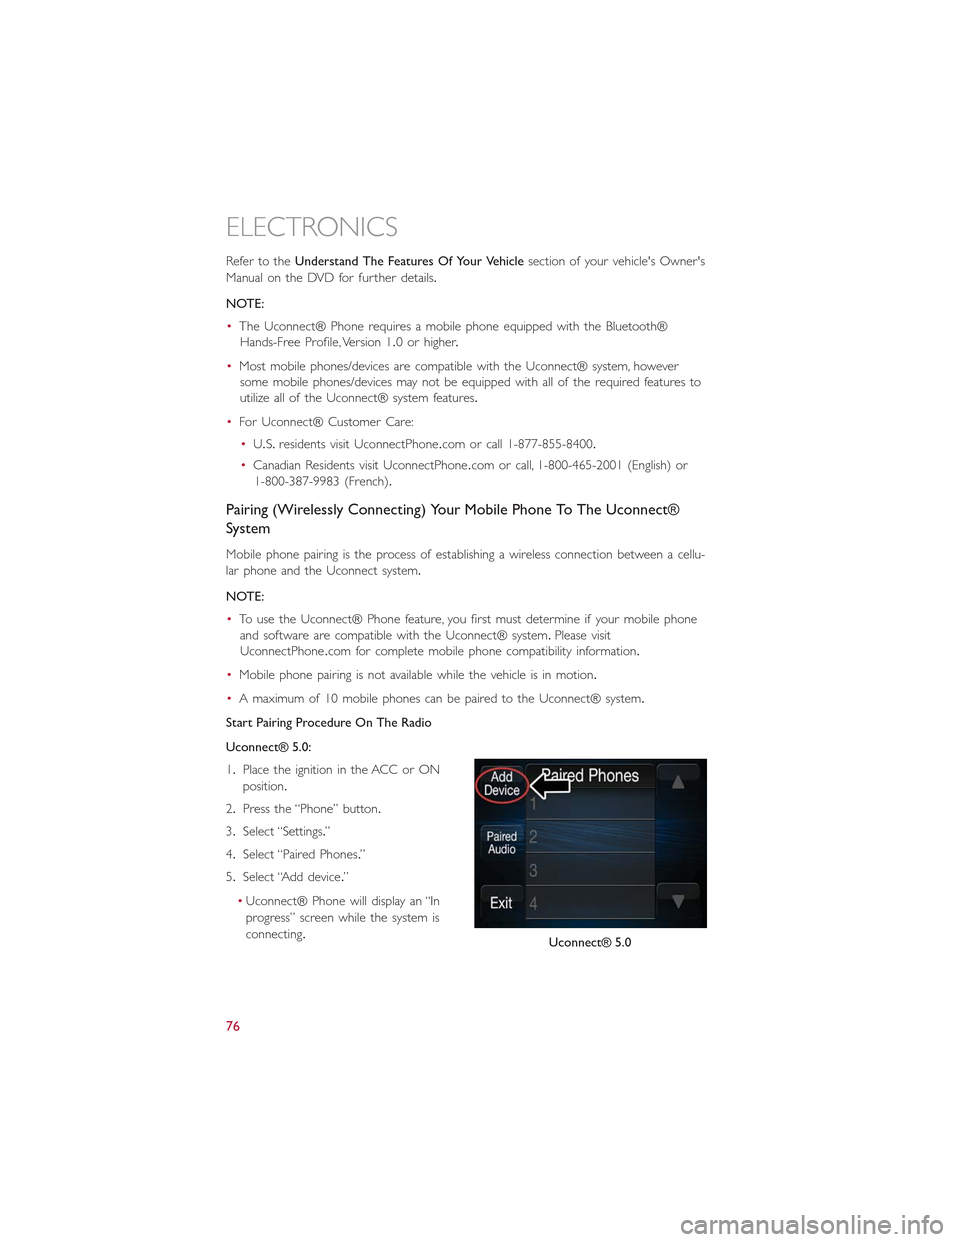
Uconnect® 5.0:
1.Place the ignition in the ACC or ON
position.
2.Press the “Phone” button.
3.Select “Settings.”
4.Select “Paired Phones.”
5.Select “Add device.”
•Uconnect® Phone will display an “In
progress” screen while the system is
connecting.Uconnect® 5.0
ELECTRONICS
76
Page 82 of 148
Phonebook
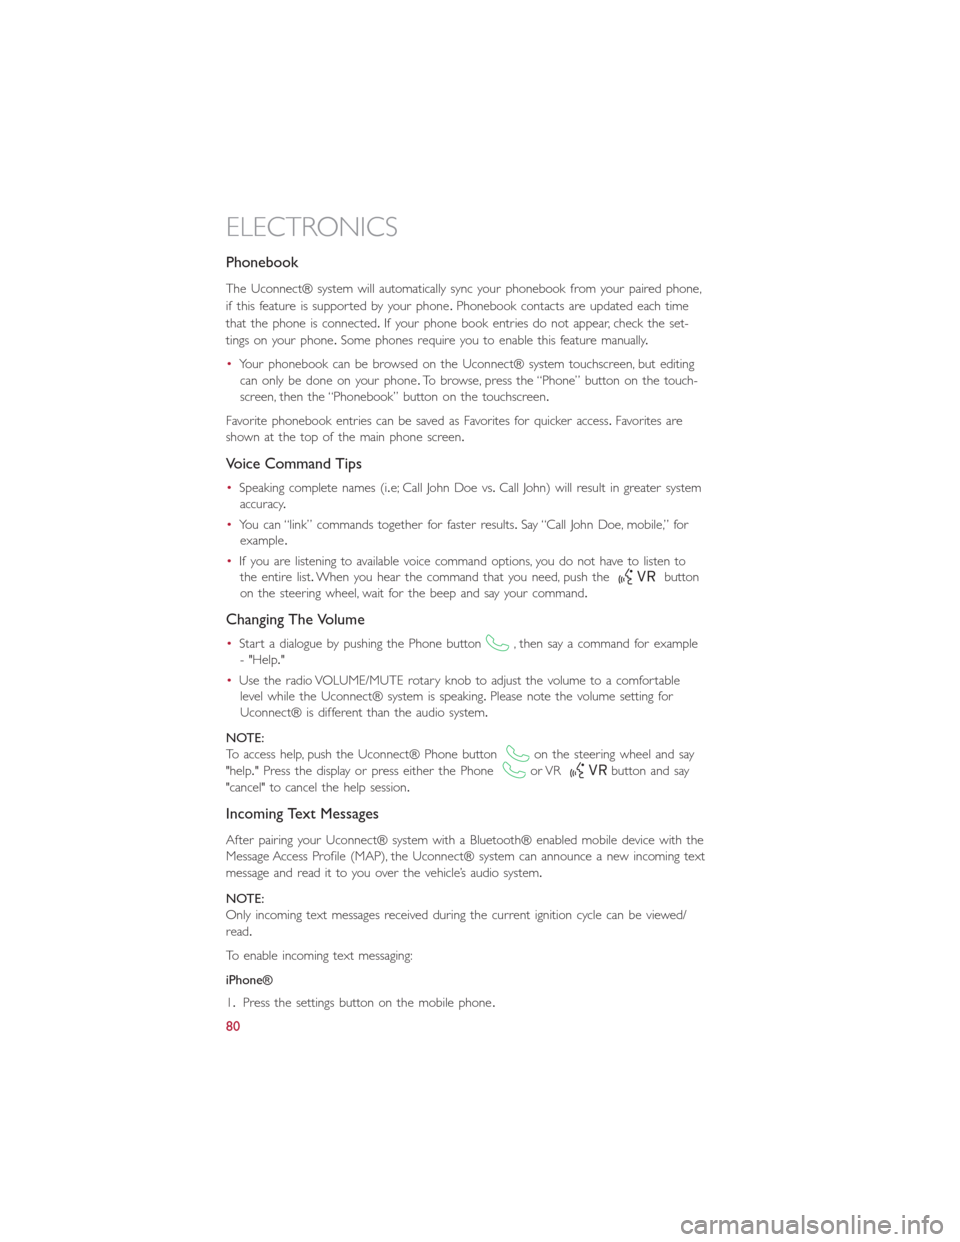
The Uconnect® system will automatically sync your phonebook from your paired phone,
if this feature is supported by your phone.Phonebook contacts are updated each time
that the phone is connected.If your phone book entries do not appear, check the set-
tings on your phone.Some phones require you to enable this feature manually.
•Your phonebook can be browsed on the Uconnect® system touchscreen, but editing
can only be done on your phone.To browse, press the “Phone” button on the touch-
screen, then the “Phonebook” button on the touchscreen.
Favorite phonebook entries can be saved as Favorites for quicker access.Favorites are
shown at the top of the main phone screen.
Voice Command Tips
•Speaking complete names (i.e; Call John Doe vs.Call John) will result in greater system
accuracy.
•You can “link” commands together for faster results.Say “Call John Doe, mobile,” for
example.
•If you are listening to available voice command options, you do not have to listen to
the entire list.When you hear the command that you need, push thebutton
on the steering wheel, wait for the beep and say your command.
Changing The Volume
•Start a dialogue by pushing the Phone button, then say a command for example
- "Help."
•Use the radio VOLUME/MUTE rotary knob to adjust the volume to a comfortable
level while the Uconnect® system is speaking.Please note the volume setting for
Uconnect® is different than the audio system.
NOTE:
To access help, push the Uconnect® Phone buttonon the steering wheel and say
"help." Press the display or press either the Phoneor VRbutton and say
"cancel" to cancel the help session.
Incoming Text Messages
After pairing your Uconnect® system with a Bluetooth® enabled mobile device with the
Message Access Profile (MAP), the Uconnect® system can announce a new incoming text
message and read it to you over the vehicle’s audio system.
NOTE:
Only incoming text messages received during the current ignition cycle can be viewed/
read.
To enable incoming text messaging:
iPhone®
1.Press the settings button on the mobile phone.
ELECTRONICS
80
Page 86 of 148
STEERING WHEEL AUDIO CONTROLS
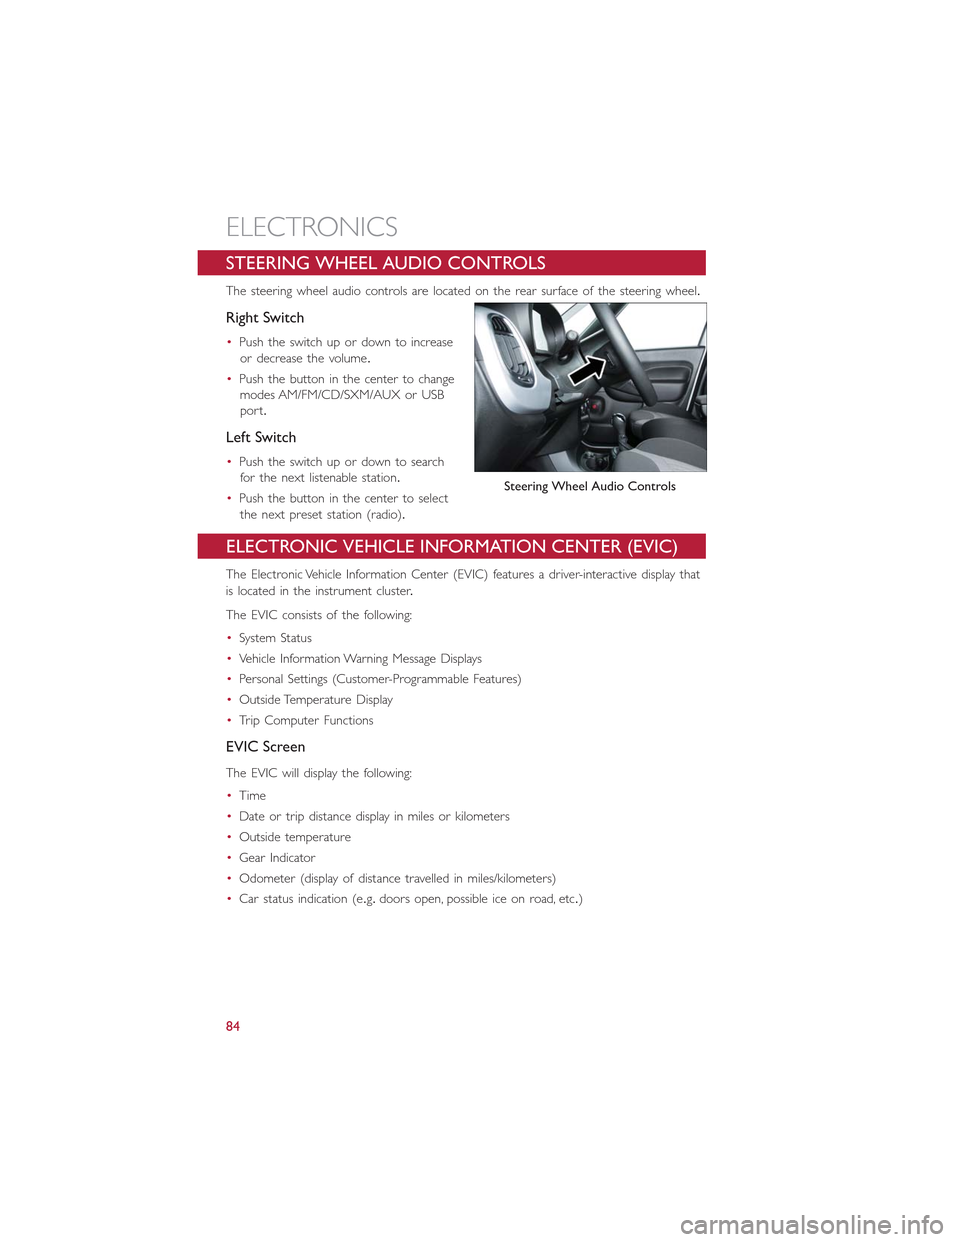
The steering wheel audio controls are located on the rear surface of the steering wheel.
Right Switch
•Push the switch up or down to increase
or decrease the volume.
•Push the button in the center to change
modes AM/FM/CD/SXM/AUX or USB
port.
Left Switch
•Push the switch up or down to search
for the next listenable station.
•Push the button in the center to select
the next preset station (radio).
ELECTRONIC VEHICLE INFORMATION CENTER (EVIC)
The Electronic Vehicle Information Center (EVIC) features a driver-interactive display that
is located in the instrument cluster.
The EVIC consists of the following:
•System Status
•Vehicle Information Warning Message Displays
•Personal Settings (Customer-Programmable Features)
•Outside Temperature Display
•Trip Computer Functions
EVIC Screen
The EVIC will display the following:
•Time
•Date or trip distance display in miles or kilometers
•Outside temperature
•Gear Indicator
•Odometer (display of distance travelled in miles/kilometers)
•Car status indication (e.g.doors open, possible ice on road, etc.)
Steering Wheel Audio Controls
ELECTRONICS
84
Page 87 of 148
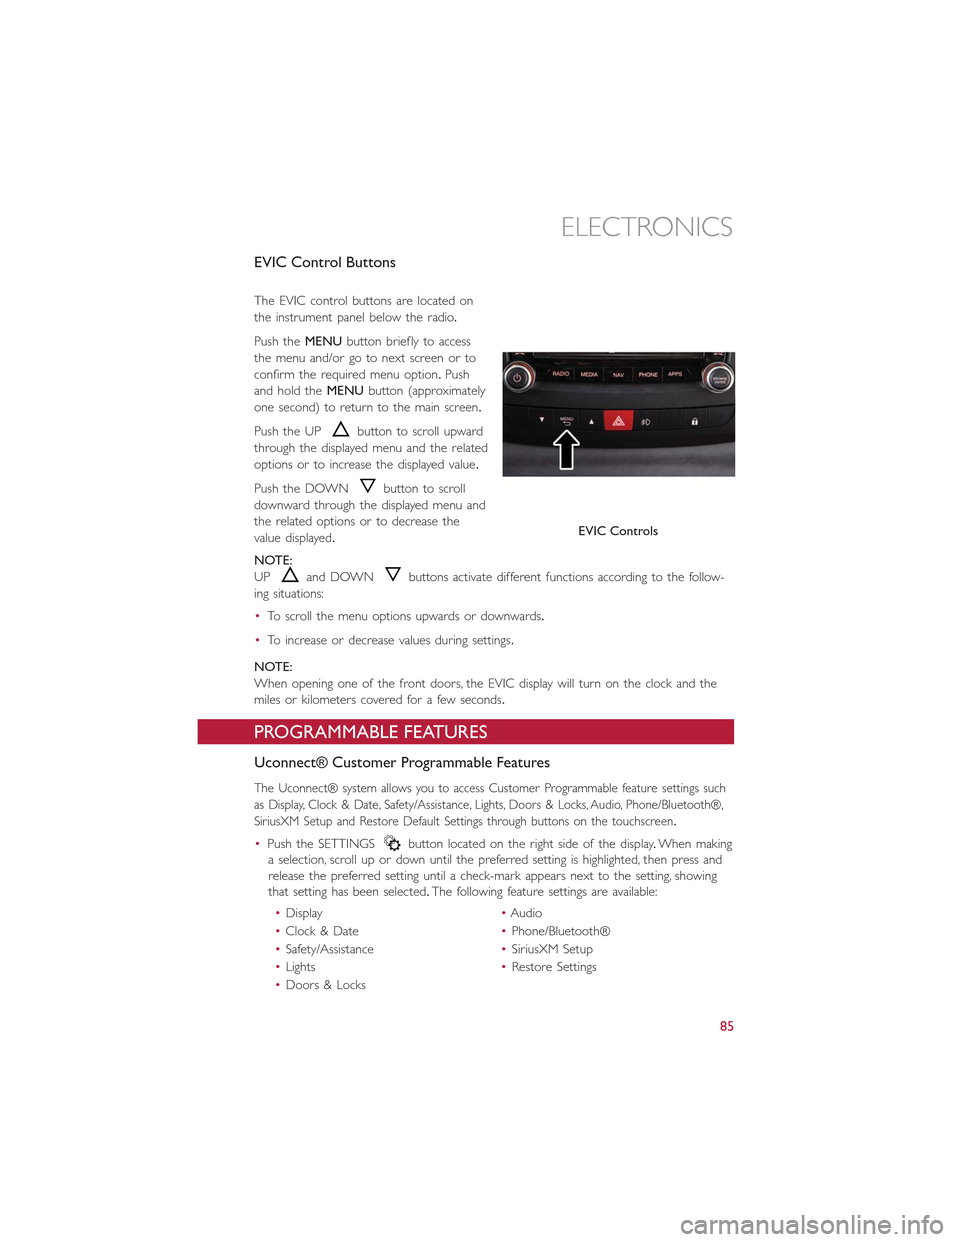
EVIC Control Buttons
The EVIC control buttons are located on
the instrument panel below the radio.
Push theMENUbutton briefly to access
the menu and/or go to next screen or to
confirm the required menu option.Push
and hold theMENUbutton (approximately
one second) to return to the main screen.
Push the UPbutton to scroll upward
through the displayed menu and the related
options or to increase the displayed value.
Push the DOWNbutton to scroll
downward through the displayed menu and
the related options or to decrease the
value displayed.
NOTE:
UPand DOWNbuttons activate different functions according to the follow-
ing situations:
•To scroll the menu options upwards or downwards.
•To increase or decrease values during settings.
NOTE:
When opening one of the front doors, the EVIC display will turn on the clock and the
miles or kilometers covered for a few seconds.
PROGRAMMABLE FEATURES
Uconnect® Customer Programmable Features
The Uconnect® system allows you to access Customer Programmable feature settings such
as Display, Clock & Date, Safety/Assistance, Lights, Doors & Locks, Audio, Phone/Bluetooth®,
SiriusXM Setup and Restore Default Settings through buttons on the touchscreen.
•Push the SETTINGSbutton located on the right side of the display.When making
a selection, scroll up or down until the preferred setting is highlighted, then press and
release the preferred setting until a check-mark appears next to the setting, showing
that setting has been selected.The following feature settings are available:
•Display•Audio
•Clock & Date•Phone/Bluetooth®
•Safety/Assistance•SiriusXM Setup
•Lights•Restore Settings
•Doors & Locks
EVIC Controls
ELECTRONICS
85
Page 88 of 148
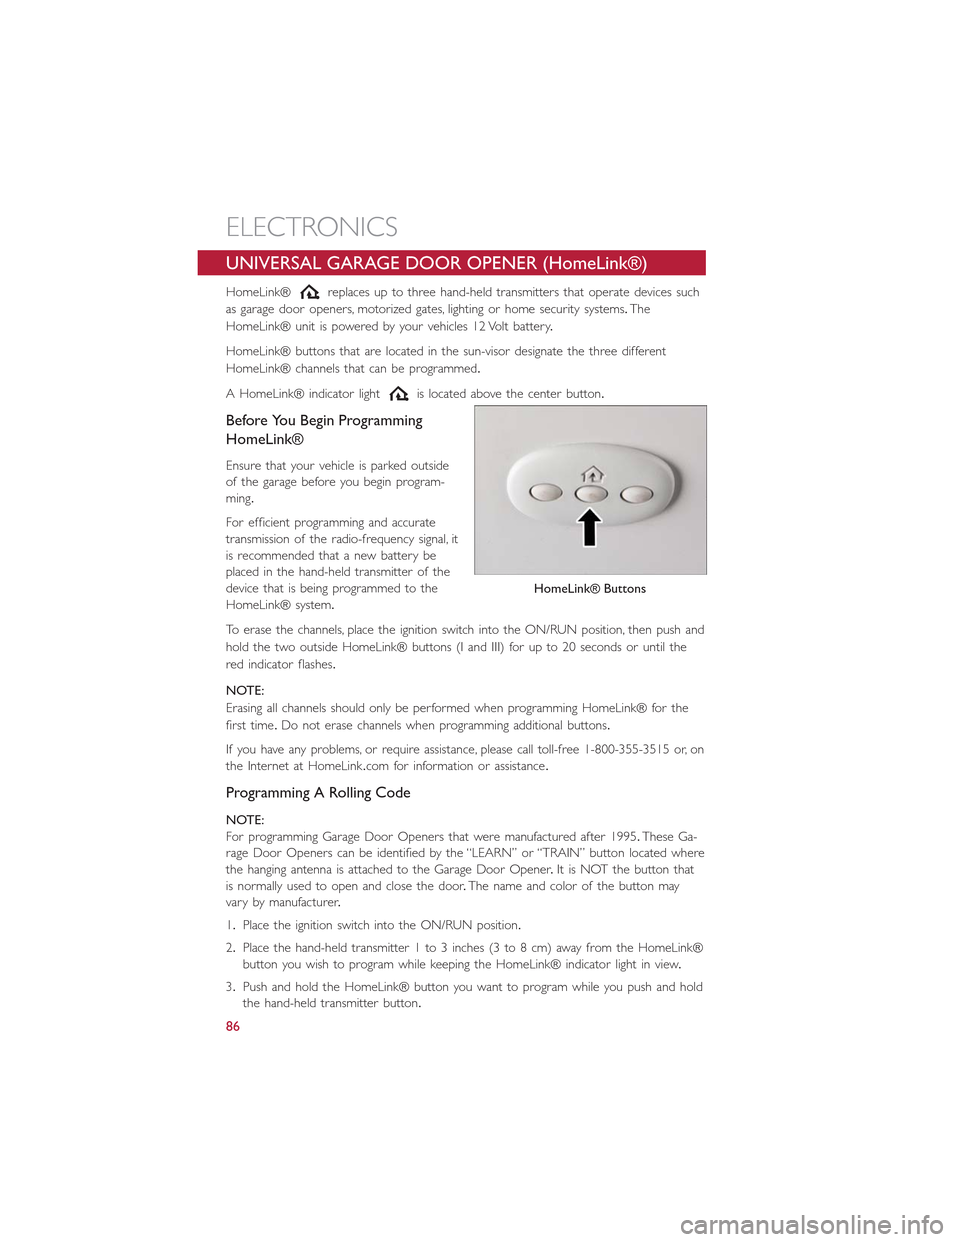
UNIVERSAL GARAGE DOOR OPENER (HomeLink®)
HomeLink®replaces up to three hand-held transmitters that operate devices such
as garage door openers, motorized gates, lighting or home security systems.The
HomeLink® unit is powered by your vehicles 12 Volt battery.
HomeLink® buttons that are located in the sun-visor designate the three different
HomeLink® channels that can be programmed.
A HomeLink® indicator lightis located above the center button.
Before You Begin Programming
HomeLink®
Ensure that your vehicle is parked outside
of the garage before you begin program-
ming.
For efficient programming and accurate
transmission of the radio-frequency signal, it
is recommended that a new battery be
placed in the hand-held transmitter of the
device that is being programmed to the
HomeLink® system.
To erase the channels, place the ignition switch into the ON/RUN position, then push and
hold the two outside HomeLink® buttons (I and III) for up to 20 seconds or until the
red indicator flashes.
NOTE:
Erasing all channels should only be performed when programming HomeLink® for the
first time.Do not erase channels when programming additional buttons.
If you have any problems, or require assistance, please call toll-free 1-800-355-3515 or, on
the Internet at HomeLink.com for information or assistance.
Programming A Rolling Code
NOTE:
For programming Garage Door Openers that were manufactured after 1995.These Ga-
rage Door Openers can be identified by the “LEARN” or “TRAIN” button located where
the hanging antenna is attached to the Garage Door Opener.It is NOT the button that
is normally used to open and close the door.The name and color of the button may
vary by manufacturer.
1.Place the ignition switch into the ON/RUN position.
2.Place the hand-held transmitter 1 to 3 inches (3 to 8 cm) away from the HomeLink®
button you wish to program while keeping the HomeLink® indicator light in view.
3.Push and hold the HomeLink® button you want to program while you push and hold
the hand-held transmitter button.
HomeLink® Buttons
ELECTRONICS
86
Page 115 of 148
JUMP-STARTING PROCEDURE
•If your vehicle has a discharged battery, it can be jump-started using a set of jumper
cables and a battery in another vehicle or by using a portable battery booster pack.
Jump-starting can be dangerous if done improperly so please follow the procedures in
this section carefully.
NOTE:
When using a portable battery booster pack, follow the manufacturer’s operating instruc-
tions and precautions.
Preparations For Jump-Start
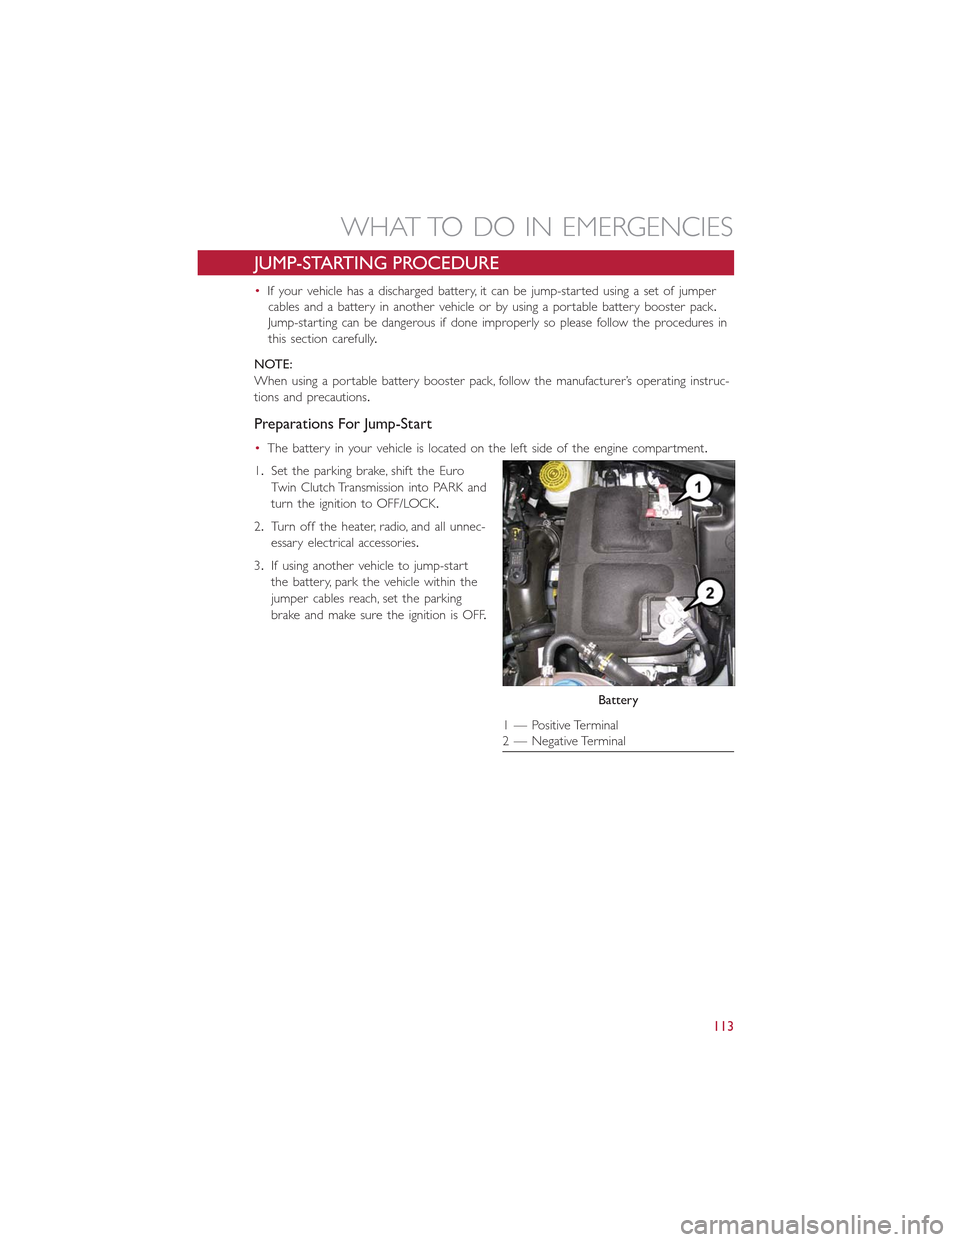
•The battery in your vehicle is located on the left side of the engine compartment.
1.Set the parking brake, shift the Euro
Twin Clutch Transmission into PARK and
turn the ignition to OFF/LOCK.
2.Turn off the heater, radio, and all unnec-
essary electrical accessories.
3.If using another vehicle to jump-start
the battery, park the vehicle within the
jumper cables reach, set the parking
brake and make sure the ignition is OFF.
Battery
1 — Positive Terminal2 — Negative Terminal
WHAT TO DO IN EMERGENCIES
113
Page 133 of 148
Cavity Maxi Fuse Mini Fuse Description
F21 – 15 Amp Blue Fuel Pump
F23 – 20 Amp Yellow Anti-Lock Brake Valves
F24 – 7.5 Amp Brown Stability Control System
F30 – 5 Amp Tan After Run Pump
F81 70 Amp Tan – PTC (Secondary)
F82 40 Amp Orange – Transmission
F83 40 Amp Orange – PTC (Primary)
F84 7.5 Amp Brown Transmission
F85 15 Amp Blue Front Power Outlet 12V
F86 – 15 Amp Blue Rear Power Outlet 12V
F88 7.5 Amp Brown Heated Mirrors
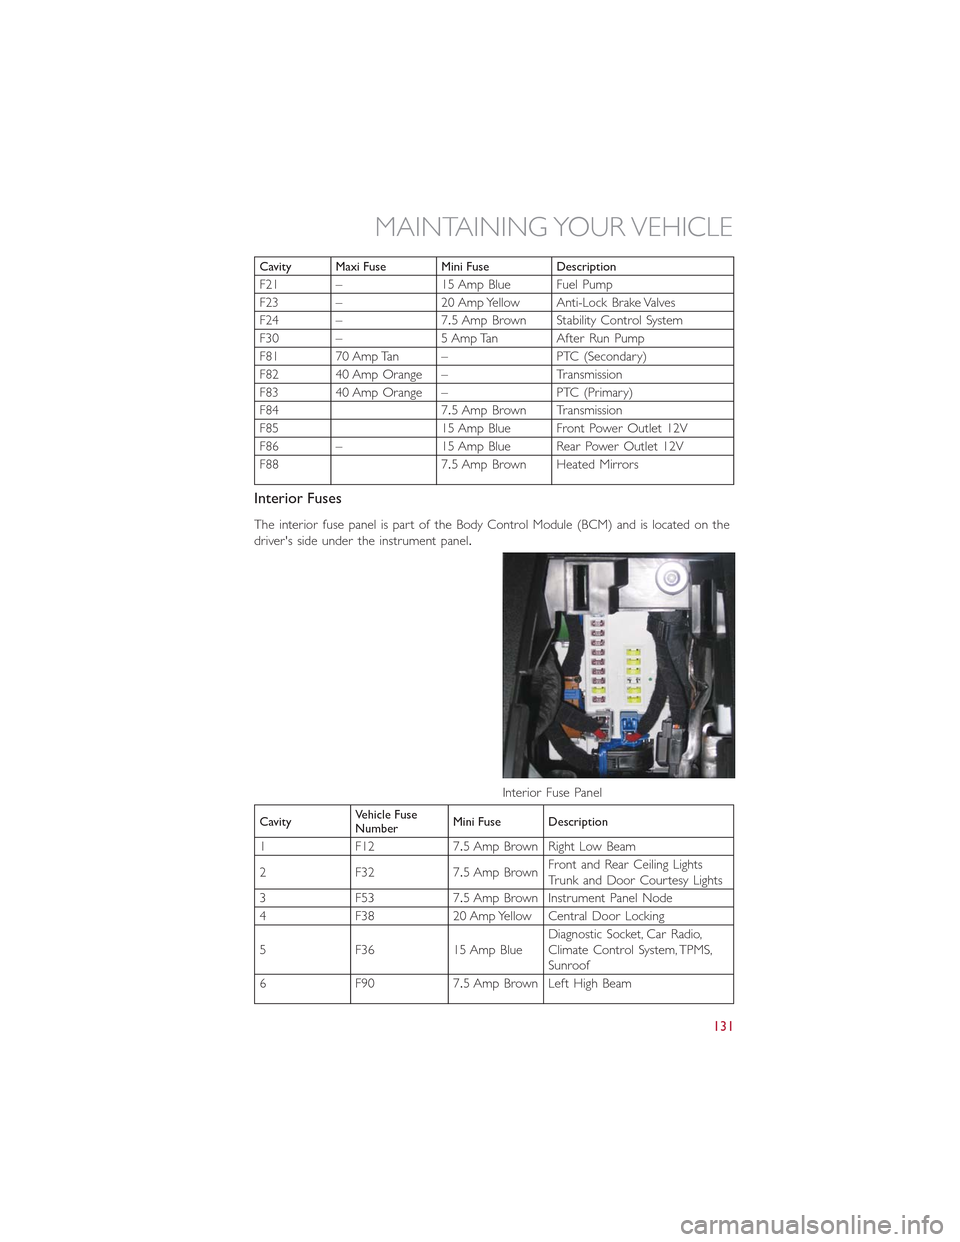
Interior Fuses
The interior fuse panel is part of the Body Control Module (BCM) and is located on the
driver's side under the instrument panel.
CavityVehicle FuseNumberMini Fuse Description
1 F12 7.5 Amp Brown Right Low Beam
2 F32 7.5 Amp BrownFront and Rear Ceiling LightsTr u n k a n d D o o r C o u r t e s y L i g h t s
3 F53 7.5 Amp Brown Instrument Panel Node
4 F38 20 Amp Yellow Central Door Locking
5 F36 15 Amp BlueDiagnostic Socket, Car Radio,Climate Control System, TPMS,Sunroof
6 F90 7.5 Amp Brown Left High Beam
Interior Fuse Panel
MAINTAINING YOUR VEHICLE
131
Page 134 of 148
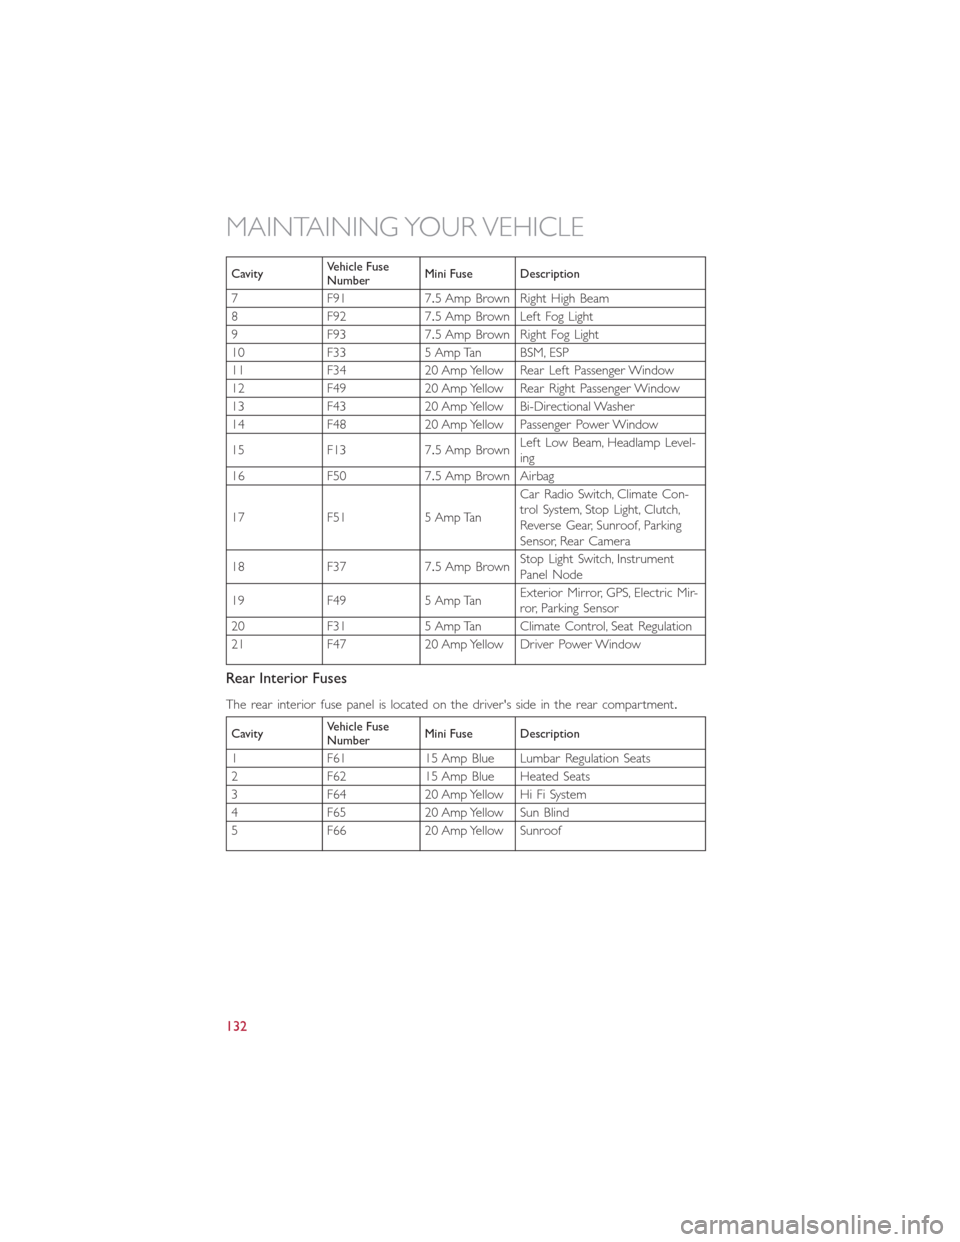
CavityVehicle FuseNumberMini Fuse Description
7 F91 7.5 Amp Brown Right High Beam
8 F92 7.5 Amp Brown Left Fog Light
9 F93 7.5 Amp Brown Right Fog Light
10 F33 5 Amp Tan BSM, ESP
11 F34 20 Amp Yellow Rear Left Passenger Window
12 F49 20 Amp Yellow Rear Right Passenger Window
13 F43 20 Amp Yellow Bi-Directional Washer
14 F48 20 Amp Yellow Passenger Power Window
15 F13 7.5 Amp BrownLeft Low Beam, Headlamp Level-ing
16 F50 7.5 Amp Brown Airbag
17 F51 5 Amp Tan
Car Radio Switch, Climate Con-trol System, Stop Light, Clutch,Reverse Gear, Sunroof, ParkingSensor, Rear Camera
18 F37 7.5 Amp BrownStop Light Switch, InstrumentPanel Node
19 F49 5 Amp TanExterior Mirror, GPS, Electric Mir-ror, Parking Sensor
20 F31 5 Amp Tan Climate Control, Seat Regulation
21 F47 20 Amp Yellow Driver Power Window
Rear Interior Fuses
The rear interior fuse panel is located on the driver's side in the rear compartment.
CavityVehicle FuseNumberMini Fuse Description
1F6115AmpBlueLumbarRegulationSeats
2 F62 15 Amp Blue Heated Seats
3 F64 20 Amp Yellow Hi Fi System
4 F65 20 Amp Yellow Sun Blind
5 F66 20 Amp Yellow Sunroof
MAINTAINING YOUR VEHICLE
132
Page 142 of 148
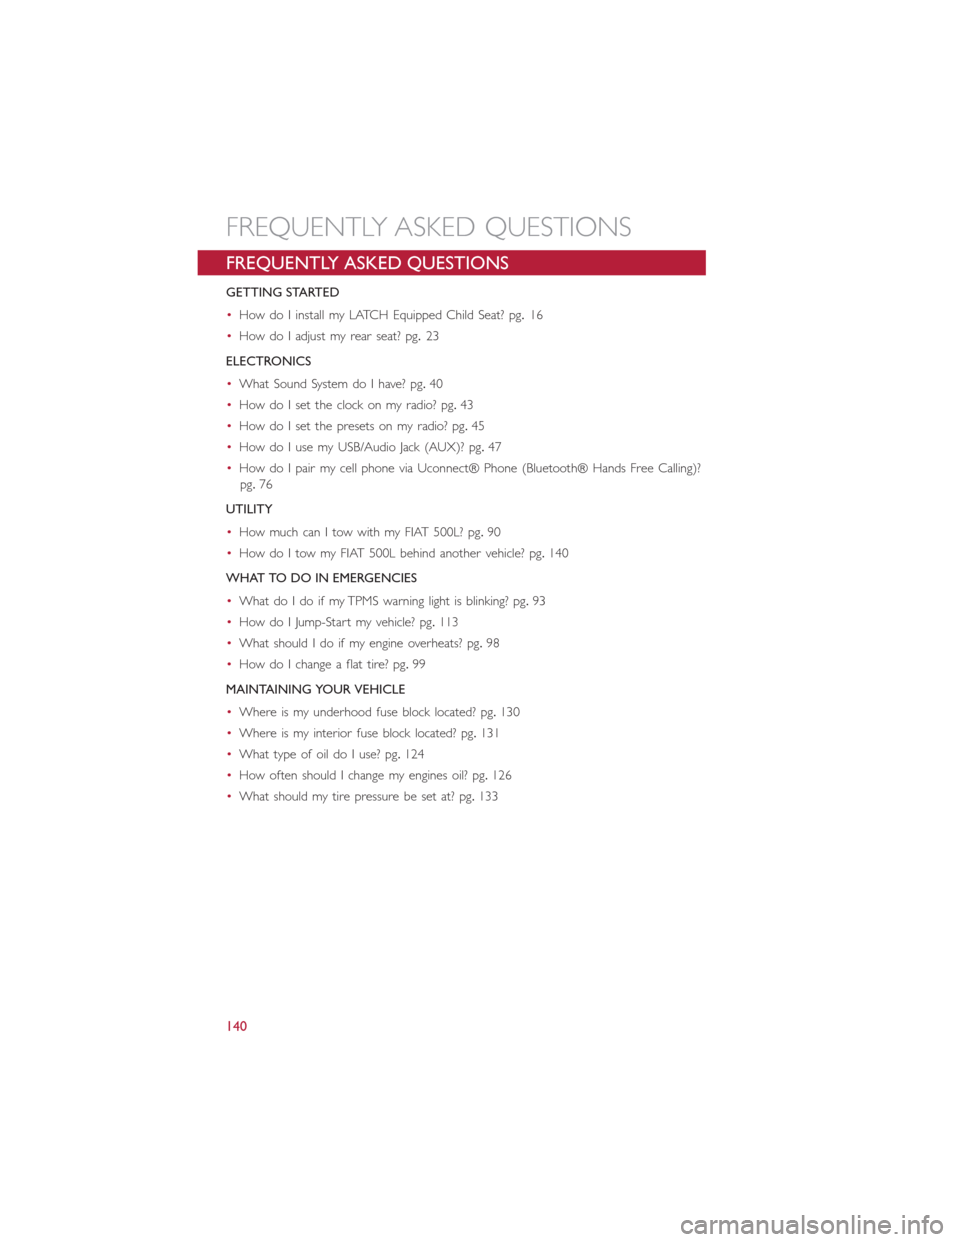
FREQUENTLY ASKED QUESTIONS
GETTING STARTED
•How do I install my LATCH Equipped Child Seat? pg.16
•How do I adjust my rear seat? pg.23
ELECTRONICS
•What Sound System do I have? pg.40
•How do I set the clock on my radio? pg.43
•How do I set the presets on my radio? pg.45
•How do I use my USB/Audio Jack (AUX)? pg.47
•How do I pair my cell phone via Uconnect® Phone (Bluetooth® Hands Free Calling)?
pg.76
UTILITY
•How much can I tow with my FIAT 500L? pg.90
•How do I tow my FIAT 500L behind another vehicle? pg.140
WHAT TO DO IN EMERGENCIES
•What do I do if my TPMS warning light is blinking? pg.93
•How do I Jump-Start my vehicle? pg.113
•What should I do if my engine overheats? pg.98
•How do I change a flat tire? pg.99
MAINTAINING YOUR VEHICLE
•Where is my underhood fuse block located? pg.130
•Where is my interior fuse block located? pg.131
•What type of oil do I use? pg.124
•How often should I change my engines oil? pg.126
•What should my tire pressure be set at? pg.133
FREQUENTLY ASKED QUESTIONS
140