CD player FIAT 500L 2015 2.G User Guide
[x] Cancel search | Manufacturer: FIAT, Model Year: 2015, Model line: 500L, Model: FIAT 500L 2015 2.GPages: 148, PDF Size: 3.77 MB
Page 4 of 148
WELCOME FROM FIAT
Congratulations on selecting your new FIAT vehicle.Be assured that it represents preci-
sion workmanship, distinctive styling, and high quality - all essentials that are traditional to
our vehicles.
Your new FIAT vehicle has characteristics to enhance the driver's control under some
driving conditions.These are to assist the driver and are never a substitute for attentive
driving.They can never take the driver's place.Always drive carefully.
Your new vehicle has many features for the comfort and convenience of you and your
passengers.Some of these should not be used when driving because they take your eyes
from the road or your attention from driving.Never text while driving or take your eyes
more than momentarily off the road.
This guide illustrates and describes the operation of features and equipment that are ei-
ther standard or optional on this vehicle.This guide may also include a description of fea-
tures and equipment that are no longer available or were not ordered on this vehicle.
Please disregard any features and equipment described in this guide that are not available
on this vehicle.FCA US LLC reserves the right to make changes in design and specifica-
tions and/or make additions to or improvements to its products without imposing any
obligation upon itself to install them on products previously manufactured.
This User Guide has been prepared to help you quickly become acquainted with the im-
portant features of your vehicle.It contains most things you will need to operate and
maintain the vehicle, including emergency information.
The DVD includes a computer application containing detailed owner's information which
can be viewed on a personal computer or MAC computer.The multimedia DVD also
includes videos which can be played on any standard DVD player.Additional DVD opera-
tional information is located on the back of the DVD sleeve.
For complete owner information, refer to your Owner's Manual on the DVD in the
owner’s kit provided at the time of new vehicle purchase.For your convenience, the in-
formation contained on the DVD may also be printed and saved for future reference.
We are committed to protecting our environment and natural resources.By converting
from paper to electronic delivery for the majority of the user information for your ve-
hicle, together we greatly reduce the demand for tree-based products and lessen the
stress on our environment.
INTRODUCTION/WELCOME
2
Page 5 of 148
VEHICLES SOLD IN CANADA
With respect to any vehicles sold in Canada, the name FCA US LLC shall be deemed to
be deleted and the name Chrysler Canada Inc.used in substitution (excluding legal lines).
WARNING!
•Pedals that cannot move freely can cause loss of vehicle control and increase the
risk of serious personal injury.
•Always make sure that objects cannot fall into the driver foot well while the ve-
hicle is moving.Objects can become trapped under the brake pedal and accelera-
tor pedal causing a loss of vehicle control.
•Failure to properly follow floor mat installation or mounting can cause interference
with the brake pedal and accelerator pedal operation causing loss of control of
the vehicle.
•Never leave children alone in a vehicle, or with access to an unlocked vehicle.Al-
lowing children to be in a vehicle unattended is dangerous for a number of rea-
sons.A child or others could be seriously or fatally injured.Children should be
warned not to touch the parking brake, brake pedal or the shift lever/transmission
gear selector.
•Do not leave the key fob in or near the vehicle, or in a location accessible to chil-
dren, and do not leave the ignition of a vehicle equipped with Keyless Enter-N-Go
in the ACC or ON/RUN mode.A child could operate power windows, other con-
trols, or move the vehicle.
•Never use the “PARK” position as a substitute for the parking brake.Always apply
the parking brake fully when parked to guard against vehicle movement and pos-
sible injury or damage.
•Refer to your Owner's Manual on the DVD for further details.
Use Of Aftermarket Products (Electronics)
The use of aftermarket devices including cell phones, MP3 players, GPS systems, or char-
gers may affect the performance of on-board wireless features.If you are experiencing
difficulties with any of your wireless features, try disconnecting your aftermarket devices
to see if the situation improves.If your symptoms persist, please see an authorized dealer.
FIAT is a registered trademark of FIAT Group Marketing & Corporate Communication
SpA, used under license by FCA US LLC.
COPYRIGHT ©2014 FCA US LLC
INTRODUCTION/WELCOME
3
Page 22 of 148
Reactive Head Restraints — Front Seats
The front driver and passenger seats are equipped with Reactive Head Restraints.In the
event of a rear impact the Reactive Head Restraints will automatically extend forward
minimizing the gap between the back of the occupant's head and the Reactive Head Re-
straint.
To raise the head restraint, pull upward on the head restraint.To lower the head re-
straint, push the adjustment button located at the base of the head restraint, and push
downward on the head restraint.
To remove the head restraint, raise it as far as it can go then push the adjustment button,
and the release button at the base of each post while pulling the head restraint up.To
reinstall the head restraint, put the head restraint posts into the holes and push down-
ward.Then adjust it to the appropriate height.
The Reactive Head Restraints will automatically return to their normal position following a
rear impact.If the Reactive Head Restraints do not return to their normal position, see
your authorized dealership immediately.
WARNING!
•A loose head restraint thrown forward in a collision or hard stop could cause seri-
ous injury or death to occupants of the vehicle.Always securely stow removed
head restraints in a location outside the occupant compartment.
•ALL the head restraints MUST be reinstalled in the vehicle to properly protect
the occupants.Follow the re-installation instructions above prior to operating the
vehicle or occupying a seat.
•Do not place items over the top of the Active Head Restraint, such as coats, seat
covers or portable DVD players.These items may interfere with the operation of
the Reactive Head Restraint in the event of a collision and could result in serious
injury or death.
GETTING STARTED
20
Page 44 of 148
IDENTIFYING YOUR RADIO
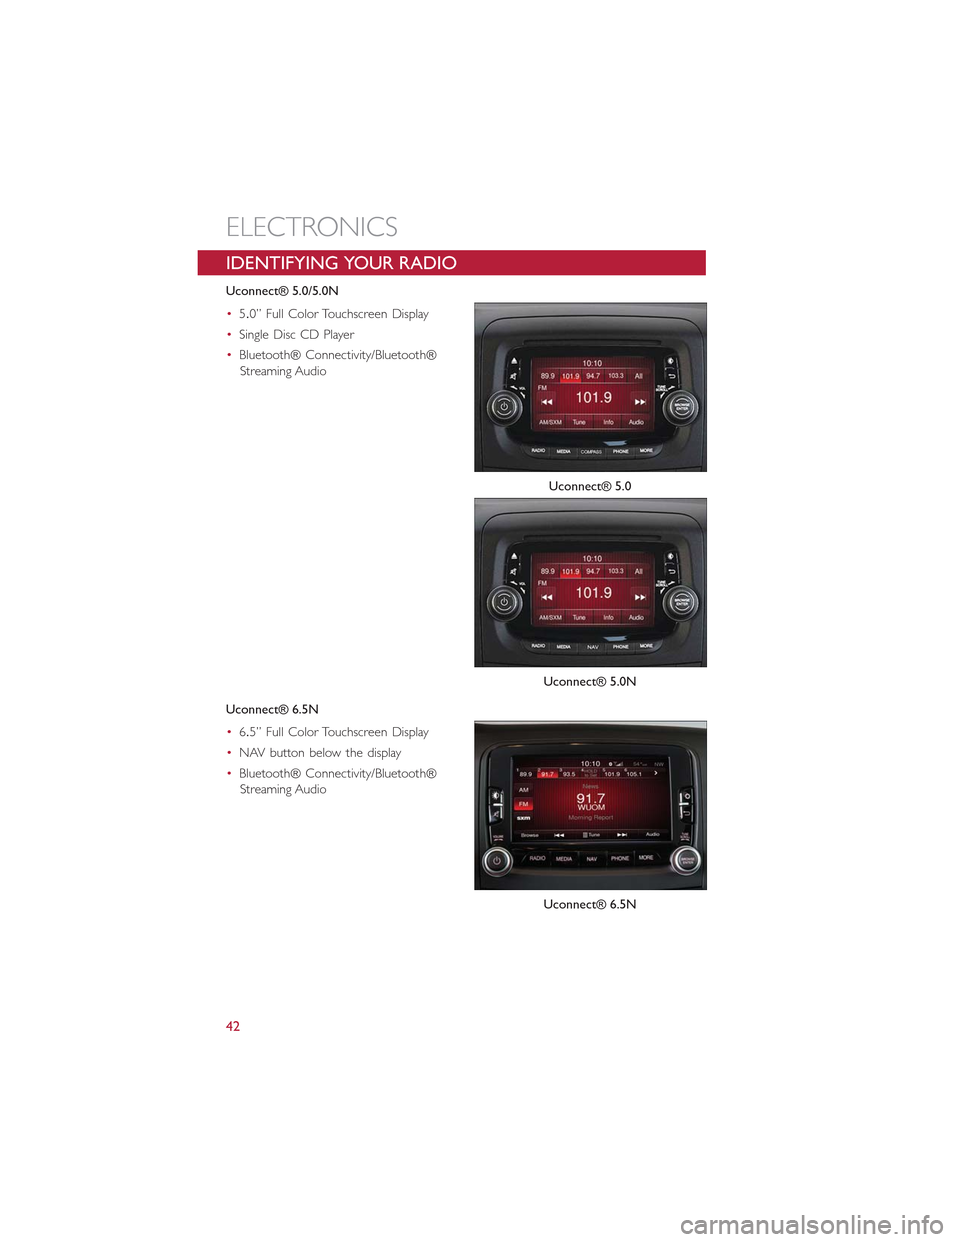
Uconnect® 5.0/5.0N
•5.0” Full Color Touchscreen Display
•Single Disc CD Player
•Bluetooth® Connectivity/Bluetooth®
Streaming Audio
Uconnect® 6.5N
•6.5” Full Color Touchscreen Display
•NAV button below the display
•Bluetooth® Connectivity/Bluetooth®
Streaming Audio
Uconnect® 5.0
Uconnect® 5.0N
Uconnect® 6.5N
ELECTRONICS
42
Page 48 of 148
SiriusXM Premier Over 160 Channels
Get every channel available on your satellite radio, and enjoy all you want, all in one place.
Hear commercial-free music plus sports, news, talk and entertainment.Get all the pre-
mium programming, including Howard Stern, every NFL game, Oprah Radio®, every
MLB® and NHL® game, every NASCAR® race and more.And get 20+ Xtra channels,
including SiriusXM Latino, a selection of channels dedicated to Spanish language program-
ming.
•To access SiriusXM Satellite Radio, push the RADIO Button on the faceplate and then
the “SXM” button on the touchscreen.
SiriusXM services require subscriptions, sold separately after the 12-month trial included
with the new vehicle purchase.If you decide to continue your service at the end of your
trial subscription, the plan you choose will automatically renew and bill at then-current
rates until you call SiriusXM at 1-866-635-2349 for U.S. residents and 1-888-539-7474
for Canadian residents to cancel. See SiriusXM Customer Agreement for complete
terms at www.siriusxm.com and www.siriusxm.ca for Canadian residents.All fees and
programming subject to change.Our satellite service is available only to those at least 18
and older in the 48 contiguous USA and D.C.Our Sirius satellite service is also available
in PR (with coverage limitations).Our Internet radio service is available throughout our
satellite service area and in AK and HI.© 2014 Sirius XM Radio Inc.Sirius, XM and all
related marks and logos are trademarks of Sirius XM Radio Inc.
Disc Operation
•CD/Disc Mode is entered by either inserting a CD/Disc or by pushing the MEDIA but-
ton located below the display.Once in Media Mode, select Disc.
•Gently insert one CD into the CD player with the CD label facing as indicated on the
illustration located on the Disc player.
Seek Up/Down Buttons
•Press to seek through Disc tracks.
•Hold either button to bypass tracks without stopping.
Browse
•Press the “Browse” button on the touchscreen to scroll through and select a desired
track on the Disc.Press the “Exit” button on the touchscreen if you wish to cancel the
browse function.
ELECTRONICS
46
Page 49 of 148
USB/Audio Jack (AUX)/Bluetooth® Operation
USB/iPod®
The USB/AUX Jack is located in the center
of the instrument panel, below the HVAC
controls.
•USB/iPod® Mode is entered by either
inserting a USB Jump Drive or an iPod®
cable into the USB port or by pushing
the MEDIA button on the faceplate lo-
cated below the display.Once in Media
Mode, press the “Source” button on the
touchscreen and select USB/iPod®.
NOTE:
The USB source will say "iPod" only when
an apple product is connected to the USB
port.
•Push the MEDIA button on the faceplate, press the “Source” button on the touch-
screen then select USB/iPod® to change the mode to the USB device.If the device is
connected, music from your portable device will play through the vehicle's speakers.
Audio Jack (AUX)
The AUX jack allows a portable device, such as an MP3 player or an iPod®, to be
plugged into the radio and utilize the vehicle’s audio system, using a 3.5 mm audio cable,
to amplify the source and play through the vehicle speakers.
•Push the MEDIA button on the faceplate, press the “Source” button on the touch-
screen then select AUX to change the mode to AUX.
•The functions of the portable device are controlled using the device.However, the
volume may be controlled using the radio or portable device.
Bluetooth®
If using a Bluetooth® - equipped device, you may also be able to stream music to your
vehicle's sound system.
•Push the MEDIA button on the faceplate, press the “Source” button on the touch-
screen then select Bluetooth® to change the mode to Bluetooth®.If the device is
paired, music from your portable device will play through the vehicle's speakers.
Uconnect® 5.0 Available Media Hubs
Uconnect® 5.0Media Hub (USB, AUX Ports)
S
S = Standard Equipment
USB/Audio Jack (AUX)
1 — USB Port2 — AUX/Audio Jack
ELECTRONICS
47
Page 54 of 148
Media
Push the VR button.After the beep, say one of the following commands and
fo l l ow t h e p ro m p t s to sw i tc h yo u r m e d i a s o u rc e o r c h o o s e a n a r t i s t.
•Change sourceto Bluetooth®
•Change sourceto iPod®
•Change sourceto USB
•Play artistBeethoven;Play albumGreatest Hits;Play songMoonlight Sonata;Play genre
Classical
TIP
Press the Browse button on the touchscreen to see all of the music on your iPod® or
USB device.Your Voice Command must matchexactlyhow the artist, album, song and
genre information is displayed.
Uconnect® offers connections via USB, SD, Bluetooth® and auxiliary ports (If Equipped).
Voice operation is only available for connected USB and iPod® devices.(Remote CD
player optional and not available on all vehicles.)
Uconnect® 5.0 Media
ELECTRONICS
52
Page 57 of 148
Uconnect® 6.5N
At A Glance
Displaying The Time
•If the time is not currently displayed on the radio or player main page press the Set-
tings button.In the Settings list, press the “Clock” button on the touchscreen then
press “On” or “Off ” for Show Time in Status Bar.
Setting The Time
Model 6.5N synchronizes time automatically via GPS, so should not require any time ad-
justment.If you do need to set the time manually, follow the instructions below.
•For Model 6.5N, turn the unit on, then press the time display at the top of the screen.
Press “Yes.”
Uconnect® 6.5 Radio
1 — On/Off Display Control2 — Programmable Settings3 — Back Control4 — Browse/Enter Button – Tune/ScrollKnob5 — More Button
6 — Uconnect® Phone Button7 — Uconnect® Navigation Button8 — Media Button9 — Radio Button10 — On/Mute Button – Volume Knob11 — Mute Button
ELECTRONICS
55
Page 62 of 148
for complete terms at www.siriusxm.com for U.S. residents and www.siriusxm.ca for
Canadian residents.All fees and programming subject to change.Our satellite service
is available only to those at least 18 and older in the 48 contiguous USA and D.C.
Our Sirius satellite service is also available in PR (with coverage limitations).Our Inter-
net radio service is available throughout our satellite service area and in AK and HI.©
2014 Sirius XM Radio Inc.Sirius, XM and all related marks and logos are trademarks of
Sirius XM Radio Inc.
MEDIA HUB – PLAYING iPod®/USB/MP3 DEVICES
There are many ways to play music from iPod®/MP3 players or USB devices through
your vehicle's sound system.
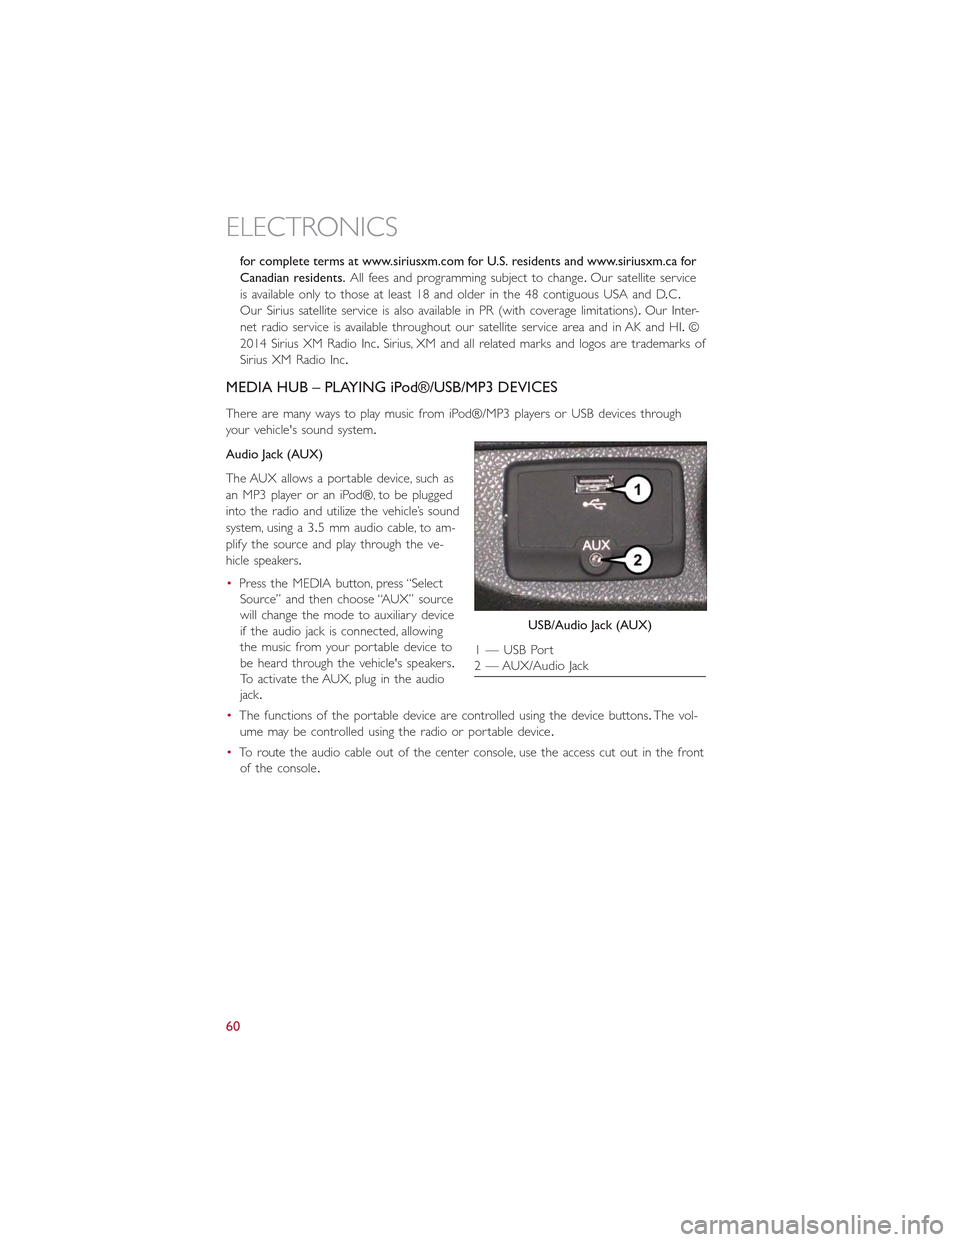
Audio Jack (AUX)
The AUX allows a portable device, such as
an MP3 player or an iPod®, to be plugged
into the radio and utilize the vehicle’s sound
system, using a 3.5 mm audio cable, to am-
plify the source and play through the ve-
hicle speakers.
•Press the MEDIA button, press “Select
Source” and then choose “AUX” source
will change the mode to auxiliary device
if the audio jack is connected, allowing
the music from your portable device to
be heard through the vehicle's speakers.
To activate the AUX, plug in the audio
jack.
•The functions of the portable device are controlled using the device buttons.The vol-
ume may be controlled using the radio or portable device.
•To route the audio cable out of the center console, use the access cut out in the front
of the console.
USB/Audio Jack (AUX)
1 — USB Port2 — AUX/Audio Jack
ELECTRONICS
60
Page 64 of 148
Bluetooth® Streaming Audio
If equipped with Uconnect® Voice Command, your Bluetooth®-equipped iPod® devices,cell phones or other media players, may also be able to stream music to your vehicle'ssound system.Your connected device must be Bluetooth®-compatible, and paired withyour system (see Uconnect® Phone for pairing instructions).You can access the musicfrom your connected Bluetooth® device by pressing the “Bluetooth®” button on thetouchscreen while in Media mode.
Uconnect® 6.5N Media Hub (USB,AUX Ports)Media Hub (SD,USB, AUX Ports)Remote USB Port(Fully Functional)
-SS
S = Standard Equipment
O = Optional Equipment
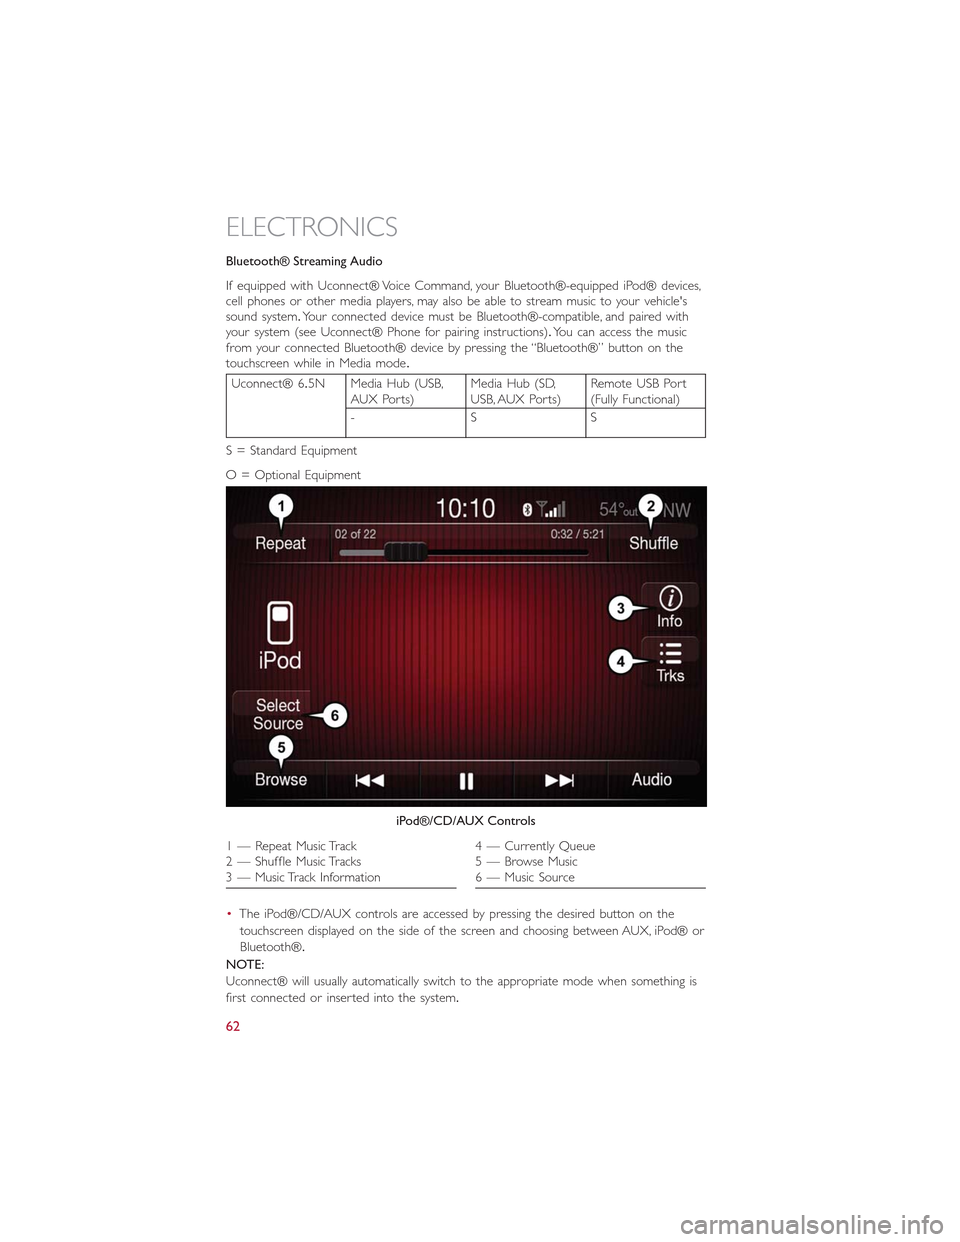
•The iPod®/CD/AUX controls are accessed by pressing the desired button on the
touchscreen displayed on the side of the screen and choosing between AUX, iPod® or
Bluetooth®.
NOTE:
Uconnect® will usually automatically switch to the appropriate mode when something is
first connected or inserted into the system.
iPod®/CD/AUX Controls
1 — Repeat Music Track2 — Shuffle Music Tracks3 — Music Track Information
4 — Currently Queue5 — Browse Music6 — Music Source
ELECTRONICS
62