navigation FIAT 500L 2015 2.G User Guide
[x] Cancel search | Manufacturer: FIAT, Model Year: 2015, Model line: 500L, Model: FIAT 500L 2015 2.GPages: 148, PDF Size: 3.77 MB
Page 45 of 148
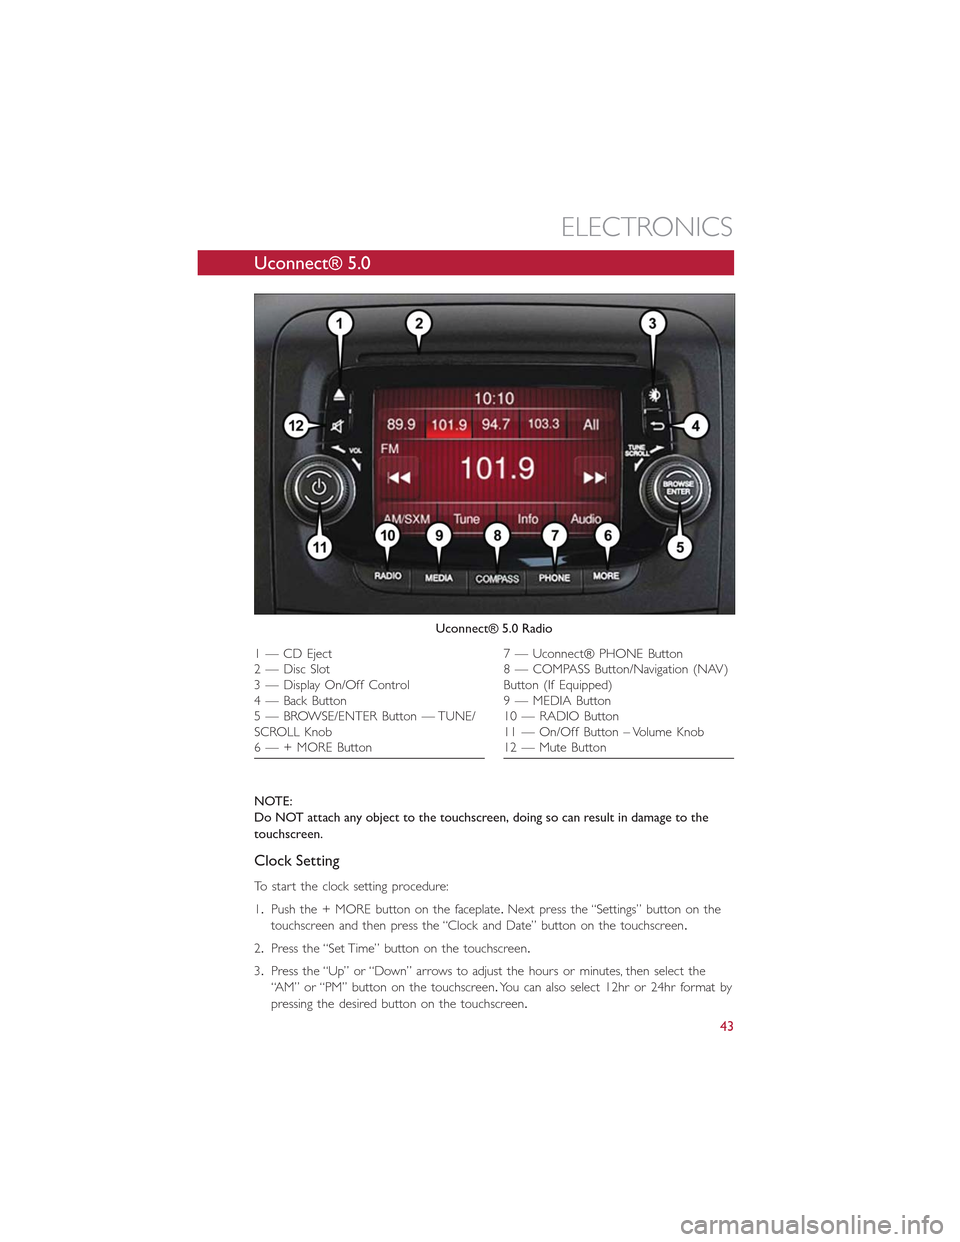
Uconnect® 5.0
NOTE:
Do NOT attach any object to the touchscreen, doing so can result in damage to the
touchscreen.
Clock Setting
To start the clock setting procedure:
1.Push the + MORE button on the faceplate.Next press the “Settings” button on the
touchscreen and then press the “Clock and Date” button on the touchscreen.
2.Press the “Set Time” button on the touchscreen.
3.Press the “Up” or “Down” arrows to adjust the hours or minutes, then select the
“AM” or “PM” button on the touchscreen.You can also select 12hr or 24hr format by
pressing the desired button on the touchscreen.
Uconnect® 5.0 Radio
1 — CD Eject2 — Disc Slot3 — Display On/Off Control4 — Back Button5 — BROWSE/ENTER Button — TUNE/SCROLL Knob6 — + MORE Button
7 — Uconnect® PHONE Button8 — COMPASS Button/Navigation (NAV)Button (If Equipped)9 — MEDIA Button10 — RADIO Button11 — On/Off Button – Volume Knob12 — Mute Button
ELECTRONICS
43
Page 50 of 148
Uconnect® 5.0 VOICE RECOGNITION QUICK TIPS
Introducing Uconnect®
Start using Uconnect® Voice Recognition with these helpful quick tips.It provides the key
Voice Commands and tips you need to know to control your Uconnect® 5.0 system.
Key Features:
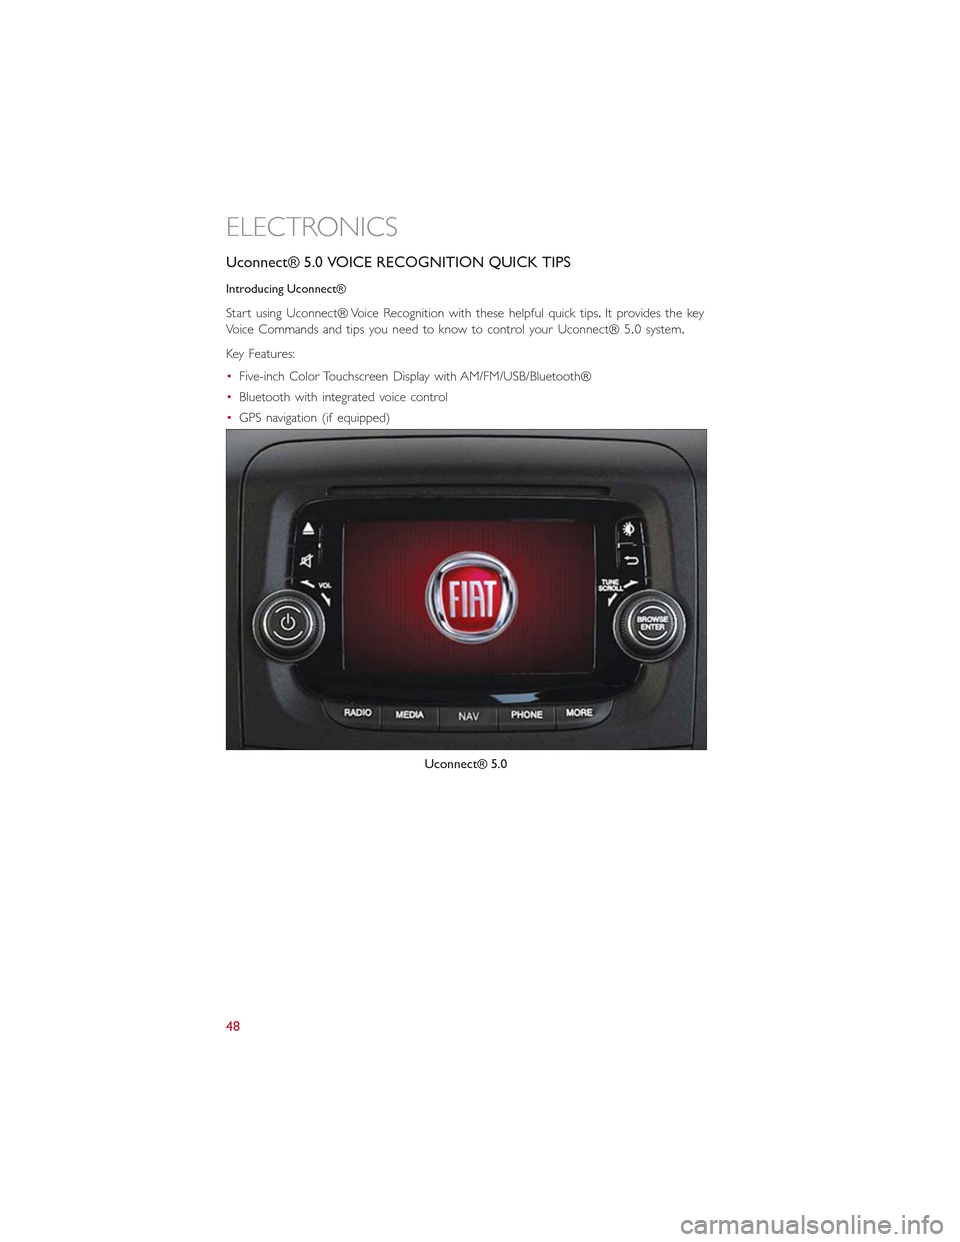
•Five-inch Color Touchscreen Display with AM/FM/USB/Bluetooth®
•Bluetooth with integrated voice control
•GPS navigation (if equipped)
Uconnect® 5.0
ELECTRONICS
48
Page 57 of 148
Uconnect® 6.5N
At A Glance
Displaying The Time
•If the time is not currently displayed on the radio or player main page press the Set-
tings button.In the Settings list, press the “Clock” button on the touchscreen then
press “On” or “Off ” for Show Time in Status Bar.
Setting The Time
Model 6.5N synchronizes time automatically via GPS, so should not require any time ad-
justment.If you do need to set the time manually, follow the instructions below.
•For Model 6.5N, turn the unit on, then press the time display at the top of the screen.
Press “Yes.”
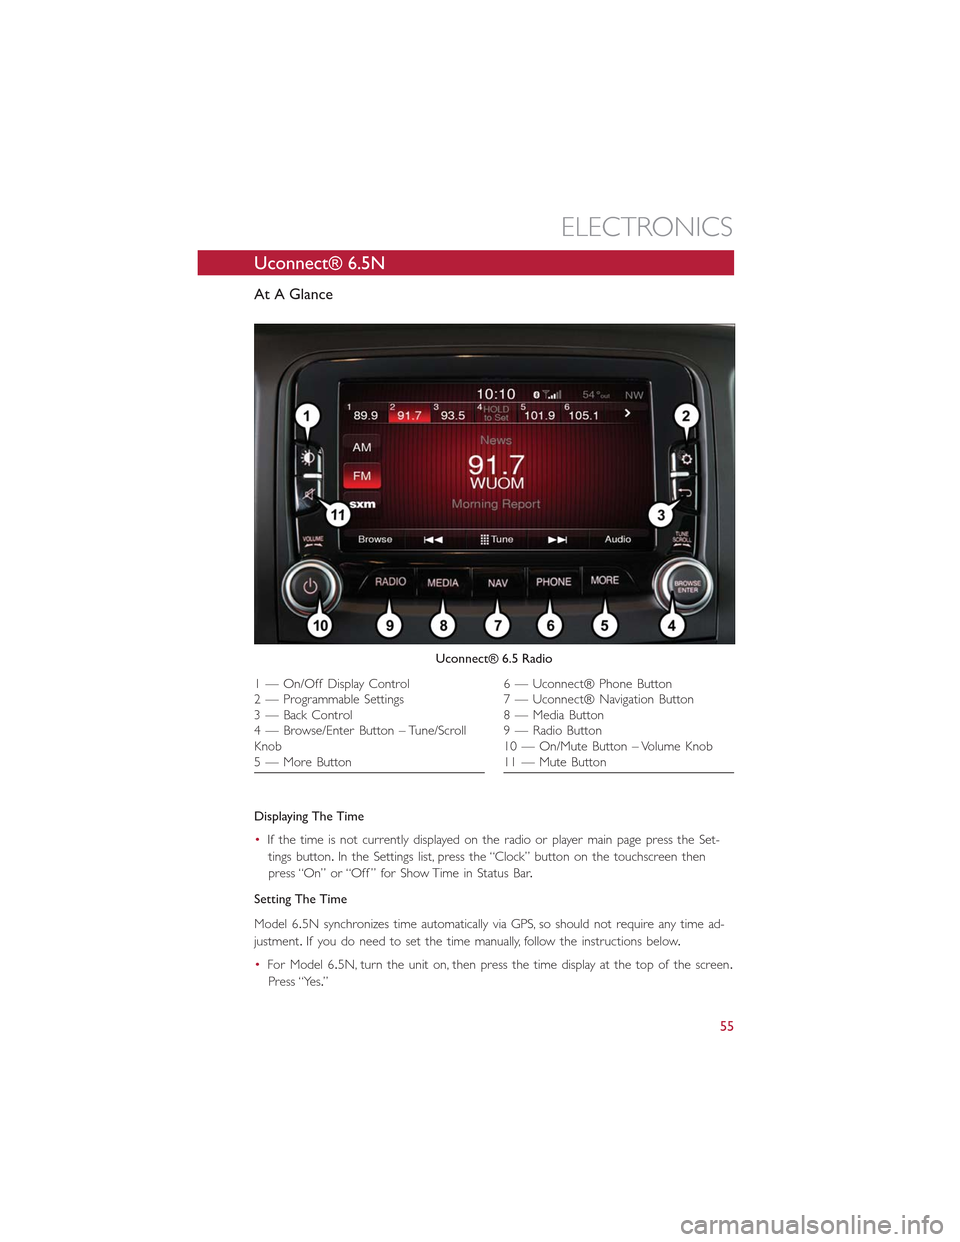
Uconnect® 6.5 Radio
1 — On/Off Display Control2 — Programmable Settings3 — Back Control4 — Browse/Enter Button – Tune/ScrollKnob5 — More Button
6 — Uconnect® Phone Button7 — Uconnect® Navigation Button8 — Media Button9 — Radio Button10 — On/Mute Button – Volume Knob11 — Mute Button
ELECTRONICS
55
Page 65 of 148
Uconnect® 6.5N NAVIGATION
•Press the NAV button to access the Navigation feature.
Changing The Navigation Voice Prompt Volume
1.Press the “View Map” button on the touchscreen from the Nav Main Menu.
2.With the map displayed, press the “Options” button on the touchscreen in the lower
right area of the screen then select Settings.
3.In the Settings menu, press the “Guidance” button on the touchscreen.
4.In the Guidance menu, adjust the Nav Volume by pressing the “+” or “–” buttons on
the touchscreen.
Finding Points Of Interest
•From the main Navigation menu, press the “Where To?” button on the touchscreen,
then press the “Points of Interest” button on the touchscreen.
•Select a Category and then a subcategory, if necessary.
•Select your destination and press the “Yes” button on the touchscreen.
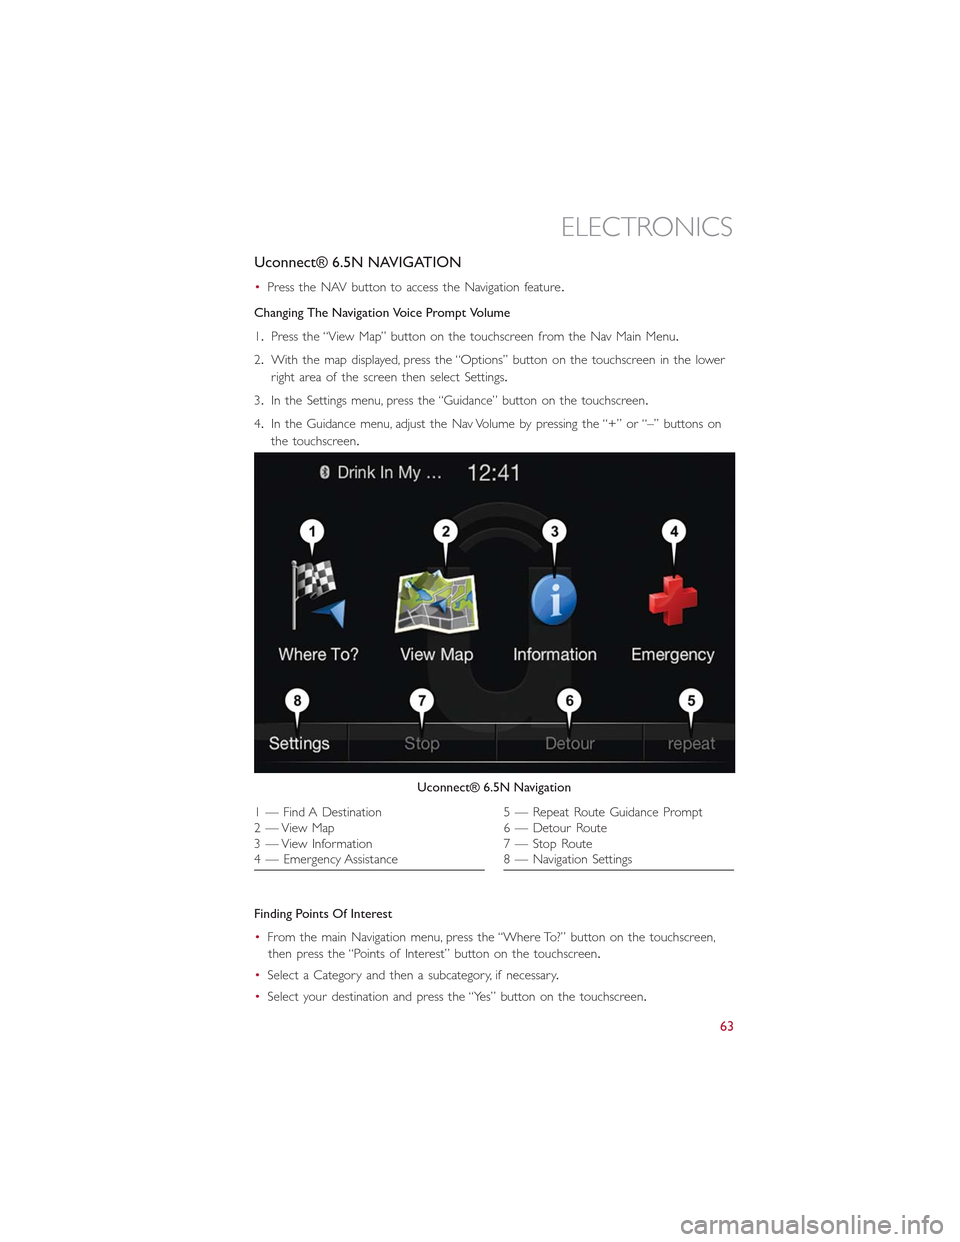
Uconnect® 6.5N Navigation
1 — Find A Destination2 — View Map3 — View Information4 — Emergency Assistance
5 — Repeat Route Guidance Prompt6 — Detour Route7 — Stop Route8 — Navigation Settings
ELECTRONICS
63
Page 66 of 148
Finding A Place By Spelling The Name
•From the Main Navigation Menu press the “Where to?” button on the touchscreen,
press the “Points of Interest” button on the touchscreen and then press the “Spell
Name” button on the touchscreen.
•Enter the name of your destination.
•Press the “List” button on the touchscreen.
•Select your destination and press the “Yes” button on the touchscreen.
Entering A Destination Address
•From the main Navigation menu press the “Where To?” button on the touchscreen,
then press the “Address” button on the touchscreen.
•Follow the on-screen prompts (country, state/province, city, street) to enter the address
and press the “Yes” button on the touchscreen.
•Destination entry is not available while your vehicle is in motion.However, you can also
use Voice Command to enter an address while moving.See Voice Command Tips for
more information.
Setting Your Home Location
•Press the NAV button to access the Navigation system and the Main Navigation menu.
•Press the “Where To?” button on the touchscreen, then press the “Go Home” button
on the touchscreen.
•You may enter your address directly, use your current location as your home address,
or choose from recently found locations.
•To delete your Home location (or other saved locations) so you can save a new Home
location, press the “Where To?” button on the touchscreen from the Main Navigation
menu, then press the “Go Home” button on the touchscreen, and in the Yes screen
press the “Options” button on the touchscreen.In the Options menu press Clear
Home.Set a new Home location by following the previous instructions.
ELECTRONICS
64
Page 67 of 148
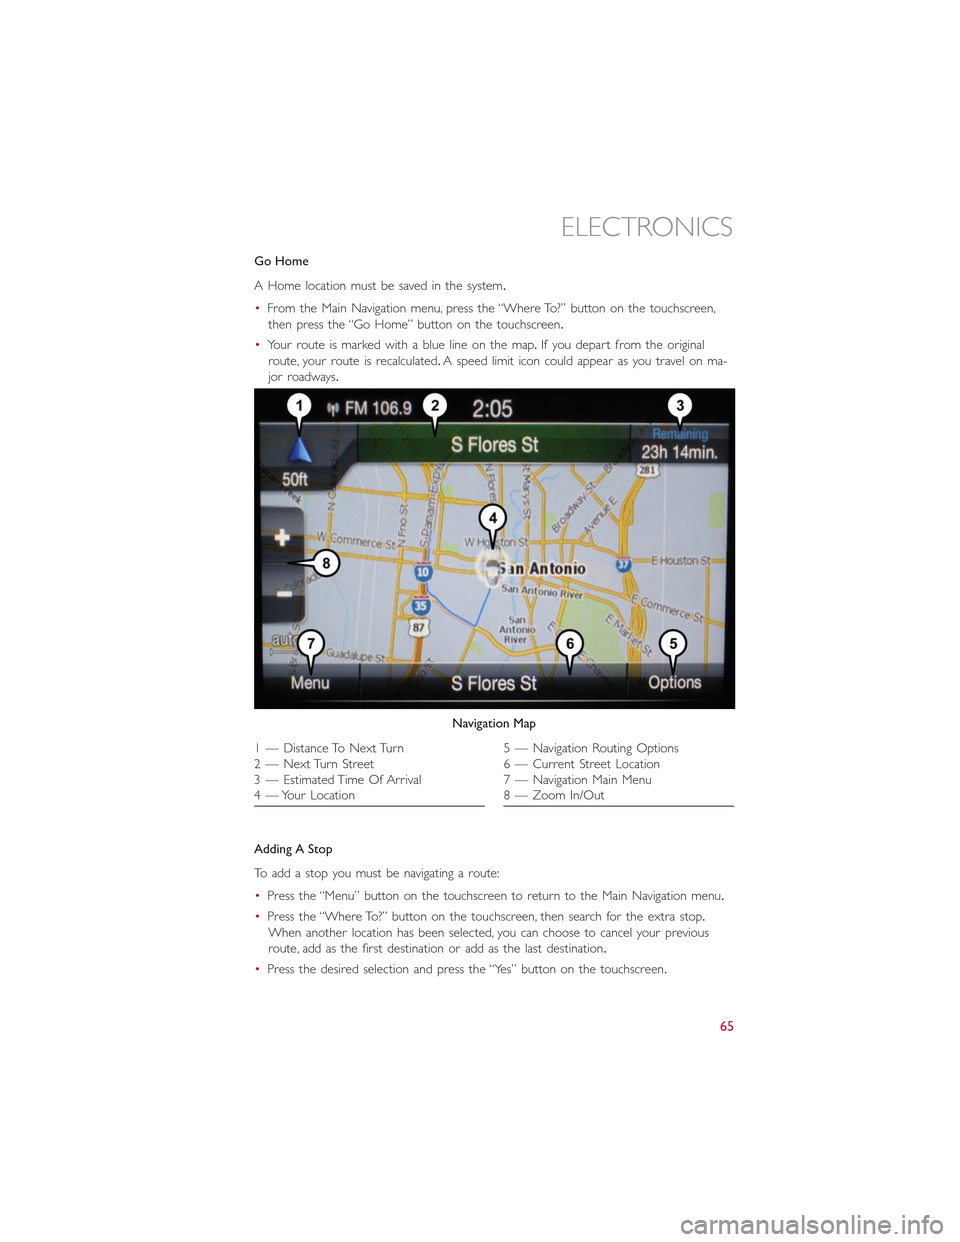
Go Home
A Home location must be saved in the system.
•From the Main Navigation menu, press the “Where To?” button on the touchscreen,
then press the “Go Home” button on the touchscreen.
•Your route is marked with a blue line on the map.If you depart from the original
route, your route is recalculated.A speed limit icon could appear as you travel on ma-
jor roadways.
Adding A Stop
To add a stop you must be navigating a route:
•Press the “Menu” button on the touchscreen to return to the Main Navigation menu.
•Press the “Where To?” button on the touchscreen, then search for the extra stop.
When another location has been selected, you can choose to cancel your previous
route, add as the first destination or add as the last destination.
•Press the desired selection and press the “Yes” button on the touchscreen.
Navigation Map
1 — Distance To Next Turn2 — Next Turn Street3 — Estimated Time Of Arrival4 — Your Location
5 — Navigation Routing Options6 — Current Street Location7 — Navigation Main Menu8 — Zoom In/Out
ELECTRONICS
65
Page 73 of 148
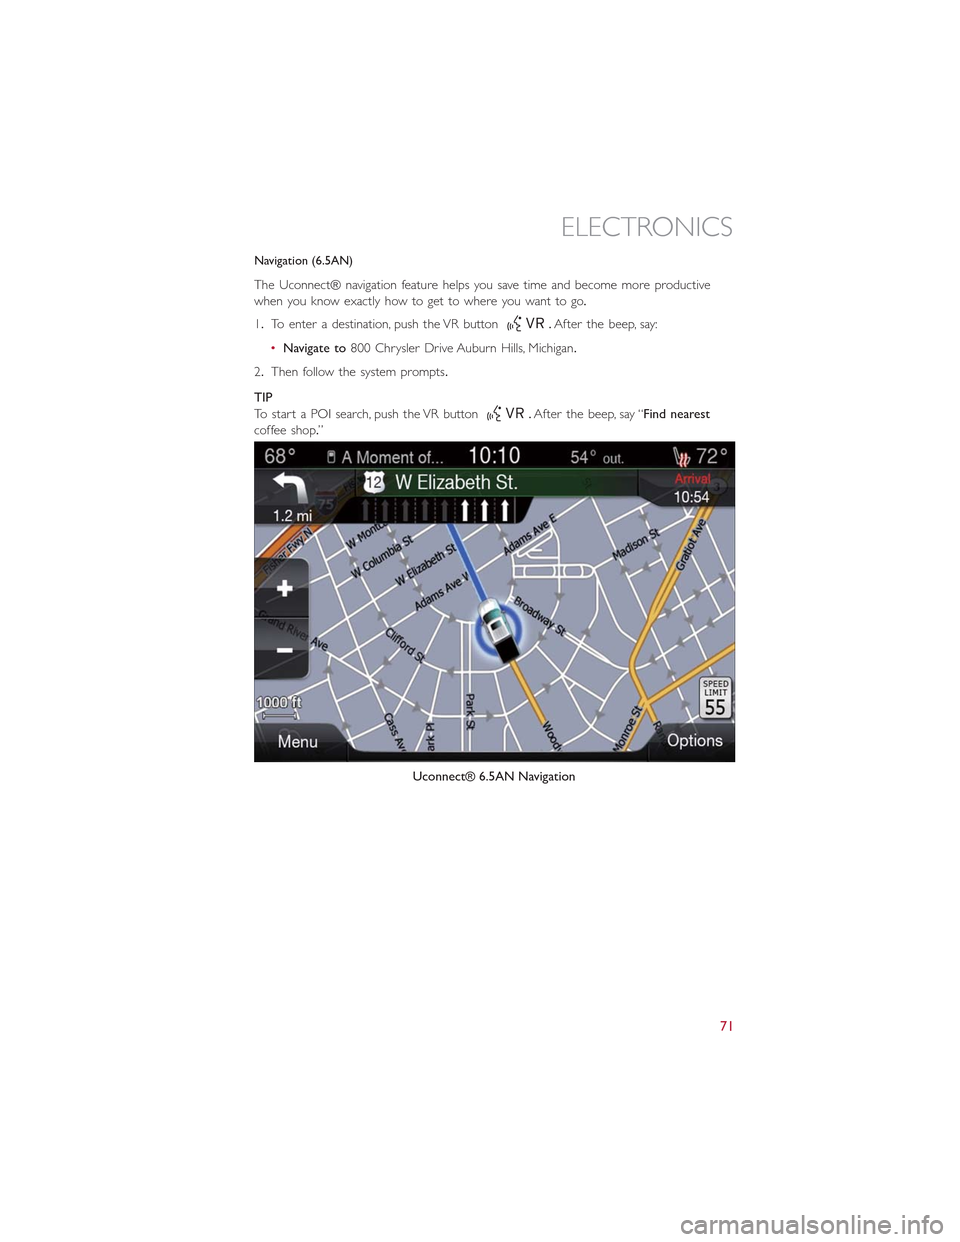
Navigation (6.5AN)
The Uconnect® navigation feature helps you save time and become more productive
when you know exactly how to get to where you want to go.
1.To enter a destination, push the VR button.After the beep, say:
•Navigate to800 Chrysler Drive Auburn Hills, Michigan.
2.Then follow the system prompts.
TIP
To start a POI search, push the VR button.After the beep, say “Find nearest
coffee shop.”
Uconnect® 6.5AN Navigation
ELECTRONICS
71
Page 139 of 148
FIAT CUSTOMER CENTER
P.O.Box 21–8004 Auburn Hills, MI 48321–8004 Phone: 1-888-242-6342
FIAT CANADA CUSTOMER CENTER
P.O.Box 1621 Windsor, Ontario N9A 4H6 Phone: 1-800-465-2001 (English) Phone:
1-800-387-9983 (French)
ASSISTANCE FOR THE HEARING IMPAIRED
To assist customers who have hearing difficulties, the manufacturer has installed special
TDD (Telecommunication Devices for the Deaf ) equipment at its customer center.Any
hearing or speech impaired customer, who has access to a TDD or a conventional tele-
typewriter (TTY) in the United States, can communicate with the manufacturer by dialing
1-800-380-CHRY.Canadian residents with hearing difficulties that require assistance can
use the special needs relay service offered by Bell Canada.For TTY teletypewriter users,
dial 711 and for Voice callers, dial 1-800-855-0511 to connect with a Bell Relay Service
operator.
WARNING!
Engine exhaust, some of its constituents, and certain vehicle components contain, or
emit, chemicals known to the State of California to cause cancer and birth defects, or
other reproductive harm.In addition, certain fluids contained in vehicles and certain
products of component wear contain, or emit, chemicals known to the State of
California to cause cancer and birth defects, or other reproductive harm.
PUBLICATIONS ORDERING
•If you are the first registered retail owner of your vehicle, you may obtain a compli-
mentary printed copy of the Owner's Manual, Navigation/Uconnect® Manuals or War-
ranty Booklet.United States customers may visit the Fiat Contact Us page at
www.fiat.com scroll to the bottom of the page and select the “Contact Us” link, then
select the “Owner’s Manual and Glove Box Material” from the left menu.You may also
obtain a complimentary copy by calling 1-888-242-6342 (U.S.) or 1-800-387-1143
(Canada).
•Replacement English User Guide kits or DVDs may be purchased by visiting
www.techauthority.com or by calling 1-800-890-4038 (U.S.) or 1-800-387-1143
(Canada).Visa, Master Card, American Express and Discover orders are accepted.If
you prefer mailing your order, please call the above numbers for an order form.
NOTE:
A street address is required when ordering manuals (no P.O.Boxes).
CONSUMER ASSISTANCE
137
Page 145 of 148
Disarm The Alarm.............9
Lane Change Assist.............26
Lap/Shoulder Belts..............11
LATCH (Lower Anchors And Tether
For CHildren)............16, 18
Liftgate....................8
Light Bulbs.................136
Lights
Fog...................97High Beam Indicator..........96Low Fuel................92Seat Belt Reminder...........94Security Alarm.............97Tire Pressure Monitoring (TPMS)...93Turn Signal...............26LocksKeys...................8Liftgate, Tailgate..............8Lower Anchors And Tether For CHildren(LATCH).................16Lubrication, Body..............126
Maintenance Free Battery.........126Maintenance, General...........126Maintenance Procedures..........126Maintenance Schedule...........126Malfunction Indicator Light (CheckEngine)..................95Manual TransmissionLubricant Selection..........125Master Cylinder (Brakes)..........126MirrorsHeated...............31, 33
Navigation..................63New Vehicle Break-In Period........26
Occupant Restraints.............15Oil Change Indicator............98Oil Change Indicator, Reset.........98Oil, Engine...............124, 126Capacity................124Change Interval............126Checking................126Disposal................126Filter..................126Filter Disposal.............126
Materials Added To..........126
Recommendation.........124, 126
Viscosity................126
Oil Filter, Selection.............126
Oil Pressure Light..............92
Outlet
Power..................89
Overheating, Engine.............98
Paint Care.................126Phone, Hands-Free (Uconnect®)......74Phone (Uconnect®).............74Placard, Tire And Loading Information...133PowerDoor Locks...............9Inverter.................88Outlet (Auxiliary Electrical Outlet)...89Steering.................97Sunroof.................33Power Steering Fluid............125Programmable Electronic Features.....85
Radio Operation...............45Radio (Sound Systems)...........45Rear Seat, Folding..............23Reclining Front Seats............22Recreational Towing.............90Refrigerant.................126Remote Keyless Entry (RKE)Disarm The Alarm.............9Replacement Bulbs.............136Reporting Safety Defects..........138
Schedule, Maintenance...........126Seat BeltEngage The Automatic Locking Mode..17Seat Belt Maintenance...........126Seat Belts..................11Adjustable Shoulder Belt........11Pretensioners..............11Reminder................94Seat Belt Warning............11SeatsAdjustment...............22Heated.................24Rear Folding...............23Security Alarm................97Disarm The System............9
INDEX
143