set clock FIAT 500L 2015 2.G User Guide
[x] Cancel search | Manufacturer: FIAT, Model Year: 2015, Model line: 500L, Model: FIAT 500L 2015 2.GPages: 148, PDF Size: 3.77 MB
Page 45 of 148
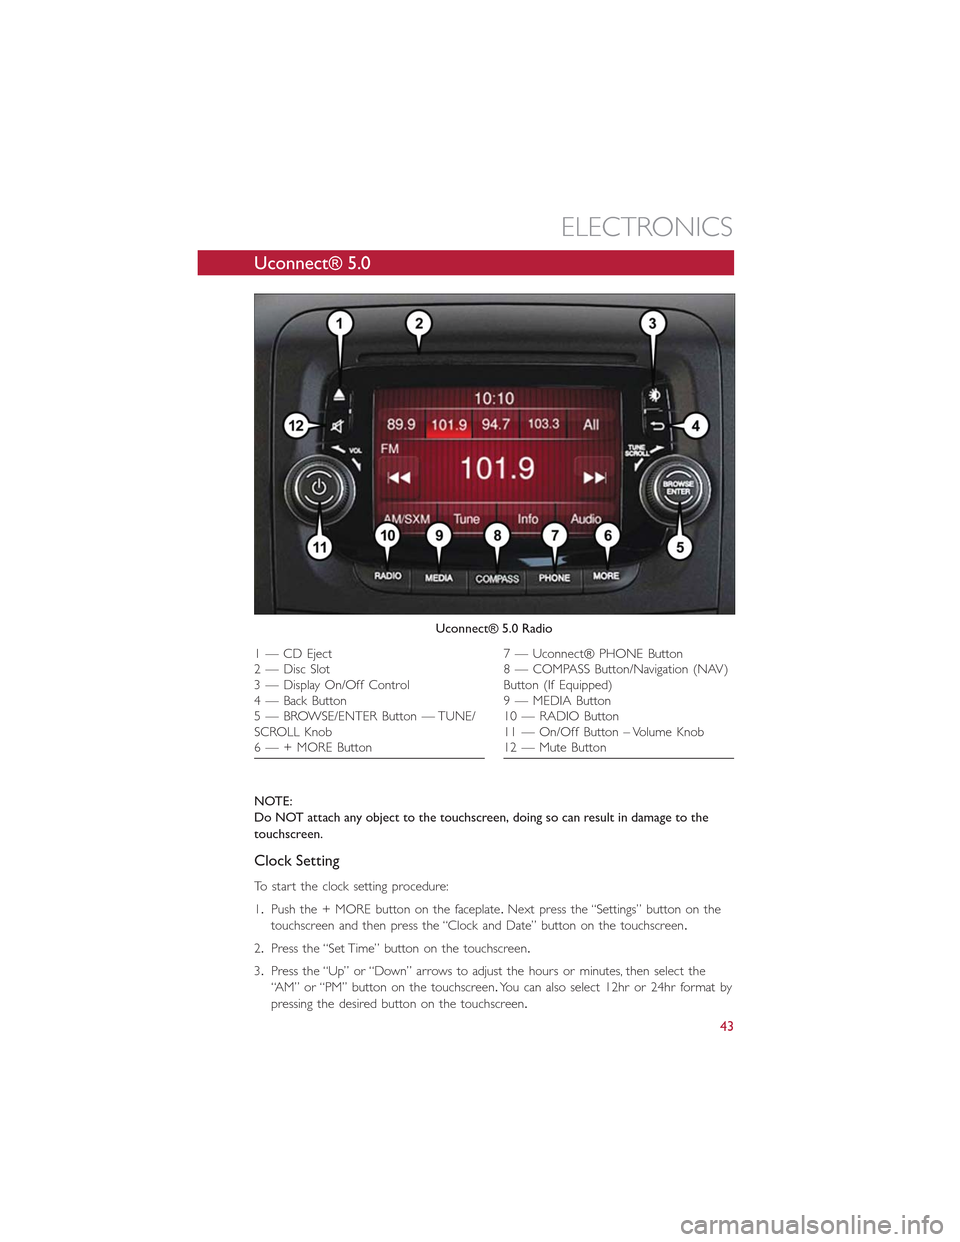
Uconnect® 5.0
NOTE:
Do NOT attach any object to the touchscreen, doing so can result in damage to the
touchscreen.
Clock Setting
To start the clock setting procedure:
1.Push the + MORE button on the faceplate.Next press the “Settings” button on the
touchscreen and then press the “Clock and Date” button on the touchscreen.
2.Press the “Set Time” button on the touchscreen.
3.Press the “Up” or “Down” arrows to adjust the hours or minutes, then select the
“AM” or “PM” button on the touchscreen.You can also select 12hr or 24hr format by
pressing the desired button on the touchscreen.
Uconnect® 5.0 Radio
1 — CD Eject2 — Disc Slot3 — Display On/Off Control4 — Back Button5 — BROWSE/ENTER Button — TUNE/SCROLL Knob6 — + MORE Button
7 — Uconnect® PHONE Button8 — COMPASS Button/Navigation (NAV)Button (If Equipped)9 — MEDIA Button10 — RADIO Button11 — On/Off Button – Volume Knob12 — Mute Button
ELECTRONICS
43
Page 46 of 148
4.Once the time is set press the “Done” button on the touchscreen to exit the time
screen.
NOTE:
In the Clock Setting Menu you can also select Display Clock.Display Clock turns the
clock display in the status bar on or off.
Equalizer, Balance And Fade
1.Push the MORE button on the faceplate below the display then press the “Setting”
button on the touchscreen.
2.Scroll down and press the “Audio” button on the touchscreen to open the Audio
menu.
3.The Audio Menu shows the following options for you to customize your audio set-
tings.
Equalizer
•Press the “Equalizer” button on the touchscreen to adjust the Bass, Mid and Treble.
Use the “+” or “-” button on the touchscreen to adjust the equalizer to your desired
settings.
Balance/Fade
•Press the “Balance/Fade” button on the touchscreen to adjust the sound from the
speakers.Use the arrow buttons on the touchscreen to adjust the sound level from
the front and rear or right and left side speakers.Press the Center “C” button on the
touchscreen to reset the balance and fade to the factory setting.
Speed Adjusted Volume — If Equipped
•Press the “Speed Adjusted Volume” button on the touchscreen to select between OFF,
1, 2 or 3.This will decrease the radio volume relative to a decrease in vehicle speed.
Loudness
•Press the “Loudness” button on the touchscreen to select the Loudness feature.When
this feature is activated it improves sound quality at lower volumes.
Surround Sound — If Equipped
•Press the “Surround Sound” button on the touchscreen, select On or Off followed by
pressing the back arrow button on the touchscreen.When this feature is activated, it
provides simulated surround sound mode.
ELECTRONICS
44
Page 57 of 148
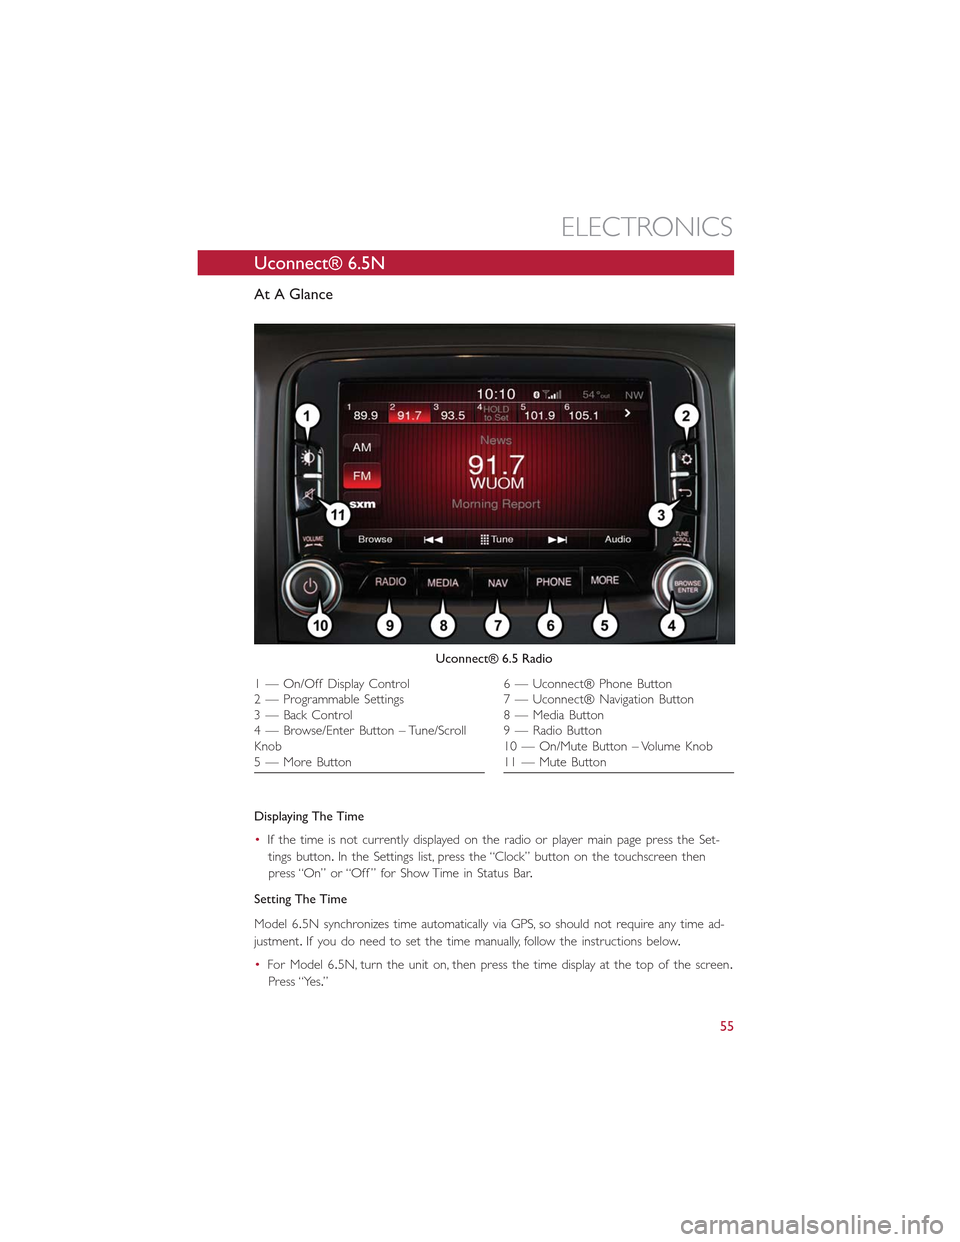
Uconnect® 6.5N
At A Glance
Displaying The Time
•If the time is not currently displayed on the radio or player main page press the Set-
tings button.In the Settings list, press the “Clock” button on the touchscreen then
press “On” or “Off ” for Show Time in Status Bar.
Setting The Time
Model 6.5N synchronizes time automatically via GPS, so should not require any time ad-
justment.If you do need to set the time manually, follow the instructions below.
•For Model 6.5N, turn the unit on, then press the time display at the top of the screen.
Press “Yes.”
Uconnect® 6.5 Radio
1 — On/Off Display Control2 — Programmable Settings3 — Back Control4 — Browse/Enter Button – Tune/ScrollKnob5 — More Button
6 — Uconnect® Phone Button7 — Uconnect® Navigation Button8 — Media Button9 — Radio Button10 — On/Mute Button – Volume Knob11 — Mute Button
ELECTRONICS
55
Page 58 of 148
•If the time is not displayed at the top of the screen, press the Settings button.In the
Settings screen, press the “Clock” button on the touchscreen, then check or uncheck
this option.
•Press “+” or “–” next to Set Time Hours and Set Time Minutes to adjust the time.
•If these features are not available, press “Off “for Sync with GPS.
•Press “X” to save your settings and exit out of the Clock Setting screen.
Audio Settings
•Press the “Audio” button on the touchscreen to activate the Audio settings screen to
adjust Balance\Fade, Equalizer, and Speed Adjusted Volume.
•You can return to the Radio screen by pressing the “X” located at the top right.
Balance/Fade
•Press the “Balance/Fade” button on the touchscreen to Balance audio between the
front speakers or fade the audio between the rear and front speakers.
•Pressing the “Front,” “Rear,” “Left,” or “Right” buttons on the touchscreen or press and
drag the Speaker Icon to adjust the Balance/Fade.
Equalizer
•Press the “Equalizer” button on the touchscreen to activate the Equalizer screen.
•Press the “+” or “-” buttons on the touchscreen, or press and drag over the level bar
for each of the equalizer bands.The level value, which spans between plus or minus 9,
is displayed at the bottom of each of the Bands.
Speed Adjusted Volume — If Equipped
•Press the “Speed Adjusted Volume” button on the touchscreen to activate the Speed
Adjusted Volume screen.The Speed Adjusted Volume is adjusted by pressing the “+”
and “–” buttons or by pressing and dragging over the level bar.This alters the auto-
matic adjustment of the audio volume with variation to vehicle speed.
Surround Sound — If Equipped
•Press the “Surround Sound” button on the touchscreen, select “On” or “Off ” followed
by pressing the back arrow button on the touchscreen.When this feature is activated,
it provides simulated surround sound mode.
ELECTRONICS
56
Page 87 of 148
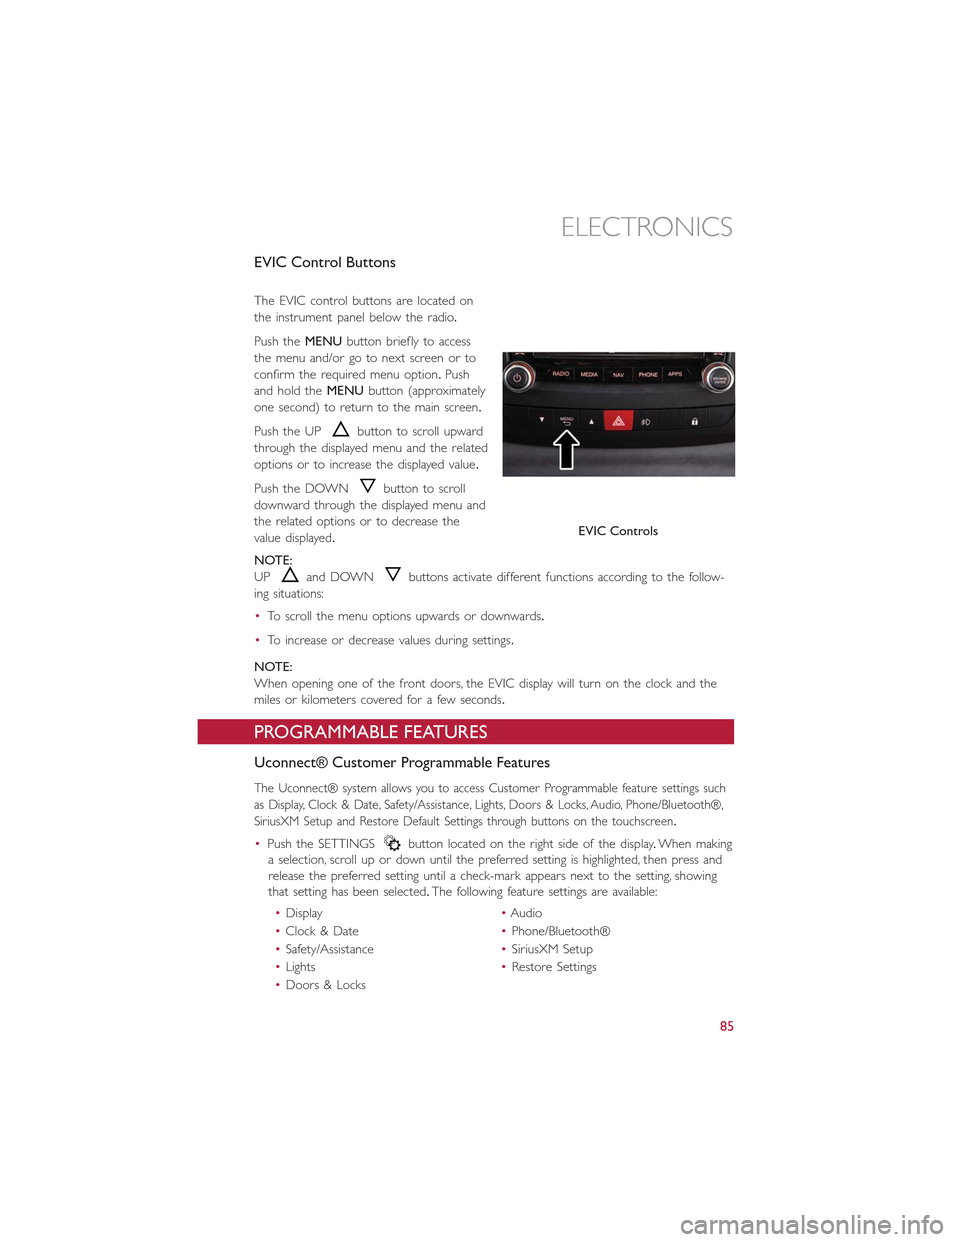
EVIC Control Buttons
The EVIC control buttons are located on
the instrument panel below the radio.
Push theMENUbutton briefly to access
the menu and/or go to next screen or to
confirm the required menu option.Push
and hold theMENUbutton (approximately
one second) to return to the main screen.
Push the UPbutton to scroll upward
through the displayed menu and the related
options or to increase the displayed value.
Push the DOWNbutton to scroll
downward through the displayed menu and
the related options or to decrease the
value displayed.
NOTE:
UPand DOWNbuttons activate different functions according to the follow-
ing situations:
•To scroll the menu options upwards or downwards.
•To increase or decrease values during settings.
NOTE:
When opening one of the front doors, the EVIC display will turn on the clock and the
miles or kilometers covered for a few seconds.
PROGRAMMABLE FEATURES
Uconnect® Customer Programmable Features
The Uconnect® system allows you to access Customer Programmable feature settings such
as Display, Clock & Date, Safety/Assistance, Lights, Doors & Locks, Audio, Phone/Bluetooth®,
SiriusXM Setup and Restore Default Settings through buttons on the touchscreen.
•Push the SETTINGSbutton located on the right side of the display.When making
a selection, scroll up or down until the preferred setting is highlighted, then press and
release the preferred setting until a check-mark appears next to the setting, showing
that setting has been selected.The following feature settings are available:
•Display•Audio
•Clock & Date•Phone/Bluetooth®
•Safety/Assistance•SiriusXM Setup
•Lights•Restore Settings
•Doors & Locks
EVIC Controls
ELECTRONICS
85
Page 142 of 148
FREQUENTLY ASKED QUESTIONS
GETTING STARTED
•How do I install my LATCH Equipped Child Seat? pg.16
•How do I adjust my rear seat? pg.23
ELECTRONICS
•What Sound System do I have? pg.40
•How do I set the clock on my radio? pg.43
•How do I set the presets on my radio? pg.45
•How do I use my USB/Audio Jack (AUX)? pg.47
•How do I pair my cell phone via Uconnect® Phone (Bluetooth® Hands Free Calling)?
pg.76
UTILITY
•How much can I tow with my FIAT 500L? pg.90
•How do I tow my FIAT 500L behind another vehicle? pg.140
WHAT TO DO IN EMERGENCIES
•What do I do if my TPMS warning light is blinking? pg.93
•How do I Jump-Start my vehicle? pg.113
•What should I do if my engine overheats? pg.98
•How do I change a flat tire? pg.99
MAINTAINING YOUR VEHICLE
•Where is my underhood fuse block located? pg.130
•Where is my interior fuse block located? pg.131
•What type of oil do I use? pg.124
•How often should I change my engines oil? pg.126
•What should my tire pressure be set at? pg.133
FREQUENTLY ASKED QUESTIONS
140
Page 143 of 148
Adding Engine Coolant (Antifreeze)....126
Adding Fuel.................37
Adding Washer Fluid............126
Air Bag
Advanced Front Air Bag.........12
Advance Front Air Bag.........12
Air Bags.................12
Air Bag Warning Light..........12
Driver Knee Air Bag...........13
Front Air Bag..............12Passenger Knee Air Bag.........13Rollover.................12Side Impacts...............12Air Bag Light.................92Air Bag, Side.................12Air Cleaner, Engine (Engine AirCleaner Filter).............126Air Conditioner Maintenance.......126Air Conditioning Refrigerant........126Air Conditioning System..........126AlarmDisarm The System............9Vehicle Security Alarm..........9Alarm (Security Alarm)..........9, 97Antifreeze (Engine Coolant).....124, 126Capacities...............124Disposal................126Anti-Lock Warning Light...........92Appearance Care.............126Audio Systems (Radio).........41, 45Automatic TransmissionFluid Type...............125
Battery...................126Body Mechanism Lubrication........126Brake Fluid.................125Brakes...................126Brake System................126Master Cylinder............126Warning Light..............94Break-In Recommendations, New Vehicle..26Bulb Replacement.............136Bulbs, Light.................136
Capacities, Antifreeze (Engine Coolant)..124Capacities, Fluid...............124Caps, FillerFuel..................120
Oil (Engine)..............126
Car Washes................126
Changing A Flat Tire.............99
Charging System Light............92
Child Restraint................15
Child Restraints
Center Seat LATCH...........16
Installing Child Restraints Using The
Vehicle Seat Belt.............17
Lower Anchors And Tethers ForChildren.................17Using The Top Tether Anchorage....17CleaningWheels................126Windshield Wiper Blades.......126Climate ControlAutomatic................32Manual..................31Clock....................43Clock Setting................43Cluster Warning/Indicator LightsAnti-Lock Brake (ABS) Light......92Brake Warning Light...........94Charging System Light.........92Electronic Speed Control SETIndicator.................97Electronic Throttle Control (ETC)Indicator Light..............96Engine Temperature Warning Light...94Front Fog Light Indicator........97High Beam Indicator..........96Malfunction Indicator Light (MIL)....95Oil Pressure Warning Light.......92Park/Headlight ON Indicator......97Tire Pressure Monitoring System(TPMS) Light..............93Turn Signal Indicator..........96Vehicle Security Light..........97Clutch...................126Clutch Fluid................126Compact Spare Tire............134Coolant (Antifreeze)............124Cooling System...............126Adding Coolant (Antifreeze).....126Coolant Level.............126Disposal Of Used Coolant......126Drain, Flush, And Refill.........126Inspection...............126
INDEX
141