reset FIAT 500L 2018 Owner handbook (in English)
[x] Cancel search | Manufacturer: FIAT, Model Year: 2018, Model line: 500L, Model: FIAT 500L 2018Pages: 268, PDF Size: 4.87 MB
Page 49 of 268
DISPLAY
DESCRIPTION
The display shows useful information to
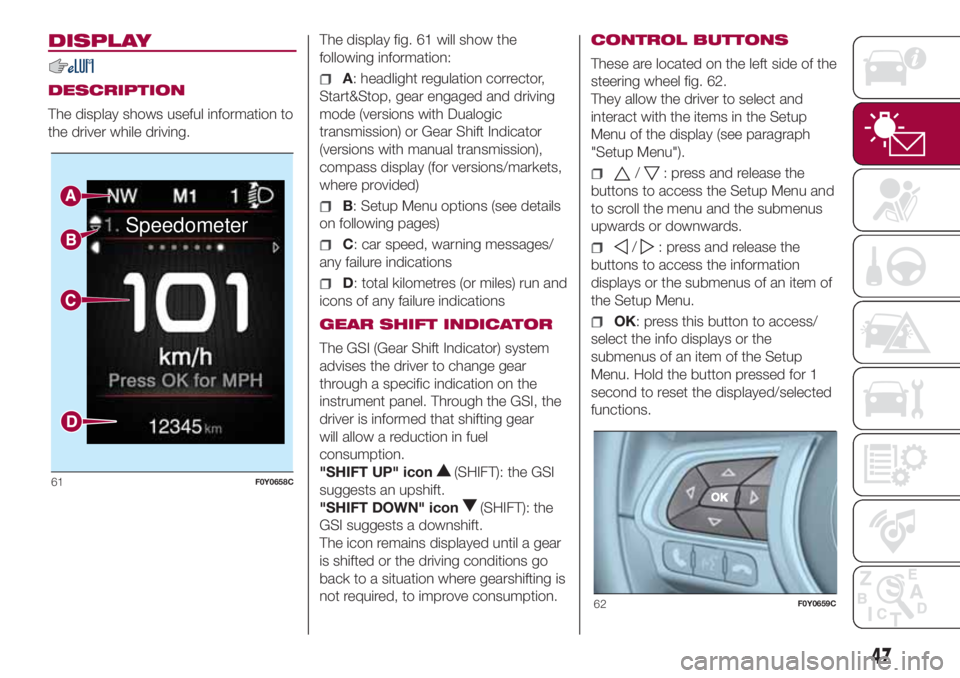
the driver while driving.The display fig. 61 will show the
following information:A: headlight regulation corrector,
Start&Stop, gear engaged and driving
mode (versions with Dualogic
transmission) or Gear Shift Indicator
(versions with manual transmission),
compass display (for versions/markets,
where provided)
B: Setup Menu options (see details
on following pages)
C: car speed, warning messages/
any failure indications
D: total kilometres (or miles) run and
icons of any failure indications
GEAR SHIFT INDICATOR
The GSI (Gear Shift Indicator) system
advises the driver to change gear
through a specific indication on the
instrument panel. Through the GSI, the
driver is informed that shifting gear
will allow a reduction in fuel
consumption.
"SHIFT UP" icon
(SHIFT): the GSI
suggests an upshift.
"SHIFT DOWN" icon
(SHIFT): the
GSI suggests a downshift.
The icon remains displayed until a gear
is shifted or the driving conditions go
back to a situation where gearshifting is
not required, to improve consumption.CONTROL BUTTONS
These are located on the left side of the
steering wheel fig. 62.
They allow the driver to select and
interact with the items in the Setup
Menu of the display (see paragraph
"Setup Menu").
/: press and release the
buttons to access the Setup Menu and
to scroll the menu and the submenus
upwards or downwards.
/: press and release the
buttons to access the information
displays or the submenus of an item of
the Setup Menu.
OK: press this button to access/
select the info displays or the
submenus of an item of the Setup
Menu. Hold the button pressed for 1
second to reset the displayed/selected
functions.
Speedometer
61F0Y0658C
62F0Y0659C
47
Page 50 of 268
SETUP MENU
The Setup Menu includes the following
items:
Speedometer
Trip
Vehicle info
Audio
Telephone (for versions/markets,
where provided)
Navigation (for versions/markets,
where provided)
Alerts
Vehicle Settings
When the ignition key is turned to the
MAR-ON position, the display shows
the last Menu option active before
the engine was switched off.
NOTE With theUconnect™system,
some Menu items are shown and
managed on the display of the latter
and not on the instrument panel display
(refer to the Multimedia chapter or to
the supplement available online).
Vehicle Settings
This menu item allows you to change
the settings for:
"Display"
"Safety / Assistance"
"Safety"
“Oil level reset” (0.9 TwinAir Turbo
versions only)
Display
By selecting item "Display" you can
access the settings/information
regarding: “Dimmer” (for versions/
markets, where provided), “Screen
Setup”, “See phone”, “See navigation”,
“Reset trip B automatic".
Safety / Assistance
By selecting “Safety / Assistance" you
can access the settings/information
regarding: “City Brake Control” (for
versions/markets, where provided),
“Parking sensor volume”, “Buzzer
volume”.
Safety
By selecting item "Security" you can
access the settings/information
regarding: “Hill Holder” (for versions/
markets, where provided), “Passenger
AIRBAG” (for versions/markets, where
provided), “Seat belt buzzer”, “Speed
beep”.
Oil level reset
(0.9 TwinAir Turbo versions only)
By selecting this item you can reset the
engine oil top-up warning, which
appears about every 8000 km.
Proceed as follows to reset this warning
after topping up the engine oil:
briefly press theOKbutton on the
steering wheel: the display will show"Oil level reset";
pressto select "Yes" and reset
the top-up warning, or press
to
select “No” of you do not wish to reset
the warning.
IMPORTANT Failure to top up the
engine oil could result in a low level,
which could prevent normal car
operation and even cause it to stop.
TRIP COMPUTER
The Trip computer is used to display
information on car operation when the
key is turned to MAR.
The Trip computer comprises:
Instantaneous info(except LPG
and Natural Power versions): display of
“Range” and “Instantaneous
consumption" parameters
"Trip A" displays the following
values: “Travel Distance”, “Travel time”,
“Average fuel consumption” and
“Average speed”
"Trip B" displays the following
values: “Travel Distance”, “Travel time”,
“Average fuel consumption” and
“Average speed”
48
KNOWING THE INSTRUMENT PANEL
“Trip A” and “Trip B” monitor the car's
"complete missions" (trips) separately
from each other. The “Trip B” function
may be excluded.
Page 51 of 268
The "Range" is also calculated and
displayed with the car at a standstill
and the engine running.
Reset “Trip A” / “Trip B”
Both functions can be reset (reset
means start of a new journey). To reset
the values, press and hold down the
OKbutton on the steering wheel (see
"Control buttons" section). The reset
only applies to the values displayed
(“Trip A” or “Trip B”).
LPG and Natural Power versions
Only the “Travel Distance”, “Travel
Time” and “Average speed” values are
displayed on LPG and Natural Power
versions.
NOTE “Range” and “Current
Consumption" parameters cannot be
reset.
49
Page 57 of 268
Amber warning lights
Warning light What it means
iTPMS
(for versions/markets, where provided)
The warning light switches on when the ignition key is turned to MAR, but it should switch off after a few
seconds.
iTPMS failure/iTPMS temporarily deactivated
The warning light flashes for about 75 seconds and then stays on constantly to indicate that the system is
temporarily deactivated or faulty. The system will go back to normal operation when the operating
conditions will allow it. If this is not the case, carry out the “Reset” procedure after restoring the normal
operating conditions. If the malfunction warning persists, contact a Fiat Dealership as soon as possible.
Tyre pressure low
The warning light switches on constantly to indicate that the tyre pressure is lower than the recommended
value and/or that slow pressure loss is occurring. In these cases, optimal tyre duration and fuel
consumption may not be guaranteed. It is advisable to restore the correct pressure value (see the "Wheels"
paragraph in the "Technical specifications" section). Once the normal operating conditions of the vehicle
are restored, carry out the "Reset" procedure.
IMPORTANT Do not continue driving with one or more flat tyres as the car handling may be compromised.
Stop the vehicle, avoiding sharp braking and steering.
55
Page 61 of 268
Warning light What it means
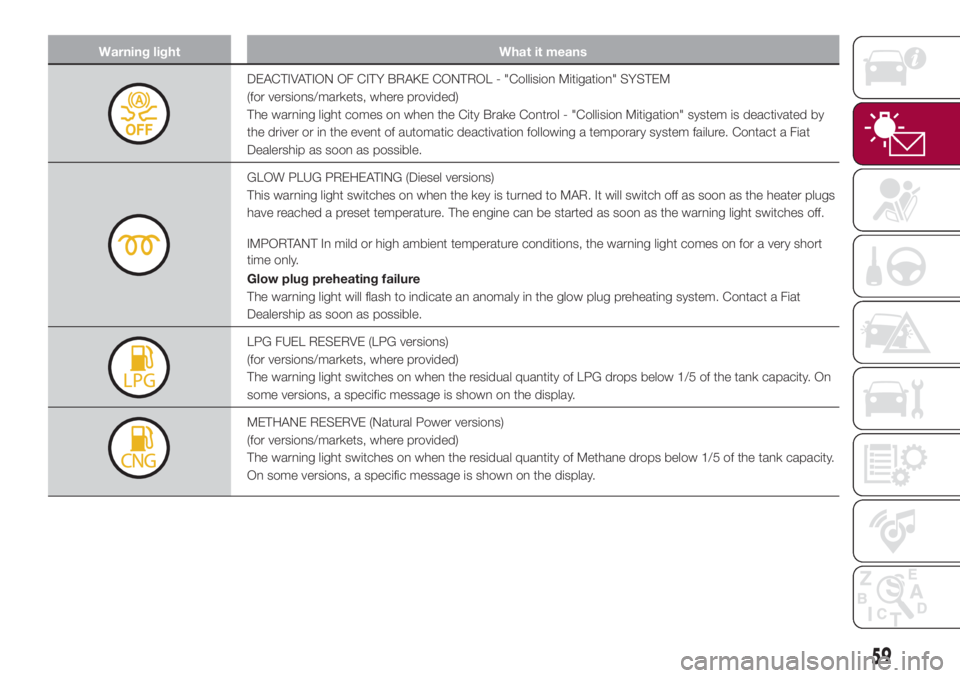
DEACTIVATION OF CITY BRAKE CONTROL - "Collision Mitigation" SYSTEM
(for versions/markets, where provided)
The warning light comes on when the City Brake Control - "Collision Mitigation" system is deactivated by
the driver or in the event of automatic deactivation following a temporary system failure. Contact a Fiat
Dealership as soon as possible.
GLOW PLUG PREHEATING (Diesel versions)
This warning light switches on when the key is turned to MAR. It will switch off as soon as the heater plugs
have reached a preset temperature. The engine can be started as soon as the warning light switches off.
IMPORTANT In mild or high ambient temperature conditions, the warning light comes on for a very short
time only.
Glow plug preheating failure
The warning light will flash to indicate an anomaly in the glow plug preheating system. Contact a Fiat
Dealership as soon as possible.
LPG FUEL RESERVE (LPG versions)
(for versions/markets, where provided)
The warning light switches on when the residual quantity of LPG drops below 1/5 of the tank capacity. On
some versions, a specific message is shown on the display.
METHANE RESERVE (Natural Power versions)
(for versions/markets, where provided)
The warning light switches on when the residual quantity of Methane drops below 1/5 of the tank capacity.
On some versions, a specific message is shown on the display.
59
Page 70 of 268
Symbol What it means
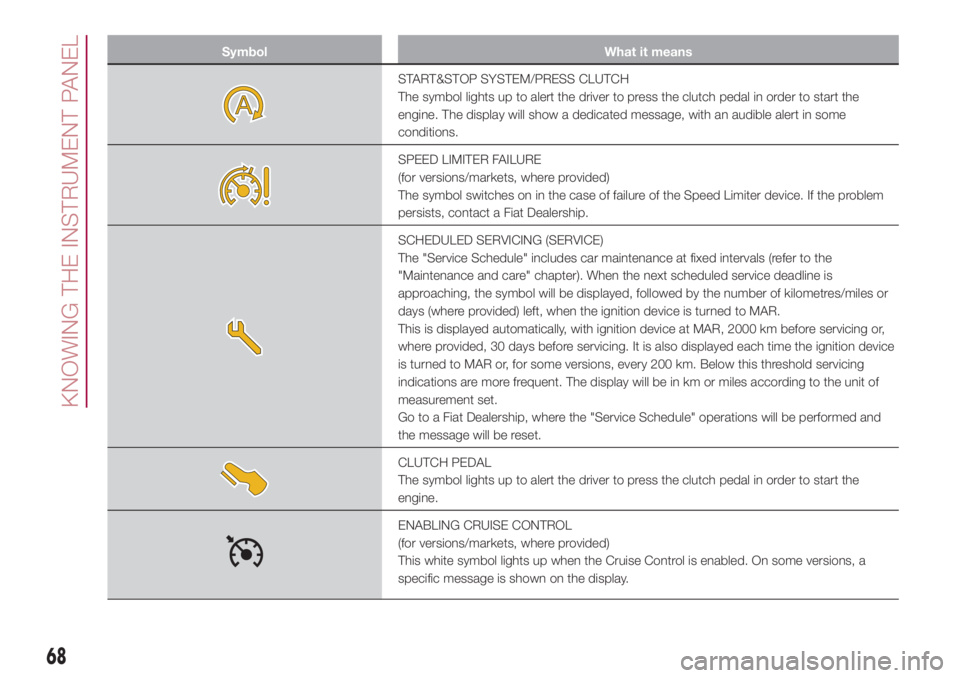
START&STOP SYSTEM/PRESS CLUTCH
The symbol lights up to alert the driver to press the clutch pedal in order to start the
engine. The display will show a dedicated message, with an audible alert in some
conditions.
SPEED LIMITER FAILURE
(for versions/markets, where provided)
The symbol switches on in the case of failure of the Speed Limiter device. If the problem
persists, contact a Fiat Dealership.
SCHEDULED SERVICING (SERVICE)
The "Service Schedule" includes car maintenance at fixed intervals (refer to the
"Maintenance and care" chapter). When the next scheduled service deadline is
approaching, the symbol will be displayed, followed by the number of kilometres/miles or
days (where provided) left, when the ignition device is turned to MAR.
This is displayed automatically, with ignition device at MAR, 2000 km before servicing or,
where provided, 30 days before servicing. It is also displayed each time the ignition device
is turned to MAR or, for some versions, every 200 km. Below this threshold servicing
indications are more frequent. The display will be in km or miles according to the unit of
measurement set.
Go to a Fiat Dealership, where the "Service Schedule" operations will be performed and
the message will be reset.
CLUTCH PEDAL
The symbol lights up to alert the driver to press the clutch pedal in order to start the
engine.
ENABLING CRUISE CONTROL
(for versions/markets, where provided)
This white symbol lights up when the Cruise Control is enabled. On some versions, a
specific message is shown on the display.
68
KNOWING THE INSTRUMENT PANEL
Page 79 of 268
IMPORTANT After the car is stopped,
the brake callipers may be locked
for about 2 seconds for safety reasons.
Make sure you press the brake pedal
if the vehicle moves slightly forwards.
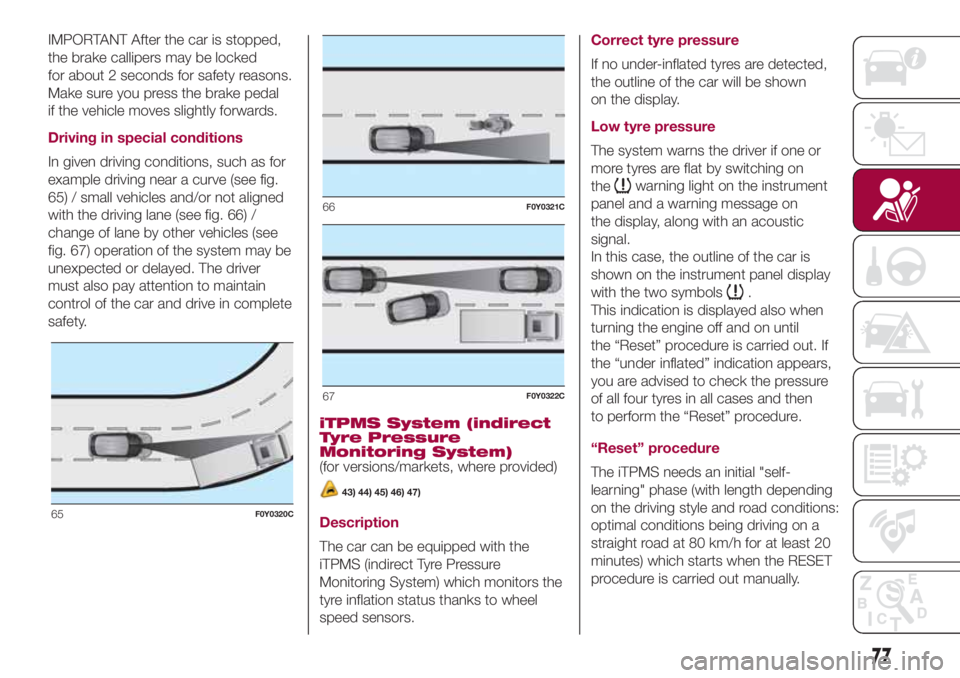
Driving in special conditions
In given driving conditions, such as for
example driving near a curve (see fig.
65) / small vehicles and/or not aligned
with the driving lane (see fig. 66) /
change of lane by other vehicles (see
fig. 67) operation of the system may be
unexpected or delayed. The driver
must also pay attention to maintain
control of the car and drive in complete
safety.
iTPMS System (indirect
Tyre Pressure
Monitoring System)
(for versions/markets, where provided)
43) 44) 45) 46) 47)
Description
The car can be equipped with the
iTPMS (indirect Tyre Pressure
Monitoring System) which monitors the
tyre inflation status thanks to wheel
speed sensors.Correct tyre pressure
If no under-inflated tyres are detected,
the outline of the car will be shown
on the display.
Low tyre pressure
The system warns the driver if one or
more tyres are flat by switching on
the
warning light on the instrument
panel and a warning message on
the display, along with an acoustic
signal.
In this case, the outline of the car is
shown on the instrument panel display
with the two symbols
.
This indication is displayed also when
turning the engine off and on until
the “Reset” procedure is carried out. If
the “under inflated” indication appears,
you are advised to check the pressure
of all four tyres in all cases and then
to perform the “Reset” procedure.
“Reset” procedure
The iTPMS needs an initial "self-
learning" phase (with length depending
on the driving style and road conditions:
optimal conditions being driving on a
straight road at 80 km/h for at least 20
minutes) which starts when the RESET
procedure is carried out manually.
65F0Y0320C
66F0Y0321C
67F0Y0322C
77
Page 80 of 268
The "Reset" procedure must be carried
out:
each time tyre pressure is modified;
when even only one tyre is changed;
when tyres are rotated/inverted;
when the space-saver wheel is
fitted.
Before carrying out the “Reset”
procedure, inflate the tyres to the rated
pressure values specified in the inflation
pressure table (see "Wheels" paragraph
in the "Technical specifications"
chapter).
If the “Reset” procedure is not carried
out, in all above cases, the
warning
light may give false indications on
one or more tyres.
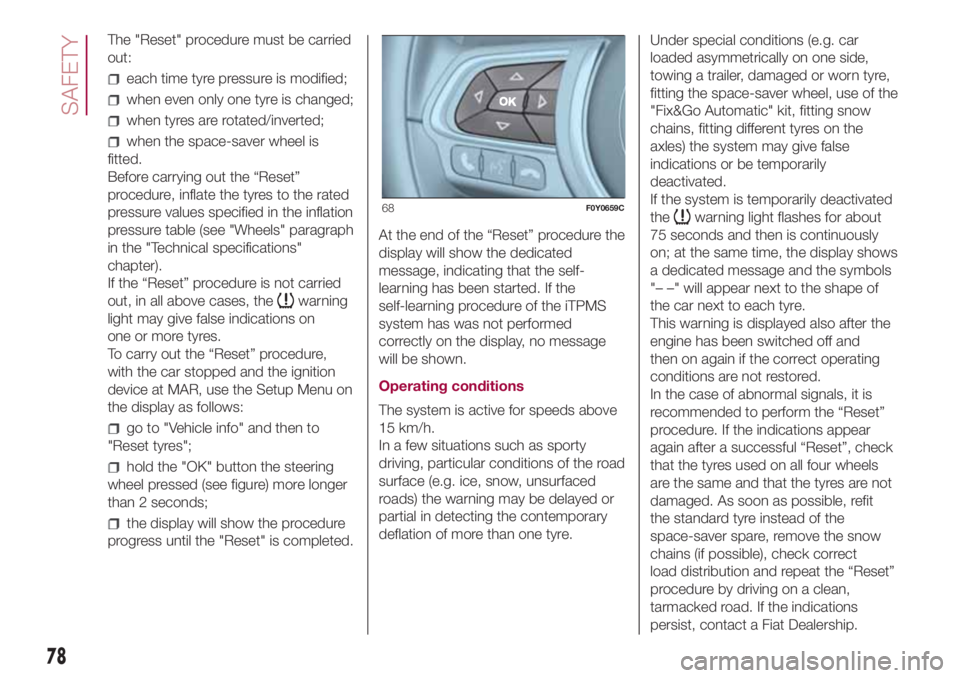
To carry out the “Reset” procedure,
with the car stopped and the ignition
device at MAR, use the Setup Menu on
the display as follows:
go to "Vehicle info" and then to
"Reset tyres";
hold the "OK" button the steering
wheel pressed (see figure) more longer
than 2 seconds;
the display will show the procedure
progress until the "Reset" is completed.At the end of the “Reset” procedure the
display will show the dedicated
message, indicating that the self-
learning has been started. If the
self-learning procedure of the iTPMS
system has was not performed
correctly on the display, no message
will be shown.
Operating conditions
The system is active for speeds above
15 km/h.
In a few situations such as sporty
driving, particular conditions of the road
surface (e.g. ice, snow, unsurfaced
roads) the warning may be delayed or
partial in detecting the contemporary
deflation of more than one tyre.Under special conditions (e.g. car
loaded asymmetrically on one side,
towing a trailer, damaged or worn tyre,
fitting the space-saver wheel, use of the
"Fix&Go Automatic" kit, fitting snow
chains, fitting different tyres on the
axles) the system may give false
indications or be temporarily
deactivated.
If the system is temporarily deactivated
the
warning light flashes for about
75 seconds and then is continuously
on; at the same time, the display shows
a dedicated message and the symbols
"– –" will appear next to the shape of
the car next to each tyre.
This warning is displayed also after the
engine has been switched off and
then on again if the correct operating
conditions are not restored.
In the case of abnormal signals, it is
recommended to perform the “Reset”
procedure. If the indications appear
again after a successful “Reset”, check
that the tyres used on all four wheels
are the same and that the tyres are not
damaged. As soon as possible, refit
the standard tyre instead of the
space-saver spare, remove the snow
chains (if possible), check correct
load distribution and repeat the “Reset”
procedure by driving on a clean,
tarmacked road. If the indications
persist, contact a Fiat Dealership.68F0Y0659C
78
SAFETY
Page 120 of 268
IMPORTANT NOTES
For towing caravans or trailers the car
must be fitted with an approved tow
hook and an adequate electrical
system. Installation must be carried out
by specialised technicians.
Install any specific and/or additional
door mirrors as specified by the
Highway Code.
Remember that, when towing a trailer,
steep hills are harder to climb, braking
distances increase and overtaking
takes longer depending on the overall
weight of the trailer.
Engage a low gear when driving
downhill, rather than constantly using
the brake.
The weight the trailer exerts on the car
tow hook reduces the car's loading
capacity by the same amount. To make
sure that the maximum towable weight
is not exceeded (given in the vehicle
registration document) account should
be taken of the fully laden trailer,
including accessories and luggage.
Do not exceed the speed limits specific
to each country you are driving in, in
the case of vehicles towing trailers.
In any case, the top speed must not
exceed 100 km/h.Any electric brake (or electric winch,
etc.) should be supplied directly by the
battery through a cable with a section
of at least 2.5 mm
2.
In addition to the electrical branches,
the car electrical system can only
be connected to the supply cable for an
electric brake and to the cable for an
internal light for the trailer, not
exceeding 15 W. For connections, use
the preset control unit with a battery
cable with section not less than 2.5
mm
2.
IMPORTANT The use of auxiliary loads
other than external lights (electric brake,
winch, etc.) must take place with
engine running.
IMPORTANT To install a tow hook
contact a Fiat Dealership.
WARNING
116)The ABS with which the car is
equipped will not control the braking
system of the trailer. Particular caution is
required on slippery roads.
117)Never modify the braking system of
the vehicle to control the trailer brake. The
trailer braking system must be fully
independent of the vehicle’s hydraulic
system.
118)After fitting, screw holes must be
sealed to prevent a exhaust gas inlet.
REFUELLING THE
VEHICLE
119) 120) 121)60)
Before refuelling, make sure that the
fuel type is correct. During refuelling
procedure, switch off the engine,
engage handbrake, rotate the ignition
key to STOP and do not smoke.
PETROL ENGINES
Only use unleaded petrol with a number
of octanes (R.O.N.) not lower than 95
(EN228 specification).
DIESEL ENGINES
Only use Diesel for motor vehicles
(EN590 specification).
When using or parking the car for a
long time in the mountains or cold
areas, it is advisable to refuel using
locally available Diesel. In this case, it is
also advisable to keep the tank over
50% full.
REFUELLING
PROCEDURE
Diesel and petrol versions
Proceed as follows:
open the flap A fig. 111 pulling
outwards, insert the nozzle in the filler
and refuel;
118
STARTING AND DRIVING
Page 147 of 268
FUEL CUT-OFF
SYSTEM
144)
This intervenes in the case of an impact
causing:
the interruption of the fuel supply
with the engine consequently cutting
out;
the automatic unlocking of the
doors;
turning on the lights inside the car;
the switching on of the hazard
warning lights.
The intervention of the system is
indicated by a message shown on the
display.
IMPORTANT Carefully check the vehicle
for fuel leaks, for instance in the engine
compartment, under the vehicle or
near the tank area. After an impact, turn
the ignition key to STOP to prevent the
battery from running down.
Reset procedure
To restore correct operation of the
system, carry out the following Reset
procedure (the procedure must be
completed in less than 1 minute):
turn the ignition key to the MAR
position;
activate the right direction indicator
and then stop it;
activate the left direction indicator
and then stop it;
activate the right direction indicator
and then stop it;
activate the left direction indicator
and then stop it;
turn the ignition key to the STOP
position and then to MAR.
LPG versions: in case of collision, the
petrol feed is immediately closed, the
LPG safety solenoid valves are closed
and injection is interrupted to stop
the engine.
Natural Power versions: in the event
of an impact, the power supply is
immediately cut off, causing engine
switching off.
WARNING
144)If, after an impact, you smell fuel or
notice leaks from the fuel system, do
not reactivate the system to avoid the risk
of fire.
TOWING THE
VEHICLE
ATTACHING THE TOW
RING
145) 146) 147) 148)
The tow rings, which are supplied with
the car, are housed in the tool box,
under the carpet in the luggage
compartment.
IMPORTANT The shorter tow ring is for
use on the front of the car and the
longer one on the rear.
500L WAGON versions
NOTE 500L WAGON versions have
only one tow ring, which can be used
on either the front or the rear bumper.
Front
Manually remove cap A fig. 168,
pressing in the lower part. Take tow ring
B from its housing in the tool support
and screw it completely onto the
threaded pin.
Rear
Manually remove cap A fig. 169 or fig.
170 (500L WAGON versions) by
pressing at the bottom. Take tow ring B
from its housing in the tool support
and screw it completely onto the
threaded pin.
145