ABS FIAT 500L 2019 Owner handbook (in English)
[x] Cancel search | Manufacturer: FIAT, Model Year: 2019, Model line: 500L, Model: FIAT 500L 2019Pages: 248, PDF Size: 5.74 MB
Page 106 of 248
WARNING
38)The flashing of the warning lightfor
60 seconds after starting or during
prolonged cranking of the engine indicates
a fault with the glow plug heating system.
You can use the vehicle as usual if the
engine starts but you should contact a Fiat
Dealership as soon as possible.
39)It is advisable not to demand maximum
performance from your car (e.g. excessive
acceleration, long distances at maximum
rpm, excessively intense braking, etc.)
when it is first used.
40)When the engine is switched off never
leave the key turned to MAR-ON to prevent
useless current absorption from draining
the battery.
41)Never, under any circumstances, jump
start the engine by pushing, towing or
coasting downhill. This could cause fuel to
flow into the catalytic converter and
damage it beyond repair.
42)A quick burst on the accelerator before
stopping the engine serves no practical
purpose; it wastes fuel and is especially
damaging to turbocharged engines.
WHEN PARKED
Always remove the ignition key when
leaving the car.
When parking and leaving the car,
proceed as follows:
engage a gear (1stgear if facing
uphill or reverse if facing downhill) and
leave the wheels turned;
stop the engine and engage the
handbrake.
Block the wheels with a wedge or a
stone if the car is parked on a steep
slope.
On versions with Dualogic gearbox, 1
st
gear or reverse must be engaged
with the foot on the brake pedal and, if
on a slope, the handbrake must be
operated in order to park safely.
IMPORTANT NEVER leave the car with
the gearbox in neutral (on versions
equipped with Dualogic transmission,
this is indicated by the letter N on
the display).
HANDBRAKE
98) 99)
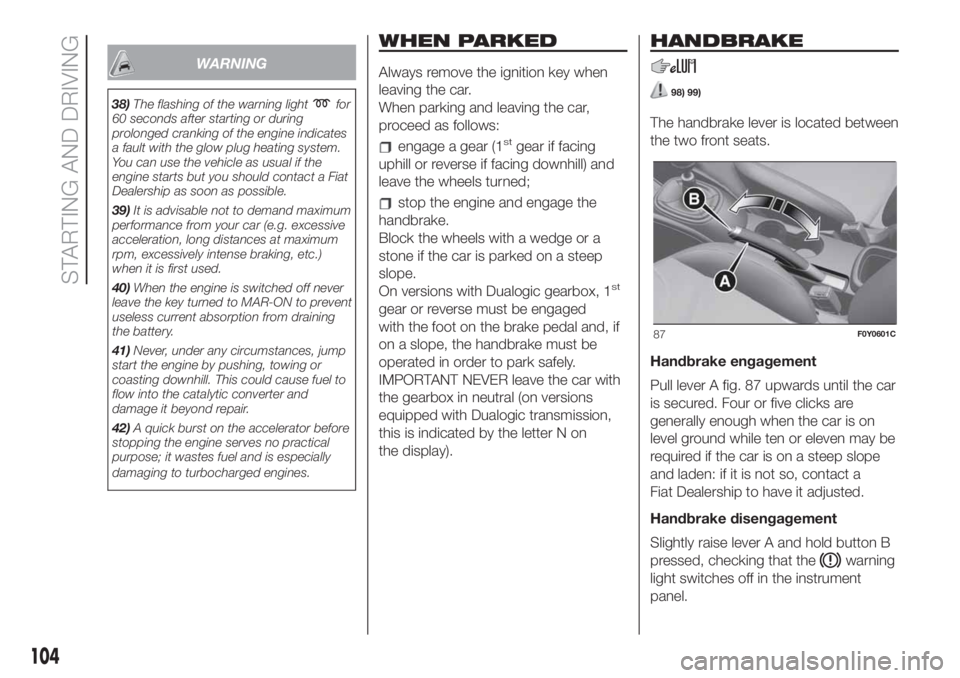
The handbrake lever is located between
the two front seats.
Handbrake engagement
Pull lever A fig. 87 upwards until the car
is secured. Four or five clicks are
generally enough when the car is on
level ground while ten or eleven may be
required if the car is on a steep slope
and laden: if it is not so, contact a
Fiat Dealership to have it adjusted.
Handbrake disengagement
Slightly raise lever A and hold button B
pressed, checking that the
warning
light switches off in the instrument
panel.
87F0Y0601C
104
STARTING AND DRIVING
Page 120 of 248
Any electric brake (or electric winch,
etc.) should be supplied directly by the
battery through a cable with a section
of at least 2.5 mm
2.
In addition to the electrical branches,
the car electrical system can only
be connected to the supply cable for an
electric brake and to the cable for an
internal light for the trailer, not
exceeding 15 W. For connections, use
the preset control unit with a battery
cable with section not less than 2.5
mm
2.
IMPORTANT The use of auxiliary loads
other than external lights (electric brake,
winch, etc.) must take place with
engine running.
IMPORTANT To install a tow hook
contact a Fiat Dealership.
WARNING
109)The ABS with which the car is
equipped will not control the braking
system of the trailer. Particular caution is
required on slippery roads.
110)Never modify the braking system of
the vehicle to control the trailer brake. The
trailer braking system must be fully
independent of the vehicle’s hydraulic
system.
111)After fitting, screw holes must be
sealed to prevent a exhaust gas inlet.
REFUELLING THE
VEHICLE
112) 113) 114)49)
Before refuelling, make sure that the
fuel type is correct. During refuelling
procedure, switch off the engine,
engage handbrake, rotate the ignition
key to STOP and do not smoke.
PETROL ENGINES
Only use unleaded petrol with a number
of octanes (R.O.N.) not lower than 95
(EN228 specification).
DIESEL ENGINES
Only use Diesel for motor vehicles
(EN590 specification).
When using or parking the car for a
long time in the mountains or cold
areas, it is advisable to refuel using
locally available Diesel. In this case, it is
also advisable to keep the tank over
50% full.
REFUELLING
PROCEDURE
Diesel and petrol versions
Proceed as follows:
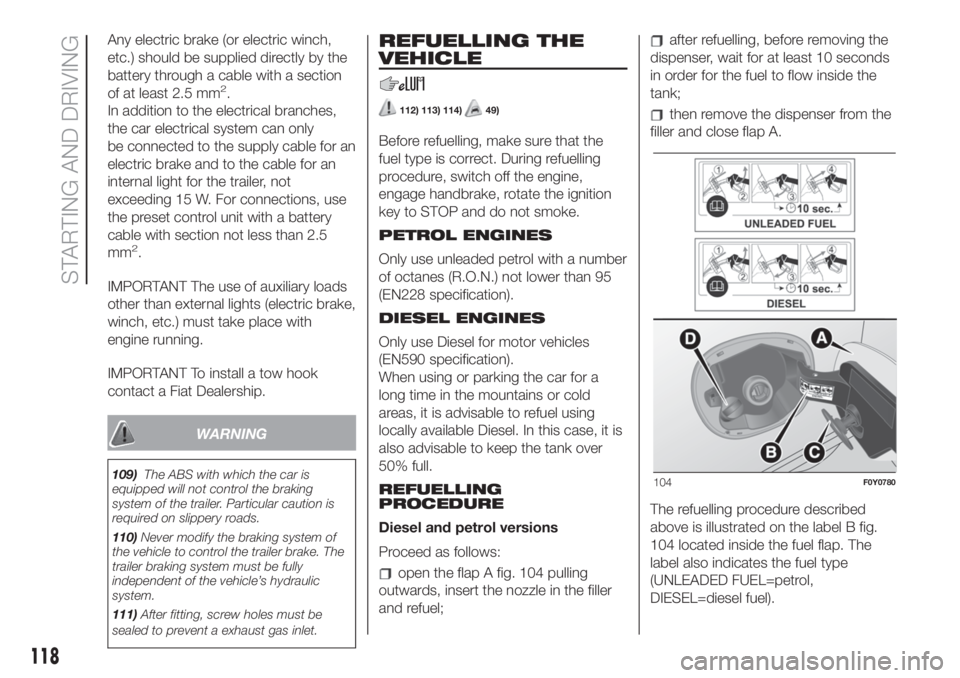
open the flap A fig. 104 pulling
outwards, insert the nozzle in the filler
and refuel;
after refuelling, before removing the
dispenser, wait for at least 10 seconds
in order for the fuel to flow inside the
tank;
then remove the dispenser from the
filler and close flap A.
The refuelling procedure described
above is illustrated on the label B fig.
104 located inside the fuel flap. The
label also indicates the fuel type
(UNLEADED FUEL=petrol,
DIESEL=diesel fuel).
104F0Y0780
118
STARTING AND DRIVING
Page 122 of 248

set the ignition device to MAR (it is
not necessary to start the engine);
wait for the indication on the
instrument panel to switch off before
moving the car. The indication may stay
on for a few seconds to approximately
half a minute. If the engine is started
and the car is moved, the indication will
remain on for longer. This will not
compromise engine operation;
if the AdBlue® was topped up when
the tank was empty, see the “Refuelling
” paragraph in the “Technical
Specifications” chapter and wait for 2
minutes before starting the engine.
IMPORTANT If AdBlue® is spilled out of
the filler neck, clean up well the area
and proceed to filling up again; If the
liquid crystallises, eliminate it with a
sponge and warm water.
IMPORTANT
DO NOT EXCEED THE
MAXIMUM LEVEL: this could cause
damage to the reservoir. UREA
freezes at under -11 °C. Although
the system is designed to operate
below the freezing point of the
UREA, it is advisable not to fill the
tank beyond the maximum level
because if the UREA freezes the
system can be damaged. Comply
with the instructions provided in
this section.
If the UREA is spilled on painted
surfaces or aluminium, immediately
clean the area with water and use
absorbent material to collect the
fluid that has been spilled on the
ground.
Do not try to start the engine if
UREA was accidentally added to
the Diesel fuel tank, this can result
in serious engine damage, contact
a Fiat Dealership.
Do not add additives or other
fluids to AdBlue®, doing so could
damage the system.
The use of non-conforming or
degraded AdBlue® may lead to
indications appearing on the
instrument panel display (see
“Warning lights and messages"
paragraph in the “Knowing the
instrument panel” chapter).
Never pour AdBlue® into
another container: it could be
contaminated.
In case of damage to the
sewage system of exhaust gas
resulting from the use of additives /
tap water, the introduction of diesel
fuel, or at least by not fulfilling the
requirements, the warranty expires.
If the AdBlue® runs out, see
“Warning lights and messages"
paragraph in the “Knowing the
instrument panel” chapter to
continue using the vehicle normally.
AdBlue® UREA) storage
AdBlue® is considered a very stable
product with a long shelf life. Stored at
temperatures LOWER than 32°C, it
has a shelf life of at least one year.
Follow the instructions on the label of
the container.
50)
Fuels - identification of vehicle
compatibility. Graphic symbol for
consumer information in
accordance with EN16942
The symbols shown below facilitated
recognising the correct fuel type to
be used on your car.
Before proceeding with refuelling,
check the symbols inside the fuel filler
flap (where provided) and compare
them with the symbols shown on the
fuel pump (where provided).
Symbols for petrol powered cars
106BENZINA-TARGH
120
STARTING AND DRIVING
Page 140 of 248

WARNING
53)Halogen bulbs must be handled
holding the metallic part only. Touching the
transparent part of the bulb with your
fingers may reduce the intensity of the
emitted light and even reduce the lifespan
of the bulb. In the event of accidental
contact, wipe the bulb with a cloth
moistened with alcohol and let the bulb
dry.
54)Where possible, it is advisable to have
bulbs changed at a Fiat Dealership. The
correct operation and direction of the
external lights are absolutely essential for
the safety of the car and of compliance
with the law.
REPLACING FUSES
130) 131) 132) 133) 134) 135)55)
FUSE LOCATION
Fuses are grouped together in three
fuseboxes located in the engine
compartment, under the dashboard
and inside the boot.
ENGINE COMPARTMENT
CONTROL UNIT
To access the fuses unscrew the two
screws A fig. 148 and remove the cover
B in the direction shown by the arrow.
IMPORTANT Before removing cover
Bfig. 148 press and turn the two
bayonet screws A slowly anticlockwise
(using the flat tip screwdriver provided)
until unlocking them. This is shown
by the screw heads lifting.After replacing the fuse, make sure you
close cover B on the junction unit.
The fuseboxfig. 149 is located by the
side of the battery.
148F0Y0071C
149F0Y0072C
138
IN AN EMERGENCY