ECU FIAT 500L 2019 Owner handbook (in English)
[x] Cancel search | Manufacturer: FIAT, Model Year: 2019, Model line: 500L, Model: FIAT 500L 2019Pages: 248, PDF Size: 5.74 MB
Page 5 of 248
“CYBERSECURITY” DEVICES
The car is equipped with security devices developed according to the technological standards currently applied in the
automotive industry to protect the onboard electronic systems from hacking attempts. The purpose of these security devices is
to minimise the risk of cyber-attacks or the installation of viruses or malware which could compromise the performance of the
car and/or allow stealing of personal data of the buyers and/or users and/or unauthorised dissemination of said information.
The car's purchaser must not remove, modify or tamper with these anti-hacking security devices. The Manufacturer will
therefore not be liable for negative consequences and/or damage to the vehicle and/or to the buyer and/or to third parties
deriving from the removal, modification or alteration of the security devices performed by the car's purchaser and/or user.
Page 19 of 248
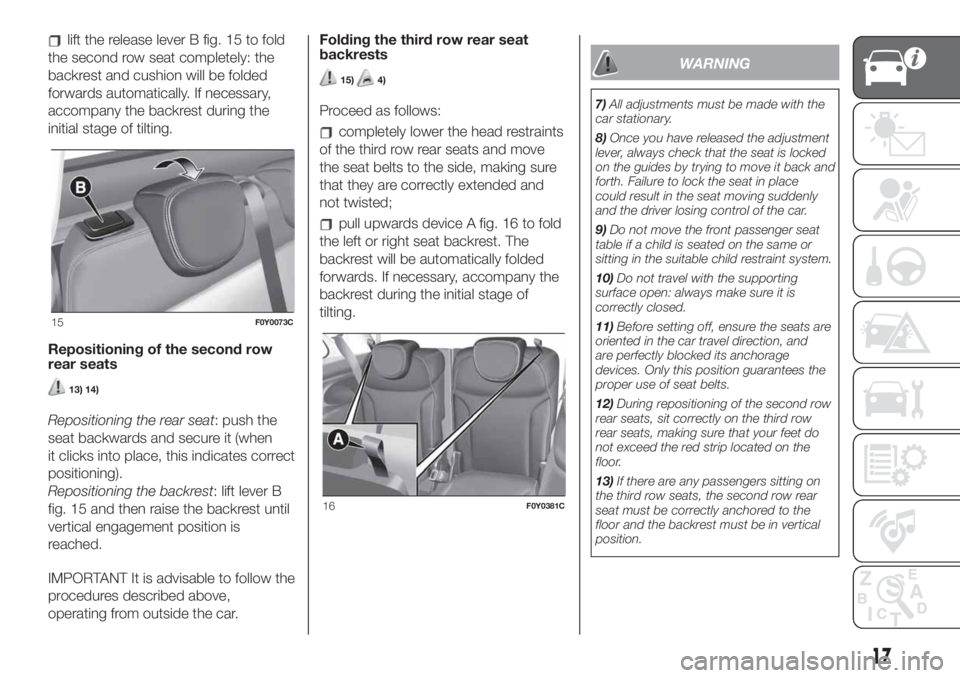
lift the release lever B fig. 15 to fold
the second row seat completely: the
backrest and cushion will be folded
forwards automatically. If necessary,
accompany the backrest during the
initial stage of tilting.
Repositioning of the second row
rear seats
13) 14)
Repositioning the rear seat: push the
seat backwards and secure it (when
it clicks into place, this indicates correct
positioning).
Repositioning the backrest: lift lever B
fig. 15 and then raise the backrest until
vertical engagement position is
reached.
IMPORTANT It is advisable to follow the
procedures described above,
operating from outside the car.Folding the third row rear seat
backrests
15)4)
Proceed as follows:
completely lower the head restraints
of the third row rear seats and move
the seat belts to the side, making sure
that they are correctly extended and
not twisted;
pull upwards device A fig. 16 to fold
the left or right seat backrest. The
backrest will be automatically folded
forwards. If necessary, accompany the
backrest during the initial stage of
tilting.
WARNING
7)All adjustments must be made with the
car stationary.
8)Once you have released the adjustment
lever, always check that the seat is locked
on the guides by trying to move it back and
forth. Failure to lock the seat in place
could result in the seat moving suddenly
and the driver losing control of the car.
9)Do not move the front passenger seat
table if a child is seated on the same or
sitting in the suitable child restraint system.
10)Do not travel with the supporting
surface open: always make sure it is
correctly closed.
11)Before setting off, ensure the seats are
oriented in the car travel direction, and
are perfectly blocked its anchorage
devices. Only this position guarantees the
proper use of seat belts.
12)During repositioning of the second row
rear seats, sit correctly on the third row
rear seats, making sure that your feet do
not exceed the red strip located on the
floor.
13)If there are any passengers sitting on
the third row seats, the second row rear
seat must be correctly anchored to the
floor and the backrest must be in vertical
position.
15F0Y0073C
16F0Y0381C
17
Page 20 of 248
14)Make sure the backrest is properly
secured at both sides to prevent it moving
forward in the event of sharp braking,
with possible impact with the occupants. A
metallic click is heard when locking is
correct.
15)Do not move the seat when a child is
sitting in the car.
WARNING
2)The fabric upholstery of the seats has
been designed to withstand long-term
wear deriving from normal use of the car.
Some precautions are however required.
Avoid prolonged and/or excessive rubbing
against clothing accessories such as
metal buckles and Velcro strips which, by
applying a high pressure on the fabric in
a small area, could cause it to break,
thereby damaging the upholstery.
3)Before tilting the front passenger seat
table fully, remove any objects laid on it.
4)Before tilting the seat backrest fully,
remove any objects laid on it.
HEAD RESTRAINTS
ADJUSTMENTS
16)
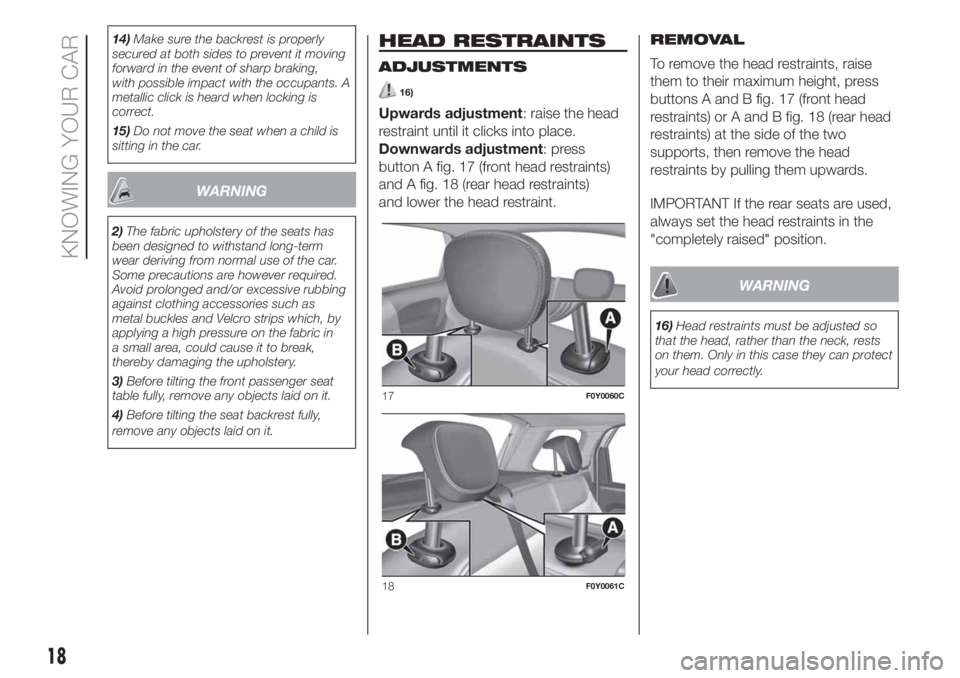
Upwards adjustment: raise the head
restraint until it clicks into place.
Downwards adjustment: press
button A fig. 17 (front head restraints)
and A fig. 18 (rear head restraints)
and lower the head restraint.REMOVAL
To remove the head restraints, raise
them to their maximum height, press
buttons A and B fig. 17 (front head
restraints) or A and B fig. 18 (rear head
restraints) at the side of the two
supports, then remove the head
restraints by pulling them upwards.
IMPORTANT If the rear seats are used,
always set the head restraints in the
"completely raised" position.
WARNING
16)Head restraints must be adjusted so
that the head, rather than the neck, rests
on them. Only in this case they can protect
your head correctly.
17F0Y0060C
18F0Y0061C
18
KNOWING YOUR CAR
Page 40 of 248
"CARGO MAGIC SPACE"
(for versions/markets, where provided)
14)
The "Cargo Magic Space" adjustable
load platform can be adjusted to three
different heights:
Position 0 (platform completely
lowered)
Position 1 (platform at threshold
level)
Position 2 (platform completely
raised)
Load platform tilting
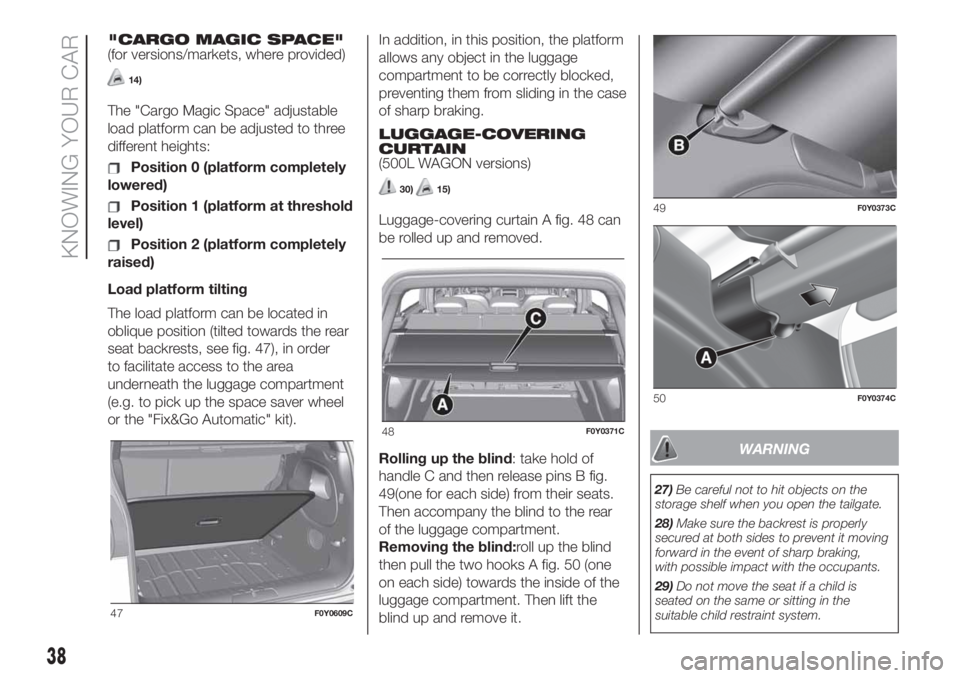
The load platform can be located in
oblique position (tilted towards the rear
seat backrests, see fig. 47), in order
to facilitate access to the area
underneath the luggage compartment
(e.g. to pick up the space saver wheel
or the "Fix&Go Automatic" kit).In addition, in this position, the platform
allows any object in the luggage
compartment to be correctly blocked,
preventing them from sliding in the case
of sharp braking.
LUGGAGE-COVERING
CURTAIN
(500L WAGON versions)
30)15)
Luggage-covering curtain A fig. 48 can
be rolled up and removed.
Rolling up the blind: take hold of
handle C and then release pins B fig.
49(one for each side) from their seats.
Then accompany the blind to the rear
of the luggage compartment.
Removing the blind:roll up the blind
then pull the two hooks A fig. 50 (one
on each side) towards the inside of the
luggage compartment. Then lift the
blind up and remove it.
WARNING
27)Be careful not to hit objects on the
storage shelf when you open the tailgate.
28)Make sure the backrest is properly
secured at both sides to prevent it moving
forward in the event of sharp braking,
with possible impact with the occupants.
29)Do not move the seat if a child is
seated on the same or sitting in the
suitable child restraint system.
47F0Y0609C
48F0Y0371C
49F0Y0373C
50F0Y0374C
38
KNOWING YOUR CAR
Page 41 of 248
30)In the event of an accident or sharp
braking, any object placed on the curtain
may be projected backwards in the
passenger compartment, and risk to hurt
the occupants.
31)Abrupt braking or occasional impacts
may cause sudden movements of the load
with consequent situations of hazard for
the driver and passengers: before setting
off, secure the load tightly using the hooks
provided. For securing use cables, ropes
or belts strong enough to hold the items to
be secured.
WARNING
13)Before tilting the seat backrest fully,
remove any objects laid on it.
14)The dimensions of the platform permit
a maximum capacity of distributed weight
of 70 kg (in position 1) or 40 kg (in position
2): do not load objects with a higher
weight.
15)To avoid damaging the blind, do not
place heavy objects on it.
DUALDRIVE
ELECTRIC POWER
STEERING
(for versions/markets, where provided)
This only operates with the ignition
key turned to MAR and engine running.
Electric power steering allows the
force required at the steering wheel to
be adapted to the driving conditions.
IMPORTANT When turning the ignition
key quickly, full power steering
functionality can be achieved after a
few seconds.
IMPORTANT During parking
manoeuvres requiring a lot of steering,
the steering may become harder; this is
normal and is due to the intervention
of the system to protect the electric
steering motor from overheating. No
repair intervention is needed in this
case. When the car is used again, the
power steering will work normally again.IMPORTANT The Dualdrive electric
power steering provides an electronic
damping effect when approaching
the end of travel. In some manoeuvring
conditions, the steering wheel may
perform an additional small rotation until
reaching its mechanical stop. This
behaviour is normal and is intended to
prevent excessive impacts with the
mechanical components located inside
the device.
POWER STEERING
ACTIVATION/
DEACTIVATION
32) 33)
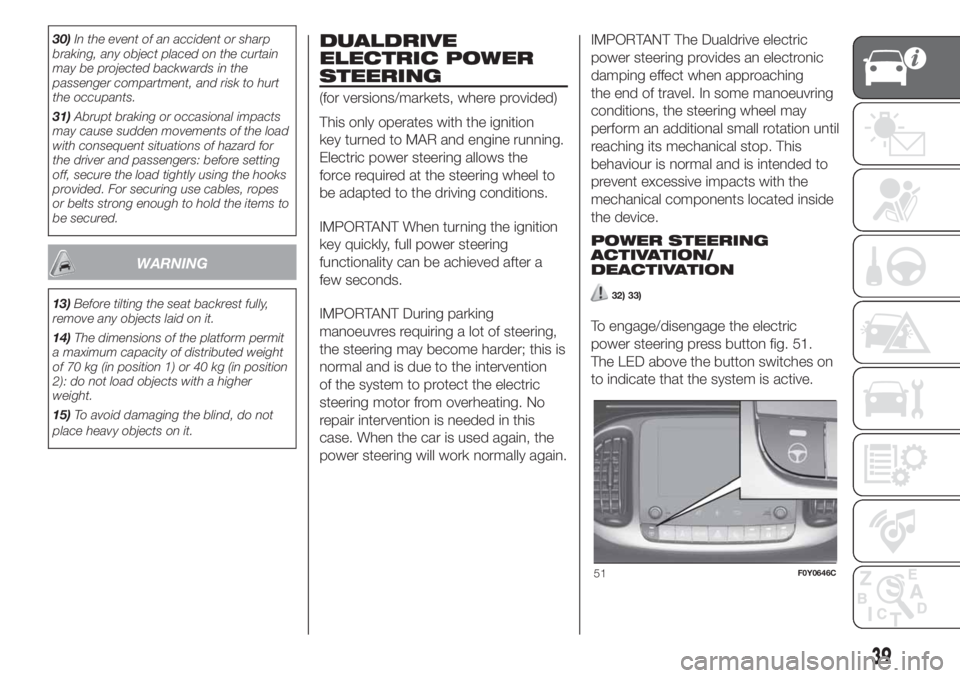
To engage/disengage the electric
power steering press button fig. 51.
The LED above the button switches on
to indicate that the system is active.
51F0Y0646C
39
Page 47 of 248
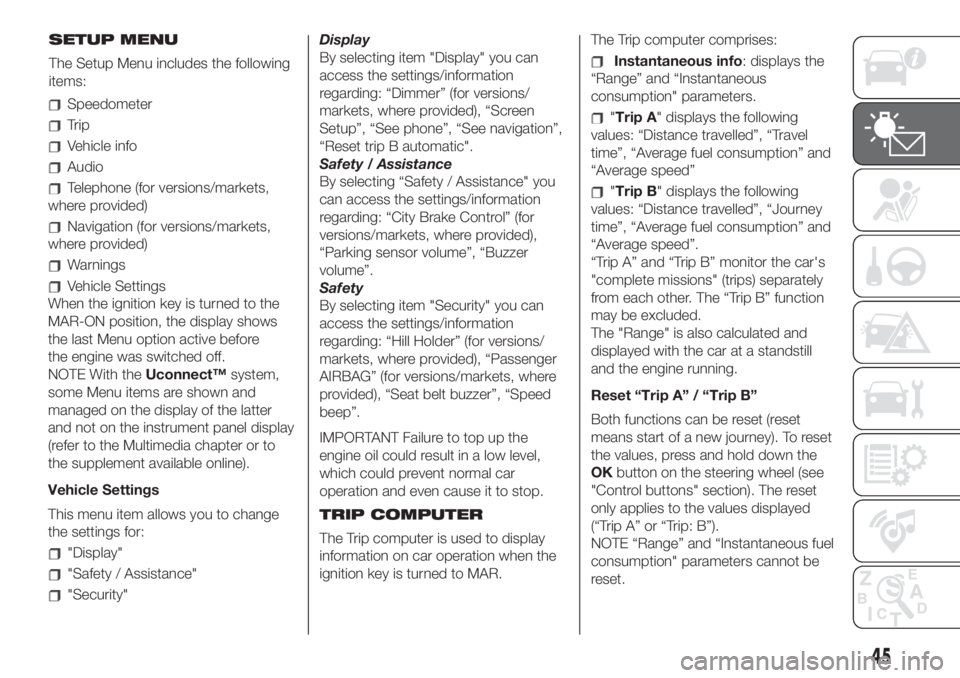
Speedometer
Trip
Vehicle info
Audio
Telephone (for versions/markets,
where provided)
Navigation (for versions/markets,
where provided)
Warnings
Vehicle Settings
When the ignition key is turned to the
MAR-ON position, the display shows
the last Menu option active before
the engine was switched off.
NOTE With theUconnect™system,
some Menu items are shown and
managed on the display of the latter
and not on the instrument panel display
(refer to the Multimedia chapter or to
the supplement available online).
Vehicle Settings
This menu item allows you to change
the settings for:
"Display"
"Safety / Assistance"
"Security"Display
By selecting item "Display" you can
access the settings/information
regarding: “Dimmer” (for versions/
markets, where provided), “Screen
Setup”, “See phone”, “See navigation”,
“Reset trip B automatic".
Safety / Assistance
By selecting “Safety / Assistance" you
can access the settings/information
regarding: “City Brake Control” (for
versions/markets, where provided),
“Parking sensor volume”, “Buzzer
volume”.
Safety
By selecting item "Security" you can
access the settings/information
regarding: “Hill Holder” (for versions/
markets, where provided), “Passenger
AIRBAG” (for versions/markets, where
provided), “Seat belt buzzer”, “Speed
beep”.
IMPORTANT Failure to top up the
engine oil could result in a low level,
which could prevent normal car
operation and even cause it to stop.
TRIP COMPUTER
The Trip computer is used to display
information on car operation when the
ignition key is turned to MAR.The Trip computer comprises:
Instantaneous info: displays the
“Range” and “Instantaneous
consumption" parameters.
"Trip A" displays the following
values: “Distance travelled”, “Travel
time”, “Average fuel consumption” and
“Average speed”
"Trip B" displays the following
values: “Distance travelled”, “Journey
time”, “Average fuel consumption” and
“Average speed”.
“Trip A” and “Trip B” monitor the car's
"complete missions" (trips) separately
from each other. The “Trip B” function
may be excluded.
The "Range" is also calculated and
displayed with the car at a standstill
and the engine running.
Reset “Trip A” / “Trip B”
Both functions can be reset (reset
means start of a new journey). To reset
the values, press and hold down the
OKbutton on the steering wheel (see
"Control buttons" section). The reset
only applies to the values displayed
(“Trip A” or “Trip: B”).
NOTE “Range” and “Instantaneous fuel
consumption" parameters cannot be
reset.
45
SETUP MENU
The Setup Menu includes the following
items:
Page 85 of 248
Children must be seated safely and
comfortably. As far as the
characteristics of the child seats used
allow, you are advised to keep children
in rear facing child seats for as long
as possible (at least until 3–4 years old),
since this is the most protected
position in the event of an impact.
The choice of the most suitable child
restraint system depends on the weight
and size of the child. There are various
types of child restraint systems, which
can be secured to the car by means
of the seat belts or with the ISOFIX/
i-Size anchoring points. It is
recommended to always choose the
restraint system most suitable for
the child; for this reason always refer to
the Owner Handbook provided with
the child restraint system, to be sure
that it is of the right type for the children
it is intended for.In Europe the characteristics of child
restraint systems are ruled by the
regulation ECE-R44, dividing them into
five weight groups:
Group Weight range
Group 0 up to 10 kg in weight
Group 0+ up to 13 kg in weight
Group 1 9-18 kg
Group 2 15 - 25 kg
Group 3 22 - 36 kg
The ECE-R44 standard was recently
paired with the ECE R-129 regulation,
which defines the features of the new
i-Size child restraint systems (see
the "Suitability of passenger seats for
i-Size child restraint system use"
paragraph for more information).
All restraint devices must bear the
type-approval data, together with the
control mark, on a label solidly fixed to
the child restraint system which must
never be removed.
Lineaccessori MOPAR
®includes child
restraint systems for each weight
group. These devices are
recommended having been specifically
designed for Fiat vehicles.IMPORTANT For correct installation on
the vehicle, some universal child
restraint systems require an accessory
(base) sold separately by the restraint
system's producer. Therefore, FCA
recommends confirming the retailer if
the desired child seat can be installed in
the car by having it done, before
buying the seat.
500L PRO versions
IMPORTANT The Highway Code
forbids transporting children on this
version, regardless of the child restraint
system: seat, ISOFIX/i-Size seat and
seat belts. This limitation also applies to
rear seats.
INSTALLING A CHILD
CARSEAT WITH
SEATBELTS
The Universal child restraint systems
installed with the seat belts only are
type-approved on the basis of the ECE
R44 standard and are divided into
various weight groups.
500L WAGON versions
Only forward facing child restraint
systems in Group 1, 2, 3 can be fitted
on the third row of rear seats.
83
Page 86 of 248
IMPORTANT The figures are indicative
and provided for assembly purposes
only. Fit the child restraint system
according to the instructions, which
must be included.
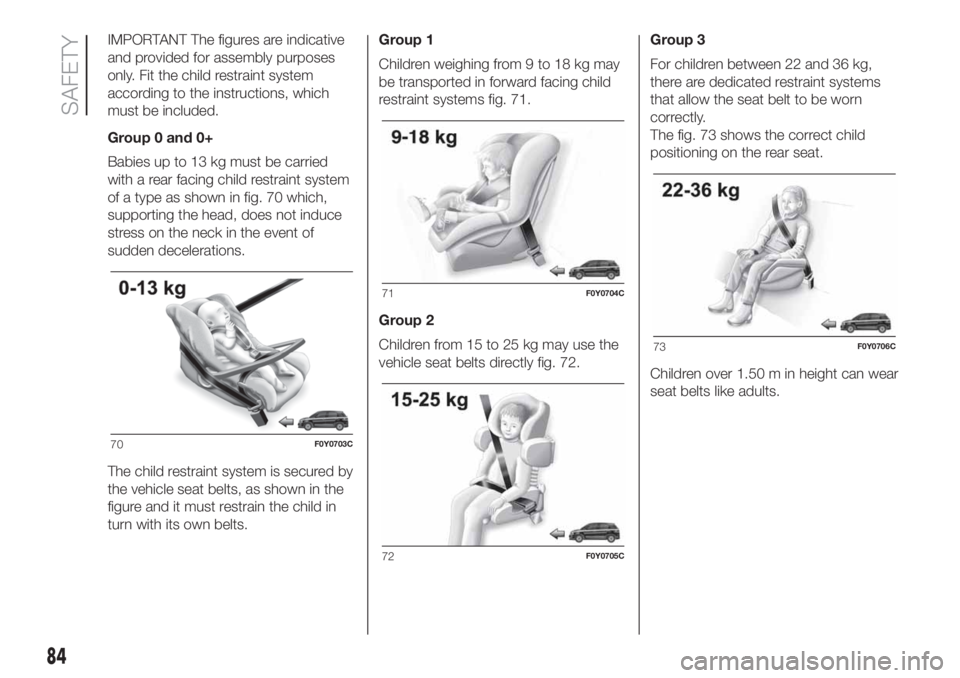
Group 0 and 0+
Babies up to 13 kg must be carried
with a rear facing child restraint system
of a type as shown in fig. 70 which,
supporting the head, does not induce
stress on the neck in the event of
sudden decelerations.
The child restraint system is secured by
the vehicle seat belts, as shown in the
figure and it must restrain the child in
turn with its own belts.Group 1
Children weighing from 9 to 18 kg may
be transported in forward facing child
restraint systems fig. 71.
Group 2
Children from 15 to 25 kg may use the
vehicle seat belts directly fig. 72.Group 3
For children between 22 and 36 kg,
there are dedicated restraint systems
that allow the seat belt to be worn
correctly.
The fig. 73 shows the correct child
positioning on the rear seat.
Children over 1.50 m in height can wear
seat belts like adults.
70F0Y0703C
71F0Y0704C
72F0Y0705C
73F0Y0706C
84
SAFETY
Page 97 of 248
72)Incorrect fitting of the child restraint
system may result in an inefficient
protection system. In the event of an
accident the child restraint system may
become loose and the child may be
injured, even fatally. When fitting a restraint
system for newborns or children, strictly
comply with the instructions provided
by the Manufacturer.
73)When the child restraint system is not
used, secure it with the seat belt or with
the ISOFIX anchorages, or remove it from
the vehicle. Do not leave it unsecured
inside the passenger compartment. This
way, in the case of sudden braking or
an accident, it will not cause injuries to the
occupants.
74)After installing a child restraint system,
do not move the seat: always remove
the child restraint system before making
any adjustment.
75)Always make sure that the chest
section of the seat belt does not pass
under the arms or behind the back of the
child. In the event of an accident the seat
belt will not be able to secure the child,
with the risk of injury, including fatal injury.
Therefore the child must always wear
the seat belt correctly.
76)Do not use the same lower anchoring
to install more than one child restraint
system.
77)If a Universal ISOFIX child seat system
is not fixed to all three anchorages, it will
not be able to protect the child correctly. In
a crash, the child could be seriously or
fatally injured.78)Fit the child restraint system when the
car is stationary. The child restraint system
is correctly fixed to the brackets when
you hear the click. Follow the instructions
for assembly, disassembly and positioning
that the Manufacturer must supply with
the child restraint system.SUPPLEMENTARY
RESTRAINT SYSTEM
(SRS) - AIRBAG
The car is equipped with:
driver front airbag;
passenger front airbag;
driver side knee bag (for versions/
markets, where provided);
front side bags for pelvis, chest and
shoulder protection of driver and
passenger (for versions/markets, where
provided);
side bags for head protection of
front seat passengers and rear side
seat passengers (window bag).
FRONT AIRBAGS
The front driver/passenger airbags and
the driver's knee bag (for versions/
markets, where provided) protect the
front seat occupants in the event of
frontal impacts of medium/high severity,
by placing the bag between the
occupant and the steering wheel or
dashboard.
Non-activation in other types of crash
(side-on collisions, rear shunts,
roll-overs, etc...) is therefore not a sign
of system malfunction.
95
Page 106 of 248
WARNING
38)The flashing of the warning lightfor
60 seconds after starting or during
prolonged cranking of the engine indicates
a fault with the glow plug heating system.
You can use the vehicle as usual if the
engine starts but you should contact a Fiat
Dealership as soon as possible.
39)It is advisable not to demand maximum
performance from your car (e.g. excessive
acceleration, long distances at maximum
rpm, excessively intense braking, etc.)
when it is first used.
40)When the engine is switched off never
leave the key turned to MAR-ON to prevent
useless current absorption from draining
the battery.
41)Never, under any circumstances, jump
start the engine by pushing, towing or
coasting downhill. This could cause fuel to
flow into the catalytic converter and
damage it beyond repair.
42)A quick burst on the accelerator before
stopping the engine serves no practical
purpose; it wastes fuel and is especially
damaging to turbocharged engines.
WHEN PARKED
Always remove the ignition key when
leaving the car.
When parking and leaving the car,
proceed as follows:
engage a gear (1stgear if facing
uphill or reverse if facing downhill) and
leave the wheels turned;
stop the engine and engage the
handbrake.
Block the wheels with a wedge or a
stone if the car is parked on a steep
slope.
On versions with Dualogic gearbox, 1
st
gear or reverse must be engaged
with the foot on the brake pedal and, if
on a slope, the handbrake must be
operated in order to park safely.
IMPORTANT NEVER leave the car with
the gearbox in neutral (on versions
equipped with Dualogic transmission,
this is indicated by the letter N on
the display).
HANDBRAKE
98) 99)
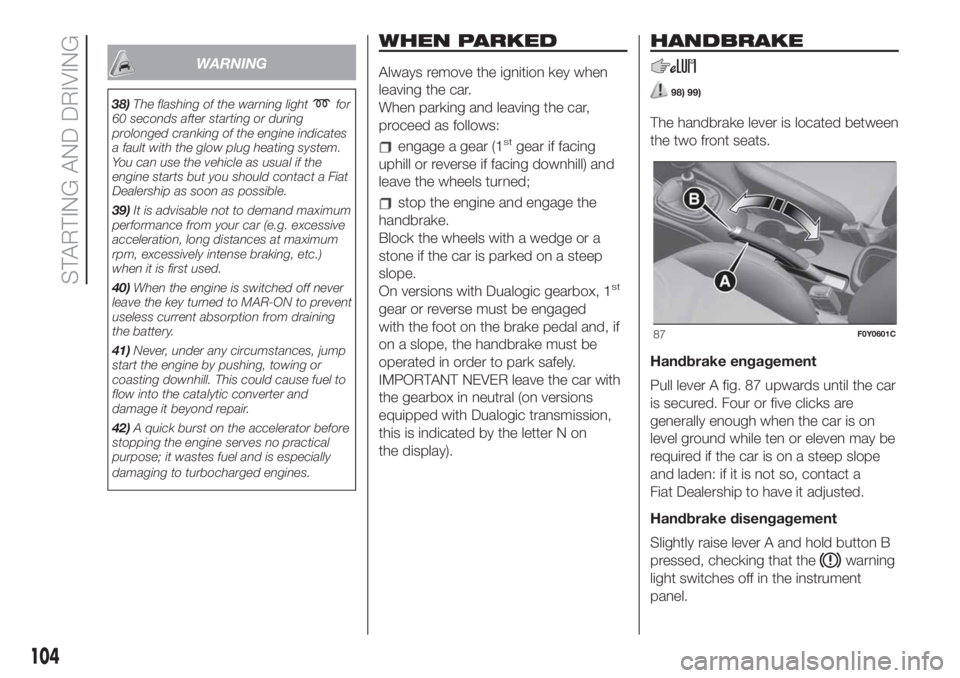
The handbrake lever is located between
the two front seats.
Handbrake engagement
Pull lever A fig. 87 upwards until the car
is secured. Four or five clicks are
generally enough when the car is on
level ground while ten or eleven may be
required if the car is on a steep slope
and laden: if it is not so, contact a
Fiat Dealership to have it adjusted.
Handbrake disengagement
Slightly raise lever A and hold button B
pressed, checking that the
warning
light switches off in the instrument
panel.
87F0Y0601C
104
STARTING AND DRIVING