start stop button FIAT 500L 2019 Owner handbook (in English)
[x] Cancel search | Manufacturer: FIAT, Model Year: 2019, Model line: 500L, Model: FIAT 500L 2019Pages: 248, PDF Size: 5.74 MB
Page 14 of 248
THE FIAT CODE
SYSTEM
This is an electronic engine locking
system which increases protection
against attempted thefts of the car. It is
automatically activated when the
ignition key is removed.
There is an electronic device in each
key which can identify the signal
emitted, when the engine is started,
from an aerial built into the ignition
switch. The signal is the "password",
different every time the car is started,
through which the control unit
recognises the key and enables
starting.
OPERATION
Each time the car is started by turning
the ignition key to MAR, the Fiat CODE
system control unit sends a recognition
code to the Powertrain Control Module
to deactivate the immobiliser.
The code is sent only if the Fiat CODE
system control unit has acknowledged
the code received from the key.Each time the ignition key is turned to
STOP, the Fiat CODE system
deactivates the functions of the engine
control module. If, during starting,
the code is not correctly recognised,
the icon
appears on the instrument
panel display. In this case, turn the
key to STOP and then to MAR-ON; if it
is still locked, try again with the other
keys that come with the car. Contact a
Fiat Dealership if you still cannot start
the engine.
Activation of symbol while driving
If the
symbol illuminates, this
means that the system is running a
self-diagnosis (for example due to
a voltage drop). If the symbol remains
on, contact a Fiat Dealership.
KEYS
1)1)1)
MECHANICAL KEY
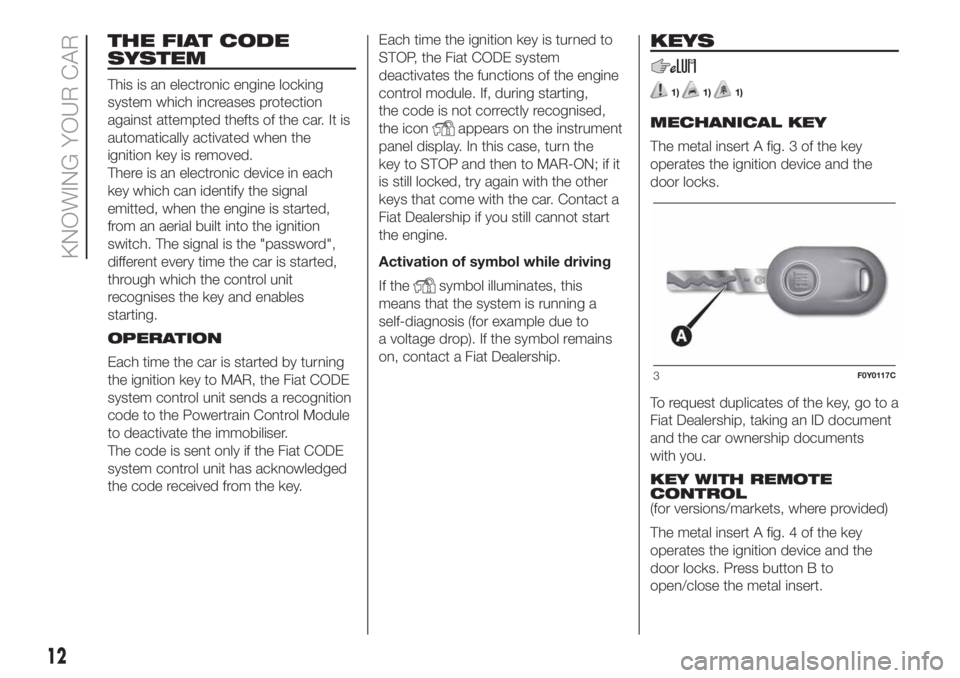
The metal insert A fig. 3 of the key
operates the ignition device and the
door locks.
To request duplicates of the key, go to a
Fiat Dealership, taking an ID document
and the car ownership documents
with you.
KEY WITH REMOTE
CONTROL
(for versions/markets, where provided)
The metal insert A fig. 4 of the key
operates the ignition device and the
door locks. Press button B to
open/close the metal insert.
3F0Y0117C
12
KNOWING YOUR CAR
Page 16 of 248
WARNING
1)Button B fig. 4should only be pressed
when the key is away from the body, in
particular from the eyes and from objects
that can be spoilt (e.g. clothes). Do not
leave the key unattended to avoid the
button being accidentally pressed while it
is being handled, e.g. by a child.
2)Once the safe lock system is engaged, it
is impossible to open the doors from
inside the car. Therefore, before getting out
of the car check that there is no-one left
on board.
WARNING
1)The electronic components inside the
key may be damaged if the key is
subjected to strong shocks. In order to
ensure complete efficiency of the
electronic devices inside the key, it should
never be exposed to direct sunlight.
WARNING
1)Used batteries should be disposed of,
as specified by law, in the special
containers, otherwise take them to a Fiat
Dealership, which will deal with their
disposal.
IGNITION DEVICE
3) 4) 5) 6)
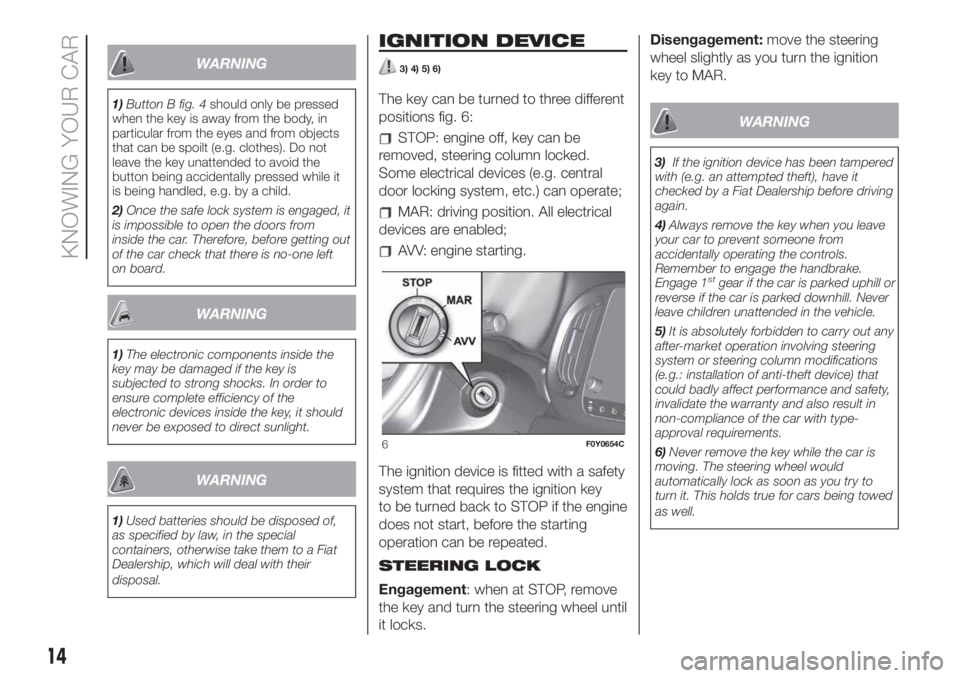
The key can be turned to three different
positions fig. 6:
STOP: engine off, key can be
removed, steering column locked.
Some electrical devices (e.g. central
door locking system, etc.) can operate;
MAR: driving position. All electrical
devices are enabled;
AVV: engine starting.
The ignition device is fitted with a safety
system that requires the ignition key
to be turned back to STOP if the engine
does not start, before the starting
operation can be repeated.
STEERING LOCK
Engagement: when at STOP, remove
the key and turn the steering wheel until
it locks.Disengagement:move the steering
wheel slightly as you turn the ignition
key to MAR.
WARNING
3)If the ignition device has been tampered
with (e.g. an attempted theft), have it
checked by a Fiat Dealership before driving
again.
4)Always remove the key when you leave
your car to prevent someone from
accidentally operating the controls.
Remember to engage the handbrake.
Engage 1
stgear if the car is parked uphill or
reverse if the car is parked downhill. Never
leave children unattended in the vehicle.
5)It is absolutely forbidden to carry out any
after-market operation involving steering
system or steering column modifications
(e.g.: installation of anti-theft device) that
could badly affect performance and safety,
invalidate the warranty and also result in
non-compliance of the car with type-
approval requirements.
6)Never remove the key while the car is
moving. The steering wheel would
automatically lock as soon as you try to
turn it. This holds true for cars being towed
as well.
6F0Y0654C
14
KNOWING YOUR CAR
Page 28 of 248
If the front and rear fog lights are on
when the engine is stopped, they will
switch off. When the engine is
restarted, the fog lights will remain off
until switched on again by pressing the
button.
AUTOMATIC LIGHTING
CONTROL (AUTOLIGHT)
(dusk sensor)
(for versions/markets, where provided)
This is an infrared LED sensor located
on the windscreen, which detects
variations in outside light levels.
Activation: turn ring nut A fig. 27 to
.
With dusk sensor active, with daytime
running lights (DRL) on, it is not
possible to keep the main beam
headlights on constantly; only flashing
is permitted. In these conditions, the
main beam headlights can be turned on
by turning the ring nut to
and
pushing the stalk towards the
dashboard; otherwise, wait until the
dusk sensor indicates a low light level
(dipped beam headlights on).
On automatic sensor controlled
deactivation, the dipped beam
headlights are deactivated first,
followed by the side lights a few
seconds later.IMPORTANT The sensor cannot detect
the presence of fog. These lights must
therefore be switched on manually in
these circumstances.
MAIN BEAM HEADLIGHTS
With ring nut in position
, push the
stalk forward toward the dashboard
(stable position) to turn on the lights.
The
warning light on the instrument
panel turns on.
The lights are switched off by pulling
the stalk towards the steering wheel.
FLASHING
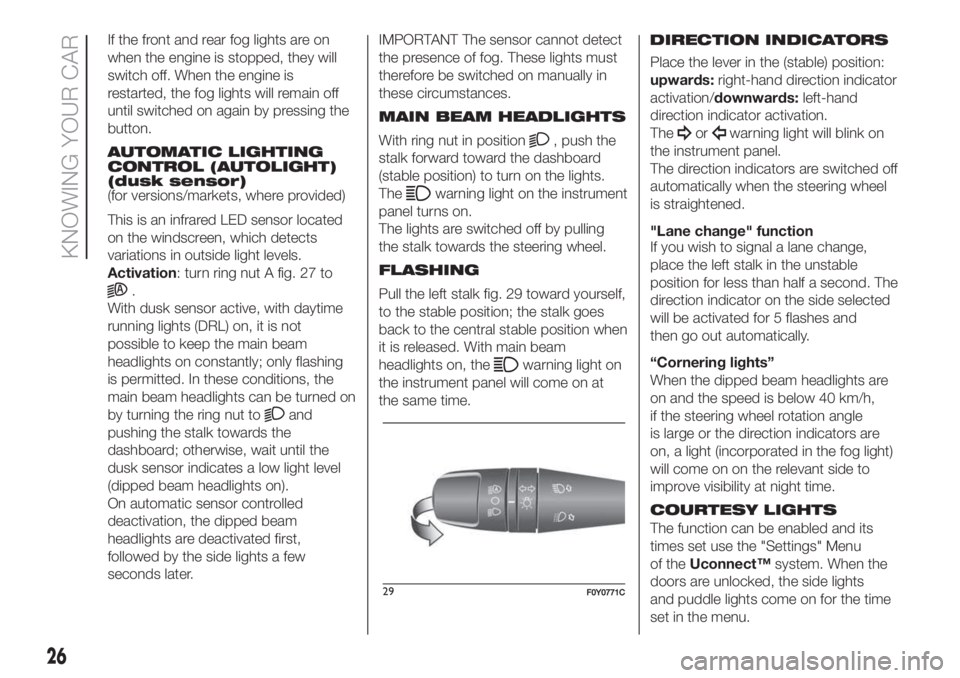
Pull the left stalk fig. 29 toward yourself,
to the stable position; the stalk goes
back to the central stable position when
it is released. With main beam
headlights on, the
warning light on
the instrument panel will come on at
the same time.DIRECTION INDICATORS
Place the lever in the (stable) position:
upwards:right-hand direction indicator
activation/downwards:left-hand
direction indicator activation.
The
orwarning light will blink on
the instrument panel.
The direction indicators are switched off
automatically when the steering wheel
is straightened.
"Lane change" function
If you wish to signal a lane change,
place the left stalk in the unstable
position for less than half a second. The
direction indicator on the side selected
will be activated for 5 flashes and
then go out automatically.
“Cornering lights”
When the dipped beam headlights are
on and the speed is below 40 km/h,
if the steering wheel rotation angle
is large or the direction indicators are
on, a light (incorporated in the fog light)
will come on on the relevant side to
improve visibility at night time.
COURTESY LIGHTS
The function can be enabled and its
times set use the "Settings" Menu
of theUconnect™system. When the
doors are unlocked, the side lights
and puddle lights come on for the time
set in the menu.
26
KNOWING YOUR CAR
")99;U;ZZY’
Page 36 of 248
To restore the starting condition of the
door locks (only if battery charge
restored) press the
button on the
remote control or the
button on the
dashboard or introduce the metal insert
of the ignition key in the driver's side
front door pawl and pull the door inner
handle.
INITIALISING THE DOOR
OPENING / CLOSING
MECHANISM
If the battery is disconnected or the
protection fuse blows, the door
opening/closing mechanism must be
initialised as follows:
close all the doors;
press thebutton on the remote
control or the button on the dashboard;
press thebutton on the remote
control or the button on the dashboard.
WARNING
24)Always use this device when carrying
children. After engaging the child lock
on both rear doors, check for effective
engagement by trying to open a door with
the internal handle.
WARNING
12)If the child lock was engaged and the
previously described locking procedure
carried out, operating the internal opening
handle will not open the door: in this case,
to open the door, the outside handle
must be used. The door central locking/
unlocking button
is not disabled by the
engagement of the emergency lock.
ELECTRIC WINDOWS
25)
OPERATION
These operate when the ignition key is
turned to MAR-ON and for about 3
minutes after the ignition key is turned
to STOP or removed unless one of
the front doors is opened.
DRIVE SIDE FRONT
DOOR CONTROLS
Versions with 4 electric windows
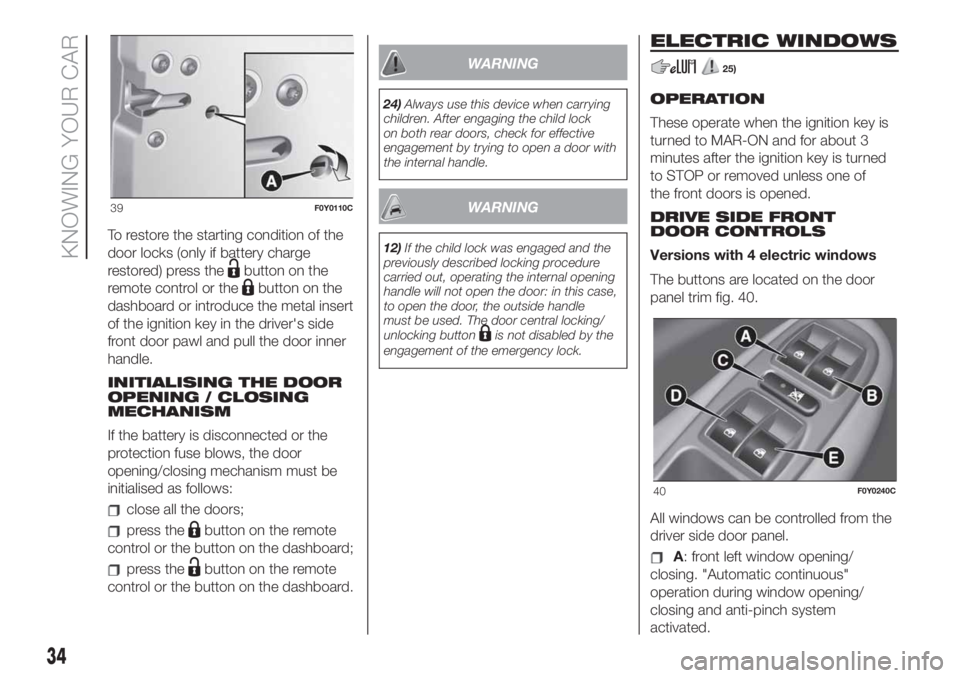
The buttons are located on the door
panel trim fig. 40.
All windows can be controlled from the
driver side door panel.
A: front left window opening/
closing. "Automatic continuous"
operation during window opening/
closing and anti-pinch system
activated.
39F0Y0110C
40F0Y0240C
34
KNOWING YOUR CAR
Page 46 of 248
DISPLAY
DESCRIPTION
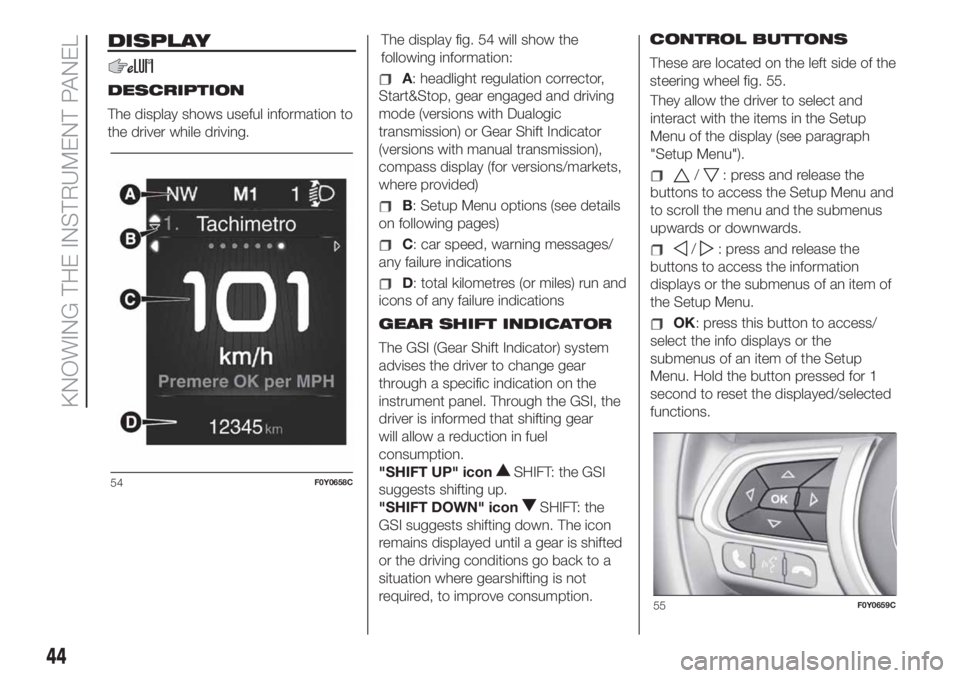
The display shows useful information to
the driver while driving.The display fig. 54 will show the
following information:A: headlight regulation corrector,
Start&Stop, gear engaged and driving
mode (versions with Dualogic
transmission) or Gear Shift Indicator
(versions with manual transmission),
compass display (for versions/markets,
where provided)
B: Setup Menu options (see details
on following pages)
C: car speed, warning messages/
any failure indications
D: total kilometres (or miles) run and
icons of any failure indications
GEAR SHIFT INDICATOR
The GSI (Gear Shift Indicator) system
advises the driver to change gear
through a specific indication on the
instrument panel. Through the GSI, the
driver is informed that shifting gear
will allow a reduction in fuel
consumption.
"SHIFT UP" icon
SHIFT: the GSI
suggests shifting up.
"SHIFT DOWN" icon
SHIFT: the
GSI suggests shifting down. The icon
remains displayed until a gear is shifted
or the driving conditions go back to a
situation where gearshifting is not
required, to improve consumption.CONTROL BUTTONS
These are located on the left side of the
steering wheel fig. 55.
They allow the driver to select and
interact with the items in the Setup
Menu of the display (see paragraph
"Setup Menu").
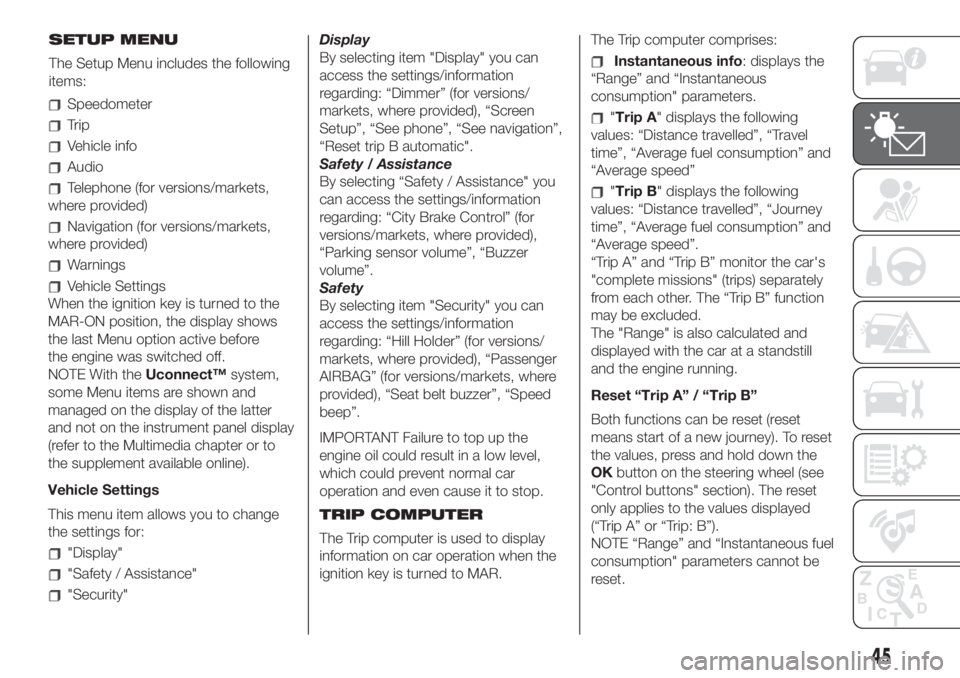
/: press and release the
buttons to access the Setup Menu and
to scroll the menu and the submenus
upwards or downwards.
/: press and release the
buttons to access the information
displays or the submenus of an item of
the Setup Menu.
OK: press this button to access/
select the info displays or the
submenus of an item of the Setup
Menu. Hold the button pressed for 1
second to reset the displayed/selected
functions.
54F0Y0658C
55F0Y0659C
44
KNOWING THE INSTRUMENT PANEL
Page 47 of 248
Speedometer
Trip
Vehicle info
Audio
Telephone (for versions/markets,
where provided)
Navigation (for versions/markets,
where provided)
Warnings
Vehicle Settings
When the ignition key is turned to the
MAR-ON position, the display shows
the last Menu option active before
the engine was switched off.
NOTE With theUconnect™system,
some Menu items are shown and
managed on the display of the latter
and not on the instrument panel display
(refer to the Multimedia chapter or to
the supplement available online).
Vehicle Settings
This menu item allows you to change
the settings for:
"Display"
"Safety / Assistance"
"Security"Display
By selecting item "Display" you can
access the settings/information
regarding: “Dimmer” (for versions/
markets, where provided), “Screen
Setup”, “See phone”, “See navigation”,
“Reset trip B automatic".
Safety / Assistance
By selecting “Safety / Assistance" you
can access the settings/information
regarding: “City Brake Control” (for
versions/markets, where provided),
“Parking sensor volume”, “Buzzer
volume”.
Safety
By selecting item "Security" you can
access the settings/information
regarding: “Hill Holder” (for versions/
markets, where provided), “Passenger
AIRBAG” (for versions/markets, where
provided), “Seat belt buzzer”, “Speed
beep”.
IMPORTANT Failure to top up the
engine oil could result in a low level,
which could prevent normal car
operation and even cause it to stop.
TRIP COMPUTER
The Trip computer is used to display
information on car operation when the
ignition key is turned to MAR.The Trip computer comprises:
Instantaneous info: displays the
“Range” and “Instantaneous
consumption" parameters.
"Trip A" displays the following
values: “Distance travelled”, “Travel
time”, “Average fuel consumption” and
“Average speed”
"Trip B" displays the following
values: “Distance travelled”, “Journey
time”, “Average fuel consumption” and
“Average speed”.
“Trip A” and “Trip B” monitor the car's
"complete missions" (trips) separately
from each other. The “Trip B” function
may be excluded.
The "Range" is also calculated and
displayed with the car at a standstill
and the engine running.
Reset “Trip A” / “Trip B”
Both functions can be reset (reset
means start of a new journey). To reset
the values, press and hold down the
OKbutton on the steering wheel (see
"Control buttons" section). The reset
only applies to the values displayed
(“Trip A” or “Trip: B”).
NOTE “Range” and “Instantaneous fuel
consumption" parameters cannot be
reset.
45
SETUP MENU
The Setup Menu includes the following
items:
Page 59 of 248
Green warning lights
Warning light What it means
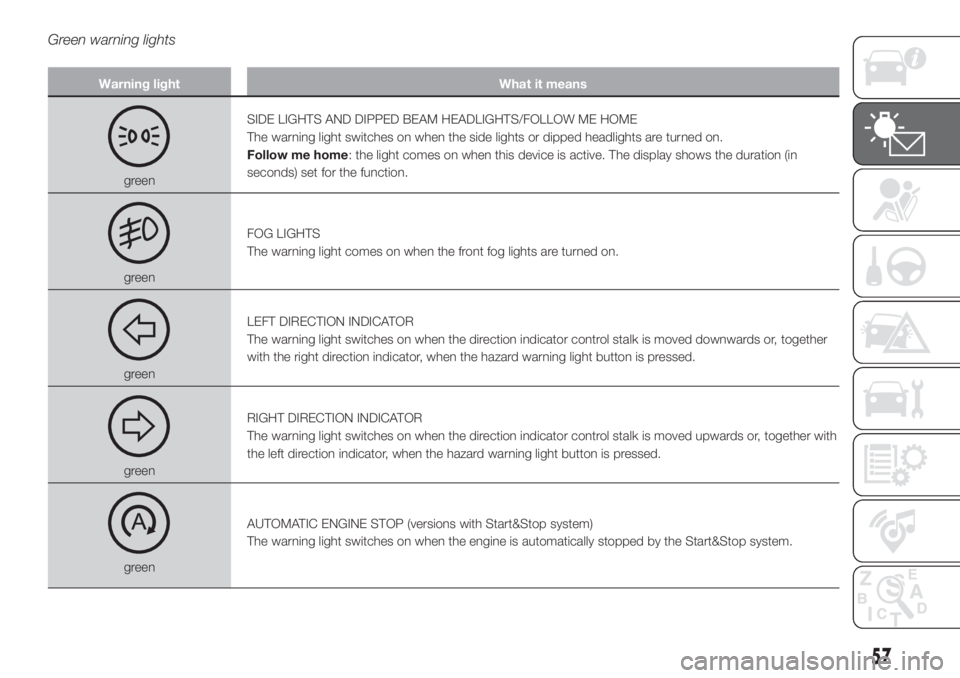
greenSIDE LIGHTS AND DIPPED BEAM HEADLIGHTS/FOLLOW ME HOME
The warning light switches on when the side lights or dipped headlights are turned on.
Follow me home: the light comes on when this device is active. The display shows the duration (in
seconds) set for the function.
greenFOG LIGHTS
The warning light comes on when the front fog lights are turned on.
greenLEFT DIRECTION INDICATOR
The warning light switches on when the direction indicator control stalk is moved downwards or, together
with the right direction indicator, when the hazard warning light button is pressed.
greenRIGHT DIRECTION INDICATOR
The warning light switches on when the direction indicator control stalk is moved upwards or, together with
the left direction indicator, when the hazard warning light button is pressed.
greenAUTOMATIC ENGINE STOP (versions with Start&Stop system)
The warning light switches on when the engine is automatically stopped by the Start&Stop system.
57
Page 78 of 248
The "Reset" procedure must be carried
out:
each time tyre pressure is modified;
when even only one tyre is changed;
when tyres are rotated/inverted;
when the space-saver wheel is
fitted.
Before carrying out the “Reset”
procedure, inflate the tyres to the rated
pressure values specified in the inflation
pressure table (see "Wheels" paragraph
in the "Technical specifications"
chapter).
If the “Reset” procedure is not carried
out, in all above cases, the
warning
light may give false indications on
one or more tyres.
To carry out the “Reset” procedure,
with the car stopped and the ignition
device at MAR, use the Setup Menu on
the display as follows:
go to "Vehicle info" and then to
"Reset tyres";
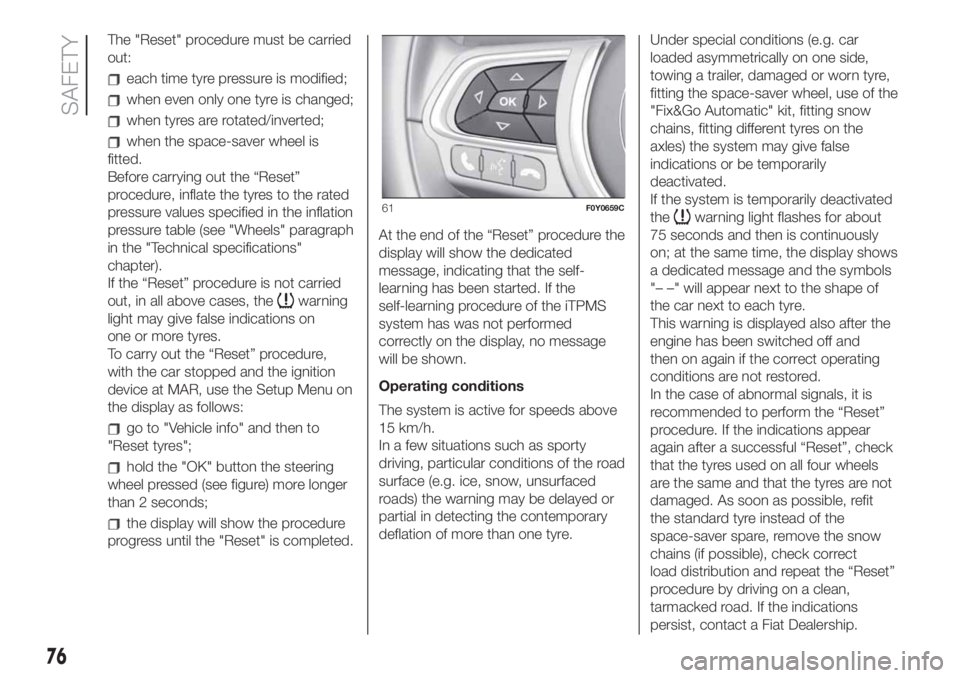
hold the "OK" button the steering
wheel pressed (see figure) more longer
than 2 seconds;
the display will show the procedure
progress until the "Reset" is completed.At the end of the “Reset” procedure the
display will show the dedicated
message, indicating that the self-
learning has been started. If the
self-learning procedure of the iTPMS
system has was not performed
correctly on the display, no message
will be shown.
Operating conditions
The system is active for speeds above
15 km/h.
In a few situations such as sporty
driving, particular conditions of the road
surface (e.g. ice, snow, unsurfaced
roads) the warning may be delayed or
partial in detecting the contemporary
deflation of more than one tyre.Under special conditions (e.g. car
loaded asymmetrically on one side,
towing a trailer, damaged or worn tyre,
fitting the space-saver wheel, use of the
"Fix&Go Automatic" kit, fitting snow
chains, fitting different tyres on the
axles) the system may give false
indications or be temporarily
deactivated.
If the system is temporarily deactivated
the
warning light flashes for about
75 seconds and then is continuously
on; at the same time, the display shows
a dedicated message and the symbols
"– –" will appear next to the shape of
the car next to each tyre.
This warning is displayed also after the
engine has been switched off and
then on again if the correct operating
conditions are not restored.
In the case of abnormal signals, it is
recommended to perform the “Reset”
procedure. If the indications appear
again after a successful “Reset”, check
that the tyres used on all four wheels
are the same and that the tyres are not
damaged. As soon as possible, refit
the standard tyre instead of the
space-saver spare, remove the snow
chains (if possible), check correct
load distribution and repeat the “Reset”
procedure by driving on a clean,
tarmacked road. If the indications
persist, contact a Fiat Dealership.61F0Y0659C
76
SAFETY
Page 106 of 248
WARNING
38)The flashing of the warning lightfor
60 seconds after starting or during
prolonged cranking of the engine indicates
a fault with the glow plug heating system.
You can use the vehicle as usual if the
engine starts but you should contact a Fiat
Dealership as soon as possible.
39)It is advisable not to demand maximum
performance from your car (e.g. excessive
acceleration, long distances at maximum
rpm, excessively intense braking, etc.)
when it is first used.
40)When the engine is switched off never
leave the key turned to MAR-ON to prevent
useless current absorption from draining
the battery.
41)Never, under any circumstances, jump
start the engine by pushing, towing or
coasting downhill. This could cause fuel to
flow into the catalytic converter and
damage it beyond repair.
42)A quick burst on the accelerator before
stopping the engine serves no practical
purpose; it wastes fuel and is especially
damaging to turbocharged engines.
WHEN PARKED
Always remove the ignition key when
leaving the car.
When parking and leaving the car,
proceed as follows:
engage a gear (1stgear if facing
uphill or reverse if facing downhill) and
leave the wheels turned;
stop the engine and engage the
handbrake.
Block the wheels with a wedge or a
stone if the car is parked on a steep
slope.
On versions with Dualogic gearbox, 1
st
gear or reverse must be engaged
with the foot on the brake pedal and, if
on a slope, the handbrake must be
operated in order to park safely.
IMPORTANT NEVER leave the car with
the gearbox in neutral (on versions
equipped with Dualogic transmission,
this is indicated by the letter N on
the display).
HANDBRAKE
98) 99)
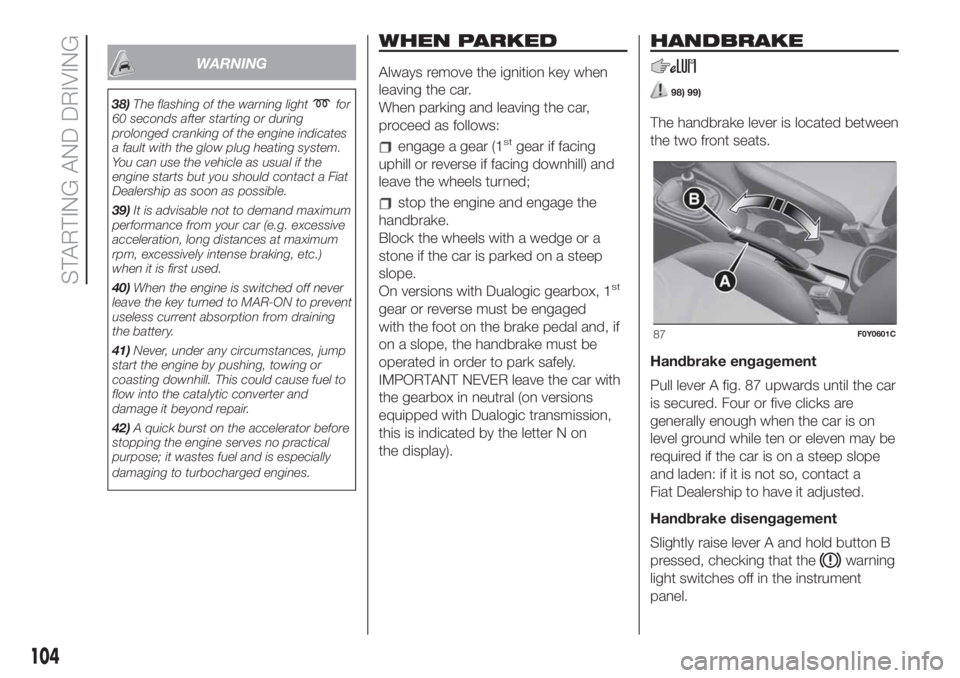
The handbrake lever is located between
the two front seats.
Handbrake engagement
Pull lever A fig. 87 upwards until the car
is secured. Four or five clicks are
generally enough when the car is on
level ground while ten or eleven may be
required if the car is on a steep slope
and laden: if it is not so, contact a
Fiat Dealership to have it adjusted.
Handbrake disengagement
Slightly raise lever A and hold button B
pressed, checking that the
warning
light switches off in the instrument
panel.
87F0Y0601C
104
STARTING AND DRIVING
Page 110 of 248
WARNING
101)If the engine fails to start with a gear
engaged, the potentially dangerous
situation due to the fact that the
transmission is automatically put in neutral
will be signalled by an acoustic signal.
WARNING
44)Avoid keeping your hand on this lever
except during gear change or AUTO/
MANUAL mode requests.
45)Using the paddles incorrectly (paddles
pushed towards the dashboard) could
break them.
START&STOP
SYSTEM
102) 103)46)
The Start&Stop system automatically
stops the engine whenever the car
is stationary and all the conditions for
automatic switch-off are met. The
engine is restarted when the driver
wants to move off.
In this way, the car efficiency is
increased, by reducing consumption,
dangerous gas emissions and sound
pollution.
OPERATING MODE
Stopping the engine
Versions with manual transmission
: with the car stationary, the engine
stops with the gears in neutral and the
clutch pedal released.
Versions with Dualogic
transmission: the engine stops if the
vehicle is at a standstill and the brake
pedal is pressed. This condition can be
maintained even if the brake pedal is
not depressed, if the gear lever is
in position N (Neutral).
NOTE The engine can only be stopped
automatically after exceeding about
10 km/h, to prevent the engine from
being repeatedly stopped when driving
at walking pace.The
warning light on the instrument
panel switches on to signal that the
engine has stopped.
Restarting the engine
Versions with manual transmission:
press the clutch pedal.
Versions with Dualogic
transmission: if the gear lever is in
position N (Neutral), place it in any other
gear, otherwise release the brake pedal
or move the gear lever to +, – or R.
MANUAL SYSTEM
ACTIVATION/
DEACTIVATION
To activate/deactivate the system
manually, press the
fig. 92 button.
LED off: system activated /LED on:
system deactivated.
WARNING
102)If the battery needs to be replaced,
always contact a Fiat Dealership. Replace
the battery with one of the same type
(HEAVY DUTY) and with the same
specifications.
108
STARTING AND DRIVING
IMPORTANT For versions/markets,
where provided, the system is
activated automatically whenever the
engine is started, regardless of the
condition (system on or off) present
before the engine was stopped.