handbrake FIAT 500L LIVING 2014 2.G User Guide
[x] Cancel search | Manufacturer: FIAT, Model Year: 2014, Model line: 500L LIVING, Model: FIAT 500L LIVING 2014 2.GPages: 420, PDF Size: 9.77 MB
Page 186 of 420
WARNING LIGHTS AND MESSAGES
WARNING LIGHTS AND MESSAGESGENERAL WARNINGS
The warning light switches on together with a
dedicated message and/or acoustic signal when
applicable. These indications areconcise and
precautionaryand, as such, must not be
considered as exhaustive and/or an alternative to the
information contained in this Owner Handbook,
which you are advised to read carefully in all cases. In
the event of a failure indication,always refer to
the contents of this chapter.
IMPORTANT Failure indications displayed are divided
into two categories:very seriousandless serious
failures.
Very seriousfailures are indicated by a repeated
and prolonged warning “cycle”.
Less seriousfailures are indicated by a shorter
warning “cycle”.
The displaying cycle of both failure categories can be
stopped by pressing the button
. The control
panel warning light will stay on until the cause of the
malfunction is eliminated.
BRAKE FLUID LOW (red) /
HANDBRAKE ENGAGED (red)
Turning the key to the MAR-ON position illuminates
the warning light, but it should switch off after a
few seconds.
LOW BRAKE FLUID LEVEL
The warning light turns on when the level of the
brake fluid in the reservoir falls below the minimum
level due to a possible leak in the circuit. On some
versions the display shows the dedicated message.
WARNING
If the
warning light switches on while
driving, stop immediately and contact
a Fiat Dealership.
HANDBRAKE ENGAGED
When the key is turned to MAR position, the
warning light switches on but should switch off after
a few seconds.
The warning light (or symbol on the display) switches
on when the handbrake is engaged. If the car is
moving the buzzer will also sound.
182GETTING TO KNOW
YOUR CAR
SAFETY
STARTING AND
DRIVINGWARNING LIGHTS
AND MESSAGESIN AN EMERGENCY
SERVICING AND
MAINTENANCE
TECHNICAL
SPECIFICATIONS
INDEX
Page 187 of 420
IMPORTANT If the warning light comes on when the
car is in motion, check that the handbrake is not
on.
EBD FAILURE (red)
(amber)
The simultaneous switching on of the
(red),
(amber) andESCwarning lights with the engine
on, indicates either a failure of the EBD system or
that the system is not available.
In this case, the rear wheels may suddenly lock and
the vehicle may swerve when braking sharply.
A dedicated message is displayed on certain versions.
Drive very carefully to the nearest Fiat Dealership
to have the system inspected immediately.
ABS SYSTEM FAILURE (amber)
Turning the key to the MAR-ON position illuminates
the warning light, but it should switch off after a
few seconds.
The warning light switches on (on some versions,
together with a message and a symbol on the display)
when the system is not efficient. In this case the
braking system maintains its efficiency unaltered but
without the advantage of the ABS system.
Drive carefully and contact a Fiat Dealership as soon
as possible.
AIRBAG FAILURE (red)
Turning the key to the MAR-ON position illuminates
the warning light, but it should switch off after a
few seconds.
The warning light switches on constantly (on some
versions, together with a message and a symbol
on the display) to indicate an airbag system fault.
WARNING
If the warning light
does not come on
when the key is turned to the MAR-ON
position or if it remains lit while driving, there
may be a problem with the airbag restraint
system. In this case, the airbags or pretensioners
may not be activated in the event of an
accident or, in a more limited number of cases,
may be activated when not necessary. Before
continuing, contact a Fiat Dealership
immediately to have the system checked.
183GETTING TO KNOW
YOUR CAR
SAFETY
STARTING AND
DRIVINGWARNING LIGHTS
AND MESSAGESIN AN EMERGENCY
SERVICING AND
MAINTENANCE
TECHNICAL
SPECIFICATIONS
INDEX
Page 203 of 420
JACK
Please note that:
❒the jack weight is 1,76 kg;
❒the jack requires no adjustment;
❒the jack cannot be repaired and in the event of a
fault it must be replaced by another original one;
❒no tool other than its cranking device may be
fitted on the jack.
To change a wheel, proceed as follows:
❒Stop the car in a position that is not dangerous for
oncoming traffic where you can change the wheel
safely. The ground must be flat and sufficiently
compact;
❒switch off the engine, pull up the handbrake and
engage the 1
stgear or reverse. Wear the reflective
safety jacket (compulsory by law) before getting
out of the car;
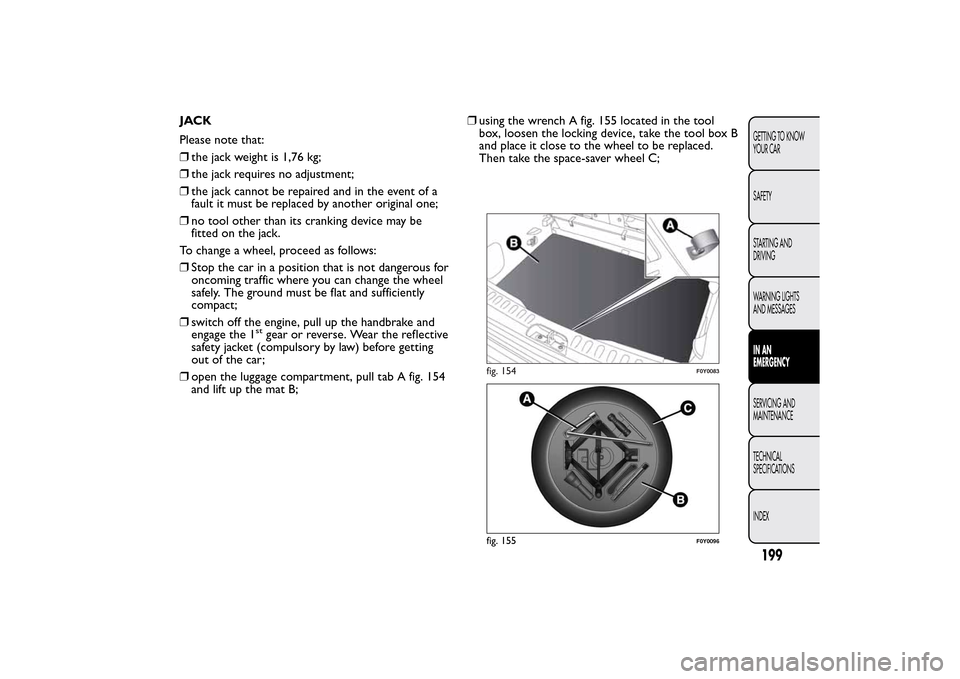
❒open the luggage compartment, pull tab A fig. 154
and lift up the mat B;❒using the wrench A fig. 155 located in the tool
box, loosen the locking device, take the tool box B
and place it close to the wheel to be replaced.
Then take the space-saver wheel C;
fig. 154
F0Y0083
fig. 155
F0Y0096
199GETTING TO KNOW
YOUR CAR
SAFETY
STARTING AND
DRIVING
WARNING LIGHTS
AND MESSAGESIN AN
EMERGENCYSERVICING AND
MAINTENANCE
TECHNICAL
SPECIFICATIONS
INDEX
Page 209 of 420
WARNING
The cylinder contains ethyl glycol.
Contains latex: may cause an allergic
reaction. Harmful if swallowed. Eye irritant .
May cause irritation if inhaled or on contact .
Avoid contact with eyes, skin and clothes. In the
event of contact , wash immediately with plenty
of water. If ingested, do not induce vomiting.
Rinse out your mouth, drink large quantities of
water and seek immediate medical attention.
Keep away from children.The product must not
be used by asthmatics. Do not inhale the
vapours during insertion and suction. Call a
doctor immediately if allergic reactions are
noted. Store the canister in its proper
compartment , away from sources of heat .The
sealant fluid has an expiry date. Replace the
bottle containing out-of-date sealant fluid.Dispose of the bottle and the sealant
liquid properly. Have the sealing fluid and
the cylinder disposed of in compliance
with national and local regulations.
INFLATING PROCEDURE
WARNING
Put on the protective gloves provided
together with quick tyre repair kit .Proceed as follows:
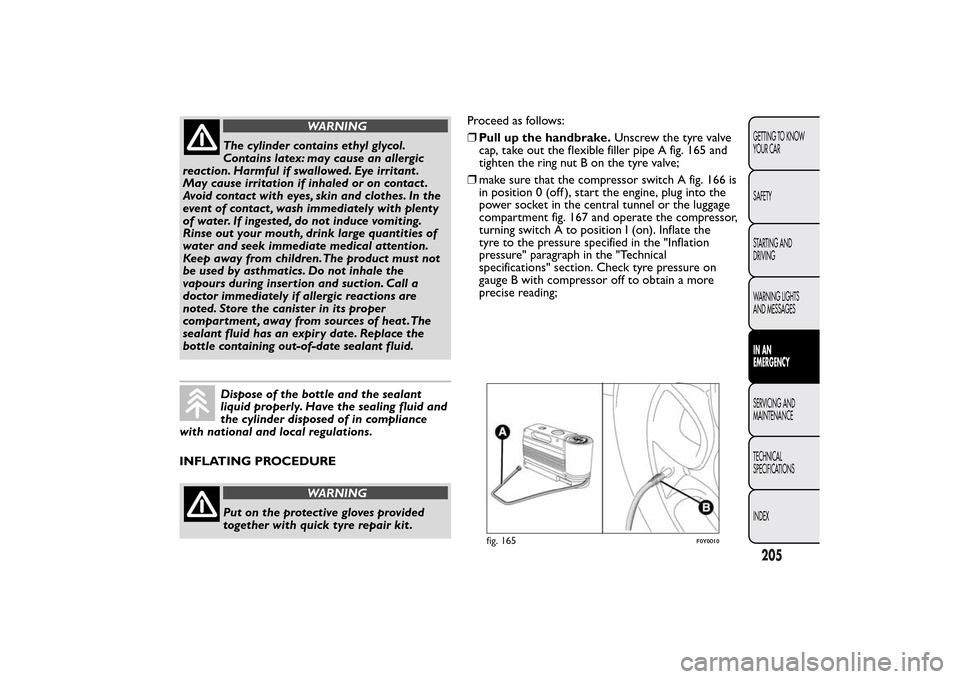
❒Pull up the handbrake.Unscrew the tyre valve
cap, take out the flexible filler pipe A fig. 165 and
tighten the ring nut B on the tyre valve;
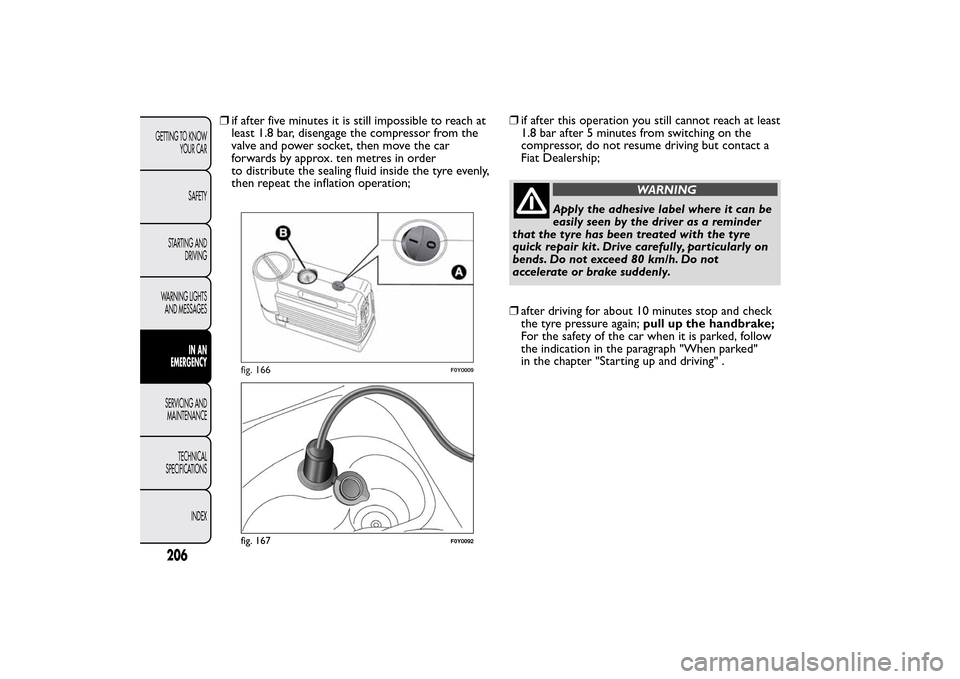
❒make sure that the compressor switch A fig. 166 is
in position 0 (off ), start the engine, plug into the
power socket in the central tunnel or the luggage
compartment fig. 167 and operate the compressor,
turning switch A to position I (on). Inflate the
tyre to the pressure specified in the "Inflation
pressure" paragraph in the "Technical
specifications" section. Check tyre pressure on
gauge B with compressor off to obtain a more
precise reading;
fig. 165
F0Y0010
205GETTING TO KNOW
YOUR CAR
SAFETY
STARTING AND
DRIVING
WARNING LIGHTS
AND MESSAGESIN AN
EMERGENCYSERVICING AND
MAINTENANCE
TECHNICAL
SPECIFICATIONS
INDEX
Page 210 of 420
❒if after five minutes it is still impossible to reach at
least 1.8 bar, disengage the compressor from the
valve and power socket, then move the car
forwards by approx. ten metres in order
to distribute the sealing fluid inside the tyre evenly,
then repeat the inflation operation;❒if after this operation you still cannot reach at least
1.8 bar after 5 minutes from switching on the
compressor, do not resume driving but contact a
Fiat Dealership;
WARNING
Apply the adhesive label where it can be
easily seen by the driver as a reminder
that the tyre has been treated with the tyre
quick repair kit . Drive carefully, particularly on
bends. Do not exceed 80 km/h. Do not
accelerate or brake suddenly.
❒after driving for about 10 minutes stop and check
the tyre pressure again;pull up the handbrake;
For the safety of the car when it is parked, follow
the indication in the paragraph "When parked"
in the chapter "Starting up and driving" .
fig. 166
F0Y0009
fig. 167
F0Y0092
206GETTING TO KNOW
YOUR CAR
SAFETY
STARTING AND
DRIVING
WARNING LIGHTS
AND MESSAGES
IN AN
EMERGENCY
SERVICING AND
MAINTENANCE
TECHNICAL
SPECIFICATIONS
INDEX
Page 211 of 420
WARNING
If the pressure has fallen below 1.8 bar,
do not drive any further: the automatic
tyre quick repair kit cannot guarantee the
correct hold because the tyre is too damaged.
Contact a Fiat Dealership.
❒if a pressure value of at least 1.8 bar is detected,
restore the correct pressure (with the engine
running and the handbrake engaged), resume
driving and drive with great care to the nearest
Fiat Dealership.
WARNING
Inform the dealership that the tyre has
been repaired using the tyre quick
repair kit . Give the instruction booklet to the
personnel charged with handling the treated
tyre.
207GETTING TO KNOW
YOUR CAR
SAFETY
STARTING AND
DRIVING
WARNING LIGHTS
AND MESSAGESIN AN
EMERGENCYSERVICING AND
MAINTENANCE
TECHNICAL
SPECIFICATIONS
INDEX
Page 244 of 420
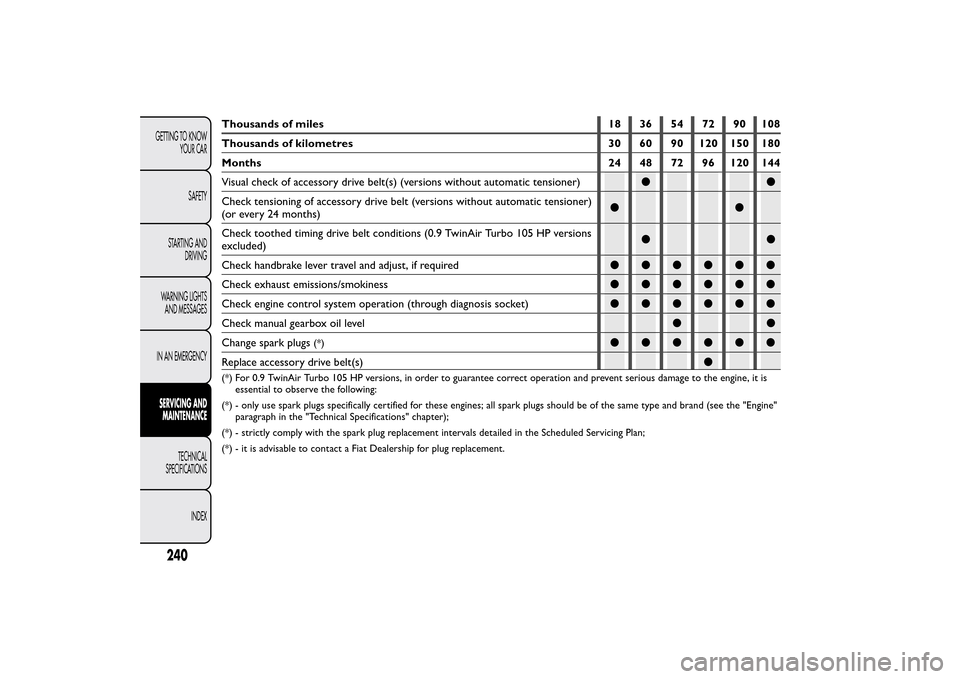
Thousands of miles 18 36 54 72 90 108
Thousands of kilometres 30 60 90 120 150 180
Months 24 48 72 96 120 144
Visual check of accessory drive belt(s) (versions without automatic tensioner)●●
Check tensioning of accessory drive belt (versions without automatic tensioner)
(or every 24 months)●●
Check toothed timing drive belt conditions (0.9 TwinAir Turbo 105 HP versions
excluded)●●
Check handbrake lever travel and adjust, if required●●●●●●
Check exhaust emissions/smokiness●●●●●●
Check engine control system operation (through diagnosis socket)●●●●●●
Check manual gearbox oil level●●
Change spark plugs
(*)
●●●●●●
Replace accessory drive belt(s)●
(*) For 0.9 TwinAir Turbo 105 HP versions, in order to guarantee correct operation and prevent serious damage to the engine, it is
essential to observe the following:
(*) - only use spark plugs specifically certified for these engines; all spark plugs should be of the same type and brand (see the "Engine"
paragraph in the "Technical Specifications" chapter);
(*) - strictly comply with the spark plug replacement intervals detailed in the Scheduled Servicing Plan;
(*) - it is advisable to contact a Fiat Dealership for plug replacement.
240GETTING TO KNOW
YOUR CAR
SAFETY
STARTING AND
DRIVING
WARNING LIGHTS
AND MESSAGES
IN AN EMERGENCYSERVICING AND
MAINTENANCE
TECHNICAL
SPECIFICATIONS
INDEX
Page 247 of 420
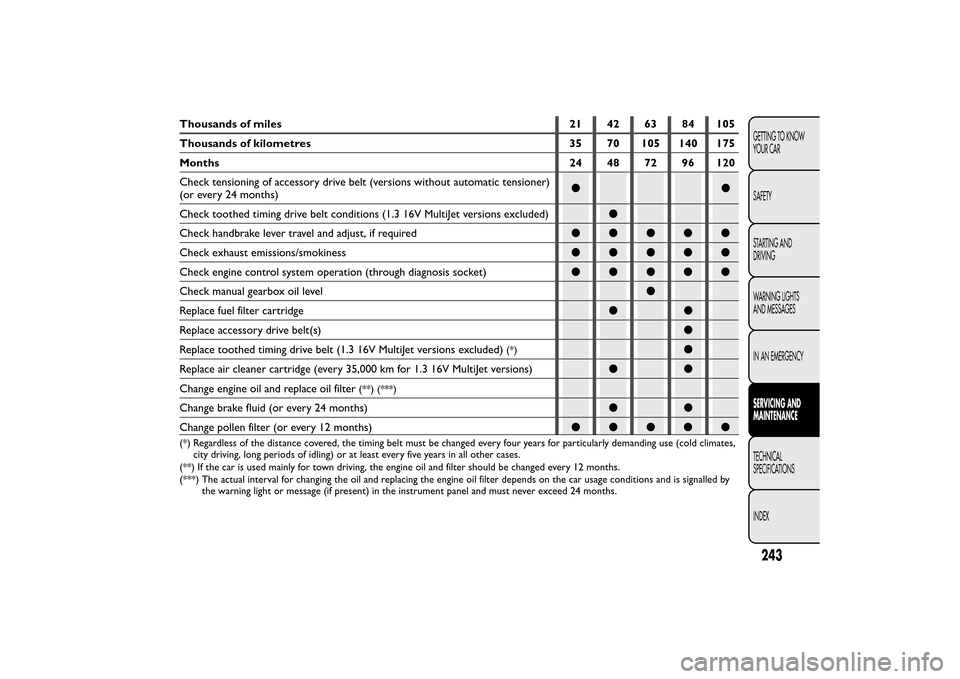
Thousands of miles 21 42 63 84 105
Thousands of kilometres 35 70 105 140 175
Months 24 48 72 96 120
Check tensioning of accessory drive belt (versions without automatic tensioner)
(or every 24 months)●●
Check toothed timing drive belt conditions (1.3 16V MultiJet versions excluded)●
Check handbrake lever travel and adjust, if required●●●●●
Check exhaust emissions/smokiness●●●●●
Check engine control system operation (through diagnosis socket)●●●●●
Check manual gearbox oil level●
Replace fuel filter cartridge●●
Replace accessory drive belt(s)●
Replace toothed timing drive belt (1.3 16V MultiJet versions excluded)
(*)
●
Replace air cleaner cartridge (every 35,000 km for 1.3 16V MultiJet versions)●●
Change engine oil and replace oil filter
(**) (***)
Change brake fluid (or every 24 months)●●
Change pollen filter (or every 12 months)●●●●●(*) Regardless of the distance covered, the timing belt must be changed every four years for particularly demanding use (cold climates,
city driving, long periods of idling) or at least every five years in all other cases.
(**) If the car is used mainly for town driving, the engine oil and filter should be changed every 12 months.
(***) The actual interval for changing the oil and replacing the engine oil filter depends on the car usage conditions and is signalled by
the warning light or message (if present) in the instrument panel and must never exceed 24 months.
243GETTING TO KNOW
YOUR CAR
SAFETY
STARTING AND
DRIVING
WARNING LIGHTS
AND MESSAGES
IN AN EMERGENCYSERVICING AND
MAINTENANCETECHNICAL
SPECIFICATIONS
INDEX
Page 273 of 420
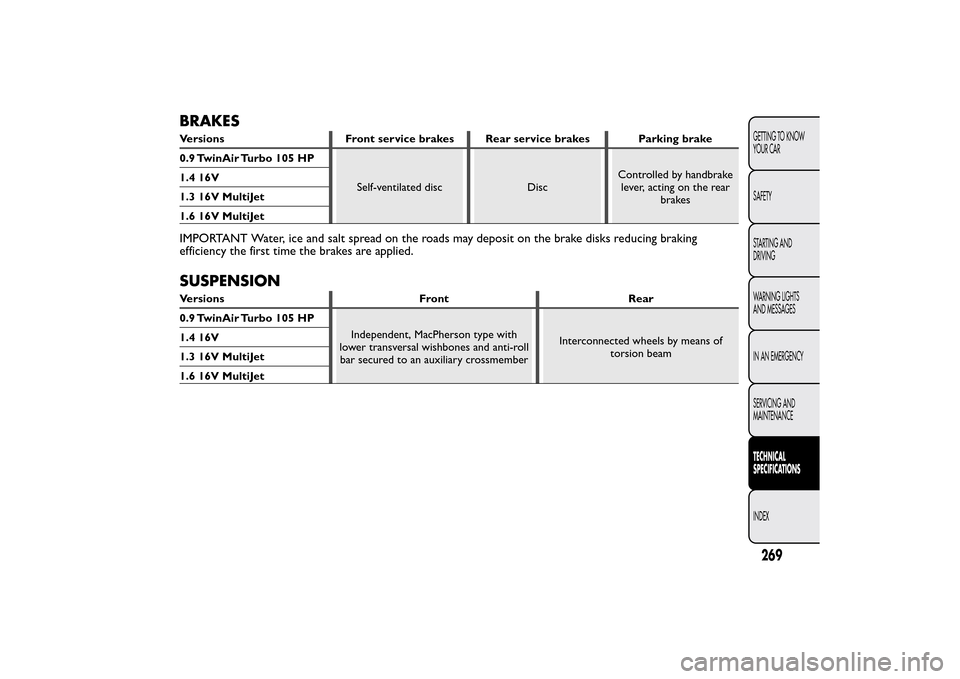
BRAKESVersions Front service brakes Rear service brakes Parking brake
0.9 TwinAir Turbo 105 HP
Self-ventilated disc DiscControlled by handbrake
lever, acting on the rear
brakes 1.4 16V
1.3 16V MultiJet
1.6 16V MultiJetIMPORTANT Water, ice and salt spread on the roads may deposit on the brake disks reducing braking
efficiency the first time the brakes are applied.SUSPENSIONVersions Front Rear
0.9 TwinAir Turbo 105 HP
Independent, MacPherson type with
lower transversal wishbones and anti-roll
bar secured to an auxiliary crossmemberInterconnected wheels by means of
torsion beam 1.4 16V
1.3 16V MultiJet
1.6 16V MultiJet
269GETTING TO KNOW
YOUR CAR
SAFETY
STARTING AND
DRIVING
WARNING LIGHTS
AND MESSAGES
IN AN EMERGENCY
SERVICING AND
MAINTENANCETECHNICAL
SPECIFICATIONSINDEX
Page 323 of 420
JACK
Please note that:
❒the jack weight is 1.76 kg;
❒the jack requires no adjustment;
❒the jack cannot be repaired and in the event of a
fault it must be replaced by another original one;
❒no tool other than its cranking device may be fitted
on the jack.
WHEEL REPLACEMENT PROCEDURE
To change a wheel, proceed as follows:
❒stop the car in a position that is not dangerous for
oncoming traffic where you can change the wheel
safely. The ground should be flat if possible, and
sufficiently firm;
❒switch off the engine, pull up the handbrake and
engage the 1
stgear or reverse. Wear the reflective
safety jacket (compulsory by law) before getting
out of the car;
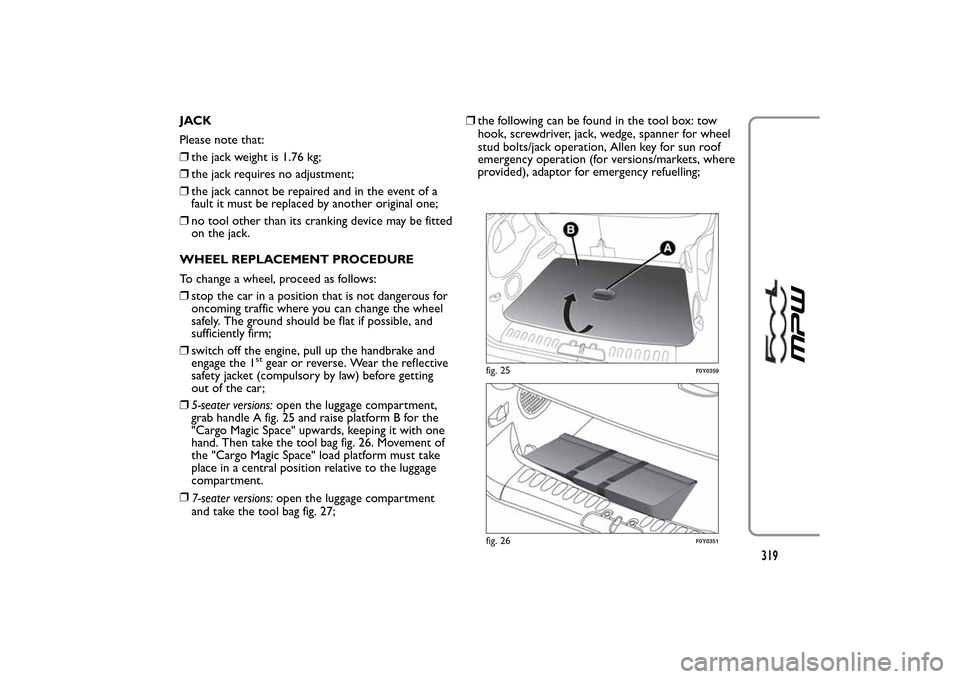
❒5-seater versions:open the luggage compartment,
grab handle A fig. 25 and raise platform B for the
"Cargo Magic Space" upwards, keeping it with one
hand. Then take the tool bag fig. 26. Movement of
the "Cargo Magic Space" load platform must take
place in a central position relative to the luggage
compartment.
❒
7-seater versions:open the luggage compartment
and take the tool bag fig. 27;❒the following can be found in the tool box: tow
hook, screwdriver, jack, wedge, spanner for wheel
stud bolts/jack operation, Allen key for sun roof
emergency operation (for versions/markets, where
provided), adaptor for emergency refuelling;
fig. 25
F0Y0359
fig. 26
F0Y0351
319