seats FIAT 500L LIVING 2015 2.G Owners Manual
[x] Cancel search | Manufacturer: FIAT, Model Year: 2015, Model line: 500L LIVING, Model: FIAT 500L LIVING 2015 2.GPages: 224, PDF Size: 5.92 MB
Page 8 of 224
GETTING TO KNOW YOUR CAR
In-depth knowledge of your new vehicle
starts here.
The handbook that you are reading
simply and directly explains how it
is made and how it works.
That’s why we advise you to read it
seated comfortably on board, so that
you can see immediately what is
described here for yourself.DASHBOARD ................................. 7
THE FIAT CODE SYSTEM ............... 8
THE KEYS....................................... 8
IGNITION DEVICE ........................... 10
SEATS ............................................ 11
HEAD RESTRAINTS ........................ 13
STEERING WHEEL ......................... 14
REAR VIEW MIRRORS .................... 15
CLIMATE CONTROL SYSTEM ....... 16
EXTERIOR LIGHTS ......................... 19
WINDOW CLEANING ...................... 21
ROOF LIGHTS ................................ 23
FIXED GLASS ROOF ....................... 23
ELECTRIC SUN ROOF .................... 24
DOORS ........................................... 26
ELECTRIC WINDOWS .................... 28
LUGGAGE COMPARTMENT ........... 29
BONNET ......................................... 31
DUALDRIVE ELECTRIC POWER
STEERING ...................................... 32
VERSION WITH LPG SYSTEM ........ 33
VERSION WITH METHANE
SYSTEM (NATURAL POWER) ......... 36
6
GETTING TO KNOW YOUR CAR
9-1-2015 12:9 Pagina 6
Page 13 of 224
SEATS
7) 9)
2) 3)
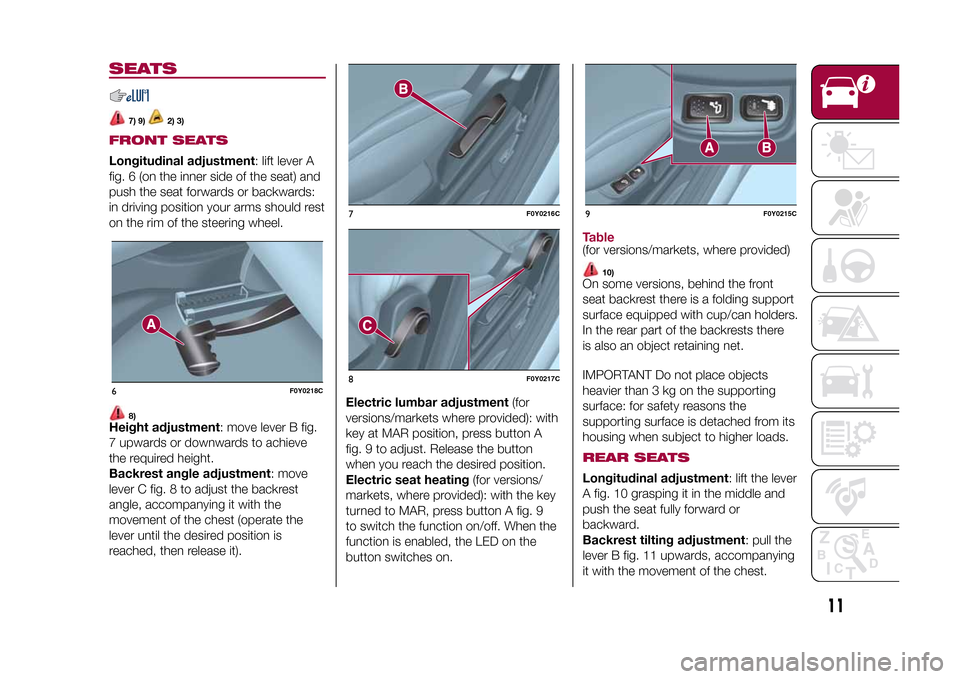
FRONT SEATSLongitudinal adjustment: lift lever A
fig. 6 (on the inner side of the seat) and
push the seat forwards or backwards:
in driving position your arms should rest
on the rim of the steering wheel.
8)
Height adjustment: move lever B fig.
7 upwards or downwards to achieve
the required height.
Backrest angle adjustment: move
lever C fig. 8 to adjust the backrest
angle, accompanying it with the
movement of the chest (operate the
lever until the desired position is
reached, then release it).Electric lumbar adjustment(for
versions/markets where provided): with
key at MAR position, press button A
fig. 9 to adjust. Release the button
when you reach the desired position.
Electric seat heating(for versions/
markets, where provided): with the key
turned to MAR, press button A fig. 9
to switch the function on/off. When the
function is enabled, the LED on the
button switches on.
Table(for versions/markets, where provided)
10)
On some versions, behind the front
seat backrest there is a folding support
surface equipped with cup/can holders.
In the rear part of the backrests there
is also an object retaining net.
IMPORTANT Do not place objects
heavier than 3 kg on the supporting
surface: for safety reasons the
supporting surface is detached from its
housing when subject to higher loads.REAR SEATSLongitudinal adjustment: lift the lever
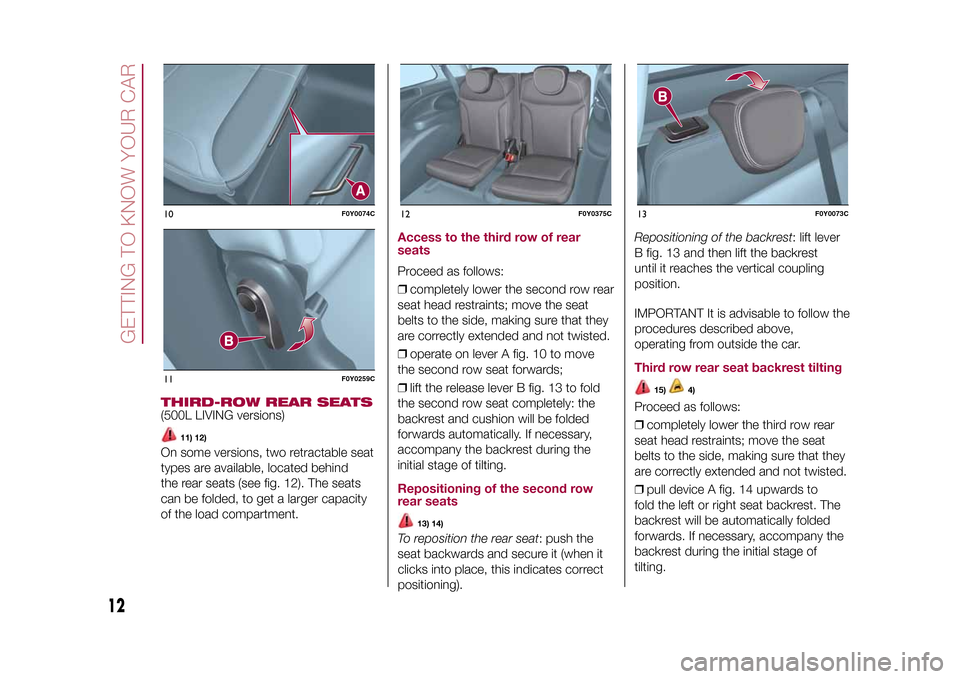
A fig. 10 grasping it in the middle and
push the seat fully forward or
backward.
Backrest tilting adjustment: pull the
lever B fig. 11 upwards, accompanying
it with the movement of the chest.
6
F0Y0218C
7
F0Y0216C
8
F0Y0217C
9
F0Y0215C
11
9-1-2015 12:9 Pagina 11
Page 14 of 224
THIRD-ROW REAR SEATS(500L LIVING versions)
11) 12)
On some versions, two retractable seat
types are available, located behind
the rear seats (see fig. 12). The seats
can be folded, to get a larger capacity
of the load compartment.
Access to the third row of rear
seatsProceed as follows:
❒completely lower the second row rear
seat head restraints; move the seat
belts to the side, making sure that they
are correctly extended and not twisted.
❒operate on lever A fig. 10 to move
the second row seat forwards;
❒lift the release lever B fig. 13 to fold
the second row seat completely: the
backrest and cushion will be folded
forwards automatically. If necessary,
accompany the backrest during the
initial stage of tilting.Repositioning of the second row
rear seats
13) 14)
To reposition the rear seat: push the
seat backwards and secure it (when it
clicks into place, this indicates correct
positioning).Repositioning of the backrest: lift lever
B fig. 13 and then lift the backrest
until it reaches the vertical coupling
position.
IMPORTANT It is advisable to follow the
procedures described above,
operating from outside the car.
Third row rear seat backrest tilting
15)
4)
Proceed as follows:
❒completely lower the third row rear
seat head restraints; move the seat
belts to the side, making sure that they
are correctly extended and not twisted.
❒pull device A fig. 14 upwards to
fold the left or right seat backrest. The
backrest will be automatically folded
forwards. If necessary, accompany the
backrest during the initial stage of
tilting.
10
F0Y0074C
11
F0Y0259C
12
F0Y0375C
13
F0Y0073C
12
GETTING TO KNOW YOUR CAR
9-1-2015 12:9 Pagina 12
Page 15 of 224
WARNING
7)Any adjustment must be performed with
the vehicle at a standstill.
8)After releasing the adjustment lever,
always check that the seat is locked on the
guides by trying to move it back and forth.
If the seat is not locked into place, it may
unexpectedly slide and cause the driver to
lose control of the vehicle.
9)Do not move the front passenger seat
table if a child is seated on the same or
sitting in the suitable child restraint system.
10)Do not travel with the supporting
surface open: always make sure it is
correctly closed.
11)Before setting off, make sure that the
seats are locked correctly to their
anchoring devices.
12)During repositioning of the second row
rear seats, sit correctly on the third row
rear seats, making sure that your feet do
not exceed the red strip located on the
floor.13)If there are any passengers sitting on
the third row seats, the second row rear
seat must be correctly anchored to the
floor and the backrest must be in vertical
position.
14)Make sure that the backrest is correctly
secured on both sides to prevent it from
moving forward in the event of sharp
braking, causing injuries to passengers. A
metallic click is heard when locking is
correct.
15)Do not move the front passenger seat
table if a child is seated on the same or
sitting in the suitable child restraint system.
WARNING
2)The fabric upholstery for the seats has
been designed to withstand long-term
wear deriving from normal use of the
vehicle. Nevertheless, some precautions
are required. Avoid prolonged and/or
excessive rubbing involving clothing
accessories such as metal buckles,
bosses, Velcro strips and the like, which,
by applying a high pressure on the fabric in
a limited area, could cause it to break,
thereby damaging the upholstery.
3)Before tilting the front passenger seat
table fully, remove any objects laid on it.
4)Before tilting the seat backrest fully,
remove any objects laid on it.
HEAD RESTRAINTSADJUSTMENTS
16)
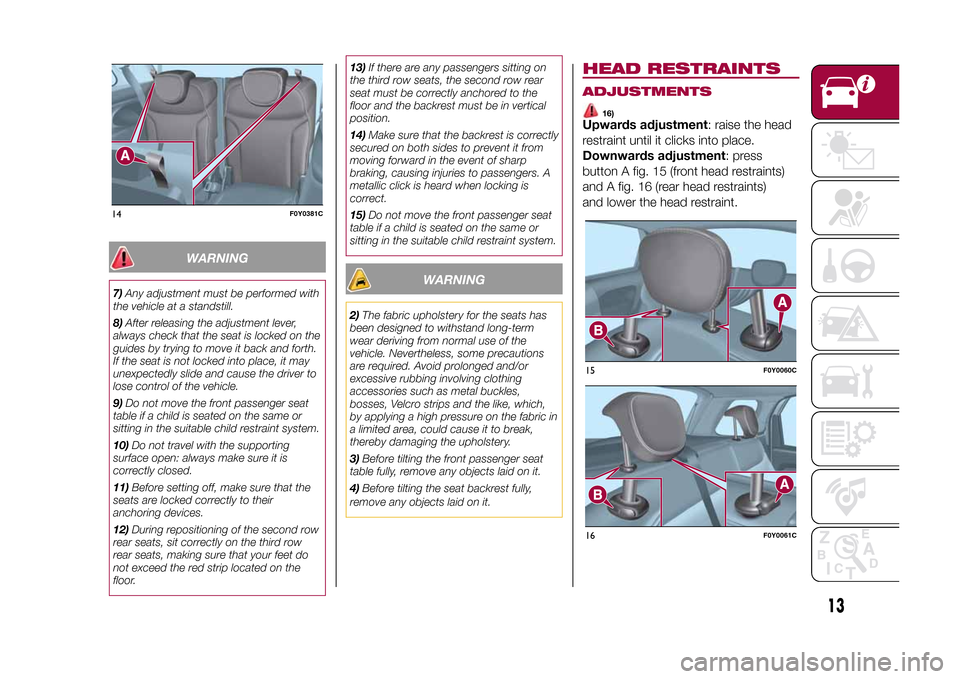
Upwards adjustment: raise the head
restraint until it clicks into place.
Downwards adjustment: press
button A fig. 15 (front head restraints)
and A fig. 16 (rear head restraints)
and lower the head restraint.
14
F0Y0381C
15
F0Y0060C
16
F0Y0061C
13
9-1-2015 12:9 Pagina 13
Page 16 of 224
REMOVALTo remove head restraints, lift them to
the max. height, press buttons A and B
fig. 15 (front head restraints) or A and
B fig. 16 (rear head restraints) at the
side of the two supports, then remove
the head restraints by pulling them
upwards.
IMPORTANT If the rear seats are used,
always set the head restraints in the
"completely raised" position.
WARNING
16)The head restraints must be adjusted
so that the head, rather than the neck,
rests on them. Only in this case can they
protect your head correctly.
STEERING WHEEL
17) 18)
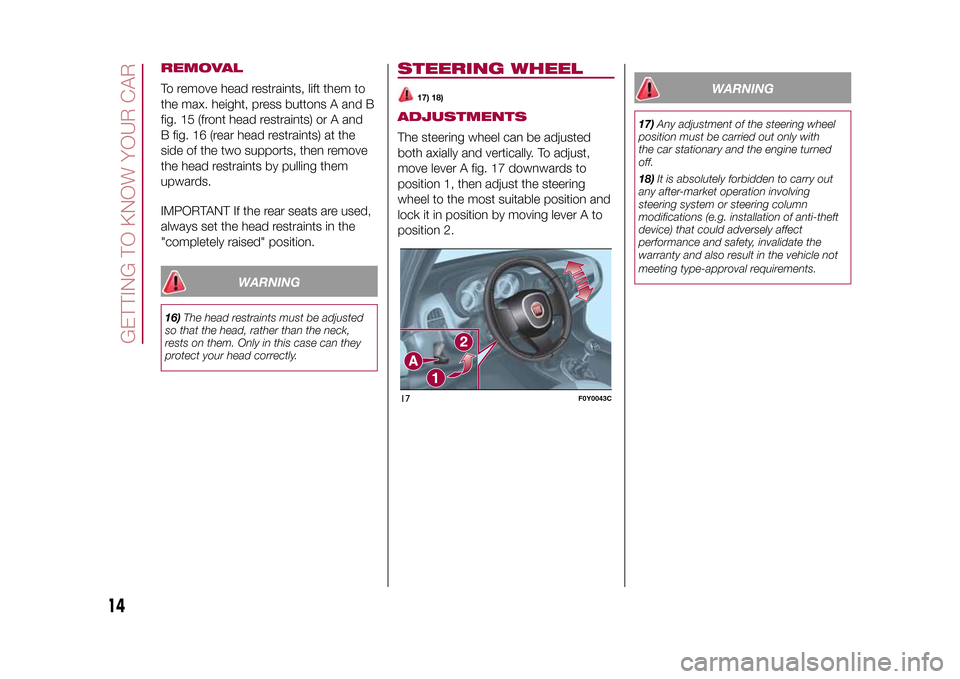
ADJUSTMENTSThe steering wheel can be adjusted
both axially and vertically. To adjust,
move lever A fig. 17 downwards to
position 1, then adjust the steering
wheel to the most suitable position and
lock it in position by moving lever A to
position 2.
WARNING
17)Any adjustment of the steering wheel
position must be carried out only with
the car stationary and the engine turned
off.
18)It is absolutely forbidden to carry out
any after-market operation involving
steering system or steering column
modifications (e.g. installation of anti-theft
device) that could adversely affect
performance and safety, invalidate the
warranty and also result in the vehicle not
meeting type-approval requirements.
17
F0Y0043C
14
GETTING TO KNOW YOUR CAR
9-1-2015 12:9 Pagina 14
Page 31 of 224
WARNING
25)Improper use of the electric windows
can be dangerous. Before and during
operation, always check that passengers
are not exposed to the risk of being injured
either directly by the moving windows or
through objects getting caught or struck by
them. When leaving the vehicle, always
remove the ignition key to avoid the risk of
injury of people still on board due to
accidental operation of the electric
windows.
LUGGAGE
COMPARTMENT
27) 28) 29) 31)
13)
Luggage compartment unlocking is
electrically operated and is deactivated
when the car is in motion.OPENING
26)
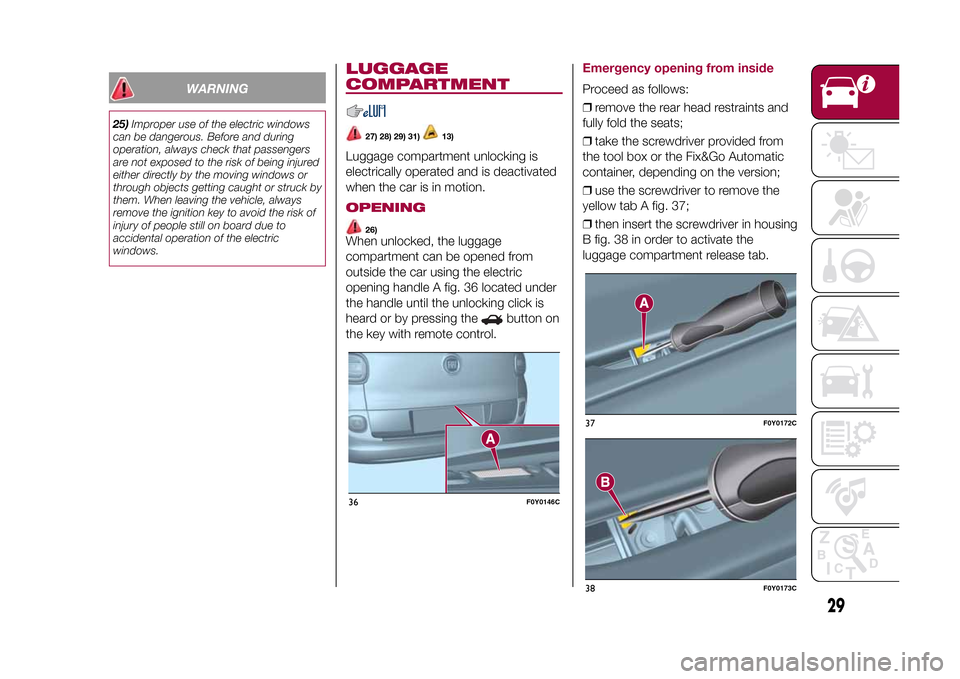
When unlocked, the luggage
compartment can be opened from
outside the car using the electric
opening handle A fig. 36 located under
the handle until the unlocking click is
heard or by pressing the
button on
the key with remote control.
Emergency opening from insideProceed as follows:
❒remove the rear head restraints and
fully fold the seats;
❒take the screwdriver provided from
the tool box or the Fix&Go Automatic
container, depending on the version;
❒use the screwdriver to remove the
yellow tab A fig. 37;
❒then insert the screwdriver in housing
B fig. 38 in order to activate the
luggage compartment release tab.
36
F0Y0146C
37
F0Y0172C
38
F0Y0173C
29
9-1-2015 12:9 Pagina 29
Page 32 of 224
CLOSINGGrip the handle located inside the
tailgate and lower the latter, pressing
next to the lock until it clicks.
IMPORTANT Before closing the
luggage compartment make sure that
you have the keys since the luggage
compartment is automatically locked.LUGGAGE
COMPARTMENT
INITIALISATIONIMPORTANT If the battery is
disconnected or the protection fuse
blows, the luggage compartment
opening/closing mechanism must be
reinitialised as follows:
❒close all the doors and the luggage
compartment;
❒press the
button on the remote
control;
❒press thebutton on the remote
control.
"CARGO MAGIC SPACE"(for versions/markets, where provided)
14)
The adjustable load platform "Cargo
Magic Space" can be positioned on
three different height levels:
❒Position 0 (platform completely
lowered);❒Position 1 (platform at threshold
level);
❒Position 2 (platform completely
raised).
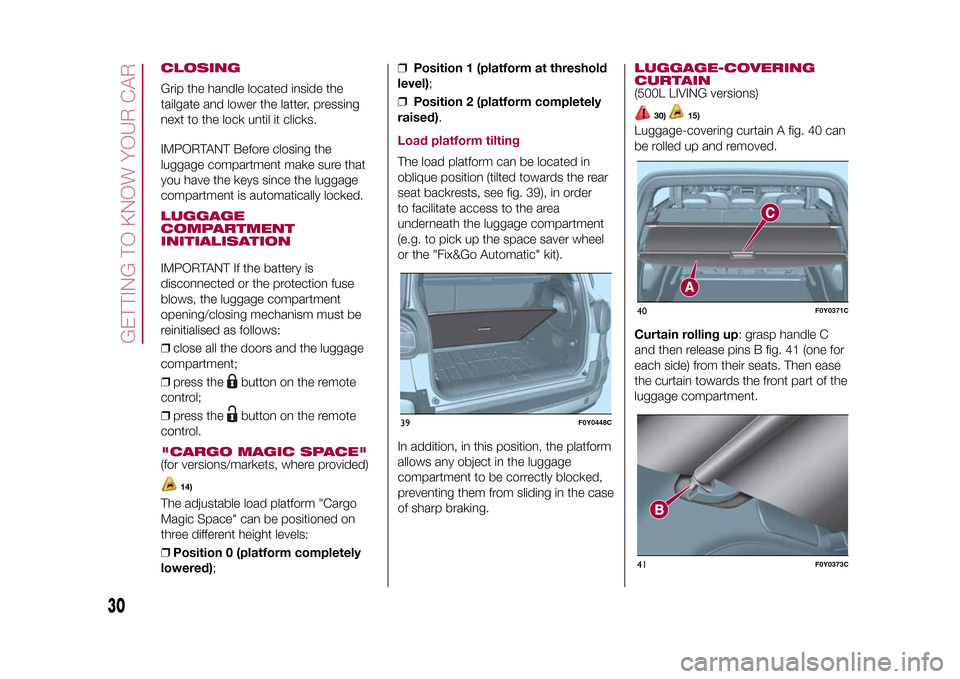
Load platform tiltingThe load platform can be located in
oblique position (tilted towards the rear
seat backrests, see fig. 39), in order
to facilitate access to the area
underneath the luggage compartment
(e.g. to pick up the space saver wheel
or the "Fix&Go Automatic" kit).
In addition, in this position, the platform
allows any object in the luggage
compartment to be correctly blocked,
preventing them from sliding in the case
of sharp braking.
LUGGAGE-COVERING
CURTAIN(500L LIVING versions)
30)
15)
Luggage-covering curtain A fig. 40 can
be rolled up and removed.
Curtain rolling up: grasp handle C
and then release pins B fig. 41 (one for
each side) from their seats. Then ease
the curtain towards the front part of the
luggage compartment.
39
F0Y0448C
40
F0Y0371C
41
F0Y0373C
30
GETTING TO KNOW YOUR CAR
9-1-2015 12:9 Pagina 30
Page 74 of 224
SEAT BELTS
69) 70)
USING THE SEAT BELTSThe driver is responsible for respecting,
and ensuring that all the other
occupants of the vehicle also respect,
the local laws in force in relation to
the use of the seat belts.
Always fasten the seat belts before
setting off.
The seat belt should be worn keeping
the torso straight and rested against
the backrest.
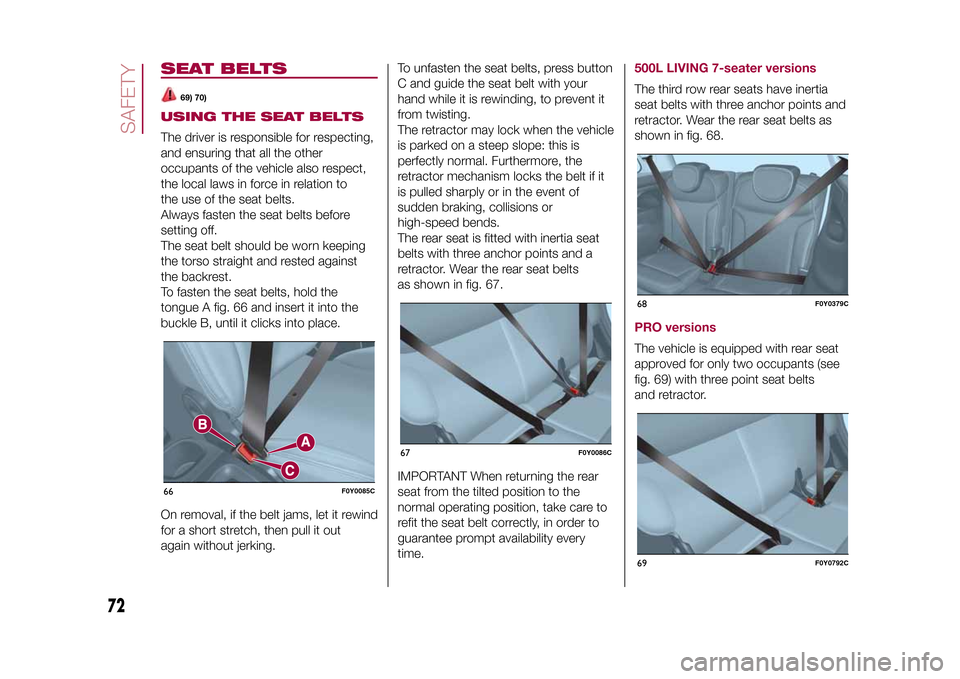
To fasten the seat belts, hold the
tongue A fig. 66 and insert it into the
buckle B, until it clicks into place.
On removal, if the belt jams, let it rewind
for a short stretch, then pull it out
again without jerking.To unfasten the seat belts, press button
C and guide the seat belt with your
hand while it is rewinding, to prevent it
from twisting.
The retractor may lock when the vehicle
is parked on a steep slope: this is
perfectly normal. Furthermore, the
retractor mechanism locks the belt if it
is pulled sharply or in the event of
sudden braking, collisions or
high-speed bends.
The rear seat is fitted with inertia seat
belts with three anchor points and a
retractor. Wear the rear seat belts
as shown in fig. 67.
IMPORTANT When returning the rear
seat from the tilted position to the
normal operating position, take care to
refit the seat belt correctly, in order to
guarantee prompt availability every
time.
500L LIVING 7-seater versionsThe third row rear seats have inertia
seat belts with three anchor points and
retractor. Wear the rear seat belts as
shown in fig. 68.PRO versionsThe vehicle is equipped with rear seat
approved for only two occupants (see
fig. 69) with three point seat belts
and retractor.
66
F0Y0085C
67
F0Y0086C
68
F0Y0379C
69
F0Y0792C
72
SAFETY
9-1-2015 12:9 Pagina 72
Page 75 of 224
WARNING
69)Never press button C fig. 66 when
travelling.
70)Remember that in the event of a violent
impact the rear seat passengers not
wearing seat belts are exposed to a very
serious risk and also represent a serious
danger for the front seat occupants.
SBR (Seat Belt
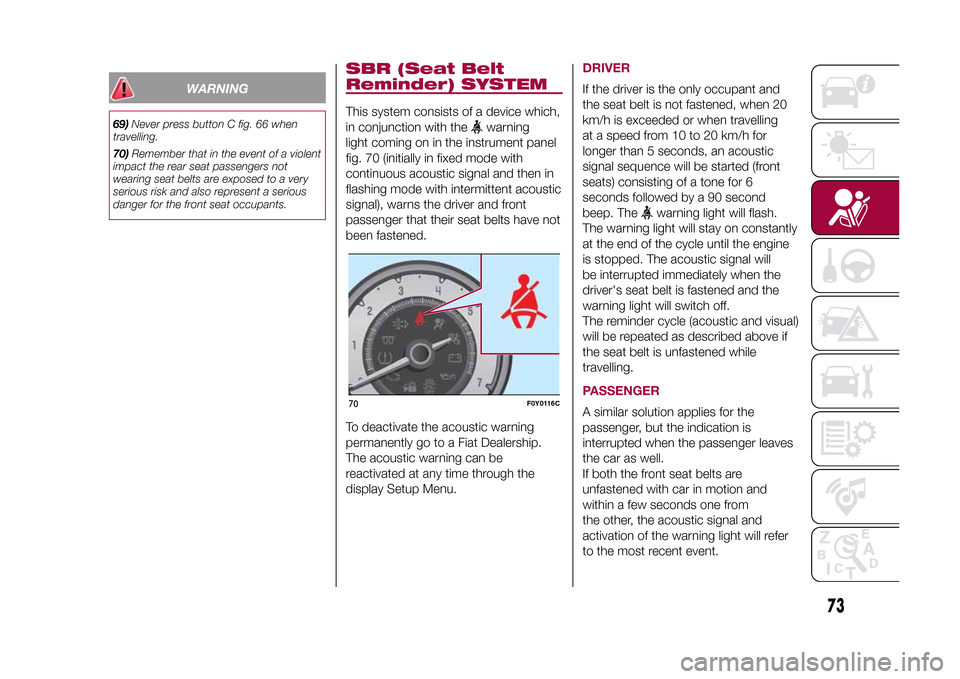
Reminder) SYSTEMThis system consists of a device which,
in conjunction with the
warning
light coming on in the instrument panel
fig. 70 (initially in fixed mode with
continuous acoustic signal and then in
flashing mode with intermittent acoustic
signal), warns the driver and front
passenger that their seat belts have not
been fastened.
To deactivate the acoustic warning
permanently go to a Fiat Dealership.
The acoustic warning can be
reactivated at any time through the
display Setup Menu.
DRIVERIf the driver is the only occupant and
the seat belt is not fastened, when 20
km/h is exceeded or when travelling
at a speed from 10 to 20 km/h for
longer than 5 seconds, an acoustic
signal sequence will be started (front
seats) consisting of a tone for 6
seconds followed by a 90 second
beep. The
warning light will flash.
The warning light will stay on constantly
at the end of the cycle until the engine
is stopped. The acoustic signal will
be interrupted immediately when the
driver's seat belt is fastened and the
warning light will switch off.
The reminder cycle (acoustic and visual)
will be repeated as described above if
the seat belt is unfastened while
travelling.
PASSENGERA similar solution applies for the
passenger, but the indication is
interrupted when the passenger leaves
the car as well.
If both the front seat belts are
unfastened with car in motion and
within a few seconds one from
the other, the acoustic signal and
activation of the warning light will refer
to the most recent event.
70
F0Y0116C
73
9-1-2015 12:9 Pagina 73
Page 77 of 224
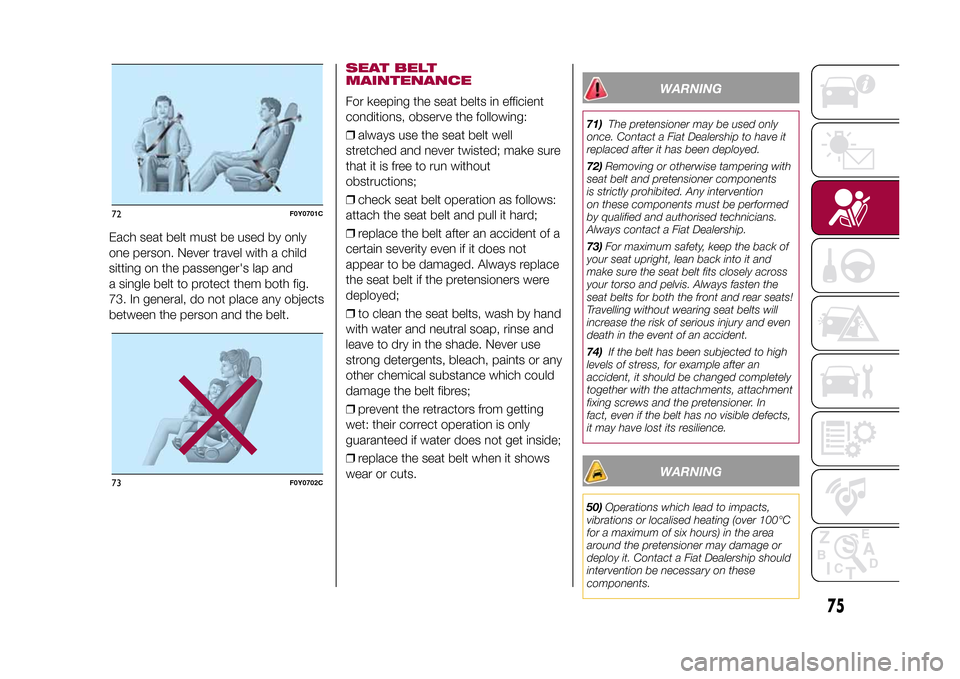
Each seat belt must be used by only
one person. Never travel with a child
sitting on the passenger's lap and
a single belt to protect them both fig.
73. In general, do not place any objects
between the person and the belt.
SEAT BELT
MAINTENANCEFor keeping the seat belts in efficient
conditions, observe the following:
❒always use the seat belt well
stretched and never twisted; make sure
that it is free to run without
obstructions;
❒check seat belt operation as follows:
attach the seat belt and pull it hard;
❒replace the belt after an accident of a
certain severity even if it does not
appear to be damaged. Always replace
the seat belt if the pretensioners were
deployed;
❒to clean the seat belts, wash by hand
with water and neutral soap, rinse and
leave to dry in the shade. Never use
strong detergents, bleach, paints or any
other chemical substance which could
damage the belt fibres;
❒prevent the retractors from getting
wet: their correct operation is only
guaranteed if water does not get inside;
❒replace the seat belt when it shows
wear or cuts.
WARNING
71)The pretensioner may be used only
once. Contact a Fiat Dealership to have it
replaced after it has been deployed.
72)Removing or otherwise tampering with
seat belt and pretensioner components
is strictly prohibited. Any intervention
on these components must be performed
by qualified and authorised technicians.
Always contact a Fiat Dealership.
73)For maximum safety, keep the back of
your seat upright, lean back into it and
make sure the seat belt fits closely across
your torso and pelvis. Always fasten the
seat belts for both the front and rear seats!
Travelling without wearing seat belts will
increase the risk of serious injury and even
death in the event of an accident.
74)If the belt has been subjected to high
levels of stress, for example after an
accident, it should be changed completely
together with the attachments, attachment
fixing screws and the pretensioner. In
fact, even if the belt has no visible defects,
it may have lost its resilience.
WARNING
50)Operations which lead to impacts,
vibrations or localised heating (over 100°C
for a maximum of six hours) in the area
around the pretensioner may damage or
deploy it. Contact a Fiat Dealership should
intervention be necessary on these
components.
72
F0Y0701C
73
F0Y0702C
75
9-1-2015 12:9 Pagina 75