low beam FIAT 500L LIVING 2017 2.G Owners Manual
[x] Cancel search | Manufacturer: FIAT, Model Year: 2017, Model line: 500L LIVING, Model: FIAT 500L LIVING 2017 2.GPages: 240, PDF Size: 5.26 MB
Page 22 of 240
SIDE LIGHTS AND
DIPPED BEAM
HEADLIGHTS
With the ignition key turned to MAR,
turn ring nut A fig. 25 to
. If dipped
headlights are activated, the daytime
running lights switch off and the side
lights and dipped headlights switch on.
The
warning light will come on
in the instrument panel.
When the ignition key is turned to
STOP or removed and the ring nut A is
turned fromOto
, all the side
lights and number plate lights come on.
The
warning light will come on in
the instrument panel.
AUTOMATIC LIGHT
CONTROL (AUTOLIGHT)
(Dusk sensor)
(for versions/markets, where provided)
This infrared LED sensor is located
on the windscreen and detects the
variations in outside brightness
depending on the light sensitivity set
through the Setup Menu.
Activation: Turn ring nut A fig. 25 to
position
.
With dusk sensor active, it is not
possible to keep the main beam
headlights on constantly; only flashing
is permitted. To switch high beams
on constantly, turn ring nut A to
and
pull the stalk towards the steering
wheel.On automatic sensor controlled
deactivation, the dipped headlights are
deactivated first, followed by the side
lights a few seconds later.
IMPORTANT The sensor cannot detect
the presence of fog. These lights must
therefore be switched on manually in
these circumstances.
MAIN BEAM HEADLIGHTS
To activate the main beam headlights,
with ring nut A fig. 25 at
, pull the
stalk towards the steering wheel
beyond the end of travel position. The
warning light switches on in the
instrument panel.
When the stalk is pulled towards the
steering wheel again, beyond the end
of travel position, the main beam
headlights deactivate, the dipped
headlights reactivate and the
warning light switches off.
It is not possible to switch on the main
beam headlights constantly if automatic
light control is active.
FLASHING
Lights can flash by pulling the stalk
towards the steering wheel (unstable
position) regardless of the position
of ring nut A fig. 25. The
warning
light switches on in the instrument
panel.
DIRECTION INDICATORS
Bring the stalk to the (stable) position:
upwards:right direction indicator
activation /downwards:left direction
indicator activation.
Warning light
orwill blink on the
instrument panel.
The direction indicators are switched off
automatically when the steering wheel
is straightened.
"Lane Change" function
If you wish to signal a lane change,
place the left stalk in the unstable
position for less than half a second.
The direction indicator on the side
selected will flash five times and then
switch off automatically.
“Cornering lights”
When the dipped beam headlights are
on and the speed is below 40 km/h,
if the steering wheel rotation angle
is large or the direction indicators are
on, a light (incorporated in the fog light)
will be operated on the relevant side
to improve visibility at night time.
20
GETTING TO KNOW YOUR CAR
Page 23 of 240
"FOLLOW ME HOME"
DEVICE
This allows the space in front of the
vehicle to be lit for a set time.
Activation
The lights turning on time is adjustable
and programmable interacting via
the Setup Menu of the instrument
panel.
It is possible to choose between 0, 30,
60 up to 90 seconds. The device is
activated automatically after turning off
the car and having rotated the ring
nut A fig. 25 to positionO.
It is also possible (if the program
described above is set to "0" seconds)
to set the headlights start time by
pulling the left stalk toward you once or
more times (same procedure to activate
the main beam lights). In this case it is
possible to choose between 0, 30,
60, 90 up to a maximum of 210
seconds.
Each time the stalk is operated, the
warning light
on the instrument
panel switches on. The display shows a
message and the time set for the
function. The
warning light comes
on when the stalk is first moved and
stays on until the function is
automatically deactivated.
Deactivation
This function is deactivated by
switching on the headlights, the side
lights or bringing the ignition device to
MAR.
WARNING
20)The daytime running lights are an
alternative to the dipped beam headlights
for driving in countries where it is
compulsory to have lights on during the
day; where it is not compulsory, the use of
daytime running lights is permitted.
21)Daytime running lights cannot replace
dipped beam headlights when driving at
night or through tunnels. The use of
daytime running lights is governed by the
highway code of the country in which
you are driving. Comply with legal
requirements.
WINDOW CLEANING
WINDSCREEN
WIPER/WASHER
6) 7)This operates only with the ignition key
turned to MAR.
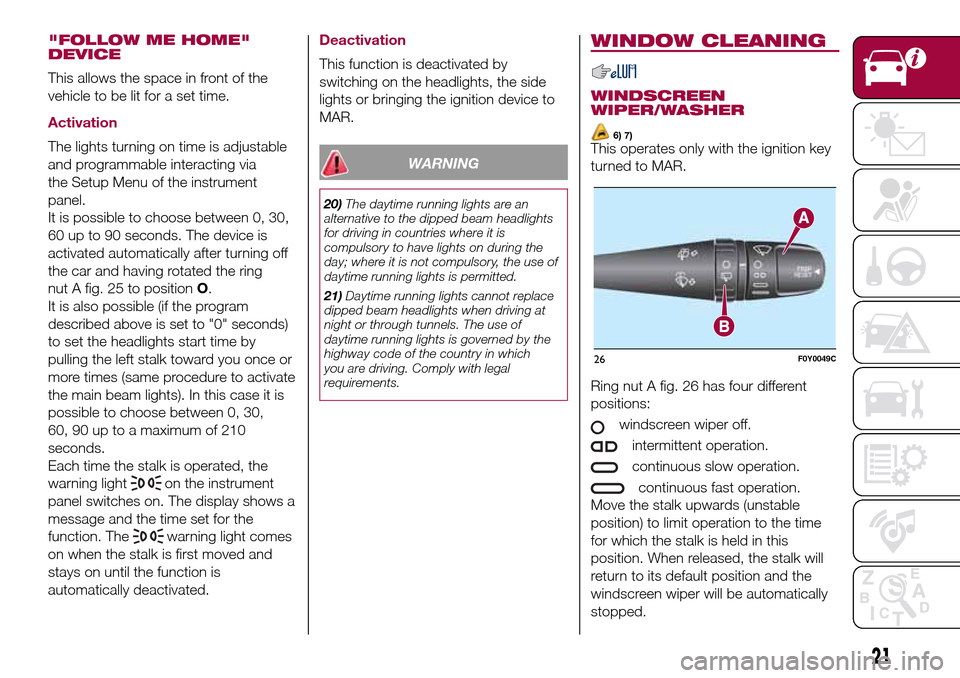
Ring nut A fig. 26 has four different
positions:
windscreen wiper off.
intermittent operation.
continuous slow operation.
continuous fast operation.
Move the stalk upwards (unstable
position) to limit operation to the time
for which the stalk is held in this
position. When released, the stalk will
return to its default position and the
windscreen wiper will be automatically
stopped.
26F0Y0049C
21
Page 44 of 240
DISPLAY
MULTIFUNCTION
DISPLAY
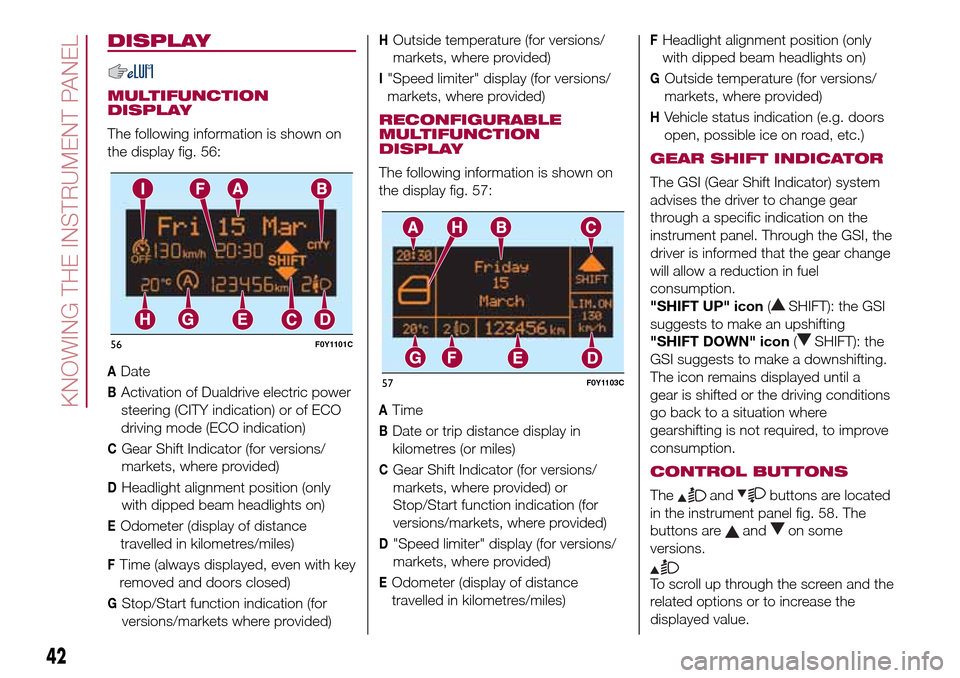
The following information is shown on
the display fig. 56:
ADate
BActivation of Dualdrive electric power
steering (CITY indication) or of ECO
driving mode (ECO indication)
CGear Shift Indicator (for versions/
markets, where provided)
DHeadlight alignment position (only
with dipped beam headlights on)
EOdometer (display of distance
travelled in kilometres/miles)
FTime (always displayed, even with key
removed and doors closed)
GStop/Start function indication (for
versions/markets where provided)
HOutside temperature (for versions/
markets, where provided)
I"Speed limiter" display (for versions/
markets, where provided)
RECONFIGURABLE
MULTIFUNCTION
DISPLAY
The following information is shown on
the display fig. 57:
ATime
BDate or trip distance display in
kilometres (or miles)
CGear Shift Indicator (for versions/
markets, where provided) or
Stop/Start function indication (for
versions/markets, where provided)
D"Speed limiter" display (for versions/
markets, where provided)
EOdometer (display of distance
travelled in kilometres/miles)
FHeadlight alignment position (only
with dipped beam headlights on)
GOutside temperature (for versions/
markets, where provided)
HVehicle status indication (e.g. doors
open, possible ice on road, etc.)
GEAR SHIFT INDICATOR
The GSI (Gear Shift Indicator) system
advises the driver to change gear
through a specific indication on the
instrument panel. Through the GSI, the
driver is informed that the gear change
will allow a reduction in fuel
consumption.
"SHIFT UP" icon(
SHIFT): the GSI
suggests to make an upshifting
"SHIFT DOWN" icon(
SHIFT): the
GSI suggests to make a downshifting.
The icon remains displayed until a
gear is shifted or the driving conditions
go back to a situation where
gearshifting is not required, to improve
consumption.
CONTROL BUTTONS
Theandbuttons are located
in the instrument panel fig. 58. The
buttons are
andon some
versions.
To scroll up through the screen and the
related options or to increase the
displayed value.
56F0Y1101C
57F0Y1103C
42
KNOWING THE INSTRUMENT PANEL
Page 60 of 240
Green warning lights
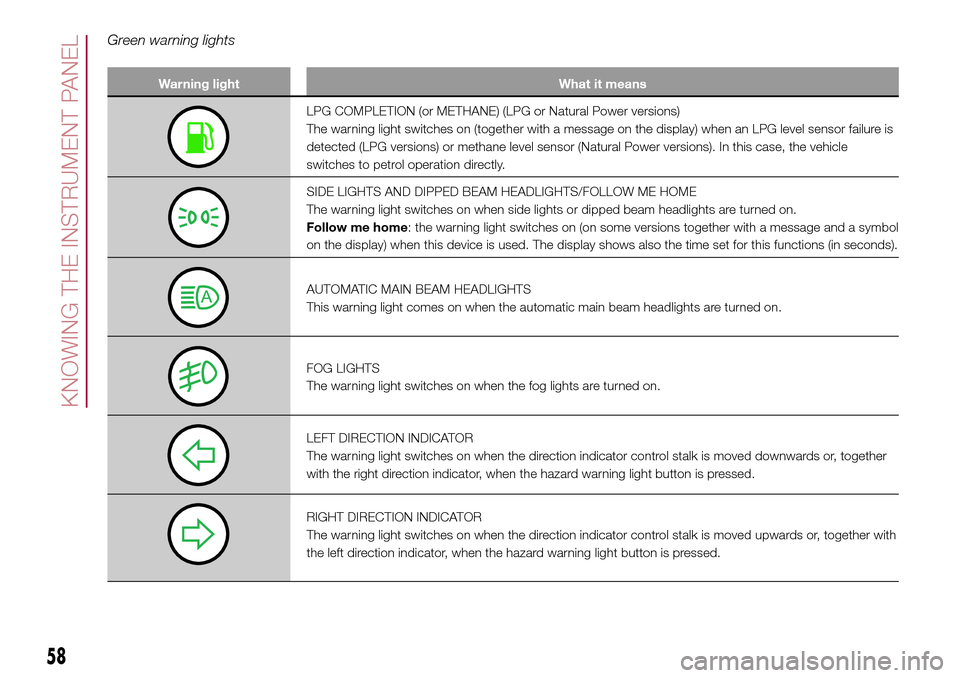
Warning light What it means
LPG COMPLETION (or METHANE) (LPG or Natural Power versions)
The warning light switches on (together with a message on the display) when an LPG level sensor failure is
detected (LPG versions) or methane level sensor (Natural Power versions). In this case, the vehicle
switches to petrol operation directly.
SIDE LIGHTS AND DIPPED BEAM HEADLIGHTS/FOLLOW ME HOME
The warning light switches on when side lights or dipped beam headlights are turned on.
Follow me home: the warning light switches on (on some versions together with a message and a symbol
on the display) when this device is used. The display shows also the time set for this functions (in seconds).
AUTOMATIC MAIN BEAM HEADLIGHTS
This warning light comes on when the automatic main beam headlights are turned on.
FOG LIGHTS
The warning light switches on when the fog lights are turned on.
LEFT DIRECTION INDICATOR
The warning light switches on when the direction indicator control stalk is moved downwards or, together
with the right direction indicator, when the hazard warning light button is pressed.
RIGHT DIRECTION INDICATOR
The warning light switches on when the direction indicator control stalk is moved upwards or, together with
the left direction indicator, when the hazard warning light button is pressed.
58
KNOWING THE INSTRUMENT PANEL
Page 72 of 240
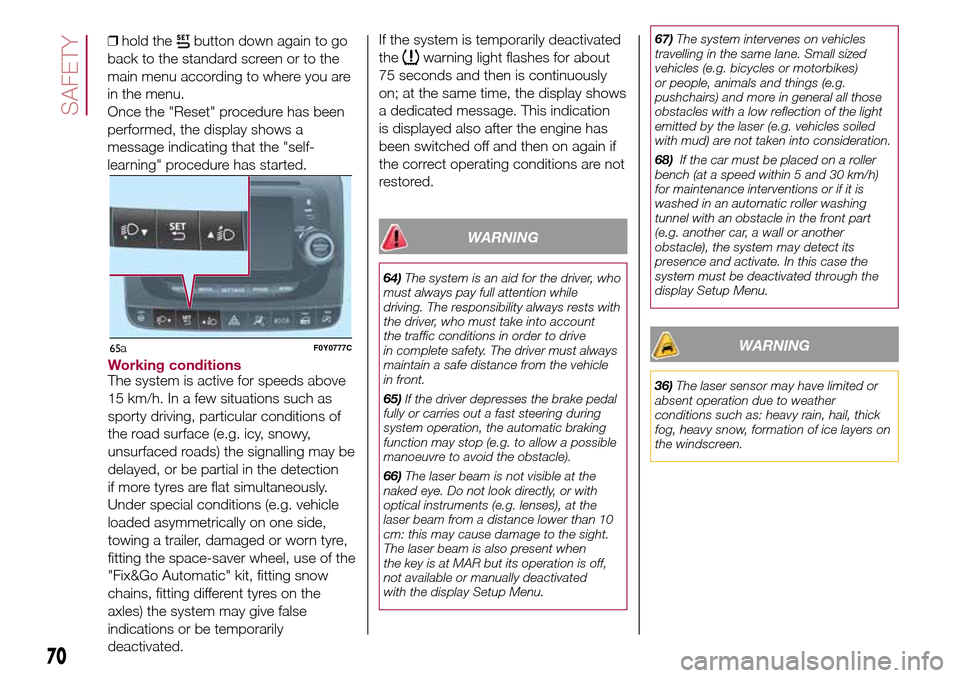
❒hold thebutton down again to go
back to the standard screen or to the
main menu according to where you are
in the menu.
Once the "Reset" procedure has been
performed, the display shows a
message indicating that the "self-
learning" procedure has started.
Working conditionsThe system is active for speeds above
15 km/h. In a few situations such as
sporty driving, particular conditions of
the road surface (e.g. icy, snowy,
unsurfaced roads) the signalling may be
delayed, or be partial in the detection
if more tyres are flat simultaneously.
Under special conditions (e.g. vehicle
loaded asymmetrically on one side,
towing a trailer, damaged or worn tyre,
fitting the space-saver wheel, use of the
"Fix&Go Automatic" kit, fitting snow
chains, fitting different tyres on the
axles) the system may give false
indications or be temporarily
deactivated.If the system is temporarily deactivated
the
warning light flashes for about
75 seconds and then is continuously
on; at the same time, the display shows
a dedicated message. This indication
is displayed also after the engine has
been switched off and then on again if
the correct operating conditions are not
restored.
WARNING
64)The system is an aid for the driver, who
must always pay full attention while
driving. The responsibility always rests with
the driver, who must take into account
the traffic conditions in order to drive
in complete safety. The driver must always
maintain a safe distance from the vehicle
in front.
65)If the driver depresses the brake pedal
fully or carries out a fast steering during
system operation, the automatic braking
function may stop (e.g. to allow a possible
manoeuvre to avoid the obstacle).
66)The laser beam is not visible at the
naked eye. Do not look directly, or with
optical instruments (e.g. lenses), at the
laser beam from a distance lower than 10
cm: this may cause damage to the sight.
The laser beam is also present when
the key is at MAR but its operation is off,
not available or manually deactivated
with the display Setup Menu.67)The system intervenes on vehicles
travelling in the same lane. Small sized
vehicles (e.g. bicycles or motorbikes)
or people, animals and things (e.g.
pushchairs) and more in general all those
obstacles with a low reflection of the light
emitted by the laser (e.g. vehicles soiled
with mud) are not taken into consideration.
68)If the car must be placed on a roller
bench (at a speed within 5 and 30 km/h)
for maintenance interventions or if it is
washed in an automatic roller washing
tunnel with an obstacle in the front part
(e.g. another car, a wall or another
obstacle), the system may detect its
presence and activate. In this case the
system must be deactivated through the
display Setup Menu.
WARNING
36)The laser sensor may have limited or
absent operation due to weather
conditions such as: heavy rain, hail, thick
fog, heavy snow, formation of ice layers on
the windscreen.
70
SAFETY
65F0Y0777Ca
Page 117 of 240
127)If the pressure has fallen below 1.8
bar, do not drive any further: the Fix&Go
Automatic kit cannot guarantee proper
hold because the tyre is too damaged.
Contact a Fiat Dealership.
128)You must always indicate that the tyre
was repaired using the Fix&Go Automatic
kit. Give the booklet to the technicians who
will be handling the tyre that was treated
using the Fix&Go Automatic kit.
129)Repairs are not possible in the case of
damage to the wheel rim (bad groove
distortion causing air loss). Do not remove
foreign bodies (screws or nails) from the
tyre.
130)Never operate the compressor for
longer than 20 consecutive minutes. Risk
of overheating. The Fix&Go Automatic kit is
not suitable for definitive repairs, so the
repaired tyres may only be used
temporarily.
131)The information required by current
regulations, regarding the chemical
substances for the protection of human
health and the environment and on the safe
use of the sealing fluid, are on the
packaging label. Compliance with the
indications on the label is an essential
condition to ensure the safety and
the effectiveness of the product.
Remember to carefully read the label
before use; the user of the product
is responsible for any damages caused by
improper use. The sealing fluid has an
expiry date. Replace the bottle if the
sealant has expired.
WARNING
64)In the event of a puncture caused by
foreign bodies, the kit may be used to
repair tyres showing damage on the tread
or shoulder up to max. 4 mm diameter.
WARNING
3)Dispose of the bottle and the sealant
properly. Dispose of the components
in compliance with national and local
regulations.
REPLACING A BULB
132) 133)65) 66)
GENERAL
INSTRUCTIONS
❒Before changing a bulb check the
contacts for oxidation;
❒burnt bulbs must be replaced by
others of the same type and power;
❒after replacing a headlight bulb,
always check the correct alignment of
the light beam;
❒when a light is not working, check
that the corresponding fuse is intact
before changing a bulb. For the location
of fuses, refer to the paragraph “If a
fuse blows” in this section;
115
Page 120 of 240
FRONT UPPER LIGHT
CLUSTER
This contains the bulbs for direction
indicators and dipped beam headlights.
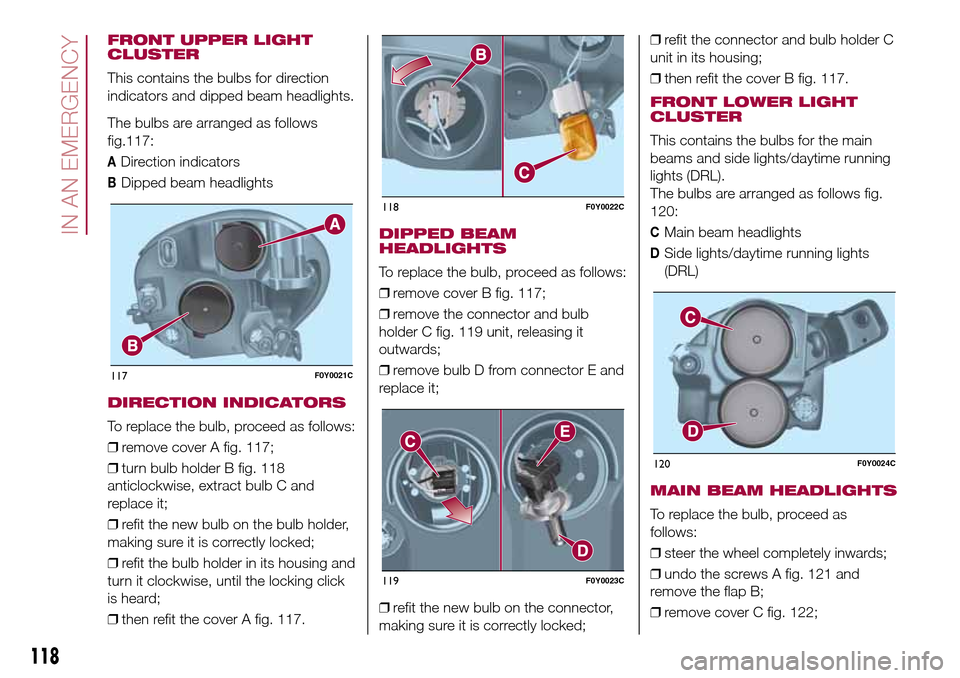
The bulbs are arranged as follows
117:
ADirection indicators
BDipped beam headlights
DIRECTION INDICATORS
To replace the bulb, proceed as follows:
❒remove cover A fig. 117;
❒turn bulb holder B fig. 118
anticlockwise, extract bulb C and
replace it;
❒refit the new bulb on the bulb holder,
making sure it is correctly locked;
❒refit the bulb holder in its housing and
turn it clockwise, until the locking click
is heard;
❒then refit the cover A fig. 117.
DIPPED BEAM
HEADLIGHTS
To replace the bulb, proceed as follows:
❒remove cover B fig. 117;
❒remove the connector and bulb
holder C fig. 119 unit, releasing it
outwards;
❒remove bulb D from connector E and
replace it;
❒refit the new bulb on the connector,
making sure it is correctly locked;❒refit the connector and bulb holder C
unit in its housing;
❒then refit the cover B fig. 117.
FRONT LOWER LIGHT
CLUSTER
This contains the bulbs for the main
beams and side lights/daytime running
lights (DRL).
The bulbs are arranged as follows fig.
120:
CMain beam headlights
DSide lights/daytime running lights
(DRL)
MAIN BEAM HEADLIGHTS
To replace the bulb, proceed as
follows:
❒steer the wheel completely inwards;
❒undo the screws A fig. 121 and
remove the flap B;
❒remove cover C fig. 122;
117F0Y0021C
118F0Y0022C
119F0Y0023C
120F0Y0024C
118
IN AN EMERGENCY
fig.
Page 236 of 240
INDEX
3
rd brake light (changing bulbs)..... 121
ABS (system) ................................ 65
Active safety systems ..................... 65
ASR (system) ................................. 65
Automatic dual-zone climate
control system ............................. 18
Battery (recharging)....................... 153
Bodywork (cleaning and
maintenance) ............................... 157
Bonnet ........................................... 31
Bulb (replacement) ......................... 115
Cargo Magic Space ...................... 30
Checking levels .............................. 145
Child protection systems ................ 76
City Brake Control - Collision
Mitigation System......................... 68
Climate control system ................... 16
CO2 emissions............................... 200
Control buttons .............................. 42
Control panel and on-board
instruments .................................. 40
Cornering lights .............................. 20
Cruise Control (constant speed
regulator)...................................... 99
Dashboard.................................... 7
Daytime running lights (DRL) .......... 19
Dimensions .................................... 174Dipped headlights (bulb
replacement) ................................ 118
Direction indicators (bulb
replacement) ................................ 118
Direction indicators ........................ 20
Display ........................................... 42
Doors ............................................. 26
Driving assistance systems ............ 67
DST (system).................................. 66
Dualdrive (electric power
steering) ....................................... 32
Dusk sensor ................................... 20
Electric sun roof ............................ 24
Electric windows ............................ 28
Engine compartment...................... 145
ERM (system) ................................. 66
ESC (system) ................................. 65
Exterior lights ................................. 19
Fiat CODE (system) ....................... 8
Fixed glass roof .............................. 23
Fix&Go Automatic kit...................... 113
Flashing ......................................... 20
Fluids and lubricants ...................... 193
Fog lights (bulb replacement) ......... 120
Follow Me Home (device) ............... 21
Front airbags .................................. 86
Front seats ..................................... 11
Fuel consumption .......................... 195
Fuel cut-off system......................... 129
Fuses (replacement) ....................... 122
Gear Shift Indicator (system) ......... 42
Handbrake.................................... 94
Hazard warning lights..................... 109
Head restraints............................... 13
Heating and ventilation ................... 16
Hill Holder (system) ........................ 65
Identification data .......................... 160
Ignition device ................................ 10
Important information and
recommendations ........................ 222
iTPMS ............................................ 69
Jump starting ................................ 128
"Lane Change" function ................ 20
Lifting the vehicle .......................... 156
Luggage compartment................... 29
Main beam headlights (bulb
replacement) ................................ 118
Main beam headlights .................... 20
Manual climate control system ....... 17
Multifunction display....................... 42
Number plate lights (bulb
replacement) ................................ 121
Occupant protection systems ....... 71
On-board instruments
– multifunction display .................. 40
– reconfigurable multifunction
display....................................... 41
Parking sensors ............................ 101
INDEX