brakes FIAT 500X 2014 2.G User Guide
[x] Cancel search | Manufacturer: FIAT, Model Year: 2014, Model line: 500X, Model: FIAT 500X 2014 2.GPages: 476, PDF Size: 5.32 MB
Page 257 of 476

NOTE:
•When enabled the system operates above 37 mph
(60 km/h) and below 112 mph (180 km/h).
• Use of the turn signal suppresses the warnings.
• The system will not apply torque to the steering
wheel whenever a safety system engages. (anti-lock
brakes, traction control system, electronic stability
control, forward collision warning, etc.).
PARKVIEW REAR BACK UP CAMERA — IF
EQUIPPED
The ParkView Rear Back Up Camera that allows you to
see an on-screen image of your vehicle’s rear surround-
ings when the gear selector is put into REVERSE. The
image will be displayed on the touchscreen display
along with a note to “check entire surroundings” across
the top of the screen. After five seconds this note will
disappear. The ParkView camera is located above the
rear license plate. When the vehicle is shifted out of REVERSE (with
camera delay turned off), the rear camera mode is
exited and the navigation or audio screen appears
again.
When the vehicle is shifted out of REVERSE (with
camera delay turned on), the camera image will con-
tinue to be displayed for up to 10 seconds after shifting
out of REVERSE unless the vehicle speed exceeds
8 mph (13 km/h), the vehicle is shifted into PARK or the
ignition is switched to STOP mode.Parking Camera7
STARTING AND OPERATING 255
Page 271 of 476
components sometimes specified by purchasers for
increased durability does not necessarily increase the
vehicle’s GVWR.
Tire Size
The tire size on the Vehicle Certification Label repre-
sents the actual tire size on your vehicle. Replacement
tires must be equal to the load capacity of this tire size.
Rim Size
This is the rim size that is appropriate for the tire size
listed.
Inflation Pressure
This is the cold tire inflation pressure for your vehicle
for all loading conditions up to full GAWR.
Curb Weight
The curb weight of a vehicle is defined as the total
weight of the vehicle with all fluids, including vehicle
fuel, at full capacity conditions, and with no occupants
or cargo loaded into the vehicle. The front and rear curb
weight values are determined by weighing your vehicle
on a commercial scale before any occupants or cargo are
added.
Loading
The actual total weight and the weight of the front and
rear of your vehicle at the ground can best be deter-
mined by weighing it when it is loaded and ready for
operation.
The entire vehicle should first be weighed on a com-
mercial scale to insure that the GVWR has not been
exceeded. The weight on the front and rear of the
vehicle should then be determined separately to be sure
that the load is properly distributed over the front and
rear axle. Weighing the vehicle may show that the
GAWR of either the front or rear axles has been ex-
ceeded but the total load is within the specified GVWR.
If so, weight must be shifted from front to rear or rear to
front as appropriate until the specified weight limita-
tions are met. Store the heavier items down low and be
sure that the weight is distributed equally. Stow all
loose items securely before driving.
Improper weight distributions can have an adverse
effect on the way your vehicle steers and handles and
the way the brakes operate.
7
STARTING AND OPERATING 269
Page 273 of 476
3. Replace the tires when tread wear indicators firstbecome visible.
4. Keep tires properly inflated.
5. Maintain sufficient distance between your vehicle and the vehicle in front of you to avoid a collision in
a sudden stop.
DRIVING THROUGH WATER
Driving through water more than a few inches/
centimeters deep will require extra caution to ensure
safety and prevent damage to your vehicle.
Flowing/Rising Water
WARNING!
Do not drive on or across a road or path where water
is flowing and/or rising (as in storm run-off). Flowing
water can wear away the road or path’s surface and
cause your vehicle to sink into deeper water. Further-
more, flowing and/or rising water can carry your
vehicle away swiftly. Failure to follow this warning
may result in injuries that are serious or fatal to you,
your passengers, and others around you.
Shallow Standing Water
Although your vehicle is capable of driving through
shallow standing water, consider the following Cau-
tions and Warnings before doing so.
WARNING!
•Driving through standing water limits your vehi-
cle’s traction capabilities. Do not exceed 5 mph
(8 km/h) when driving through standing water.
• Driving through standing water limits your vehi-
cle’s braking capabilities, which increases stop-
ping distances. Therefore, after driving through
standing water, drive slowly and lightly press on
the brake pedal several times to dry the brakes.
• Failure to follow these warnings may result in
injuries that are serious or fatal to you, your
passengers, and others around you.
7
STARTING AND OPERATING 271
Page 280 of 476
Consider the following items when computing the
weight on the rear axle of the vehicle:
•The tongue weight of the trailer.
• The weight of any other type of cargo or equipment
put in or on your vehicle.
• The weight of the driver and all passengers.
NOTE: Remember that everything put into or on the
trailer adds to the load on your vehicle. Also, additional
factory-installed options or dealer-installed options
must be considered as part of the total load on your
vehicle. Refer to the “Tire And Loading Information”
placard for the maximum combined weight of occu-
pants and cargo for your vehicle.
Towing Requirements
To promote proper break-in of your new vehicle drive-
train components, the following guidelines are recom-
mended:
WARNING!
Improper towing can lead to a collision. Follow
these guidelines to make your trailer towing as safe
as possible:
• Make certain that the load is secured in the trailer
and that it will not shift during travel. When
trailering cargo that is not fully secured, dynamic
load shifts can occur that may be difficult for the
driver to control. You could lose control of your
vehicle and have a collision.
• When hauling cargo, or towing a trailer, do not
overload your vehicle or trailer. Overloading can
cause a loss of control, poor performance, or
damage to brakes, axle, engine, transmission,
steering, suspension, chassis structure, or tires.
• Safety chains must always be used between your
vehicle and trailer. Always connect the chains to
the frame or hook retainers of the vehicle hitch.
Cross the chains under the trailer tongue and
allow enough slack for turning corners.
• Vehicles with trailers should not be parked on a
grade. When parking, apply the parking brake on
the tow vehicle. Put the tow vehicle transmission
(Continued)
278 STARTING AND OPERATING
Page 282 of 476

Towing Requirements — Trailer Brakes
•Do not interconnect the hydraulic brake system or
vacuum system of your vehicle with that of the
trailer. This could cause inadequate braking and
possible personal injury.
• An electronically actuated trailer brake controller is
required when towing a trailer with electronically
actuated brakes. When towing a trailer equipped
with a hydraulic surge actuated brake system, an
electronic brake controller is not required.
• Trailer brakes are recommended for trailers over
1,000 lbs (453 kg) and required for trailers in excess of
2,000 lbs (907 kg).
WARNING!
• Do not connect trailer brakes to your vehicle’s
hydraulic brake lines. It can overload your brake
system and cause it to fail. You might not have
brakes when you need them and could have a
collision.
• Towing any trailer will increase your stopping
distance. When towing you should allow for
additional space between your vehicle and the
vehicle in front of you. Failure to do so could
result in a collision.
CAUTION!
If the trailer weighs more than 1,000 lbs (453 kg)
loaded, it should have its own brakes and they
should be of adequate capacity. Failure to do this
could lead to accelerated brake lining wear, higher
brake pedal effort, and longer stopping distances.
280 STARTING AND OPERATING
Page 284 of 476
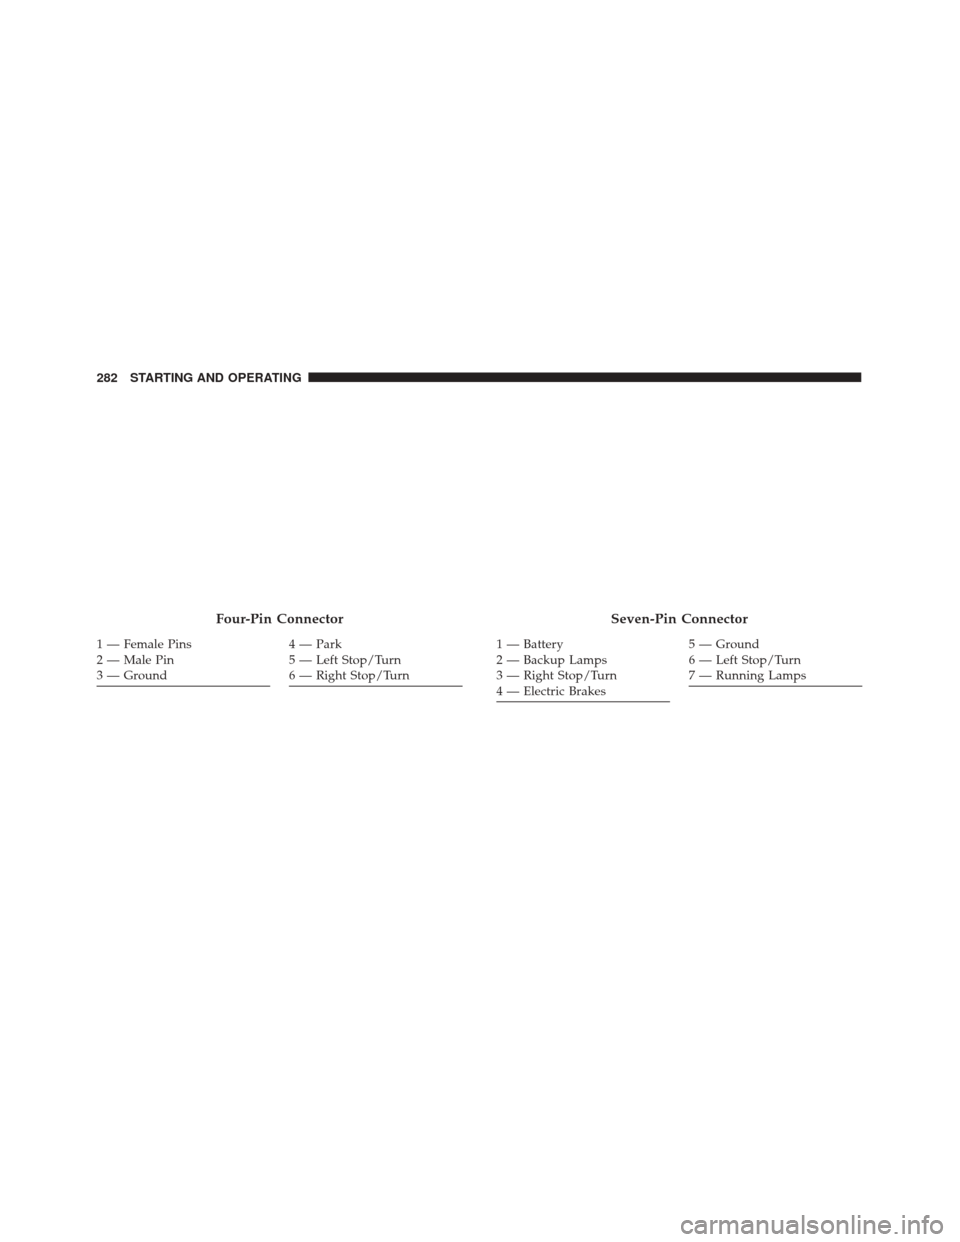
Four-Pin Connector
1 — Female Pins
2—MalePin
3 — Ground4 — Park
5 — Left Stop/Turn
6 — Right Stop/Turn
Seven-Pin Connector
1 — Battery
2 — Backup Lamps
3 — Right Stop/Turn
4 — Electric Brakes5 — Ground
6 — Left Stop/Turn
7 — Running Lamps
282 STARTING AND OPERATING
Page 349 of 476
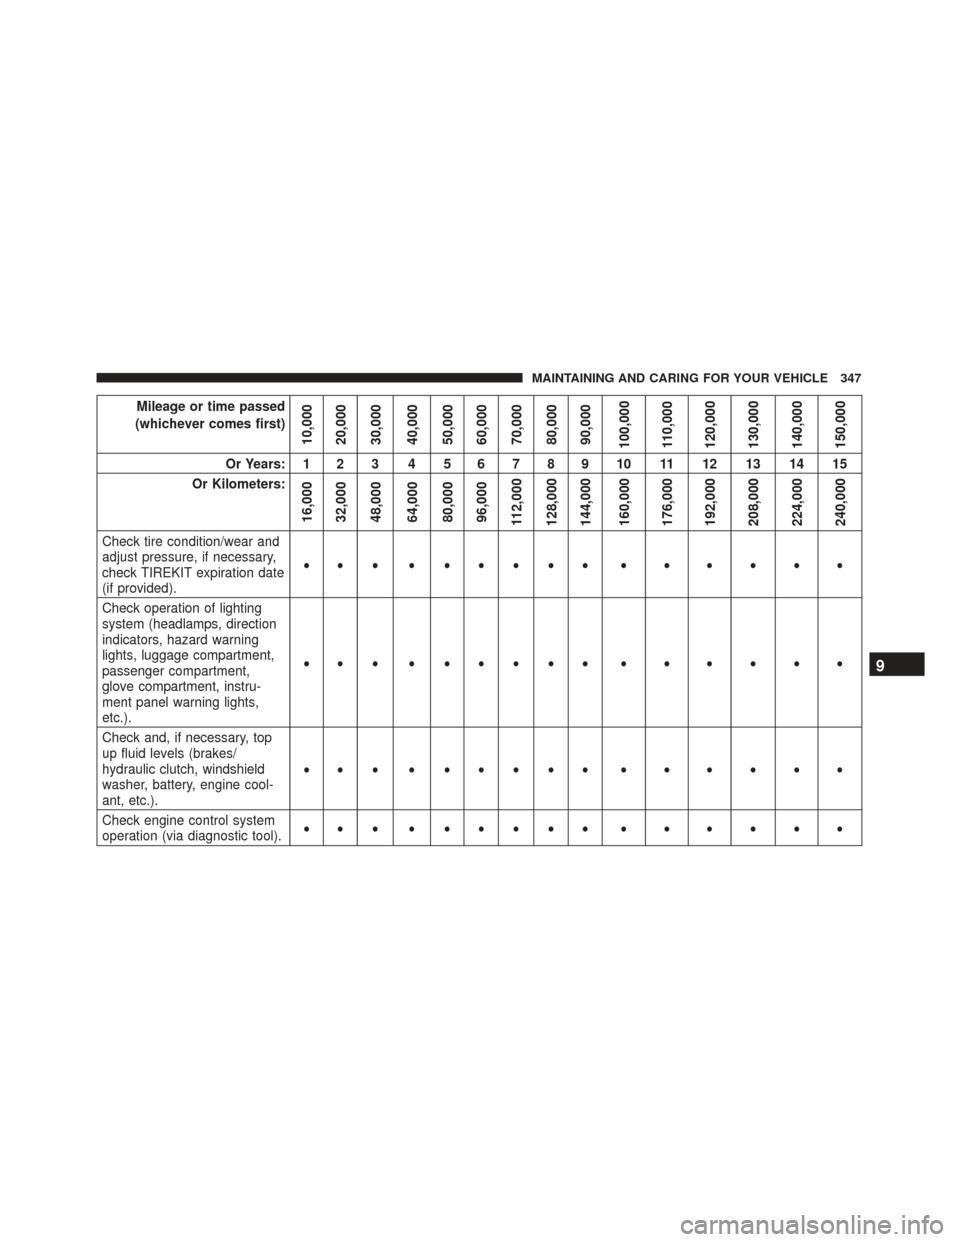
Mileage or time passed
(whichever comes first)
10,000
20,000
30,000
40,000
50,000
60,000
70,000
80,000
90,000
100,000
110,000
120,000
130,000
140,000
150,000
Or Years: 1 2 3 4 5 6 7 8 9 10 11 12 13 14 15
Or Kilometers:
16,000
32,000
48,000
64,000
80,000
96,000
112,000
128,000
144,000
160,000
176,000
192,000
208,000
224,000
240,000
Check tire condition/wear and
adjust pressure, if necessary,
check TIREKIT expiration date
(if provided). ••• •••••• • • • • • •
Check operation of lighting
system (headlamps, direction
indicators, hazard warning
lights, luggage compartment,
passenger compartment,
glove compartment, instru-
ment panel warning lights,
etc.). ••• •••••• • • • • • •
Check and, if necessary, top
up fluid levels (brakes/
hydraulic clutch, windshield
washer, battery, engine cool-
ant, etc.). ••• •••••• • • • • • •
Check engine control system
operation (via diagnostic tool). ••• •••••• • • • • • •
9
MAINTAINING AND CARING FOR YOUR VEHICLE 347
Page 350 of 476
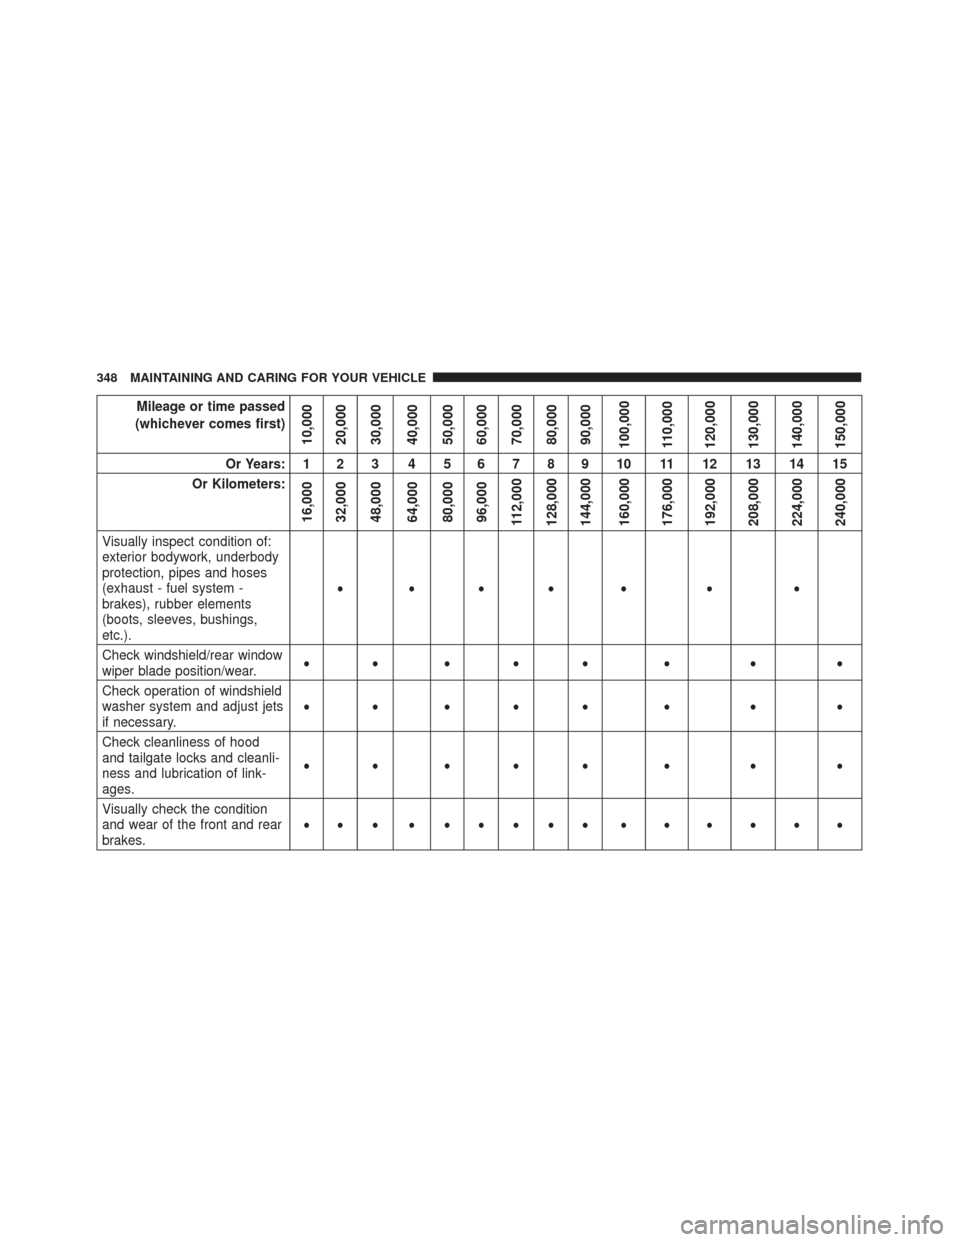
Mileage or time passed
(whichever comes first)
10,000
20,000
30,000
40,000
50,000
60,000
70,000
80,000
90,000
100,000
110,000
120,000
130,000
140,000
150,000
Or Years: 1 2 3 4 5 6 7 8 9 10 11 12 13 14 15
Or Kilometers:
16,000
32,000
48,000
64,000
80,000
96,000
112,000
128,000
144,000
160,000
176,000
192,000
208,000
224,000
240,000
Visually inspect condition of:
exterior bodywork, underbody
protection, pipes and hoses
(exhaust - fuel system -
brakes), rubber elements
(boots, sleeves, bushings,
etc.). •••• • • •
Check windshield/rear window
wiper blade position/wear. •• ••• • • •
Check operation of windshield
washer system and adjust jets
if necessary. •• ••• • • •
Check cleanliness of hood
and tailgate locks and cleanli-
ness and lubrication of link-
ages. •• ••• • • •
Visually check the condition
and wear of the front and rear
brakes. ••• •••••• • • • • • •
348 MAINTAINING AND CARING FOR YOUR VEHICLE
Page 371 of 476
WARNING!
Riding the brakes can lead to brake failure and
possibly a collision. Driving with your foot resting
or riding on the brake pedal can result in abnor-
mally high brake temperatures, excessive lining
wear, and possible brake damage. Riding the
brakes may also reduce braking capacity in an
emergency.
Brake Master Cylinder
The fluid level in the master cylinder should be checked
when performing under hood services, or immediately
if the “Brake Warning Light” is on.
Be sure to clean the top of the master cylinder area
before removing the cap. If necessary, add fluid to bring
the fluid level up to the requirements described on the
brake fluid reservoir. Fluid level can be expected to fall
as the brake pads wear. The brake fluid level should be
checked when the pads are replaced. However, low
fluid level may be caused by a leak and a checkup may
be needed.NOTE:
If your vehicle is equipped with a manual
transmission, the brake fluid reservoir supplies fluid to
both the brake system and the clutch release system.
The two systems are separated in the reservoir, and a
leak in one system will not affect the other system. The
manual transmission clutch release system should not
require fluid replacement during the life of the vehicle.
If the brake fluid reservoir is low and the brake system
does not indicate any leaks or other problems, it may be
a result of a leak in the hydraulic clutch release system.
See your local authorized dealer for service.
Use only manufacturer’s recommended brake fluid.
Refer to “Fluids, Lubricants, And Genuine Parts” in the
“Technical Data” section for further information.
WARNING!
• Use only manufacturer ’s recommended brake
fluid. Refer to “Fluids, Lubricants, And Genuine
Parts” in the “Technical Data” section for further
information. Using the wrong type of brake fluid
can severely damage your brake system and/or
impair its performance. The proper type of brake
fluid for your vehicle is also identified on the
(Continued)
9
MAINTAINING AND CARING FOR YOUR VEHICLE 369
Page 377 of 476
prevent damage to the wheels. Mopar Wheel Treatment
or Mopar Chrome Cleaner or their equivalent is recom-
mended or select a non-abrasive, non-acidic cleaner for
aluminum or chrome wheels. Do not use any products
on Dark Vapor or Black Satin Chrome Wheels. They will
permanently damage this finish and such damage is not
covered by the New Vehicle Limited Warranty.
CAUTION!
Do not use scouring pads, steel wool, a bristle
brush, metal polishes or oven cleaner. These prod-
ucts may damage the wheel’s protective finish.
Such damage is not covered by the New Vehicle
Limited Warranty. Only car wash soap, Mopar
Wheel Cleaner or equivalent is recommended.
NOTE: If you intend parking or storing your vehicle for
an extended period after cleaning the wheels with
wheel cleaner, drive your vehicle for a few minutes
before doing so. Driving the vehicle and applying the
brakes when stopping will reduce the risk of brake rotor
corrosion. Dark Vapor Or Black Satin Chrome Wheels
CAUTION!
If your vehicle is equipped with Dark Vapor or
Black Satin Chrome wheels DO NOT USE wheel
cleaners, abrasives or polishing compounds. They
will permanently damage this finish and such dam-
age is not covered by the New Vehicle Limited
Warranty. USE ONLY MILD SOAP AND WATER
WITH A SOFT CLOTH. Used on a regular basis;
this is all that is required to maintain this finish.
Stain Repel Fabric Cleaning Procedure — If
Equipped
Stain Repel seats may be cleaned in the following
manner:
•
Remove as much of the stain as possible by blotting
with a clean, dry towel.
• Blot any remaining stain with a clean, damp towel.
• For tough stains, apply Mopar Total Clean, or a mild
soap solution to a clean, damp cloth and remove
stain. Use a fresh, damp towel to remove soap
residue.9
MAINTAINING AND CARING FOR YOUR VEHICLE 375