driver seat adjustment FIAT 500X 2015 2.G Owners Manual
[x] Cancel search | Manufacturer: FIAT, Model Year: 2015, Model line: 500X, Model: FIAT 500X 2015 2.GPages: 240, PDF Size: 10.72 MB
Page 17 of 240
WARNING
8)Once the Dead Lock system is
engaged, it is impossible to open the
doors from inside the vehicle. Before
getting out of the vehicle, please therefore
check that there is no-one left on board.
9)NEVER leave children unattended inside
the vehicle, nor leave the vehicle with the
doors unlocked in a place that children can
access easily. Children may seriously, or
even fatally, injure themselves. Also ensure
that children do not inadvertently operate
the electric parking brake, the brake pedal
or the automatic transmission lever.
10)Always use this device when carrying
children. After engaging the child lock
on both rear doors, check for proper
engagement by trying to open a rear door
with the internal handle.
WARNING
2)Make sure to take the key with you once
a door or the tailgate is locked, to prevent
locking the same key inside the vehicle.
Once it has been left inside, the key can be
collected only using the second key
supplied.3)The operation of the recognition system
depends on various factors, such as, for
example, any electromagnetic wave
interference from external sources (e.g.
mobile phones), the charge of the battery
in the electronic key and the presence
of metal objects near the key or the vehicle.
In these cases it is still possible to unlock
the doors by using the metal insert in
the electronic key (see description on the
following pages).
SEATSFRONT SEATS WITH
MANUAL ADJUSTMENT
11)4)
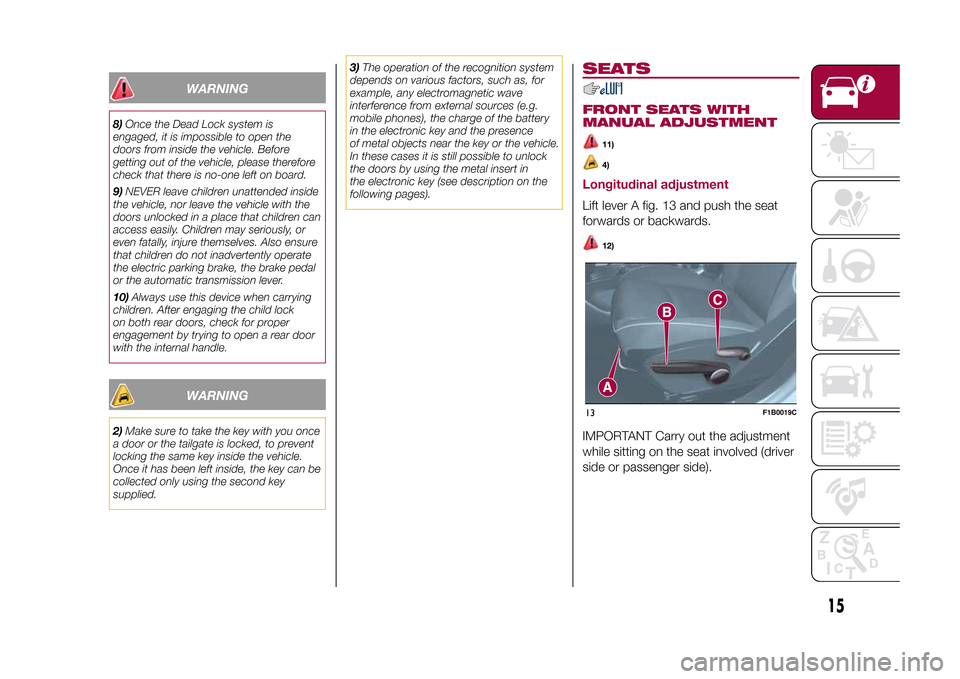
Longitudinal adjustmentLift lever A fig. 13 and push the seat
forwards or backwards.
12)
IMPORTANT Carry out the adjustment
while sitting on the seat involved (driver
side or passenger side).13
F1B0019C
15
15-12-2014 8:23 Pagina 15
Page 18 of 240
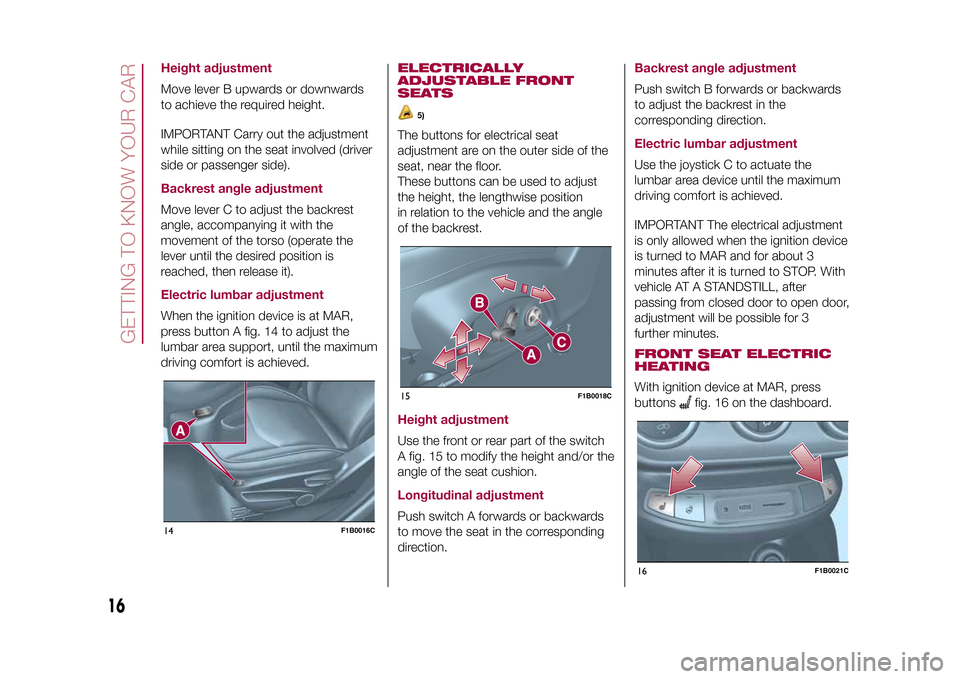
Height adjustmentMove lever B upwards or downwards
to achieve the required height.
IMPORTANT Carry out the adjustment
while sitting on the seat involved (driver
side or passenger side).Backrest angle adjustmentMove lever C to adjust the backrest
angle, accompanying it with the
movement of the torso (operate the
lever until the desired position is
reached, then release it).Electric lumbar adjustmentWhen the ignition device is at MAR,
press button A fig. 14 to adjust the
lumbar area support, until the maximum
driving comfort is achieved.
ELECTRICALLY
ADJUSTABLE FRONT
SEATS
5)
The buttons for electrical seat
adjustment are on the outer side of the
seat, near the floor.
These buttons can be used to adjust
the height, the lengthwise position
in relation to the vehicle and the angle
of the backrest.Height adjustmentUse the front or rear part of the switch
A fig. 15 to modify the height and/or the
angle of the seat cushion.Longitudinal adjustmentPush switch A forwards or backwards
to move the seat in the corresponding
direction.
Backrest angle adjustmentPush switch B forwards or backwards
to adjust the backrest in the
corresponding direction.Electric lumbar adjustmentUse the joystick C to actuate the
lumbar area device until the maximum
driving comfort is achieved.
IMPORTANT The electrical adjustment
is only allowed when the ignition device
is turned to MAR and for about 3
minutes after it is turned to STOP. With
vehicle AT A STANDSTILL, after
passing from closed door to open door,
adjustment will be possible for 3
further minutes.FRONT SEAT ELECTRIC
HEATINGWith ignition device at MAR, press
buttons
fig. 16 on the dashboard.
14
F1B0016C
15
F1B0018C
16
F1B0021C
16
GETTING TO KNOW YOUR CAR
15-12-2014 8:23 Pagina 16
Page 19 of 240
You can select two heating levels:
❒"minimum heating": (one orange LED
lit on the buttons);
❒"maximum heating": two orange
LEDs lit on the buttons.
After selecting one heating level, you
need to wait for a few minutes until
warm air flows into the compartment.
When the "maximum heating" setting is
selected, the heater produces a
boosted heat level for the first minutes
of operation.
IMPORTANT To preserve the battery
charge, this function cannot be
activated when the engine is off.REAR SEATS
Partial extension of the boot (1/3 or
2/3)
13)6)
❒remove the parcel shelf;
❒completely lower the rear seat head
restraints;
❒move the seat belt to the side,
making sure that it is fully extended and
not twisted;
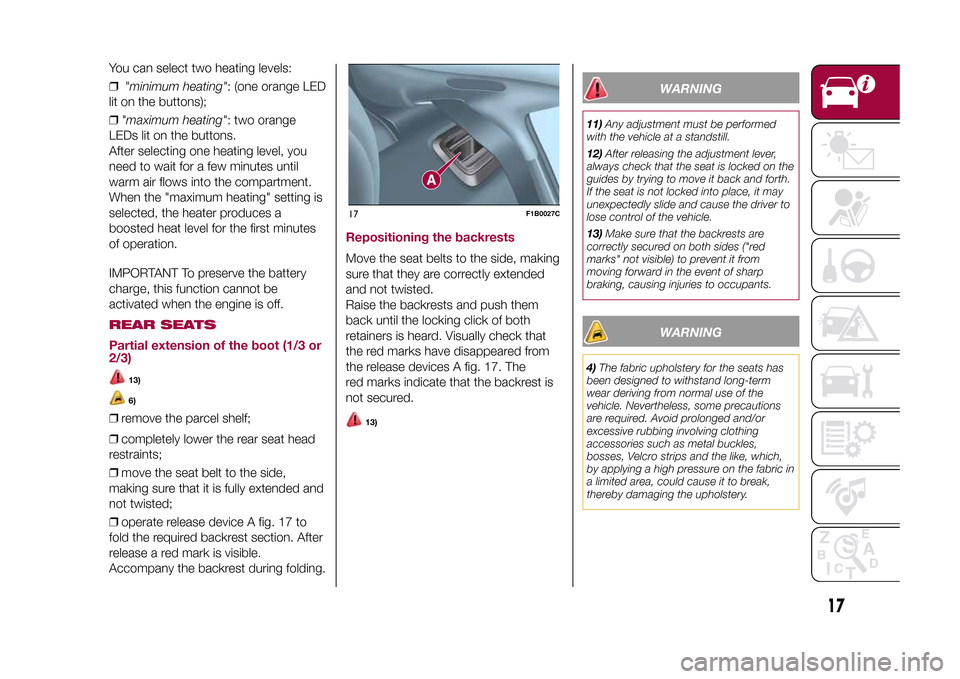
❒operate release device A fig. 17 to
fold the required backrest section. After
release a red mark is visible.
Accompany the backrest during folding.
Repositioning the backrestsMove the seat belts to the side, making
sure that they are correctly extended
and not twisted.
Raise the backrests and push them
back until the locking click of both
retainers is heard. Visually check that
the red marks have disappeared from
the release devices A fig. 17. The
red marks indicate that the backrest is
not secured.
13)
WARNING
11)Any adjustment must be performed
with the vehicle at a standstill.
12)After releasing the adjustment lever,
always check that the seat is locked on the
guides by trying to move it back and forth.
If the seat is not locked into place, it may
unexpectedly slide and cause the driver to
lose control of the vehicle.
13)Make sure that the backrests are
correctly secured on both sides ("red
marks" not visible) to prevent it from
moving forward in the event of sharp
braking, causing injuries to occupants.
WARNING
4)The fabric upholstery for the seats has
been designed to withstand long-term
wear deriving from normal use of the
vehicle. Nevertheless, some precautions
are required. Avoid prolonged and/or
excessive rubbing involving clothing
accessories such as metal buckles,
bosses, Velcro strips and the like, which,
by applying a high pressure on the fabric in
a limited area, could cause it to break,
thereby damaging the upholstery.
17
F1B0027C
17
15-12-2014 8:23 Pagina 17
Page 20 of 240
5)Do not arrange objects beneath the
electrically adjustable seat and do not
impede its movement, since the controls
may be damaged. The fabric upholstery of
the seats has been designed to withstand
long-term wear deriving from normal use of
the vehicle. Nevertheless, some
precautions are required. Avoid prolonged
and/or excessive rubbing involving clothing
accessories such as metal buckles,
bosses, Velcro strips and the like, which,
by applying a high pressure on the fabric in
a limited area, could cause it to break,
thereby damaging the upholstery. They
may also restrict the seat travel.
6)Before tilting the backrest, remove any
objects lying on the seat.
HEAD RESTRAINTSFRONT
14)
AdjustmentThey can be adjusted to 4 height
positions (completely raised / 2
intermediate positions / completely
lowered).
Upward adjustment: raise the head
restraint until it clicks into place.
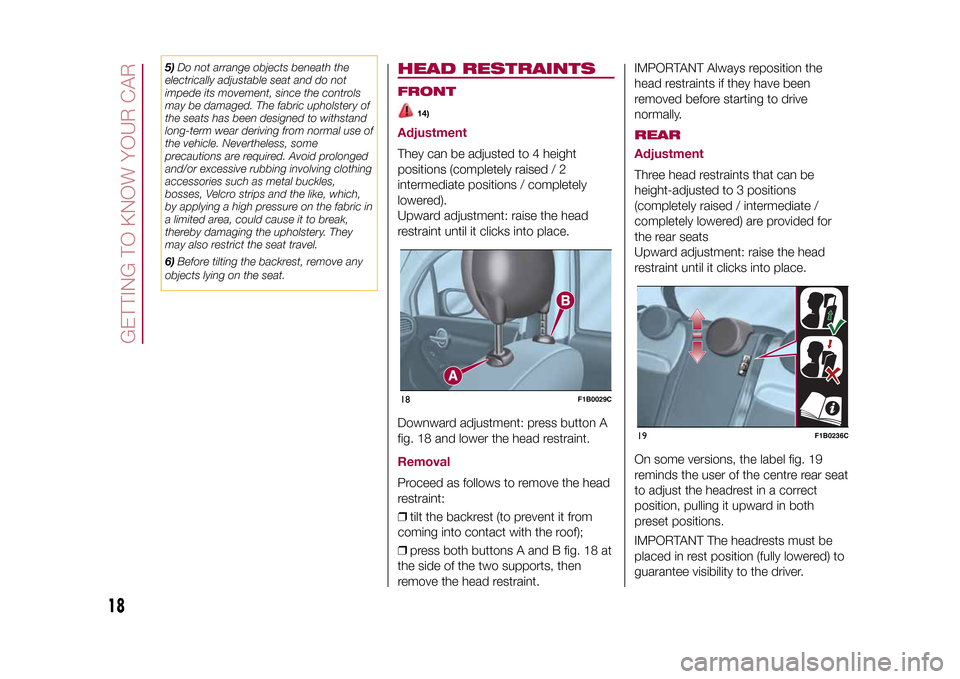
Downward adjustment: press button A
fig. 18 and lower the head restraint.RemovalProceed as follows to remove the head
restraint:
❒tilt the backrest (to prevent it from
coming into contact with the roof);
❒press both buttons A and B fig. 18 at
the side of the two supports, then
remove the head restraint.IMPORTANT Always reposition the
head restraints if they have been
removed before starting to drive
normally.
REAR
AdjustmentThree head restraints that can be
height-adjusted to 3 positions
(completely raised / intermediate /
completely lowered) are provided for
the rear seats
Upward adjustment: raise the head
restraint until it clicks into place.
On some versions, the label fig. 19
reminds the user of the centre rear seat
to adjust the headrest in a correct
position, pulling it upward in both
preset positions.
18
F1B0029C
19
F1B0236C
18
GETTING TO KNOW YOUR CAR
15-12-2014 8:23 Pagina 18
IMPORTANT The headrests must be
placed in rest position (fully lowered) to
guarantee visibility to the driver.
Page 44 of 240
MAIN MENUThe Menu includes the following items:
❒TRIP
❒MOOD SELECTOR/GSI
❒VEHICLE INFO
❒DRIVER ASSIST
❒AUDIO
❒PHONE
❒NAVIGATION
❒ALERTS
❒VEHICLE SETUPVehicle setup (Change vehicle
settings)This menu item allows you to change
the settings for:
❒"Display";
❒"Units";
❒"Clock & Date";
❒"Security"
❒"Safety & Assistance";
❒"Lights";
❒"Doors & Locks".DisplayBy selecting item "Display" you can
access the settings/information
regarding: "Language", "See phone",
"See navigation", "Trip B automatic
reset", "Mood Selector repetition".
"Units"Select item "Units" to choose the unit of
measurement between: "Imperial",
"Metric", "Custom"."Clock & Date"Select item "Clock & Date" to make the
following adjustments: "Set time",
"Time format", Set date"."Security"Select item "Security" to make the
following adjustments: "Passenger
AIRBAG", "Speed beep", "Seat belt
buzzer", "Hill Hold Control".
"Passenger AIRBAG" adjustment allows
you to activate/deactivate the
passenger airbag:
❒Passenger's protection active: the
ONLED comes on constantly in
the instrument panel dashboard.
❒Passenger's protection not
active: the
OFFLED comes on
constantly in the instrument panel
dashboard.
"Safety & Assistance"For possible adjustments see the
Uconnect™paragraph in the
dedicated chapter.
"Lights"Select item "Lights" to make the
following adjustments: "Ambient
lighting", "Headlight sensor", "Follow
me", "Headlights while opening", "High
Beams Auto Dim", "Daytime Lights",
"Cornering lights"."Doors & Locks"Select item "Doors & Locks" to make
the following adjustments: "Autoclose",
"Auto unlock on exit", "Flash Lights
w/Lock", "Horn with Lock", "Horn
w/Remote Start", "Remote Unlock",
"Door Unlock" (versions with Keyless
Entry), "Keyless Entry".
42
KNOWING THE INSTRUMENT PANEL
15-12-2014 8:23 Pagina 42
Page 77 of 240
31)The Fix&Go automatic quick tyre repair
kit, provided with the vehicle, is compatible
with the iTPMS sensors. Using sealants
different from that in the original kit may
compromise its operation. If sealants not
equivalent with the original ones are used,
it is recommended to have the iTPMS
sensor operation checked by a qualified
repair centre.
OCCUPANT
PROTECTION
SYSTEMSThe most important safety equipment
of the vehicle comprises the following
protection systems:
❒seat belts;
❒SBR (Seat Belt Reminder) system;
❒head restraints;
❒child restraint systems;
❒front airbags and side bags.
Read the information given the
following pages with the utmost care. It
is of fundamental importance that the
protection systems are used in the
correct way to guarantee the maximum
possible safety level for the driver and
the passengers.
For the description of the head restraint
adjustment see paragraph "Head
restraints" in chapter "Knowing your
vehicle".
SEAT BELTSAll vehicle seats are equipped with seat
belts with three anchor points and a
retractor.
The retractor mechanism operates
locking the belt in the event of sharp
braking or strong deceleration due
to an impact. This allows the belt strap
to slide freely and to adapt to the body
of the occupant. In the event of an
accident, the belt will lock reducing the
risk of impact inside the passenger
compartment and of being projected
outside the vehicle.
The driver is responsible for respecting,
and ensuring that all the other
occupants of the vehicle also respect,
the local laws in force in relation to
the use of the seat belts.
Always fasten the seat belts before
setting off.USING THE SEAT BELTSThe seat belt should be worn keeping
the torso straight and rested against
the backrest.
To fasten the seat belts, hold tongue A
fig. 63 and insert it into buckle B, until
it clicks into place.
On removal of the belt, if it jams, let it
rewind for a short stretch, then pull
it out again without jerking.
75
15-12-2014 8:23 Pagina 75
Page 134 of 240
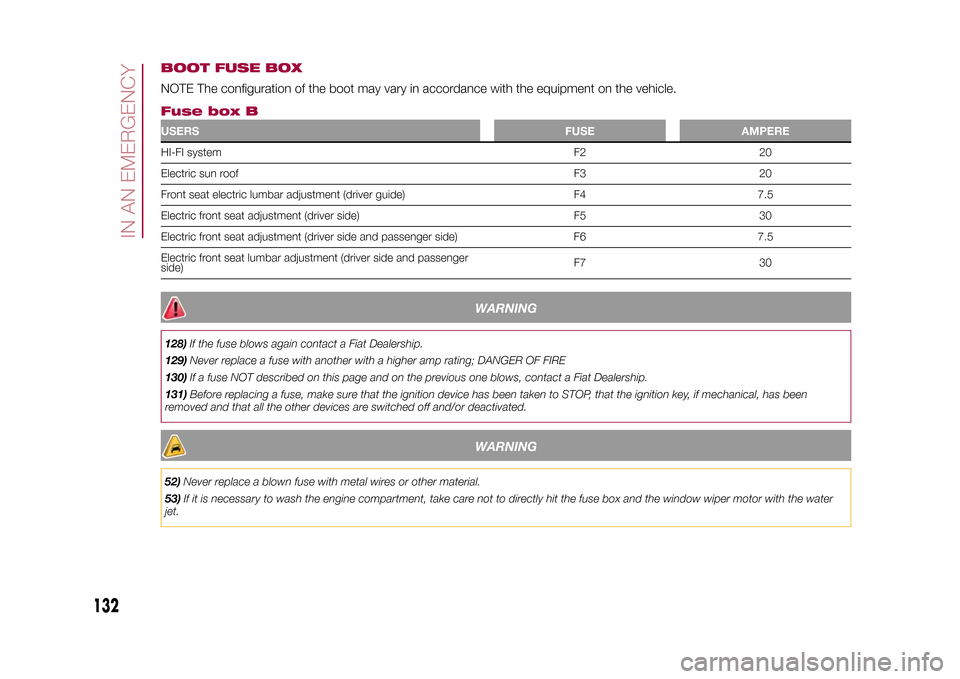
BOOT FUSE BOXNOTE The configuration of the boot may vary in accordance with the equipment on the vehicle.Fuse box BUSERSFUSE AMPEREHI-FI system F2 20
Electric sun roof F3 20
Front seat electric lumbar adjustment (driver guide) F4 7.5
Electric front seat adjustment (driver side) F5 30
Electric front seat adjustment (driver side and passenger side) F6 7.5
Electric front seat lumbar adjustment (driver side and passenger
side)F7 30
WARNING
128)If the fuse blows again contact a Fiat Dealership.
129)Never replace a fuse with another with a higher amp rating; DANGER OF FIRE
130)If a fuse NOT described on this page and on the previous one blows, contact a Fiat Dealership.
131)Before replacing a fuse, make sure that the ignition device has been taken to STOP, that the ignition key, if mechanical, has been
removed and that all the other devices are switched off and/or deactivated.
WARNING
52)Never replace a blown fuse with metal wires or other material.
53)If it is necessary to wash the engine compartment, take care not to directly hit the fuse box and the window wiper motor with the water
jet.
132
IN AN EMERGENCY
15-12-2014 8:23 Pagina 132