FIAT 500X 2019 Owner handbook (in English)
Manufacturer: FIAT, Model Year: 2019, Model line: 500X, Model: FIAT 500X 2019Pages: 284, PDF Size: 8.33 MB
Page 251 of 284
AUDIO SETTINGS
This option accesses the audio settings
menu.
The menu includes the following items:
TREBLE: adjustment of high tones;
MID: adjustment of mid tones;
BASS: adjustment of bass tones;
FADER: balancing of front/rear
speakers;
BALANCE: balancing of left/right
speakers;
SVC: speed adjustment according to
vehicle speed;
LOUDNESS: audio improvement at
low volume;
249
Page 252 of 284
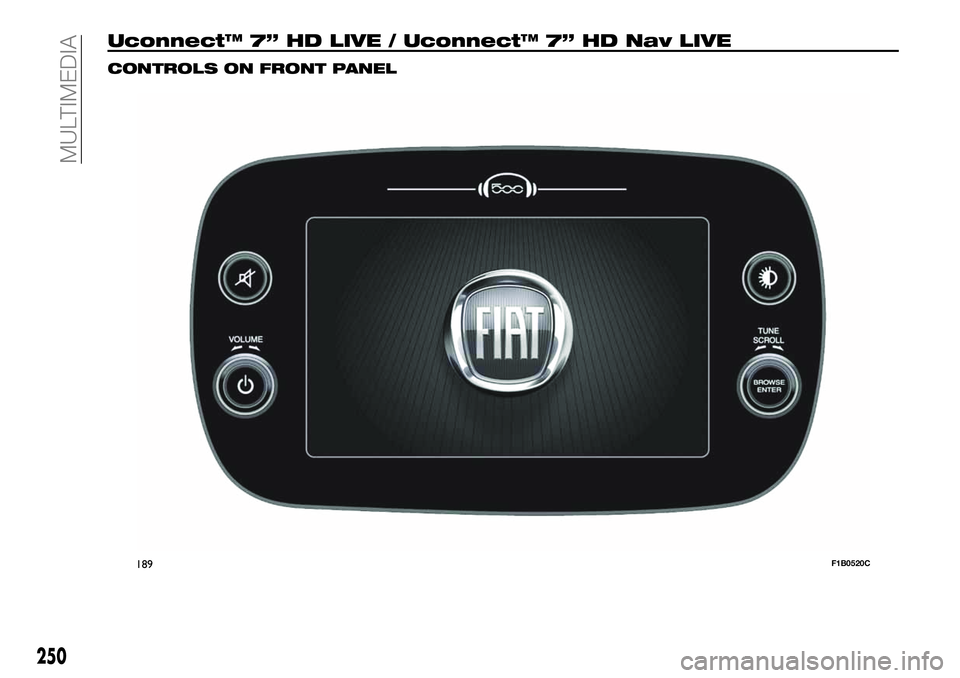
Uconnect™ 7” HD LIVE / Uconnect™ 7” HD Nav LIVE
CONTROLS ON FRONT PANEL
189F1B0520C
250
MULTIMEDIA
Page 253 of 284
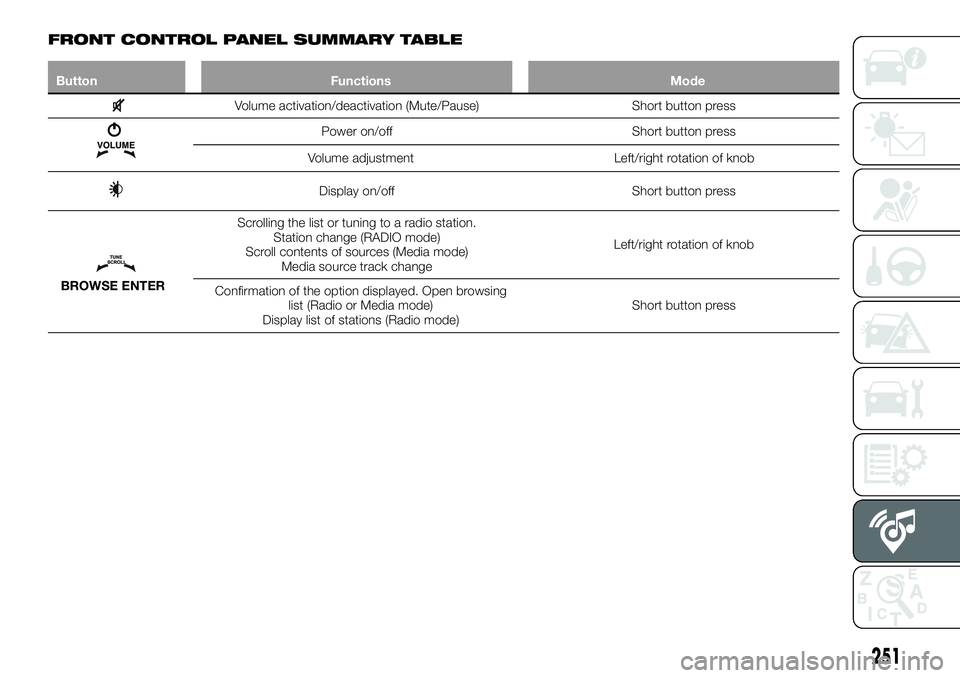
FRONT CONTROL PANEL SUMMARY TABLE
Button Functions Mode
Volume activation/deactivation (Mute/Pause) Short button press
Power on/off Short button press
Volume adjustment Left/right rotation of knob
Display on/off Short button press
BROWSE ENTERScrolling the list or tuning to a radio station.
Station change (RADIO mode)
Scroll contents of sources (Media mode)
Media source track changeLeft/right rotation of knob
Confirmation of the option displayed. Open browsing
list (Radio or Media mode)
Display list of stations (Radio mode)Short button press
251
Page 254 of 284
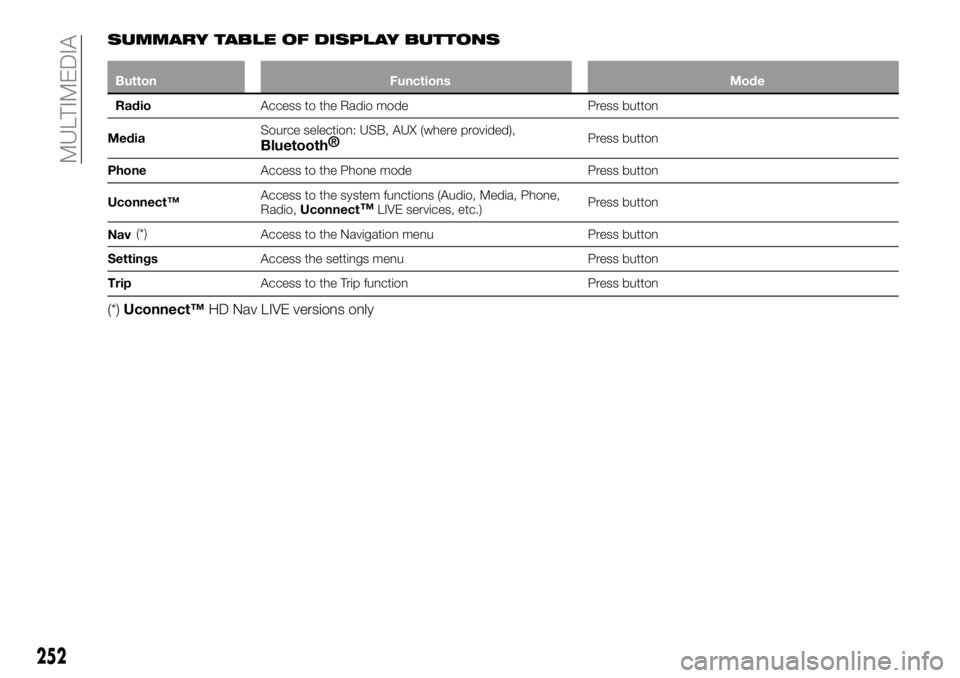
SUMMARY TABLE OF DISPLAY BUTTONS
Button Functions Mode
RadioAccess to the Radio mode Press button
MediaSource selection: USB, AUX (where provided),
Bluetooth®Press button
PhoneAccess to the Phone mode Press button
Uconnect™Access to the system functions (Audio, Media, Phone,
Radio,Uconnect
™LIVE services, etc.)Press button
Nav(*)
Access to the Navigation menu Press button
SettingsAccess the settings menu Press button
TripAccess to the Trip function Press button
(*)Uconnect™HD Nav LIVE versions only
252
MULTIMEDIA
Page 255 of 284
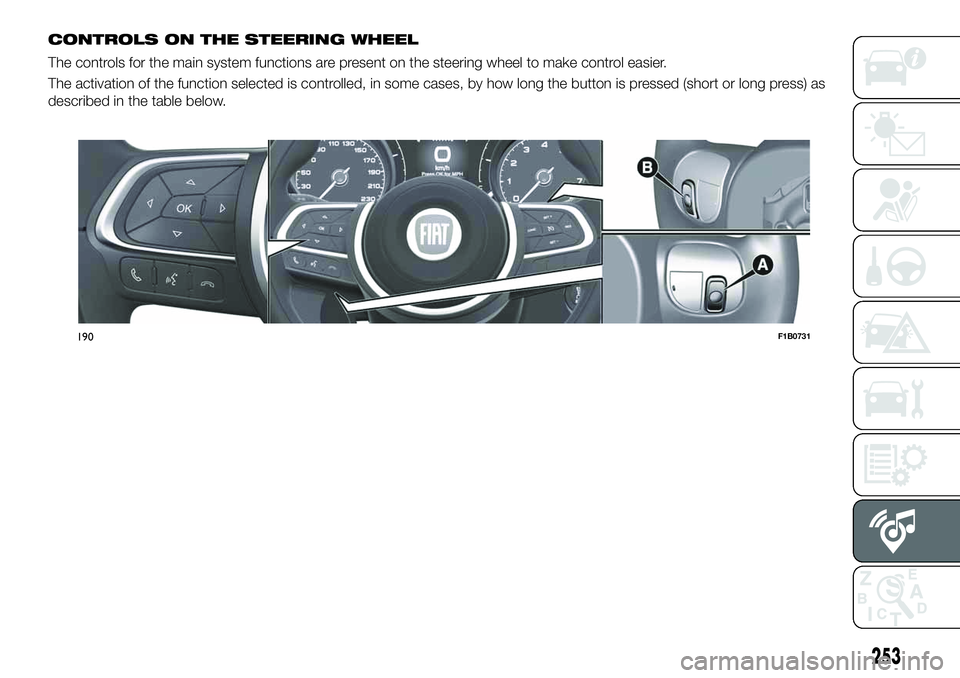
CONTROLS ON THE STEERING WHEEL
The controls for the main system functions are present on the steering wheel to make control easier.
The activation of the function selected is controlled, in some cases, by how long the button is pressed (short or long press) as
described in the table below.
190F1B0731
253
Page 256 of 284
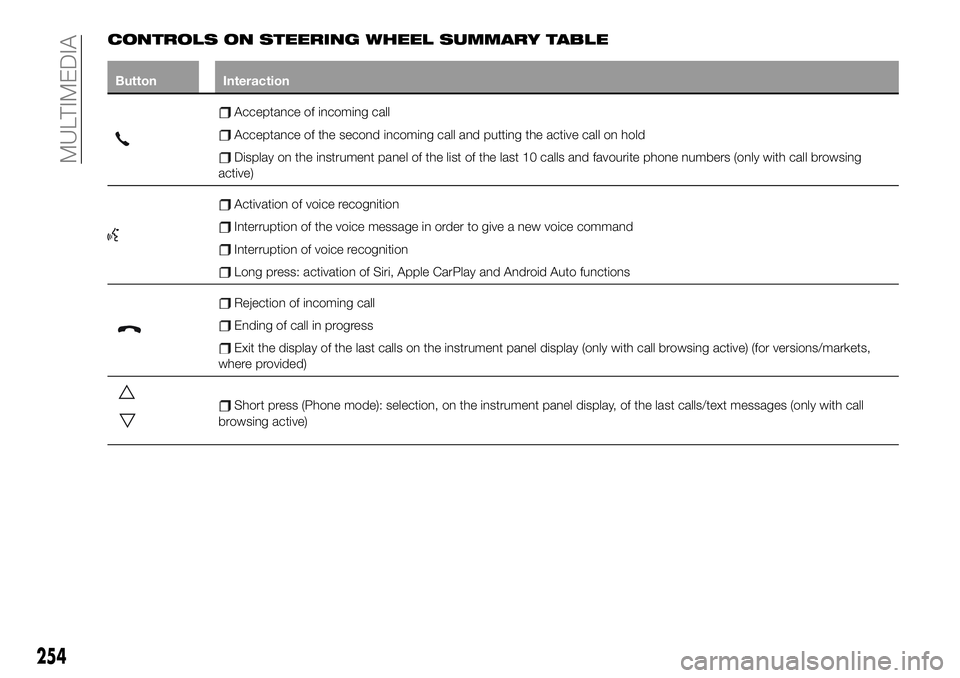
CONTROLS ON STEERING WHEEL SUMMARY TABLE
Button Interaction
Acceptance of incoming call
Acceptance of the second incoming call and putting the active call on hold
Display on the instrument panel of the list of the last 10 calls and favourite phone numbers (only with call browsing
active)
Activation of voice recognition
Interruption of the voice message in order to give a new voice command
Interruption of voice recognition
Long press: activation of Siri, Apple CarPlay and Android Auto functions
Rejection of incoming call
Ending of call in progress
Exit the display of the last calls on the instrument panel display (only with call browsing active) (for versions/markets,
where provided)
Short press (Phone mode): selection, on the instrument panel display, of the last calls/text messages (only with call
browsing active)
254
MULTIMEDIA
Page 257 of 284
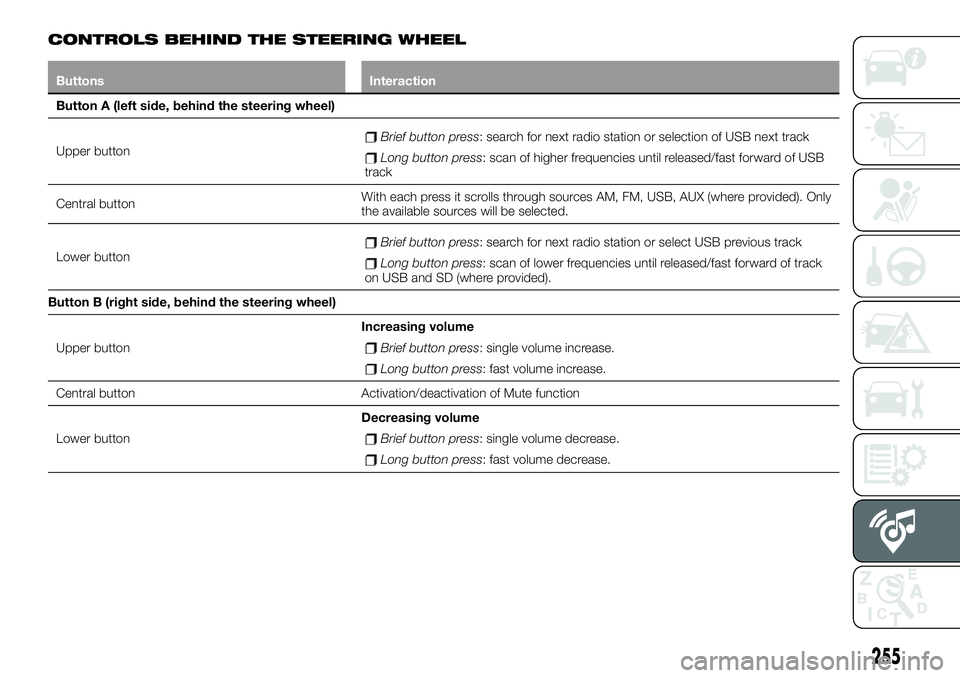
CONTROLS BEHIND THE STEERING WHEEL
Buttons Interaction
Button A (left side, behind the steering wheel)
Upper button
Brief button press: search for next radio station or selection of USB next track
Long button press: scan of higher frequencies until released/fast forward of USB
track
Central buttonWith each press it scrolls through sources AM, FM, USB, AUX (where provided). Only
the available sources will be selected.
Lower button
Brief button press: search for next radio station or select USB previous track
Long button press: scan of lower frequencies until released/fast forward of track
on USB and SD (where provided).
Button B (right side, behind the steering wheel)
Upper buttonIncreasing volume
Brief button press: single volume increase.
Long button press: fast volume increase.
Central button Activation/deactivation of Mute function
Lower buttonDecreasing volume
Brief button press: single volume decrease.
Long button press: fast volume decrease.
255
Page 258 of 284
SWITCHING THE SYSTEM
ON/OFF
The system is switched on/off by
pressing the
button/knob.
Turn the button/knob clockwise to
increase the radio volume or
anticlockwise to decrease it. The
electronic volume adjustment control
rotates continuously (360°) in both
directions, without stop positions.
"TOUCH SCREEN"
FUNCTION
The system uses the "touch screen”
function; to interact with the different
functions, press the "graphic buttons"
displayed.
Confirming a selection: press the
"OK" button.
Return to the previous screen: press
the
(Delete) button or, depending
on the active screen,
/Done.
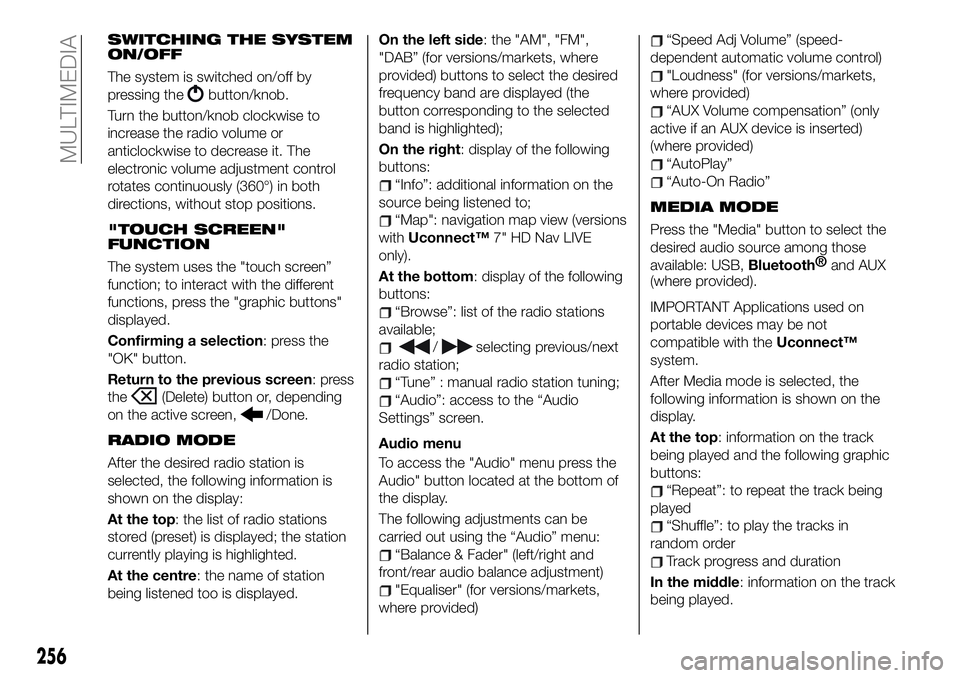
RADIO MODE
After the desired radio station is
selected, the following information is
shown on the display:
At the top: the list of radio stations
stored (preset) is displayed; the station
currently playing is highlighted.
At the centre: the name of station
being listened too is displayed.On the left side: the "AM", "FM",
"DAB” (for versions/markets, where
provided) buttons to select the desired
frequency band are displayed (the
button corresponding to the selected
band is highlighted);
On the right: display of the following
buttons:
“Info”: additional information on the
source being listened to;
“Map": navigation map view (versions
withUconnect™7" HD Nav LIVE
only).
At the bottom: display of the following
buttons:
“Browse”: list of the radio stations
available;
/selecting previous/next
radio station;
“Tune” : manual radio station tuning;
“Audio”: access to the “Audio
Settings” screen.
Audio menu
To access the "Audio" menu press the
Audio" button located at the bottom of
the display.
The following adjustments can be
carried out using the “Audio” menu:
“Balance & Fader" (left/right and
front/rear audio balance adjustment)
"Equaliser" (for versions/markets,
where provided)
“Speed Adj Volume” (speed-
dependent automatic volume control)
"Loudness" (for versions/markets,
where provided)
“AUX Volume compensation” (only
active if an AUX device is inserted)
(where provided)
“AutoPlay”
“Auto-On Radio”
MEDIA MODE
Press the "Media" button to select the
desired audio source among those
available: USB,
Bluetooth®
and AUX
(where provided).
IMPORTANT Applications used on
portable devices may be not
compatible with theUconnect™
system.
After Media mode is selected, the
following information is shown on the
display.
At the top: information on the track
being played and the following graphic
buttons:
“Repeat”: to repeat the track being
played
“Shuffle”: to play the tracks in
random order
Track progress and duration
In the middle: information on the track
being played.
256
MULTIMEDIA
Page 259 of 284
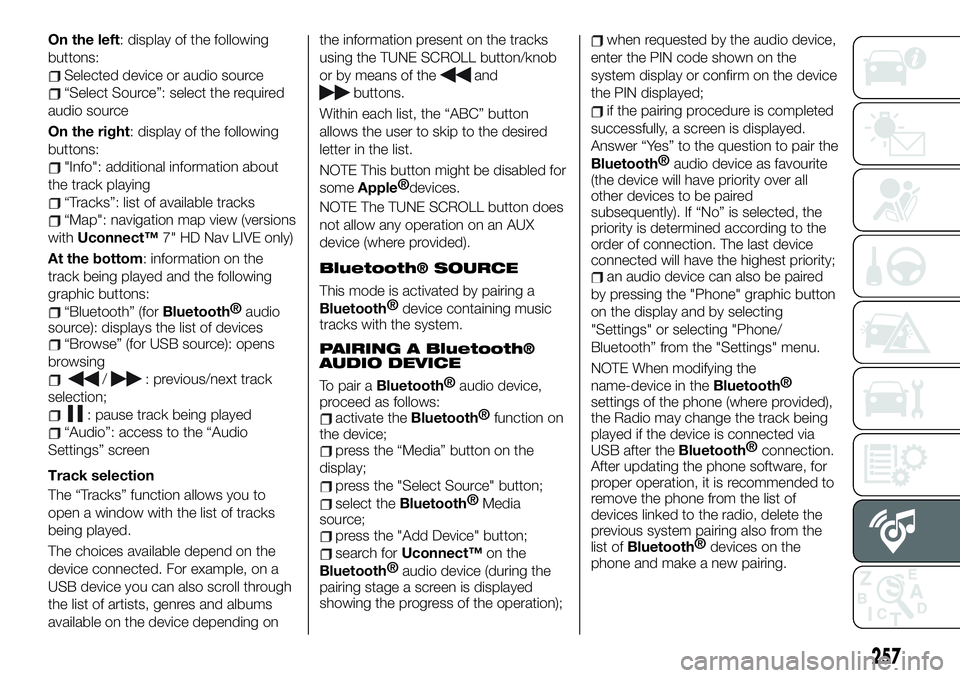
On the left: display of the following
buttons:
Selected device or audio source
“Select Source”: select the required
audio source
On the right: display of the following
buttons:
"Info": additional information about
the track playing
“Tracks”: list of available tracks
“Map": navigation map view (versions
withUconnect™7" HD Nav LIVE only)
At the bottom: information on the
track being played and the following
graphic buttons:
“Bluetooth” (forBluetooth®
audio
source): displays the list of devices
“Browse” (for USB source): opens
browsing
/: previous/next track
selection;
: pause track being played
“Audio”: access to the “Audio
Settings” screen
Track selection
The “Tracks” function allows you to
open a window with the list of tracks
being played.
The choices available depend on the
device connected. For example, on a
USB device you can also scroll through
the list of artists, genres and albums
available on the device depending onthe information present on the tracks
using the TUNE SCROLL button/knob
or by means of the
and
buttons.
Within each list, the “ABC” button
allows the user to skip to the desired
letter in the list.
NOTE This button might be disabled for
some
Apple®
devices.
NOTE The TUNE SCROLL button does
not allow any operation on an AUX
device (where provided).
Bluetooth® SOURCE
This mode is activated by pairing a
Bluetooth®
device containing music
tracks with the system.
PAIRING A Bluetooth®
AUDIO DEVICE
To pair aBluetooth®
audio device,
proceed as follows:
activate theBluetooth®
function on
the device;
press the “Media” button on the
display;
press the "Select Source" button;
select theBluetooth®
Media
source;
press the "Add Device" button;
search forUconnect™on the
Bluetooth®
audio device (during the
pairing stage a screen is displayed
showing the progress of the operation);
when requested by the audio device,
enter the PIN code shown on the
system display or confirm on the device
the PIN displayed;
if the pairing procedure is completed
successfully, a screen is displayed.
Answer “Yes” to the question to pair the
Bluetooth®
audio device as favourite
(the device will have priority over all
other devices to be paired
subsequently). If “No” is selected, the
priority is determined according to the
order of connection. The last device
connected will have the highest priority;
an audio device can also be paired
by pressing the "Phone" graphic button
on the display and by selecting
"Settings" or selecting "Phone/
Bluetooth” from the "Settings" menu.
NOTE When modifying the
name-device in the
Bluetooth®
settings of the phone (where provided),
the Radio may change the track being
played if the device is connected via
USB after the
Bluetooth®
connection.
After updating the phone software, for
proper operation, it is recommended to
remove the phone from the list of
devices linked to the radio, delete the
previous system pairing also from the
list of
Bluetooth®
devices on the
phone and make a new pairing.
257
Page 260 of 284
IMPORTANT If theBluetooth®
connection between mobile phone and
system is lost, consult the mobile
phone handbook.
USB SOURCE
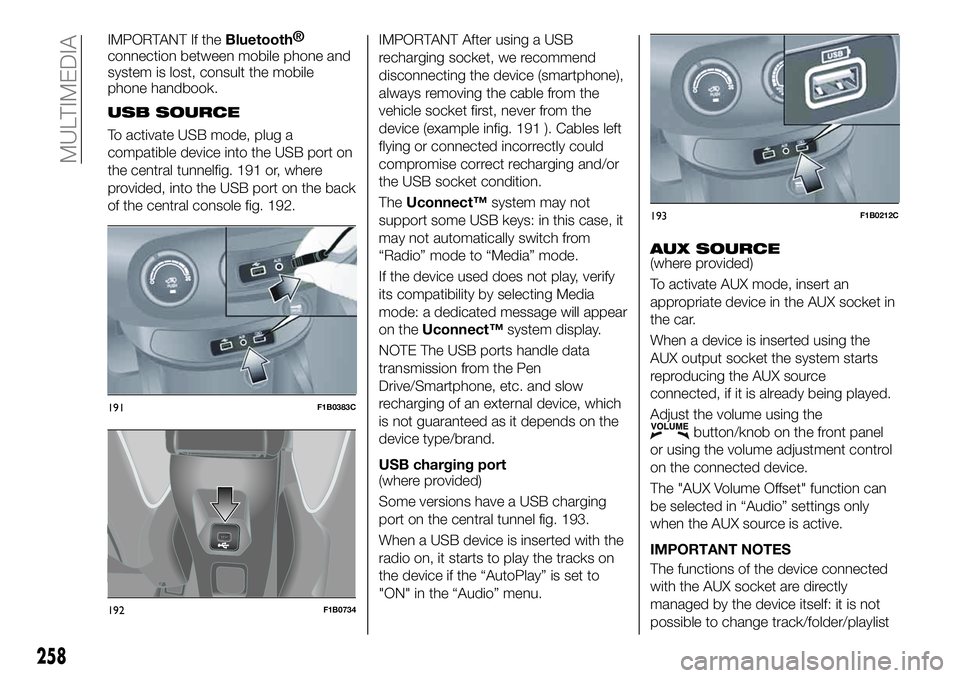
To activate USB mode, plug a
compatible device into the USB port on
the central tunnelfig. 191 or, where
provided, into the USB port on the back
of the central console fig. 192.
IMPORTANT After using a USB
recharging socket, we recommend
disconnecting the device (smartphone),
always removing the cable from the
vehicle socket first, never from the
device (example infig. 191 ). Cables left
flying or connected incorrectly could
compromise correct recharging and/or
the USB socket condition.
TheUconnect™system may not
support some USB keys: in this case, it
may not automatically switch from
“Radio” mode to “Media” mode.
If the device used does not play, verify
its compatibility by selecting Media
mode: a dedicated message will appear
on theUconnect™system display.
NOTE The USB ports handle data
transmission from the Pen
Drive/Smartphone, etc. and slow
recharging of an external device, which
is not guaranteed as it depends on the
device type/brand.
USB charging port
(where provided)
Some versions have a USB charging
port on the central tunnel fig. 193.
When a USB device is inserted with the
radio on, it starts to play the tracks on
the device if the “AutoPlay” is set to
"ON" in the “Audio” menu.
AUX SOURCE(where provided)
To activate AUX mode, insert an
appropriate device in the AUX socket in
the car.
When a device is inserted using the
AUX output socket the system starts
reproducing the AUX source
connected, if it is already being played.
Adjust the volume using the
button/knob on the front panel
or using the volume adjustment control
on the connected device.
The "AUX Volume Offset" function can
be selected in “Audio” settings only
when the AUX source is active.
IMPORTANT NOTES
The functions of the device connected
with the AUX socket are directly
managed by the device itself: it is not
possible to change track/folder/playlist
191F1B0383C
192F1B0734
193F1B0212C
258
MULTIMEDIA