service indicator FIAT 500X 2022 User Guide
[x] Cancel search | Manufacturer: FIAT, Model Year: 2022, Model line: 500X, Model: FIAT 500X 2022Pages: 312, PDF Size: 13.26 MB
Page 81 of 312
GETTING TO KNOW YOUR INSTRUMENT PANEL79
Your vehicle has a simple ignition actuated test,
which you can use prior to going to the test station.
To check if your vehicle's OBD II system is ready,
you must do the following:
1. Cycle the ignition switch to the ON position, but do not crank or start the engine.
NOTE:If you crank or start the engine, you will have to
start this test over.
2. As soon as you cycle the ignition switch to the ON position, you will see the Malfunction
Indicator Light (MIL) symbol come on as part of
a normal bulb check. 3. Approximately 15 seconds later, one of two
things will happen:
The MIL will flash for about 10 seconds and
then return to being fully illuminated until
you turn OFF the ignition or start the engine.
This means that your vehicle's OBD II
system is not ready and you should not
proceed to the I/M station.
The MIL will not flash at all and will remain
fully illuminated until you place the ignition
in the off position or start the engine. This
means that your vehicle's OBD II system is
ready and you can proceed to the I/M
station. If your OBD II system is
not ready, you should see
an authorized dealer or repair facility. If your
vehicle was recently serviced or had a battery
failure or replacement, you may need to do nothing
more than drive your vehicle as you normally would
in order for your OBD II system to update. A
recheck with the above test routine may then
indicate that the system is now ready.
Regardless of whether your vehicle's OBD II system
is ready or not, if the MIL is illuminated during
normal vehicle operation you should have your
vehicle serviced before going to the I/M station.
The I/M station can fail your vehicle because the
MIL is on with the engine running.3
22_FD_OM_EN_USC_t.book Page 79
Page 85 of 312
STARTING AND OPERATING83
(Continued)
NOTE:The EPB fault lamp will illuminate if the EPB switch
is held for longer than 60 seconds in either the
released or applied position. The light will extin -
guish upon releasing the switch.
If the Auto Park Brake feature is enabled, the EPB
will automatically engage whenever the
transmission is moved into PARK when the ignition
switch is in the STOP/OFF position. If your foot is on
the brake pedal, you may notice a small amount of
brake pedal movement while the EPB is engaging.
The EPB will be automatically released if the
driver’s seat belt is buckled (in case of automatic
transmission) and driver's intention to start (in
forward or reverse direction) is recognized by the
system
To release the EPB manually, the ignition must be
in the RUN position. Put your foot on the brake
pedal, then push the EPB switch down
momentarily. You may hear a sound from the back
of the car while the parking brake disengages. You
may also notice a small amount of movement in
the brake pedal. Once the EPB is fully disengaged,
the Brake Warning Light in the instrument cluster
and the LED indicator on the switch will extinguish.
NOTE:When parking on a hill, it is important to turn the
front wheels toward the curb on a downhill grade
and away from the curb on an uphill grade. Apply
the EPB before placing the gear selector in PARK, otherwise the load on the transmission locking
mechanism may make it difficult to move the gear
selector out of PARK. The EPB should always be
applied whenever the driver is not in the vehicle.
If exceptional circumstances should make it
necessary to engage the EPB while the vehicle is in
motion, maintain upward pressure on the EPB
switch for as long as engagement is desired. The
brake warning lamp could illuminate in case of the
hydraulic system is not available. The rear stop
lamps will also be illuminated automatically while
the vehicle remains in motion.
To disengage the EPB while the vehicle is in
motion, release the switch. If the vehicle is brought
to a complete stop using the EPB, when the vehicle
reaches approximately 1.9 mph (3 km/h) the EPB
will remain engaged.
WARNING!
When exiting the vehicle, always remove the
key fob from the vehicle and lock your vehicle.
Never leave children alone in a vehicle, or with
access to an unlocked vehicle. Allowing chil-
dren to be in a vehicle unattended is
dangerous for a number of reasons. A child or
others could be seriously or fatally injured.
Children should be warned not to touch the
parking brake, brake pedal or the transmis -
sion gear selector.
Do not leave the key fob in or near the vehicle
(or in a location accessible to children), and do
not leave the ignition in the ON or RUN posi -
tion. A child could operate power windows,
other controls, or move the vehicle.
Be sure the parking brake is fully disengaged
before driving; failure to do so can lead to
brake failure and a collision.
Always fully apply the parking brake when
leaving your vehicle, or it may roll and cause
damage or injury. Also be certain to leave the
transmission in PARK. Failure to do so may
allow the vehicle to roll and cause damage or
injury.
CAUTION!
If the Brake System Warning Light remains on
with the parking brake released, a brake system
malfunction is indicated. Have the brake system
serviced by an authorized dealer immediately.
WARNING!
4
22_FD_OM_EN_USC_t.book Page 83
Page 91 of 312
STARTING AND OPERATING89
You can start out (from a stop) in FIRST or
SECOND gear. Starting out in SECOND gear can
be helpful in snow or icy conditions. Tap the gear
selector forward or rearward to select the
desired gear after the vehicle is brought to a
stop.
If a requested downshift would cause the
engine to overspeed, that shift will not occur.
The system will ignore attempts to upshift at too
low of a vehicle speed.
Avoid using Cruise Control when AutoStick is
engaged because the transmission will not shift
automatically.
Transmission shifting will be more noticeable
when AutoStick is enabled.
The system may revert to automatic shift mode
if a fault or overheat condition is detected.
To disengage AutoStick mode, return the gear
selector to the DRIVE position. You can shift in or
out of the AutoStick position at any time without
taking your foot off the accelerator pedal.
TRANSMISSION LIMP HOME MODE
Transmission function is electronically monitored
for abnormal conditions. If a condition is detected
that could result in transmission damage,
Transmission Limp Home Mode is activated. In this
mode, the transmission may operate only in a fixed
gear, or may remain in NEUTRAL. The Malfunction
Indicator Light (MIL) may be illuminated. Limp
Home Mode may allow the vehicle to be driven to
an authorized dealer for service without damaging
the transmission.
In the event of a momentary problem, the
transmission can be reset to regain all forward
gears by performing the following steps:
1. Stop the vehicle.
2. Shift the transmission into PARK.
3. Turn the ignition OFF.
4. Wait approximately 10 seconds.
5. Restart the engine.
6. Shift into the desired gear range. If the problem is no longer detected, the
transmission will return to normal operation.
NOTE:Even if the transmission can be reset, we
recommend that you visit an authorized dealer at
your earliest possible convenience. An authorized
dealer has diagnostic equipment to assess the
condition of your transmission. If the transmission
cannot be reset, authorized dealer service is
required.
IGNITION PARK INTERLOCK
This vehicle is equipped with an Ignition Park
Interlock, which requires the transmission to be in
PARK before the ignition can be turned to the OFF
position. Also, the transmission is locked in PARK
whenever the ignition is in the OFF position.
BRAKE TRANSMISSION SHIFT
I
NTERLOCK (BTSI) SYSTEM
This vehicle is equipped with a BTSI that holds the
transmission gear selector in PARK unless the
brakes are applied. To shift the transmission out of
PARK, the ignition must be in the RUN position
(engine running or not) and the brake pedal must
be pressed.
The brake pedal must also be pressed before
pushing the button on the gear selector to shift
from NEUTRAL into DRIVE or REVERSE when the
vehicle is stopped or moving at low speeds.
WARNING!
Do not downshift for additional engine braking
on a slippery surface. The drive wheels could
lose their grip and the vehicle could skid,
causing a collision or personal injury.
4
22_FD_OM_EN_USC_t.book Page 89
Page 231 of 312
IN CASE OF EMERGENCY229
REFUELING IN EMERGENCY
The vehicle is equipped with a refueling funnel for
a Cap-Less Fuel System. It is located under the
load floor of the rear storage compartment. If
refueling is necessary, while using an approved
gas can, insert the refueling funnel into the filler
neck opening. Take care to open both flappers with
the funnel to avoid spills.
Fuel Funnel Location
NOTE:In certain cold conditions, ice may prevent the fuel
door from opening. If this occurs, lightly push on
the fuel door to break the ice buildup and
re-release the fuel door by pulling the fuel door tab
outwards. Emergency Gas Can Refueling
Most gas cans will not open the flapper doors. A
funnel is provided to allow emergency refueling
with a gas can.
See below steps for refueling:
1. Retrieve funnel from the spare tire storage
area.
2. Insert funnel into same filler pipe opening as the fuel nozzle.
Inserting Funnel
3. Ensure funnel is inserted fully to hold flapper doors open.
4. Pour fuel into funnel opening. 5. Remove funnel from filler pipe, clean off prior
to putting back in the spare tire storage area.
IF YOUR ENGINE OVERHEATS
If the vehicle is overheating, it will need to be
serviced by an authorized dealer.
In any of the following situations, you can reduce
the potential for overheating your engine by taking
the appropriate action.
On the highways — slow down.
In city traffic — while stopped, put transmission
in NEUTRAL, but do not increase engine idle
speed.CAUTION!
To avoid fuel spillage and overfilling, do not “top
off” the fuel tank after filling.
WARNING!
Never have any smoking materials lit in or
near the vehicle when the fuel door is open or
the tank is being filled.
Never add fuel when the engine is running.
This is in violation of most state and federal
fire regulations and may cause the Malfunc -
tion Indicator Light to turn on.
A fire may result if fuel is pumped into a
portable container that is inside of a vehicle.
You could be burned. Always place fuel
containers on the ground while filling.
7
22_FD_OM_EN_USC_t.book Page 229
Page 237 of 312
235
SERVICING AND MAINTENANCE
SCHEDULED MAINTENANCE
Your vehicle is equipped with an automatic oil
change indicator system. The oil change indicator
system will remind you that it is time to take your
vehicle in for scheduled maintenance.
Based on engine operation conditions, the oil
change indicator message will illuminate in the
instrument cluster. This means that service is
required for your vehicle. Operating conditions
such as frequent short-trips, trailer tow and
extremely hot or cold ambient temperatures will
influence when the “Change Oil” or “Oil Change
Required” message is displayed. Have your vehicle
serviced as soon as possible, within the next
500 miles (805 km).An authorized dealer will reset the oil change
indicator message after completing the scheduled
oil change.
NOTE:Under no circumstances should oil change
intervals exceed 10,000 miles (16,000 km),
12 months or 350 hours of engine run time,
whichever comes first. The 350 hours of engine
run or idle time is generally only a concern for fleet
customers.
NOTE:The Oil Change Indicator will not illuminate under
these conditions.
Once A Month Or Before A Long Trip:
Check engine oil level.
Check windshield washer fluid level.
Check the tire inflation pressures and look for
unusual wear or damage.
Check the fluid levels of the coolant reservoir,
and brake master cylinder reservoir, and fill as
needed.
Check function of all interior and exterior lights.
8
22_FD_OM_EN_USC_t.book Page 235
Page 239 of 312
SERVICING AND MAINTENANCE237
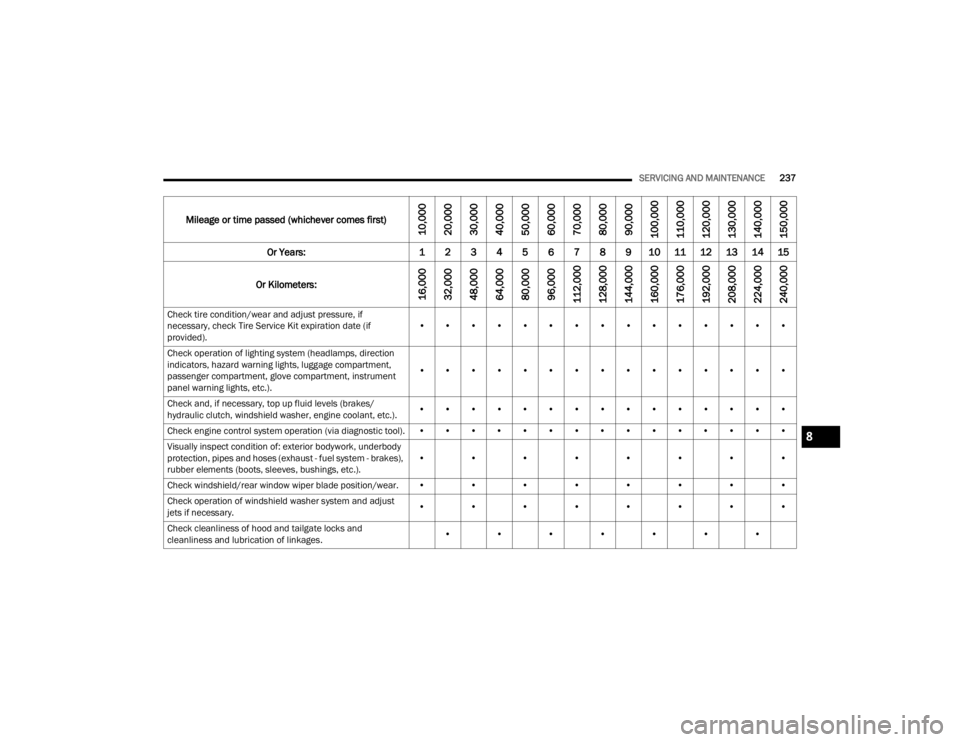
Mileage or time passed (whichever comes first)
10,000
20,000
30,000
40,000
50,000
60,000
70,000
80,000
90,000
100,000
110,000
120,000
130,000
140,000
150,000
Or Years: 1 2 3 4 5 6 7 8 9 10 11 12 13 14 15
Or Kilometers:
16,000
32,000
48,000
64,000
80,000
96,000
112,000
128,000
144,000
160,000
176,000
192,000
208,000
224,000
240,000
Check tire condition/wear and adjust pressure, if
necessary, check Tire Service Kit expiration date (if
provided). • • • • • • • • • • • • • • •
Check operation of lighting system (headlamps, direction
indicators, hazard warning lights, luggage compartment,
passenger compartment, glove compartment, instrument
panel warning lights, etc.). • • • • • • • • • • • • • • •
Check and, if necessary, top up fluid levels (brakes/
hydraulic clutch, windshield washer, engine coolant, etc.). • • • • • • • • • • • • • • •
Check engine control system operation (via diagnostic tool). • • • • • • • • • • • • • • •
Visually inspect condition of: exterior bodywork, underbody
protection, pipes and hoses (exhaust - fuel system - brakes),
rubber elements (boots, sleeves, bushings, etc.). • • • • • • • •
Check windshield/rear window wiper blade position/wear. • • • • • • • •
Check operation of windshield washer system and adjust
jets if necessary. • • • • • • • •
Check cleanliness of hood and tailgate locks and
cleanliness and lubrication of linkages. • • • • • • •
8
22_FD_OM_EN_USC_t.book Page 237
Page 262 of 312
260SERVICING AND MAINTENANCE
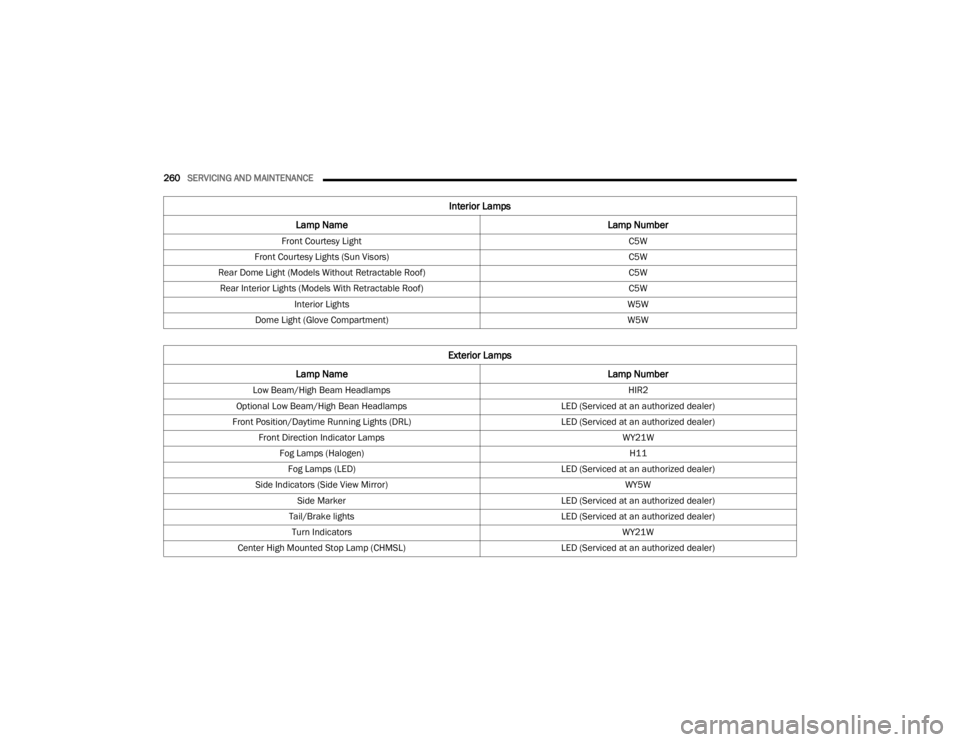
Interior Lamps
Lamp Name Lamp Number
Front Courtesy Light C5W
Front Courtesy Lights (Sun Visors) C5W
Rear Dome Light (Models Without Retractable Roof) C5W
Rear Interior Lights (Models With Retractable Roof) C5W
Interior Lights W5W
Dome Light (Glove Compartment) W5W
Exterior Lamps
Lamp Name Lamp Number
Low Beam/High Beam Headlamps HIR2
Optional Low Beam/High Bean Headlamps LED (Serviced at an authorized dealer)
Front Position/Daytime Running Lights (DRL) LED (Serviced at an authorized dealer)
Front Direction Indicator Lamps WY21W
Fog Lamps (Halogen) H11
Fog Lamps (LED) LED (Serviced at an authorized dealer)
Side Indicators (Side View Mirror) WY5W
Side Marker LED (Serviced at an authorized dealer)
Tail/Brake lights LED (Serviced at an authorized dealer)
Turn Indicators WY21W
Center High Mounted Stop Lamp (CHMSL) LED (Serviced at an authorized dealer)
22_FD_OM_EN_USC_t.book Page 260
Page 280 of 312
278SERVICING AND MAINTENANCE
condition, please replace the TPMS sensor as it is
not designed to be reused when driven under Run
Flat mode 14 psi (96 kPa) condition.
NOTE:TPMS sensor must be replaced after driving the
vehicle on a flat tire condition.
It is not recommended driving a vehicle loaded at
full capacity or to tow a trailer while a tire is in the
Run Flat mode.
See Ú page 185.
Tire Spinning
When stuck in mud, sand, snow, or ice conditions,
do not spin your vehicle's wheels above 30 mph
(48 km/h) or for longer than 30 seconds
continuously without stopping.
For further information Ú page 231.
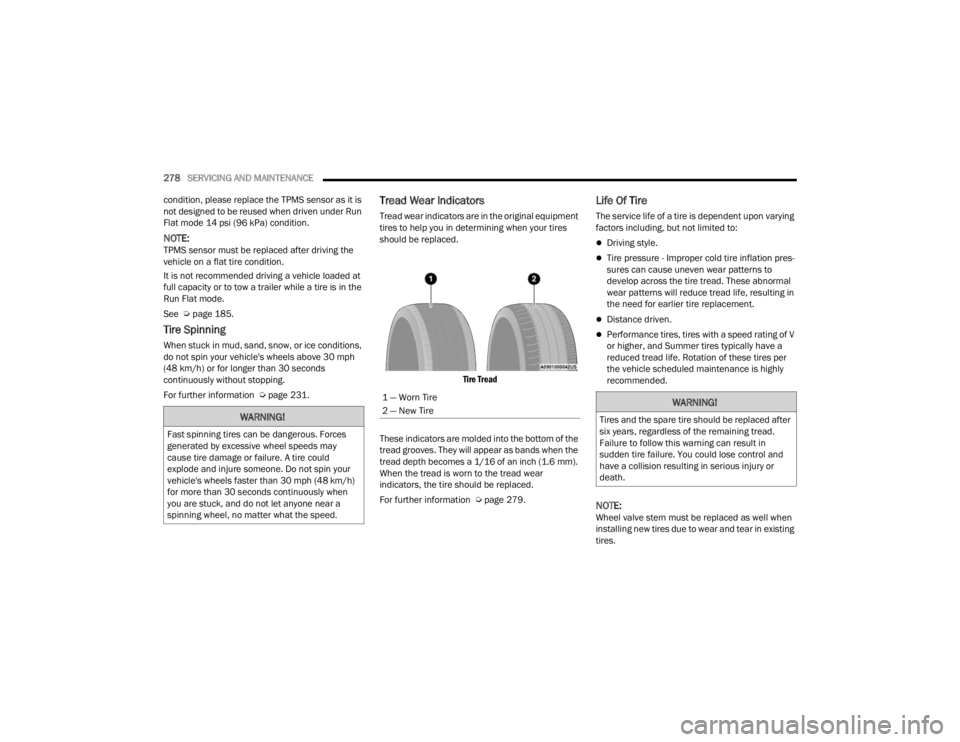
Tread Wear Indicators
Tread wear indicators are in the original equipment
tires to help you in determining when your tires
should be replaced.
Tire Tread
These indicators are molded into the bottom of the
tread grooves. They will appear as bands when the
tread depth becomes a 1/16 of an inch (1.6 mm).
When the tread is worn to the tread wear
indicators, the tire should be replaced.
For further information Ú page 279.
Life Of Tire
The service life of a tire is dependent upon varying
factors including, but not limited to:
Driving style.
Tire pressure - Improper cold tire inflation pres -
sures can cause uneven wear patterns to
develop across the tire tread. These abnormal
wear patterns will reduce tread life, resulting in
the need for earlier tire replacement.
Distance driven.
Performance tires, tires with a speed rating of V
or higher, and Summer tires typically have a
reduced tread life. Rotation of these tires per
the vehicle scheduled maintenance is highly
recommended.
NOTE:Wheel valve stem must be replaced as well when
installing new tires due to wear and tear in existing
tires.
WARNING!
Fast spinning tires can be dangerous. Forces
generated by excessive wheel speeds may
cause tire damage or failure. A tire could
explode and injure someone. Do not spin your
vehicle's wheels faster than 30 mph (48 km/h)
for more than 30 seconds continuously when
you are stuck, and do not let anyone near a
spinning wheel, no matter what the speed.
1 — Worn Tire
2 — New TireWARNING!
Tires and the spare tire should be replaced after
six years, regardless of the remaining tread.
Failure to follow this warning can result in
sudden tire failure. You could lose control and
have a collision resulting in serious injury or
death.
22_FD_OM_EN_USC_t.book Page 278
Page 302 of 312

300 B-Pillar Location
............................................. 273Brake Assist System...................................... 175Brake Control System, Electronic.................. 175Brake Fluid.................................................... 293Brake System...................................... 250, 289Anti-Lock (ABS).......................................... 289Fluid Check............................................... 293Master Cylinder......................................... 250Warning Light.............................................. 70Brightness, Interior Lights................................ 39Bulbs, Light.................................................... 216
C
Camera, Rear................................................ 110Capacities, Fluid............................................ 292Caps, Filler Oil (Engine)................................................ 240Radiator (Coolant Pressure)...................... 249Car Washes................................................... 286Carbon Monoxide Warning.................. 216, 217CD.................................................................. 150Cellular Phone............................................... 173Certification Label......................................... 112Chains, Tire.................................................... 283Chart, Tire Sizing............................................ 270Check Engine Light (Malfunction Indicator
Light)............................................................... 78Checking Your Vehicle For Safety.................. 214Checks, Safety............................................... 214Child Restraint............................................... 204
Child RestraintsBooster Seats........................................... 207Child Seat Installation.............................. 213How To Stow An unused ALR Seat Belt.... 211Infant And Child Restraints....................... 206LATCH Positions....................................... 208Locating The LATCH Anchorages.............. 210Lower Anchors And Tethers For Children.. 208Older Children And Child Restraints......... 206Seating Positions...................................... 207Cigar Lighter.................................................... 52Clean Air Gasoline......................................... 290CleaningWheels..................................................... 282Climate Control................................................ 43Clutch........................................................... 250Fluid......................................................... 250Coin Holder...................................................... 51Cold Weather Operation.................................. 80Compact Spare Tire...................................... 280Console............................................................ 51Floor............................................................ 51Contract, Service.......................................... 295Controls........................................................ 142Cooling Pressure Cap (Radiator Cap)............ 249Cooling System............................................. 247Adding Coolant (Antifreeze)...................... 248Coolant Level............................................ 249Cooling Capacity....................................... 292
Disposal Of Used Coolant......................... 249Drain, Flush, And Refill............................. 248Inspection........................................ 247, 249Points To Remember................................ 249Pressure Cap............................................ 249Radiator Cap............................................. 249Selection Of Coolant (Antifreeze)......................... 248, 292, 293Corrosion Protection..................................... 286Cruise Control (Speed Control).........................93Cruise Light............................................... 76, 77Customer Assistance.................................... 294Customer Programmable Features............... 123Cybersecurity................................................ 122
D
Daytime Running Lights...................................36Defroster, Rear Window...................................42Defroster, Windshield................................... 215De-Icer, Remote Start......................................20Deleting A Phone........................................... 156Diagnostic System, Onboard............................78Dimmer SwitchHeadlight.....................................................36DipsticksOil (Engine)............................................... 241Disabled Vehicle Towing............................... 232Disc Drive...................................................... 150Disconnecting............................................... 156
22_FD_OM_EN_USC_t.book Page 300
Page 305 of 312

303
Lap/Shoulder Belts
....................................... 190Latches.......................................................... 216Hood........................................................... 58Leaks, Fluid................................................... 216Life Of Tires................................................... 278Liftgate............................................................ 60Closing........................................................ 60Opening....................................................... 60Liftgate Window Wiper/Washer....................... 42Light Bulbs..................................................... 216Lighter Cigar............................................................ 52Lights............................................................. 216Adaptive Cruise Control............................... 72Air Bag....................................................... 215Audio System.............................................. 72Automatic Headlights.................................. 37Brake Warning............................................ 70Coolant Temperature.................................. 70Cruise................................................... 76, 77Daytime Running......................................... 36Dimmer Switch, Headlight........................... 36Drive Mode.................................................. 73Electric Power Steering............................... 71Electronic Park Brake.................................. 72Electronic Stability Control................... 72, 73Exterior............................................... 36, 216Exterior Bulb................................................ 76External Light.............................................. 73Fog....................................................... 38, 76
Fuel Cutoff................................................... 76Fuel Level.................................................... 76Full Brake Control........................................ 76Hazard Warning Flasher........................... 218Headlight Switch.......................................... 36Headlights................................................... 36Headlights On Reminder............................. 37High Beam............................................ 36, 77Hood Open.................................................. 71Icy Road Condition....................................... 76Immobilizer Fail........................................... 76Instrument Cluster....................................... 36Intensity Control.......................................... 39Interior......................................................... 38LaneSense.................................... 73, 76, 77Light Sensor................................................ 77Lights On Reminder..................................... 37Loose Fuel Filler Cap................................... 73Malfunction Indicator (Check Engine).......... 73Park............................................................. 76Passing........................................................ 37Seat Belt Reminder..................................... 71Security Alarm............................................. 72Service........................................................ 74Service LaneSense...................................... 73Service Stop Start........................................ 74Speed.......................................................... 77StopStart Active........................................... 77Tire Pressure Monitoring (TPMS).............. 185Transmission Fault...................................... 72
Transmission Temperature..........................75Trunk Open..................................................72Turn Signals................................ 38, 77, 216Vanity Mirror................................................33Loading Vehicle............................................. 112Tires.......................................................... 273LocksAutomatic Door............................................22Child Protection...........................................24Low Tire Pressure System............................. 185Lubrication, Body.......................................... 244Lug Nuts/Bolts.............................................. 289
M
Maintenance Free Battery............................ 241Maintenance Schedule................................. 235Malfunction Indicator Light (Check Engine).....73ManualService...................................................... 296Master CylinderBrakes...................................................... 250Media Mode.................................................. 150Methanol....................................................... 291Mirrors.............................................................33Heated.........................................................35Outside........................................................34Rearview......................................................33Vanity...........................................................33Modifications/AlterationsVehicle........................................................... 9
11
22_FD_OM_EN_USC_t.book Page 303