key FIAT 500X 2022 Owner's Manual
[x] Cancel search | Manufacturer: FIAT, Model Year: 2022, Model line: 500X, Model: FIAT 500X 2022Pages: 312, PDF Size: 13.26 MB
Page 66 of 312
64GETTING TO KNOW YOUR INSTRUMENT PANEL
INSTRUMENT CLUSTER DESCRIPTIONS
1. Speedometer
Indicates the speed of the car.
2. Fuel Level Gauge
The fuel gauge in the instrument panel indi -
cates the amount of fuel left in the tank.
The light comes on, together with a chime
and the display of a message in the instru -
ment cluster display, when the gas tank has
1.5 to 2 gallons (5 to 7 liters) of fuel
remaining.
3. Instrument Cluster Display
The vehicle can be equipped with multi
functional instrument cluster display which
offers useful information to the driver.
With the ignition in the OFF position (and
the key removed, for vehicles with a
mechanical key), opening/closing of a door
will activate the instrument cluster display
for viewing, and display the total miles or
kilometers in the odometer.
4. Engine Coolant Temperature
The temperature gauge on the instrument
panel displays the temperature of the
engine coolant and starts providing indica -
tions when the coolant temperature
exceeds approximately 122°F (50°C). In the normal use of the car, the temperature
gauge can move in different directions
based on the use of the car. The light comes
on, together with a chime and the display of
a message in the instrument cluster display,
to indicate an excessive increase in the
temperature of the engine coolant. Stop the
engine and contact an authorized dealer.
5. Tachometer
Indicates the engine speed in Revolutions
Per Minute (RPM x 1000).
INSTRUMENT CLUSTER DISPLAY
The vehicle is equipped with multi functional
instrument cluster display which offers useful
information to the driver. With the ignition in the
OFF position (and the key removed, for vehicles
with a mechanical key), opening/closing of a door
will activate the instrument cluster display for
viewing, and display the total miles or kilometers in
the odometer. The instrument cluster display is
designed to display important information about
the vehicle’s systems and features. Using a driver
interactive display located on the instrument
panel, your instrument cluster display can show
you how systems are working and give you
warnings when they aren’t. The steering wheel
mounted controls allow you to scroll through and enter the main menus and submenus. You can
access the specific information you want and
make selections and adjustments.
INSTRUMENT CLUSTER DISPLAY
C
ONTROL BUTTONS
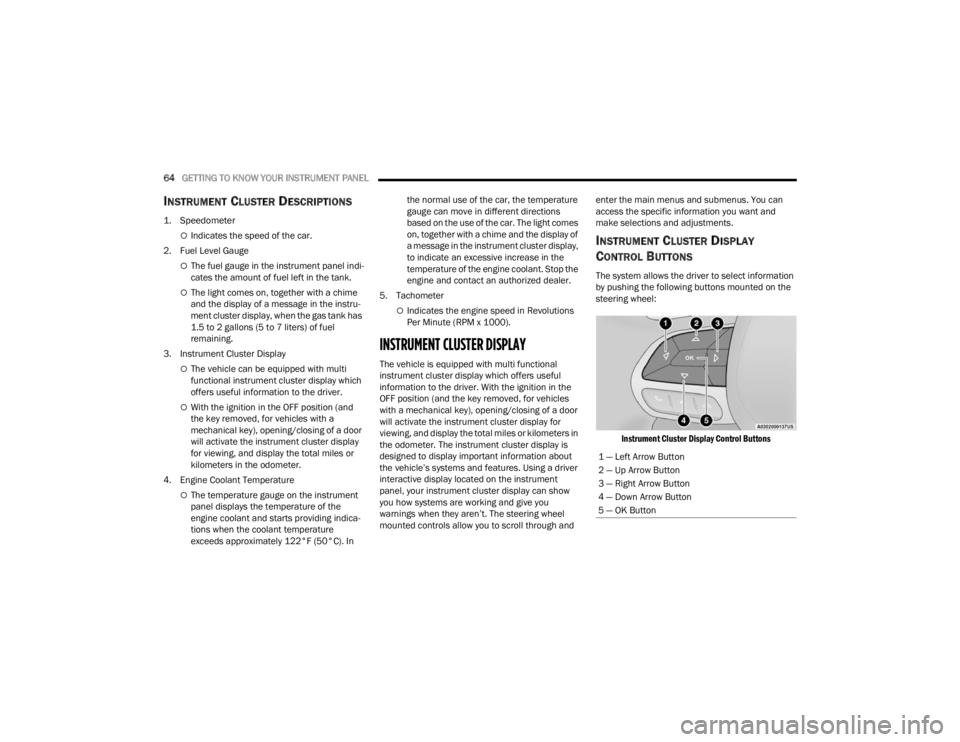
The system allows the driver to select information
by pushing the following buttons mounted on the
steering wheel:
Instrument Cluster Display Control Buttons
1 — Left Arrow Button
2 — Up Arrow Button
3 — Right Arrow Button
4 — Down Arrow Button
5 — OK Button
22_FD_OM_EN_USC_t.book Page 64
Page 71 of 312
GETTING TO KNOW YOUR INSTRUMENT PANEL69
Lights
By selecting the item "Lights," you can make the
following adjustments:
Headlight Off Delay: Set the delay for headlight
shutoff after engine shutoff.
Headlight Sensitivity: Adjust the sensitivity of
headlight brightness.
Interior Ambient Lights: Increase or decrease
the brightness of the Interior Ambient Lights.
Greeting Lights: Enable/disable the vehicle’s
Greeting Lights.
Auto High Beam: Activate/deactivate the auto -
matic main beam headlights — If Equipped.
Daytime Lights: Activate/deactivate the daytime
running lights.
Cornering Lights: Activate/deactivate the
cornering lights — If Equipped.
Doors And Locks
By selecting the item "Doors & Locks," you can
make the following adjustments:
Auto Door Lock: Activate/deactivate the auto -
matic locking of the doors with the vehicle
moving.
Auto Unlock On Exit: Automatic unlocking of the
doors when exiting the vehicle.
Flash Light With Lock: Activate the direction indi -
cators when closing the doors.
Sound Horn With Lock: Activate/deactivate the
horn when pushing the lock button on the
Remote Keyless Entry. The options are "Off,"
"First Press,” and "Second Press."
Horn With Remote Start: Activate/deactivate
the horn at the Remote Starting of the engine
with the Remote Keyless Entry.
Remote Door Unlock Without Passive Entry:
Allows you to choose whether to unlock all the
doors or only the driver’s side door on the first
push of the unlock button on the Remote
Keyless Entry.
Door Unlock With Passive Entry: Allows you to
open the driver door only on the first push of the
unlock button on the Remote Keyless Entry or
using the passive entry handles on the doors or
liftgates.
Passive Entry — If Equipped: Activate the auto -
matic locking of the doors.
Engine OFF Procedure — If Equipped: Allows you
to turn off the engine from the instrument
cluster in the event of an ignition switch failure.
Instructions for turning off the engine via the
instrument cluster display controls will display in
the instrument cluster.
WARNING LIGHTS AND MESSAGES
The warning/indicator lights will illuminate in the
instrument panel together with a dedicated
message and/or acoustic signal when applicable.
These indications are indicative and precautionary
and as such must not be considered as exhaustive
and/or alternative to the information contained in
the Owner’s Manual, which you are advised to read
carefully in all cases. Always refer to the
information in this chapter in the event of a failure
indication. All active telltales will display first if
applicable. The system check menu may appear
different based upon equipment options and
current vehicle status. Some telltales are optional
and may not appear.
RED WARNING LIGHTS
Air Bag Warning Light
This warning light will illuminate to
indicate a fault with the air bag, and will
turn on for four to eight seconds as a bulb
check when the ignition is placed in the
ON/RUN position. This light will illuminate with a
single chime when a fault with the air bag has been
detected, it will stay on until the fault is cleared. If
the light is either not on during startup, stays on, or
turns on while driving, have the system inspected
at an authorized dealer as soon as possible.
3
22_FD_OM_EN_USC_t.book Page 69
Page 76 of 312
74GETTING TO KNOW YOUR INSTRUMENT PANEL
position before engine start. If the bulb does not
come on when turning the ignition switch from OFF
to ON/RUN, have the condition checked promptly.
Certain conditions, such as a loose or missing gas
cap, poor quality fuel, etc., may illuminate the light
after engine start. The vehicle should be serviced if
the light stays on through several typical driving
styles. In most situations, the vehicle will drive
normally and will not require towing.
When the engine is running, the MIL may flash to
alert serious conditions that could lead to
immediate loss of power or severe catalytic
converter damage. The vehicle should be serviced
by an authorized dealer as soon as possible if this
occurs.
Service Warning Light — If Equipped
The “Maintenance Plan” includes vehicle
maintenance at fixed intervals. For
further information Ú page 235. This
message is displayed automatically
along with the warning light when the key is turned
to RUN - 1,242 miles (2,000 km) or 30 days before
these deadlines, and reappears every time the key
is turned to RUN. The indication will appear in
miles or kilometers according to the "Unit Of
Measurement" settings. When the next scheduled
service is approaching and the key is turned to
RUN, the word “Service” will appear on the display,
followed by the number of miles or kilometers left.
Contact an authorized dealership. The operations
in the “Maintenance Plan” will be performed and
the message will be reset.
Service Stop / Start System Warning
Light — If Equipped
This warning light will illuminate when the
Stop/Start system is not functioning
properly and service is required. Contact
an authorized dealer for service.
Tire Pressure Monitoring System (TPMS)
Warning Light
The warning light switches on and a
message is displayed to indicate that the
tire pressure is lower than the
recommended value and/or that slow
pressure loss is occurring. In these cases, optimal
tire duration and fuel consumption may not be
guaranteed.
Should one or more tires be in the condition
mentioned above, the display will show the
indications corresponding to each tire.
WARNING!
A malfunctioning catalytic converter, as refer -
enced above, can reach higher temperatures
than in normal operating conditions. This can
cause a fire if you drive slowly or park over flam -
mable substances such as dry plants, wood,
cardboard, etc. This could result in death or seri -
ous injury to the driver, occupants or others.
CAUTION!
Prolonged driving with the Malfunction Indicator
Light (MIL) on could cause damage to the vehi -
cle control system. It also could affect fuel econ -
omy and driveability. If the MIL is flashing,
severe catalytic converter damage and power
loss will soon occur. Immediate service is
required.
CAUTION!
Do not continue driving with one or more flat
tires as handling may be compromised. Stop the
vehicle, avoiding sharp braking and steering. If a
tire puncture occurs, repair immediately using
the dedicated tire repair kit and contact an
authorized dealer as soon as possible.
22_FD_OM_EN_USC_t.book Page 74
Page 82 of 312
80
STARTING AND OPERATING
STARTING THE ENGINE
Before starting your vehicle, adjust your seat,
adjust the inside and outside mirrors, fasten your
seat belt, and if present, instruct all other
occupants to buckle their seat belts.
Start the engine with the gear selector in the
NEUTRAL or PARK position. Apply the brake before
shifting to any driving range.Normal Starting
Proceed as follows:
1. Set the Electric Park Brake (EPB) and put the
gear selector in the PARK or NEUTRAL
position.
2. Press on the brake pedal, without pressing the accelerator.
3. Press the START/STOP ignition button and release it as soon as the engine is started.
4. If the engine does not start, place the ignition in the OFF position and wait 10-15 seconds
before attempting to restart the engine.
TIP START FEATURE
Do not press the accelerator. Briefly press the
START/STOP ignition button and release it. The
starter motor will continue to run but will
automatically disengage when the engine is
running.
COLD WEATHER OPERATION
To ensure reliable starting under extreme cold
conditions an externally powered electric block
heater (if equipped) is required below -20°F
(-29°C). To prevent possible engine damage while starting
at low temperatures, this vehicle will inhibit engine
cranking when the ambient temperature is less
than -20°F (-29°C), and the oil temperature
sensor reading indicates an engine block heater
has not been used. The message “Plug in Engine
Heater” will be displayed in the instrument cluster
when the ambient temperature is below -4°F
(-20°C) at the time the engine is shut off as a
reminder to avoid possible crank delays at the next
cold start.
EXTENDED PARK STARTING
NOTE:Extended Park condition occurs when the vehicle
has not been started or driven for at least 30 days.
1. Install a battery charger or jumper cables to
the battery to ensure a full battery charge
during the crank cycle.
2. Press the START/STOP ignition button and release it when the engine starts.
3. If the engine fails to start within 10 seconds, place the ignition in the OFF position, wait
10 to 15 seconds to allow the starter to cool,
then repeat the Extended Park Starting
procedure.
WARNING!
Never leave children alone in a vehicle, or with
access to an unlocked vehicle.
Allowing children to be in a vehicle unattended
is dangerous for a number of reasons. A child
or others could be seriously or fatally injured.
Children should be warned not to touch the
parking brake, brake pedal or the gear
selector.
Do not leave the key fob in or near the vehicle
(or in a location accessible to children), and do
not leave the ignition in the ON or RUN posi -
tion. A child could operate power windows,
other controls, or move the vehicle.
22_FD_OM_EN_USC_t.book Page 80
Page 85 of 312
STARTING AND OPERATING83
(Continued)
NOTE:The EPB fault lamp will illuminate if the EPB switch
is held for longer than 60 seconds in either the
released or applied position. The light will extin -
guish upon releasing the switch.
If the Auto Park Brake feature is enabled, the EPB
will automatically engage whenever the
transmission is moved into PARK when the ignition
switch is in the STOP/OFF position. If your foot is on
the brake pedal, you may notice a small amount of
brake pedal movement while the EPB is engaging.
The EPB will be automatically released if the
driver’s seat belt is buckled (in case of automatic
transmission) and driver's intention to start (in
forward or reverse direction) is recognized by the
system
To release the EPB manually, the ignition must be
in the RUN position. Put your foot on the brake
pedal, then push the EPB switch down
momentarily. You may hear a sound from the back
of the car while the parking brake disengages. You
may also notice a small amount of movement in
the brake pedal. Once the EPB is fully disengaged,
the Brake Warning Light in the instrument cluster
and the LED indicator on the switch will extinguish.
NOTE:When parking on a hill, it is important to turn the
front wheels toward the curb on a downhill grade
and away from the curb on an uphill grade. Apply
the EPB before placing the gear selector in PARK, otherwise the load on the transmission locking
mechanism may make it difficult to move the gear
selector out of PARK. The EPB should always be
applied whenever the driver is not in the vehicle.
If exceptional circumstances should make it
necessary to engage the EPB while the vehicle is in
motion, maintain upward pressure on the EPB
switch for as long as engagement is desired. The
brake warning lamp could illuminate in case of the
hydraulic system is not available. The rear stop
lamps will also be illuminated automatically while
the vehicle remains in motion.
To disengage the EPB while the vehicle is in
motion, release the switch. If the vehicle is brought
to a complete stop using the EPB, when the vehicle
reaches approximately 1.9 mph (3 km/h) the EPB
will remain engaged.
WARNING!
When exiting the vehicle, always remove the
key fob from the vehicle and lock your vehicle.
Never leave children alone in a vehicle, or with
access to an unlocked vehicle. Allowing chil-
dren to be in a vehicle unattended is
dangerous for a number of reasons. A child or
others could be seriously or fatally injured.
Children should be warned not to touch the
parking brake, brake pedal or the transmis -
sion gear selector.
Do not leave the key fob in or near the vehicle
(or in a location accessible to children), and do
not leave the ignition in the ON or RUN posi -
tion. A child could operate power windows,
other controls, or move the vehicle.
Be sure the parking brake is fully disengaged
before driving; failure to do so can lead to
brake failure and a collision.
Always fully apply the parking brake when
leaving your vehicle, or it may roll and cause
damage or injury. Also be certain to leave the
transmission in PARK. Failure to do so may
allow the vehicle to roll and cause damage or
injury.
CAUTION!
If the Brake System Warning Light remains on
with the parking brake released, a brake system
malfunction is indicated. Have the brake system
serviced by an authorized dealer immediately.
WARNING!
4
22_FD_OM_EN_USC_t.book Page 83
Page 87 of 312
STARTING AND OPERATING85
(Continued)
NOTE:A dedicated message will appear in the instrument
cluster if Brake Service Mode cannot be activated.
When brake service work is complete, the following
steps must be followed to reset the parking brake
system to normal operation:
Ensure the vehicle is at a standstill.
Press the brake pedal with moderate force.
Apply the EPB switch.
NOTE:A dedicated message will appear in the instrument
cluster if Brake Service Mode cannot be deacti -
vated.
AUTOMATIC TRANSMISSION
NOTE:You must press and hold the brake pedal while
shifting out of PARK.
The transmission gear range (PRND) is displayed
both beside the gear selector and in the instrument cluster. To select a gear range, push
the lock button on the gear selector and move the
lever rearward or forward. You must also press the
brake pedal to shift the transmission out of PARK
(or NEUTRAL, when the vehicle is stopped or
moving at low speeds). Select the DRIVE range for
normal driving.
WARNING!
You can be badly injured working on or around a
motor vehicle. Do only that service work for
which you have the knowledge and the right
equipment. If you have any doubt about your
ability to perform a service job, take your vehicle
to a competent mechanic.
WARNING!
It is dangerous to shift out of PARK or
NEUTRAL if the engine speed is higher than
idle speed. If your foot is not firmly pressing
the brake pedal, the vehicle could accelerate
quickly forward or in reverse. You could lose
control of the vehicle and hit someone or
something. Only shift into gear when the
engine is idling normally and your foot is firmly
pressing the brake pedal.
Unintended movement of a vehicle could
injure those in or near the vehicle. As with all
vehicles, you should never exit a vehicle while
the engine is running. Before exiting a vehicle,
always come to a complete stop, then apply
the parking brake, shift the transmission into
PARK, and turn the ignition OFF. When the
ignition is in the OFF position, the transmis
-
sion is locked in PARK, securing the vehicle
against unwanted movement.
When exiting the vehicle, always make sure
the ignition is in the OFF position, remove the
key fob from the vehicle, and lock the vehicle.
Never leave children alone in a vehicle, or with
access to an unlocked vehicle. Allowing chil -
dren to be in a vehicle unattended is
dangerous for a number of reasons. A child or
others could be seriously or fatally injured.
Children should be warned not to touch the
parking brake, brake pedal or the transmis -
sion gear selector.
Do not leave the key fob in or near the vehicle
(or in a location accessible to children), and do
not leave the ignition in the ON or RUN posi -
tion. A child could operate power windows,
other controls, or move the vehicle.
CAUTION!
Shift into or out of PARK or REVERSE only after
the vehicle has come to a complete stop.
Do not shift between PARK, REVERSE,
NEUTRAL, or DRIVE when the engine is above
idle speed.
Before shifting into any gear, make sure your
foot is firmly pressing the brake pedal.
WARNING!
4
22_FD_OM_EN_USC_t.book Page 85
Page 88 of 312
86STARTING AND OPERATING
(Continued)
GEAR SELECTOR
The transmission gear selector has PARK,
REVERSE, NEUTRAL, DRIVE, and AutoStick (+/-)
shift positions. Manual shifts can be made using
the AutoStick shift control. Toggling the gear
selector forward (-) or rearward (+) while in the
AutoStick position (beside the DRIVE position) will
manually select the transmission gear, and will
display the current gear in the instrument cluster
as 1, 2, 3, etc.
NOTE:If the gear selector cannot be moved to the PARK,
REVERSE, or NEUTRAL position (when pushed
forward) it is probably in the AutoStick (+/-)
position (beside the DRIVE position). In AutoStick
mode, the transmission gear (1, 2, 3, etc.) is
displayed in the instrument cluster. Move the gear
selector to the right (into the DRIVE [D] position) for
access to PARK, REVERSE, and NEUTRAL.
The electronically-controlled transmission adapts
its shift schedule based on driver inputs, along
with environmental and road conditions. The
transmission electronics are self-calibrating;
therefore, the first few shifts on a new vehicle may
be somewhat abrupt. This is a normal condition,
and precision shifts will develop within a few
hundred miles (kilometers).
The 9-speed transmission has been developed to
meet the needs of current and future FWD/AWD vehicles. Software and calibration is refined to
optimize the customer’s driving experience and
fuel economy. By design, some vehicle and
driveline combinations utilize 9th gear only in very
specific driving situations and conditions.
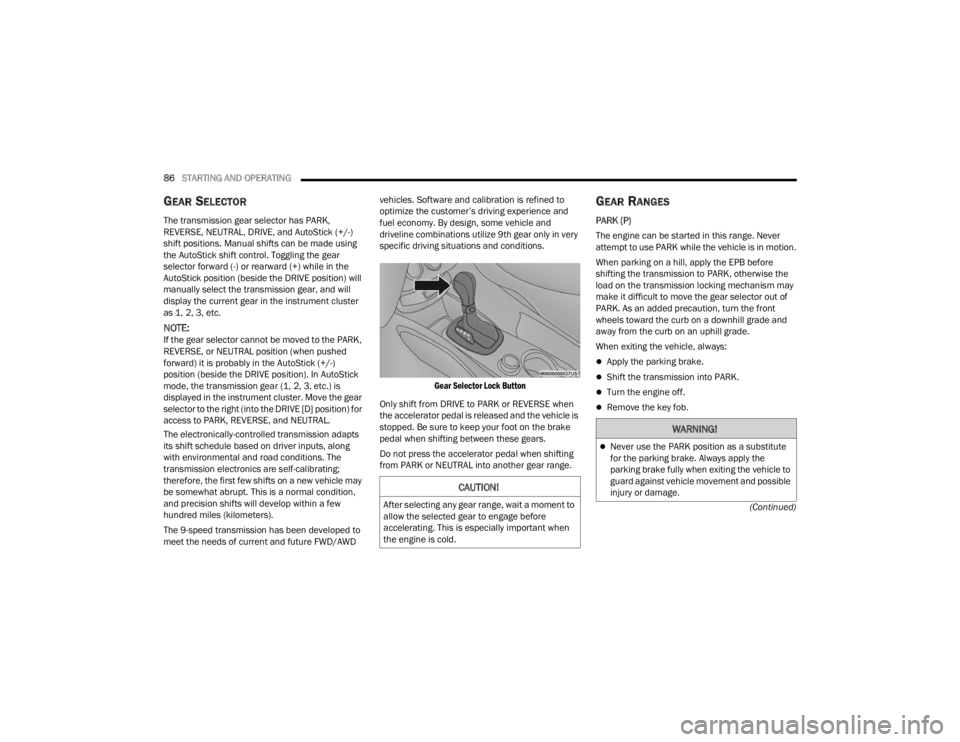
Gear Selector Lock Button
Only shift from DRIVE to PARK or REVERSE when
the accelerator pedal is released and the vehicle is
stopped. Be sure to keep your foot on the brake
pedal when shifting between these gears.
Do not press the accelerator pedal when shifting
from PARK or NEUTRAL into another gear range.
GEAR RANGES
PARK (P)
The engine can be started in this range. Never
attempt to use PARK while the vehicle is in motion.
When parking on a hill, apply the EPB before
shifting the transmission to PARK, otherwise the
load on the transmission locking mechanism may
make it difficult to move the gear selector out of
PARK. As an added precaution, turn the front
wheels toward the curb on a downhill grade and
away from the curb on an uphill grade.
When exiting the vehicle, always:
Apply the parking brake.
Shift the transmission into PARK.
Turn the engine off.
Remove the key fob.
CAUTION!
After selecting any gear range, wait a moment to
allow the selected gear to engage before
accelerating. This is especially important when
the engine is cold.
WARNING!
Never use the PARK position as a substitute
for the parking brake. Always apply the
parking brake fully when exiting the vehicle to
guard against vehicle movement and possible
injury or damage.
22_FD_OM_EN_USC_t.book Page 86
Page 89 of 312
STARTING AND OPERATING87
(Continued) The following indicators should be used to ensure
that you have properly engaged the transmission
into the PARK position:
When shifting into PARK, push the lock button
on the gear selector, and firmly move the gear
selector all the way forward until it stops and is
fully seated.
Look at the transmission gear position display
and verify that it indicates the PARK position (P),
and is not blinking.
With the brake pedal released, verify that the
gear selector will not move out of PARK.
REVERSE (R)
This range is for moving the vehicle backward.
Shift into REVERSE only after the vehicle has come
to a complete stop.
NEUTRAL (N)
Use this range when the vehicle is standing for
prolonged periods with the engine running. The
engine may be started in this range. Apply the
Electric Park Brake and shift the transmission into
PARK if you must exit the vehicle.
Your vehicle could move and injure you and
others if it is not in PARK. Check by trying to
move the transmission gear selector out of
PARK with the brake pedal released. Make
sure the transmission is in PARK before
exiting the vehicle.
It is dangerous to shift out of PARK or
NEUTRAL if the engine speed is higher than
idle speed. If your foot is not firmly pressing
the brake pedal, the vehicle could accelerate
quickly forward or in reverse. You could lose
control of the vehicle and hit someone or
something. Only shift into gear when the
engine is idling normally and your foot is firmly
pressing the brake pedal.
Unintended movement of a vehicle could
injure those in or near the vehicle. As with all
vehicles, you should never exit a vehicle while
the engine is running. Before exiting a vehicle,
always come to a complete stop, then apply
the parking brake, shift the transmission into
PARK, and turn the ignition OFF. When the
ignition is in the OFF position, the transmis -
sion is locked in PARK, securing the vehicle
against unwanted movement.
WARNING!
When exiting the vehicle, always make sure
the ignition is in the OFF position, remove the
key fob from the vehicle, and lock the vehicle.
Never leave children alone in a vehicle, or with
access to an unlocked vehicle. Allowing chil -
dren to be in a vehicle unattended is
dangerous for a number of reasons. A child or
others could be seriously or fatally injured.
Children should be warned not to touch the
parking brake, brake pedal or the transmis -
sion gear selector.
Do not leave the key fob in or near the vehicle
(or in a location accessible to children), and do
not leave the ignition in the ON or RUN posi -
tion. A child could operate power windows,
other controls, or move the vehicle.
CAUTION!
Before moving the transmission gear selector
out of PARK, you must turn the ignition to the
ON/RUN position, and also press the brake
pedal. Otherwise, damage to the gear selector
could result.
DO NOT race the engine when shifting from
PARK or NEUTRAL into another gear range, as
this can damage the drivetrain.
WARNING!
4
22_FD_OM_EN_USC_t.book Page 87
Page 134 of 312

132MULTIMEDIA
Doors & Locks
After pressing the Doors & Locks button on the touchscreen, the following settings will be available:
NOTE:Depending on the vehicle’s options, feature settings may vary.
Setting Name Description
Auto Door Locks When this feature is selected, all doors will lock automatically when the
vehicle reaches a speed of 15 mph (24 km/h).
Auto Unlock On Exit When the Auto Unlock On Exit feature is selected, all doors will unlock when
the vehicle is stopped and the transmission is in the PARK or NEUTRAL
position and the driver's door is opened.
Flash Lights With Lock This setting will allow you to turn the flash lights with lock on or off.
Sound Horn With Lock This setting will allow you to set the Sound Horn With Lock feature “Off”, “1st
Press”, or “2nd Press”.
Sound Horn With Remote Start This setting will allow you to turn horn with remote start on or off.
Keyless Entry This feature allows you to lock and unlock the vehicle’s door(s) without having
to press the key fob lock or unlock button.
Remote Door Unlock
When “Driver” is programmed, only the driver’s door will unlock on the first
push of the key fob Unlock button; you must push the key fob Unlock button
twice to unlock the passengers’ doors. When “All” is programmed, all of the
doors will unlock on the first press of the key fob Unlock button.
If “All” is programmed, all doors will unlock no matter which Passive
Entry-equipped door handle is grasped. If “Driver” is programmed, only the
driver’s door will unlock when the driver’s door is grabbed. Touching the
handle more than once will only result in the driver’s door unlocking. If the
driver’s door is opened, the interior door lock/unlock switch can be used to
unlock all doors (or use key fob).
22_FD_OM_EN_USC_t.book Page 132
Page 150 of 312
148MULTIMEDIA
The Presets are available for all Radio Modes, and
are activated by pressing any of the Preset
buttons, located at the top of the screen.
When you are on a station that you wish to save as
a preset, press and hold the numbered button on
the touchscreen for more than two seconds.
The Radio stores up to 12 presets in each of the
Radio Modes.
A total of six presets will appear on the screen. You
can switch between the radio presets list by
pressing the Arrow button located in the upper
right of the radio touchscreen.
PRESET FEATURES — IF EQUIPPED
Browse In AM/FM
When in either AM or FM, the Browse Screen
provides a means to edit the Presets List and is
entered by pushing the Enter/Browse button.
Scrolling Preset List
Once in the Browse Presets screen, you can scroll
the preset list by rotation of the Tune/Scroll knob
or by pressing the Up or Down Arrow keys, located
on the right of the screen. Preset Selection From List
A preset can be selected by pressing any of the
listed Presets, or by pushing the Enter/Browse
button on the Tune/Scroll knob to select the
currently highlighted Preset.
When selected, the radio tunes to the station
stored in the Presets.
Deleting Presets
A preset can be deleted in the Presets Browse
screen by pressing the Trash Can icon for the
corresponding preset.
Return To Main Radio Screen
You can return to the Main Radio Screen by
pressing the X button or the Back Arrow button
when in the Browse Presets screen.
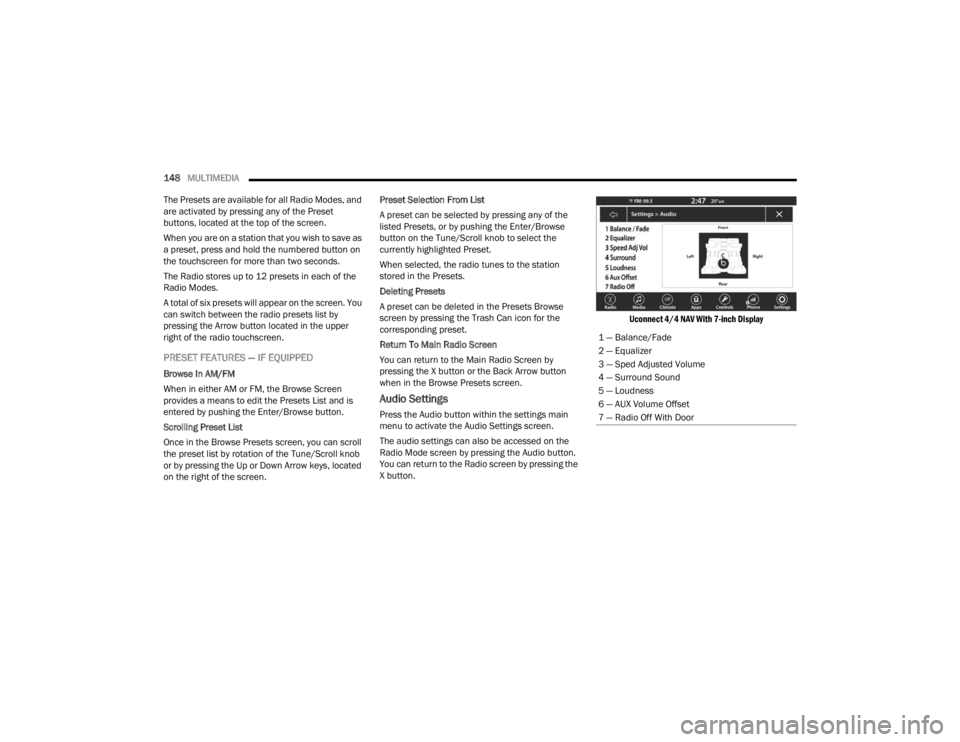
Audio Settings
Press the Audio button within the settings main
menu to activate the Audio Settings screen.
The audio settings can also be accessed on the
Radio Mode screen by pressing the Audio button.
You can return to the Radio screen by pressing the
X button.
Uconnect 4/4 NAV With 7-inch Display
1 — Balance/Fade
2 — Equalizer
3 — Sped Adjusted Volume
4 — Surround Sound
5 — Loudness
6 — AUX Volume Offset
7 — Radio Off With Door
22_FD_OM_EN_USC_t.book Page 148