headlamp FIAT 500X 2022 Owners Manual
[x] Cancel search | Manufacturer: FIAT, Model Year: 2022, Model line: 500X, Model: FIAT 500X 2022Pages: 312, PDF Size: 13.26 MB
Page 4 of 312

2
INTRODUCTION
SYMBOLS KEY ...........................................................8
ROLLOVER WARNING ............................................. 8
VEHICLE MODIFICATIONS/ALTERATIONS .............9
SYMBOL GLOSSARY.................................................9
GETTING TO KNOW YOUR VEHICLE
KEYS ....................................................................... 14 Key Fob .............................................................14
SENTRY KEY ........................................................... 17
IGNITION SWITCH .................................................. 17
Keyless Enter ‘n Go™ Ignition .........................17
REMOTE START — IF EQUIPPED .......................... 18
How To Use Remote Start ................................19
To Exit Remote Start Mode ..............................19
Remote Start Front Defrost Activation —
If Equipped........................................................20
Remote Start Comfort Systems —
If Equipped .......................................................20
Remote Start Windshield Wiper De–Icer
And Rear Defrost Activation — If Equipped.....20
Remote Start Cancel Message —
If Equipped........................................................20
VEHICLE SECURITY SYSTEM — IF EQUIPPED ..... 21
To Arm The System .........................................21
To Disarm The System ....................................21
Disabling ...........................................................21 DOORS .....................................................................22
Manual Door Locks ..........................................22
Power Door Locks ............................................22
Keyless Enter ‘n Go™ — Passive Entry
(If Equipped) .....................................................23
Automatic Door Locks — If Equipped .............24
Child-Protection Door Lock System —
Rear Doors ........................................................24
STEERING WHEEL ..................................................25
Manual Tilt/Telescoping Steering Column .....25
SEATS ......................................................................26
Manual Adjustment (Front Seats) ...................26
Manual Adjustment (Rear Seats) ....................27
Power Adjustment Front Seats —
If Equipped........................................................28
Heated Seats — If Equipped ...........................29
Head Restraints ..............................................30
UCONNECT VOICE RECOGNITION .........................32
Introducing Voice Recognition.........................32
Get Started .......................................................32
Basic Voice Commands ...................................32
Additional Information .....................................32
MIRRORS ...............................................................33
Inside Rearview Mirror .....................................33
Illuminated Vanity Mirrors —
If Equipped .......................................................33
Outside Mirrors ................................................34
Power Mirrors ...................................................34
Folding Mirror ...................................................34
Power Folding Mirrors — If Equipped ..............35
Heated Mirrors — If Equipped..........................35 EXTERIOR LIGHTS.................................................. 36
Headlight Switch ............................................. 36
Daytime Running Lights (DRLs) —
If Equipped ...................................................... 36
High Beams ...................................................... 36
Automatic High Beam Headlamp Control —
If Equipped .......................................................37
Flash-To-Pass ................................................... 37
Automatic Headlights — If Equipped .............. 37
Parking Lights ................................................... 37
Headlight Time Delay ...................................... 37
Front Fog Lights — If Equipped .......................38
Turn Signals...................................................... 38
Lane Change Assist ......................................... 38
Courtesy Lights/Approaching Lights ............... 38
INTERIOR LIGHTS ................................................. 38
Front Courtesy Light......................................... 38
Cargo Area Lights ............................................. 40
WINDSHIELD WIPERS AND WASHERS .............. 40
Windshield Wiper Operation ........................... 40
Rain Sensing Wipers — If Equipped ................41
Rear Window Wiper/Washer ........................... 42
Windshield Wiper De-Icer — If Equipped ........ 42
CLIMATE CONTROLS ............................................ 43
Automatic Climate Control Descriptions And
Functions .......................................................... 43
Manual Climate Control Descriptions And
Functions .......................................................... 46
Automatic Temperature Control (ATC) ........... 48
Climate Voice Recognition............................... 48
Operating Tips .................................................48
22_FD_OM_EN_USC_t.book Page 2
Page 39 of 312

GETTING TO KNOW YOUR VEHICLE37
AUTOMATIC HIGH BEAM HEADLAMP
C
ONTROL — IF EQUIPPED
The Automatic High Beam Headlamp Control
system provides increased forward lighting at night
by automating high beam control through the use
of a digital camera mounted on the windshield.
This camera detects vehicle specific light and
automatically switches from high beams to low
beams until the approaching vehicle is out of view.
NOTE:
The Automatic High Beam Headlamp Control
can be turned on or off through Uconnect
Settings Ú page 123.
Broken, muddy, or obstructed headlights and
taillights of vehicles in the field of view will
cause headlights to remain on longer (closer to
the vehicle). Also, dirt, film, and other obstruc -
tions on the windshield or camera lens will
cause the system to function improperly.
FLASH-TO-PASS
You can signal another vehicle with your headlights
by lightly pulling the multifunction lever toward you.
This will cause the high beam headlights to turn on,
and remain on, until the lever is released.
AUTOMATIC HEADLIGHTS — IF EQUIPPED
This system automatically turns the headlights on
or off according to ambient light levels. To turn the
system on, rotate the headlight switch clockwise to
the last detent (AUTO position) for automatic
headlight operation. To turn the automatic system
off, move the headlight switch out of the AUTO
position.
NOTE:The ignition must be in the ON/RUN or START
position before the headlights will come on in the
automatic mode.
Light Sensor
The light sensor is equipped with an infrared LED,
located on the windshield. It detects changes in
light intensity outside the vehicle, based on the
sensitivity of light set by using the menu on the
display or on the Uconnect system.
The higher the sensitivity, the lesser the amount of
external light required for controlling the lighting.
PARKING LIGHTS
Rotate the headlight switch to the first position to
turn on the parking lights. The parking light
indicator in the cluster will illuminate.
HEADLIGHT TIME DELAY
This feature provides the safety of headlight
illumination for up to 90 seconds when leaving
your vehicle in an unlit area.
The time delay of the headlights is programmable
between 0, 30, 60 and 90 seconds within
Uconnect Settings Ú page 123.
Headlight Delay Activation
To activate the delay feature, place the ignition in
the OFF position while the headlights are still on.
Then, turn off the headlights within two minutes.
The delay interval begins when the headlight
switch is turned off.
Headlight Delay Deactivation
The feature is disabled by turning on the
headlights, the parking lights or by placing the
ignition in the ON/RUN position.
If you shut off the lights before the ignition is
turned on, they will turn off in the normal manner.
NOTE:The lights must be turned off within two minutes of
placing the ignition in the OFF position to activate
this feature.
2
22_FD_OM_EN_USC_t.book Page 37
Page 203 of 312

SAFETY201
If A Deployment Occurs
The front air bags are designed to deflate
immediately after deployment.
NOTE:Front and/or side air bags will not deploy in all colli -
sions. This does not mean something is wrong with
the air bag system.
If you do have a collision which deploys the air
bags, any or all of the following may occur:
The air bag material may sometimes cause
abrasions and/or skin reddening to the occu -
pants as the air bags deploy and unfold. The
abrasions are similar to friction rope burns or
those you might get sliding along a carpet or
gymnasium floor. They are not caused by
contact with chemicals. They are not permanent
and normally heal quickly. However, if you
haven’t healed significantly within a few days, or
if you have any blistering, see your doctor imme -
diately.
As the air bags deflate, you may see some
smoke-like particles. The particles are a normal
by-product of the process that generates the
non-toxic gas used for air bag inflation. These
airborne particles may irritate the skin, eyes,
nose, or throat. If you have skin or eye irritation,
rinse the area with cool water. For nose or throat
irritation, move to fresh air. If the irritation
continues, see your doctor. If these particles settle on your clothing, follow the garment
manufacturer’s instructions for cleaning.
Do not drive your vehicle after the air bags have
deployed. If you are involved in another collision,
the air bags will not be in place to protect you.
NOTE:
Air bag covers may not be obvious in the interior
trim, but they will open during air bag deploy -
ment.
After any collision, the vehicle should be taken
to an authorized dealer immediately.
Enhanced Accident Response System
In the event of an impact, if the communication
network remains intact, and the power remains
intact, depending on the nature of the event, the
Occupant Restraint Controller (ORC) will determine
whether to have the Enhanced Accident Response
System perform the following functions:
Cut off fuel to the engine (if equipped).
Cut off battery power to the electric motor (if
equipped).
Flash hazard lights as long as the battery has
power.
Turn on the interior lights, which remain on as
long as the battery has power or for 15 minutes
from the intervention of the Enhanced Accident
Response System.
Unlock the power door locks.
Your vehicle may also be designed to perform any
of these other functions in response to the
Enhanced Accident Response System:
Turn off the Fuel Filter Heater, Turn off the HVAC
Blower Motor, Close the HVAC Circulation Door
Cut off battery power to the:
Engine
Electric Motor (if equipped)
Electric power steering
Brake booster
Electric park brake
Automatic transmission gear selector
Horn
Front wiper
Headlamp washer pump (if equipped)
WARNING!
Deployed air bags and seat belt pretensioners
cannot protect you in another collision. Have the
air bags, seat belt pretensioners, and the seat
belt retractor assemblies replaced by an
authorized dealer immediately. Also, have the
Occupant Restraint Controller System serviced
as well.
6
22_FD_OM_EN_USC_t.book Page 201
Page 239 of 312

SERVICING AND MAINTENANCE237
Mileage or time passed (whichever comes first)
10,000
20,000
30,000
40,000
50,000
60,000
70,000
80,000
90,000
100,000
110,000
120,000
130,000
140,000
150,000
Or Years: 1 2 3 4 5 6 7 8 9 10 11 12 13 14 15
Or Kilometers:
16,000
32,000
48,000
64,000
80,000
96,000
112,000
128,000
144,000
160,000
176,000
192,000
208,000
224,000
240,000
Check tire condition/wear and adjust pressure, if
necessary, check Tire Service Kit expiration date (if
provided). • • • • • • • • • • • • • • •
Check operation of lighting system (headlamps, direction
indicators, hazard warning lights, luggage compartment,
passenger compartment, glove compartment, instrument
panel warning lights, etc.). • • • • • • • • • • • • • • •
Check and, if necessary, top up fluid levels (brakes/
hydraulic clutch, windshield washer, engine coolant, etc.). • • • • • • • • • • • • • • •
Check engine control system operation (via diagnostic tool). • • • • • • • • • • • • • • •
Visually inspect condition of: exterior bodywork, underbody
protection, pipes and hoses (exhaust - fuel system - brakes),
rubber elements (boots, sleeves, bushings, etc.). • • • • • • • •
Check windshield/rear window wiper blade position/wear. • • • • • • • •
Check operation of windshield washer system and adjust
jets if necessary. • • • • • • • •
Check cleanliness of hood and tailgate locks and
cleanliness and lubrication of linkages. • • • • • • •
8
22_FD_OM_EN_USC_t.book Page 237
Page 262 of 312

260SERVICING AND MAINTENANCE
Interior Lamps
Lamp Name Lamp Number
Front Courtesy Light C5W
Front Courtesy Lights (Sun Visors) C5W
Rear Dome Light (Models Without Retractable Roof) C5W
Rear Interior Lights (Models With Retractable Roof) C5W
Interior Lights W5W
Dome Light (Glove Compartment) W5W
Exterior Lamps
Lamp Name Lamp Number
Low Beam/High Beam Headlamps HIR2
Optional Low Beam/High Bean Headlamps LED (Serviced at an authorized dealer)
Front Position/Daytime Running Lights (DRL) LED (Serviced at an authorized dealer)
Front Direction Indicator Lamps WY21W
Fog Lamps (Halogen) H11
Fog Lamps (LED) LED (Serviced at an authorized dealer)
Side Indicators (Side View Mirror) WY5W
Side Marker LED (Serviced at an authorized dealer)
Tail/Brake lights LED (Serviced at an authorized dealer)
Turn Indicators WY21W
Center High Mounted Stop Lamp (CHMSL) LED (Serviced at an authorized dealer)
22_FD_OM_EN_USC_t.book Page 260
Page 263 of 312

SERVICING AND MAINTENANCE261
Replacing Exterior Bulbs
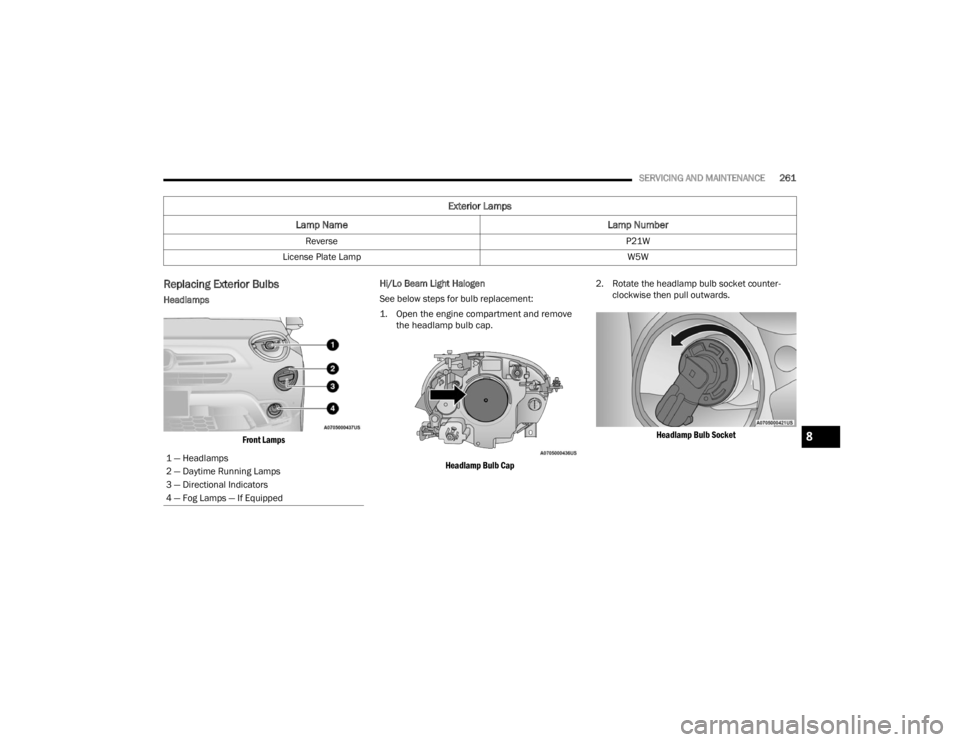
Headlamps
Front Lamps
Hi/Lo Beam Light Halogen
See below steps for bulb replacement:
1. Open the engine compartment and remove
the headlamp bulb cap.
Headlamp Bulb Cap
2. Rotate the headlamp bulb socket counter
-
clockwise then pull outwards.
Headlamp Bulb Socket
Reverse
P21W
License Plate Lamp W5W
Exterior Lamps
Lamp Name Lamp Number
1 — Headlamps
2 — Daytime Running Lamps
3 — Directional Indicators
4 — Fog Lamps — If Equipped
8
22_FD_OM_EN_USC_t.book Page 261
Page 264 of 312

262SERVICING AND MAINTENANCE
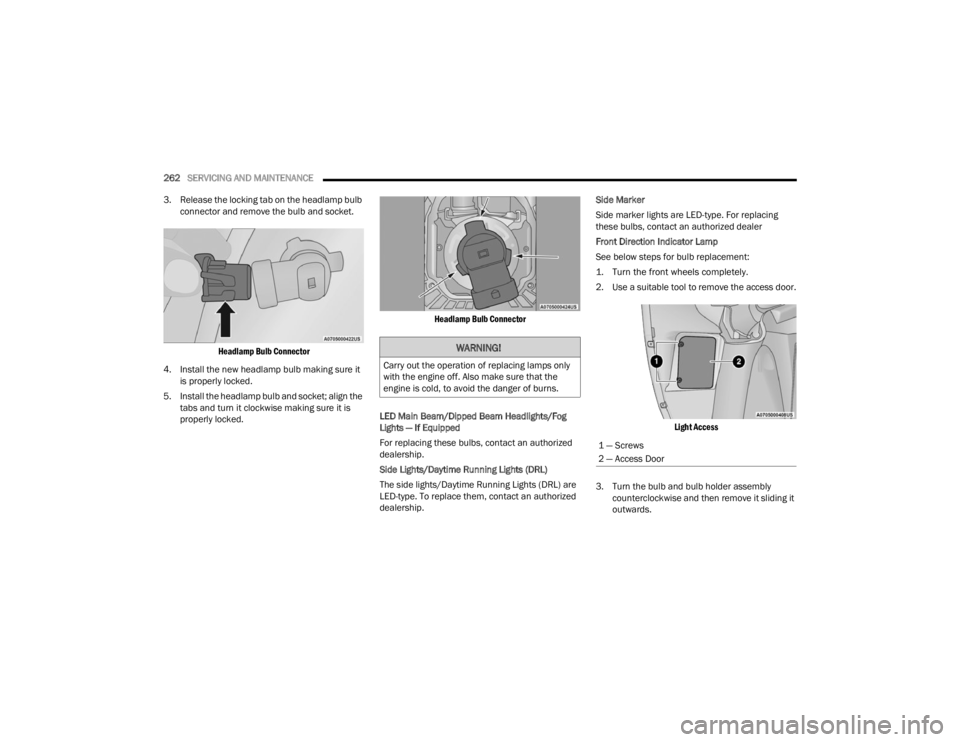
3. Release the locking tab on the headlamp bulb connector and remove the bulb and socket.
Headlamp Bulb Connector
4. Install the new headlamp bulb making sure it is properly locked.
5. Install the headlamp bulb and socket; align the tabs and turn it clockwise making sure it is
properly locked.
Headlamp Bulb Connector
LED Main Beam/Dipped Beam Headlights/Fog
Lights — If Equipped
For replacing these bulbs, contact an authorized
dealership.
Side Lights/Daytime Running Lights (DRL)
The side lights/Daytime Running Lights (DRL) are
LED-type. To replace them, contact an authorized
dealership. Side Marker
Side marker lights are LED-type. For replacing
these bulbs, contact an authorized dealer
Front Direction Indicator Lamp
See below steps for bulb replacement:
1. Turn the front wheels completely.
2. Use a suitable tool to remove the access door.
Light Access
3. Turn the bulb and bulb holder assembly counterclockwise and then remove it sliding it
outwards.
WARNING!
Carry out the operation of replacing lamps only
with the engine off. Also make sure that the
engine is cold, to avoid the danger of burns.
1 — Screws
2 — Access Door
22_FD_OM_EN_USC_t.book Page 262