maintenance FIAT 500X 2022 Owners Manual
[x] Cancel search | Manufacturer: FIAT, Model Year: 2022, Model line: 500X, Model: FIAT 500X 2022Pages: 312, PDF Size: 13.26 MB
Page 3 of 312

TABLE OF CONTENTS
1
2
3
4
5
6
7
8
9
10
11
1 INTRODUCTION .............................................................................................................................. 7
2 GETTING TO KNOW YOUR VEHICLE ................................................................................. 14
3 GETTING TO KNOW YOUR INSTRUMENT PANEL ....................................................... 63
4 STARTING AND OPERATING ................................................................................................ 80 5 MULTIMEDIA ............................................................................................................................... 122
6 SAFETY ......................................................................................................................................... 174 7 IN CASE OF EMERGENCY ..................................................................................................... 218
8 SERVICING AND MAINTENANCE ...................................................................................... 235
9 TECHNICAL SPECIFICATIONS ............................................................................................ 289
10 CUSTOMER ASSISTANCE ..................................................................................................... 294 11 INDEX ............................................................................................................................................. 299
22_FD_OM_EN_USC_t.book Page 1
Page 5 of 312
3
INTERIOR STORAGE AND EQUIPMENT ............... 50 Storage..............................................................50
USB/Media Player Control ...............................51
Power Outlets ..................................................52
Cigar Lighter — If Equipped .............................52
Ashtray — If Equipped ......................................52
Grab Handles....................................................53
WINDOWS............................................................... 53
Power Window Controls ...................................53
SUNROOF — IF EQUIPPED .................................... 55
Opening And Closing The Sunroof...................55
Pinch Protect Feature ......................................55
Venting Sunroof ................................................55
Sun Shade ........................................................56
Sunroof Maintenance ......................................56
Emergency Operation.......................................56
Power Sunroof Relearn Procedure..................56
POWER FOLDING ROOF — IF EQUIPPED ............ 57
Opening The Power Folding Roof ....................57
Closing The Power Roof ...................................58
Power Roof Maintenance ................................58
Ignition Off Operation .......................................58
Relearn Procedure ...........................................58
HOOD ...................................................................... 58
To Open The Hood ............................................58
To Close The Hood ...........................................59 LIFTGATE ................................................................. 60
To Unlock/Open The Liftgate...........................60
Lock/Close The Liftgate ...................................60
Cargo Area Features ........................................61
GETTING TO KNOW YOUR
INSTRUMENT PANEL
INSTRUMENT CLUSTER .........................................63
Instrument Cluster Descriptions .....................64
INSTRUMENT CLUSTER DISPLAY .......................64
Instrument Cluster Display Control Buttons ...64
Engine Oil Change Reset — If Equipped .........65
Instrument Cluster Display Main Menu ..........65
WARNING LIGHTS AND MESSAGES ....................69
Red Warning Lights ..........................................69
Yellow Warning Lights ......................................72
Yellow Indicator Lights .....................................76
Green Indicator Lights .....................................76
White Indicator Lights ......................................77
Blue Indicator Lights ........................................77
Gray Indicator Lights ........................................77
ONBOARD DIAGNOSTIC SYSTEM — OBD II.........78
Onboard Diagnostic System (OBD II)
Cybersecurity ....................................................78
EMISSIONS INSPECTION AND MAINTENANCE
PROGRAMS.............................................................78
STARTING AND OPERATING
STARTING THE ENGINE ......................................... 80
Tip Start Feature ............................................. 80
Cold Weather Operation .................................. 80
Extended Park Starting ....................................80
If Engine Fails To Start ....................................81
After Starting — Warming Up The Engine ....... 81
Stopping The Engine ........................................ 81
Turbocharger “Cool Down” — If Equipped ...... 82
ENGINE BREAK-IN RECOMMENDATIONS .......... 82
ELECTRIC PARK BRAKE (EPB) ............................. 82
Auto Park Brake ............................................... 84
SafeHold ........................................................... 84
Brake Service Mode......................................... 84
AUTOMATIC TRANSMISSION .............................. 85
Gear Selector.................................................... 86
Gear Ranges ..................................................... 86
Transmission Limp Home Mode ..................... 89
Ignition Park Interlock...................................... 89
Brake Transmission Shift Interlock (BTSI)
System ..............................................................89
ALL-WHEEL DRIVE (AWD) — IF EQUIPPED ........ 90
DYNAMIC SELECTOR — IF EQUIPPED ................. 90
Warning Messages........................................... 90
ELECTRIC POWER STEERING .............................. 90
22_FD_OM_EN_USC_t.book Page 3
Page 7 of 312
5
OCCUPANT RESTRAINT SYSTEMS .................... 188 Occupant Restraint Systems ........................ 188
Important Safety Precautions....................... 188
Seat Belt Systems ......................................... 189
Supplemental Restraint Systems (SRS) ...... 195
Child Restraints ............................................ 204
SAFETY TIPS ......................................................... 214
Transporting Passengers .............................. 214Transporting Pets .......................................... 215
Safety Checks You Should Make Inside
The Vehicle ................................................... 215Periodic Safety Checks You Should Make
Outside The Vehicle ...................................... 216Exhaust Gas .................................................. 216
Carbon Monoxide Warnings ......................... 217
IN CASE OF EMERGENCY
HAZARD WARNING FLASHERS ......................... 218
JACKING AND TIRE CHANGING ........................ 218
Preparations For Jacking ............................. 218
Jack Location/Spare Tire Stowage —
If Equipped..................................................... 219
Jacking Instructions ...................................... 220
SEMI–AUTO KIT ................................................... 223
Description..................................................... 223
Inflation Procedure........................................ 224
Sealant Cartridge Replacement ................... 226 JUMP STARTING .................................................. 226
Preparations For Jump Start ........................ 227
Jump Starting Procedure .............................. 227
REFUELING IN EMERGENCY .............................. 229
IF YOUR ENGINE OVERHEATS ........................... 229
GEAR SELECTOR OVERRIDE ............................. 230
FREEING A STUCK VEHICLE .............................. 231
TOWING A DISABLED VEHICLE ........................ 232
All Wheel Drive (AWD) Models ...................... 232Tow Eye Usage — If Equipped ...................... 232
ENHANCED ACCIDENT RESPONSE SYSTEM
(EARS) .................................................................. 234
EVENT DATA RECORDER (EDR) ........................ 234
SERVICING AND MAINTENANCE
SCHEDULED MAINTENANCE.............................. 235
Maintenance Plan ......................................... 236
ENGINE COMPARTMENT .................................... 240
1.3L Turbo Engine ......................................... 240
Checking Oil Level ......................................... 241
Adding Washer Fluid ..................................... 241
Maintenance-Free Battery ........................... 241Pressure Washing ......................................... 242
VEHICLE MAINTENANCE..................................... 242
Engine Oil ...................................................... 242
Engine Oil Filter ............................................. 243Engine Air Cleaner Filter ............................... 243
Accessory Drive Belt Inspection ................... 243Air Conditioner Maintenance........................ 244
Body Lubrication ........................................... 244 Windshield Wiper Blades.............................. 245
Exhaust System ............................................ 246
Cooling System.............................................. 247
Brake System ............................................... 250
Automatic Transmission ............................... 251
FUSES ............................................................ 252
BULB REPLACEMENT .................................... 259
TIRES ..................................................................... 269
Tire Safety Information ................................. 269
Tires — General Information ......................... 276
Tire Types....................................................... 279Spare Tires — If Equipped............................. 280Wheel And Wheel Trim Care......................... 282
Snow Traction Devices ................................. 283
Tire Rotation Recommendations ................ 284
DEPARTMENT OF TRANSPORTATION
UNIFORM TIRE QUALITY GRADES .................... 285
Treadwear...................................................... 285
Traction Grades ............................................. 285Temperature Grades..................................... 285
STORING THE VEHICLE ....................................... 286
BODYWORK .......................................................... 286
Protection From Atmospheric Agents .......... 286
Body And Underbody Maintenance ............. 286
Preserving The Bodywork ............................. 286
INTERIORS ........................................................... 287
Seats And Fabric Parts ................................. 287
Plastic And Coated Parts .............................. 287
Leather Surfaces........................................... 288
Glass Surfaces ............................................. 288
22_FD_OM_EN_USC_t.book Page 5
Page 9 of 312
7
INTRODUCTION
Dear Customer,
Congratulations on the purchase of your new FIAT® vehicle. Be assured that it represents precision workmanship, distinctive styling, and high quality. This
Owner's Manual has been prepared with the assistance of service and engineering specialists to acquaint you with the operation and maintenance of your
vehicle. It is supplemented by customer-oriented documents. Within this information, you will find a description of the services that FCA US LLC offers to its
customers as well as the details of the terms and conditions for maintaining its validity. Please take the time to read all of these publications carefully before
driving your vehicle for the first time. Following the instructions, recommendations, tips, and important warnings in this manual will help ensure safe and
enjoyable operation of your vehicle.
This Owner's Manual describes all versions of this vehicle. Options and equipment dedicated to specific markets or versions are not expressly indicated in the
text. Therefore, you should only consider the information that is related to the trim level, engine, and version that you have purchased. Any content introduced
throughout the Owner's Information, which may or may not be applicable to your vehicle, will be identified with the wording “If Equipped”. All data contained in
this publication are intended to help you use your vehicle in the best possible way. FCA US LLC aims at a constant improvement of the vehicles produced. For
this reason, it reserves the right to make changes to the model described for technical and/or commercial reasons. For further information, contact an authorized
dealer.
When it comes to service, remember that authorized dealers know your vehicle best, have factory-trained technicians, genuine Mopar® parts, and care about
your satisfaction.1
22_FD_OM_EN_USC_t.book Page 7
Page 51 of 312

GETTING TO KNOW YOUR VEHICLE49
Vacation/Storage
For information on maintaining the Climate Control
system when the vehicle is being stored for an
extended period of time, see Úpage 286.
Window Fogging
Vehicle windows tend to fog on the inside in mild,
rainy, and/or humid weather. To clear the
windows, select Defrost or Mix mode and increase
the front blower speed. Do not use the
Recirculation mode without A/C for long periods,
as fogging may occur.
Outside Air Intake
Make sure the air intake, located directly in front of
the windshield, is free of obstructions, such as
leaves. Leaves collected in the air intake may
reduce airflow, and if they enter the air distribution
box, they could plug the water drains. In Winter
months, make sure the air intake is clear of ice,
slush, and snow.
Cabin Air Filter
The Climate Control system filters out dust and
pollen from the air. Contact an authorized dealer to
service your cabin air filter, and to have it replaced
when needed.
System Maintenance
In Winter, the Climate Control system must be
turned on at least once a month for approximately
10 minutes.
Have the system inspected at an authorized dealer
before the Summer.
NOTE:The system uses R-1234yf (refrigerant) which does
not pollute the environment in the event of acci -
dental leakage. Under no circumstances is the use
of R-134a (refrigerant) allowed.
Rapid Window Demisting (MAX-Defrost
Function)
Push the MAX-defrost button to activate (LED on)
the windshield and side window demisting
function.
The Climate Control system carries out the
following operations:
Turns on the air conditioning compressor when
environmental conditions are suitable
Turns air recirculation off
Sets blower fan to the maximum speed and
displays the fan speed (Blower Control Indicator
LED illuminated)
Directs air flow to windshield and front side
window diffusers
Activates the heated rear window defrost
Activates the heated windshield (if equipped)
When the function is activated, the AUTO button
LED turns off. With the function activated, the only
possible manual adjustments are pushing the A/C
control button, adjusting the fan speed and turning
the heated rear window off.
When the Recirculation Control or AUTO buttons
are pushed, the Climate Control system will
deactivate the Front Defrost (MAX-DEF) function.
Selecting the footwell/windshield or only
windshield distribution activates the Climate
Control system compressor and the air
recirculation is set to outside air intake.
This logic guarantees optimum visibility at the
windows. Max-defrost is also available in manual
mode.
2
22_FD_OM_EN_USC_t.book Page 49
Page 58 of 312
56GETTING TO KNOW YOUR VEHICLE
SUN SHADE
The two sun shades are manually operated and
can be adjusted in any position.
SUNROOF MAINTENANCE
Use only a non-abrasive cleaner and a soft cloth to
clean the glass panel. Periodically check for and
clear out any debris that may have collected in the
tracks.
EMERGENCY OPERATION
If the power sunroof switch fails, the sunroof can
be operated manually as follows:
1. Remove the protective cap located on the
inner lining.
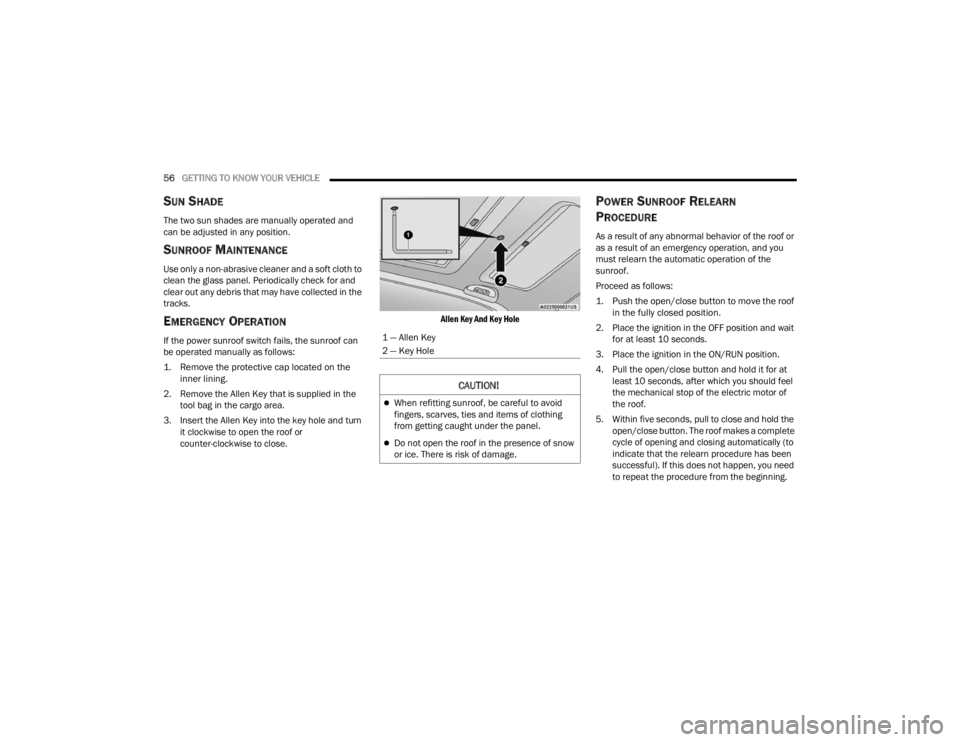
2. Remove the Allen Key that is supplied in the tool bag in the cargo area.
3. Insert the Allen Key into the key hole and turn it clockwise to open the roof or
counter-clockwise to close.
Allen Key And Key Hole
POWER SUNROOF RELEARN
P
ROCEDURE
As a result of any abnormal behavior of the roof or
as a result of an emergency operation, and you
must relearn the automatic operation of the
sunroof.
Proceed as follows:
1. Push the open/close button to move the roof
in the fully closed position.
2. Place the ignition in the OFF position and wait for at least 10 seconds.
3. Place the ignition in the ON/RUN position.
4. Pull the open/close button and hold it for at least 10 seconds, after which you should feel
the mechanical stop of the electric motor of
the roof.
5. Within five seconds, pull to close and hold the open/close button. The roof makes a complete
cycle of opening and closing automatically (to
indicate that the relearn procedure has been
successful). If this does not happen, you need
to repeat the procedure from the beginning.
1 — Allen Key
2 — Key Hole
CAUTION!
When refitting sunroof, be careful to avoid
fingers, scarves, ties and items of clothing
from getting caught under the panel.
Do not open the roof in the presence of snow
or ice. There is risk of damage.
22_FD_OM_EN_USC_t.book Page 56
Page 60 of 312
58GETTING TO KNOW YOUR VEHICLE
CLOSING THE POWER ROOF
Express Mode
Push the close switch and release it within one-half
second. The power roof will close fully and stop
automatically. This is called “Express Close”.
During Express Close operation, any movement of
the switch will stop the power roof.
Manual Mode
To close the power roof manually, push and hold
the close switch. The power roof will move forward
and automatically stop at the fully closed position.
Any release of the switch will stop the movement.
The power roof will remain in a partially closed
position until the switch is pushed and held again.
If the power roof switch fails, the sunroof can be
operated manually. See, Úpage 56 for further
information.
POWER ROOF MAINTENANCE
Use only a non-abrasive cleaner and a soft cloth to
clean the window glass. For important information
on cleaning and caring for your vehicle
Ú page 286.
IGNITION OFF OPERATION
The power sliding roof switch can remain active in
Accessory Delay for up to approximately
10 minutes after the vehicle’s ignition is placed to the OFF position. Opening either front door will
cancel this feature.
NOTE:Ignition Off timing is programmable through the
Uconnect system Ú
page 123.
RELEARN PROCEDURE
For vehicles equipped with a power sliding roof,
there is a relearn procedure that allows you to
calibrate the power roof when the “Express Mode”
stops working. To reset the power sliding roof,
follow these steps:
1. Place the ignition in the RUN position, and
start the vehicle.
NOTE:The engine must be running to perform the relearn
procedure.
2. Ensure the power sliding roof is in the fully closed position.
3. Push and hold the open/close switch for 10 seconds. This will put the power sliding roof
into calibration mode.
4. Continue holding down the close button while the top goes fully open and then back to fully
close. 5. Once the power sliding roof has stopped in the
fully closed position, release the open/close
switch. The power sliding roof is now reset and
ready to use.
NOTE:If the open/close switch is released anytime during
the relearning process, the relearn may not be
complete, and the procedure must be repeated.
HOOD
TO OPEN THE HOOD
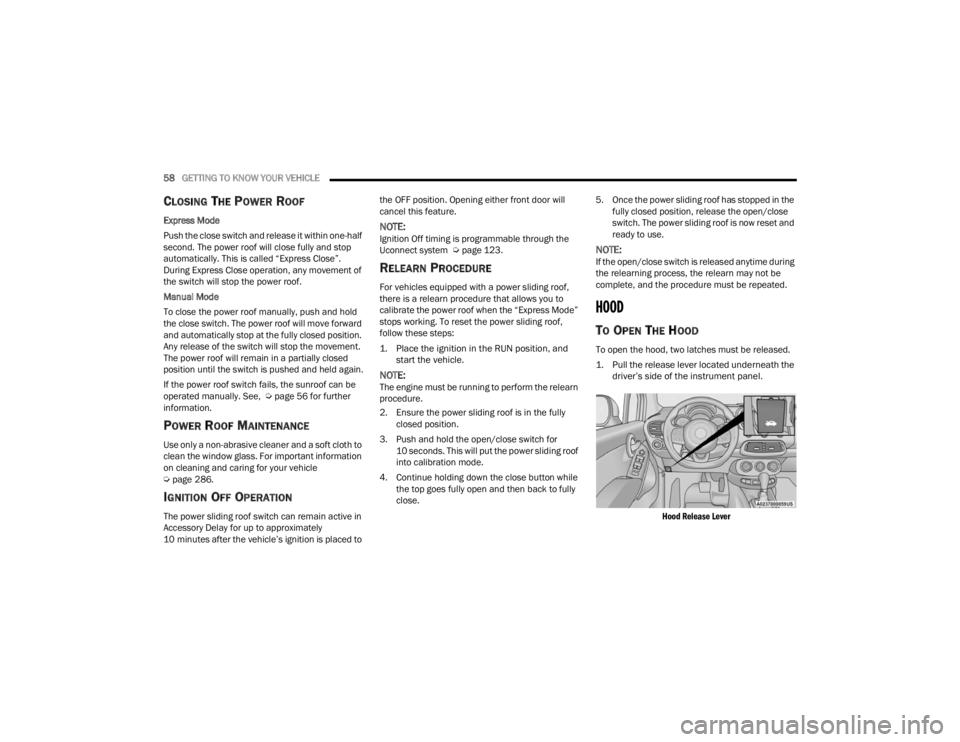
To open the hood, two latches must be released.
1. Pull the release lever located underneath the driver’s side of the instrument panel.
Hood Release Lever
22_FD_OM_EN_USC_t.book Page 58
Page 67 of 312

GETTING TO KNOW YOUR INSTRUMENT PANEL65
The instrument cluster display features a driver
interactive display that is located in the instrument
cluster. Pushing the controls on the left side of the
steering wheel allows the driver to select vehicle
information and Personal Settings.
Push the back/left arrow button to access
the information screens or submenu screens of
a main menu item.
Push the up arrow button to scroll upward
through the main menus and submenus
(Speedometer, Trip, Drive Mode Selector,
Vehicle Info, Driver Assist, Audio, Phone, Naviga -
tion, Messages, Settings).
Push the right arrow button to access the
information screens or submenu screens of a
main menu item.
Push the down arrow button to scroll down -
ward through the main menu and submenus
(Speedometer, Trip, Drive Mode Selector,
Vehicle Info, Driver Assist, Audio, Phone, Naviga -
tion, Messages, Settings).
Push the OK button to access/select the infor -
mation screens or submenu screens of a main
menu item. Push and hold the OK button for two
seconds to reset displayed/selected features
that can be reset.
ENGINE OIL CHANGE RESET —
I
F EQUIPPED
Your vehicle may be equipped with an engine oil
change indicator system. The “Change Engine Oil”
message will display in the instrument cluster
display. The engine oil change indicator system is
duty cycle based, which means the engine oil
change interval may fluctuate, dependent upon
your personal driving style.
Unless reset, this message will continue to display
each time you turn the ignition switch to the ON/
RUN position. To reset the oil change indicator
system (after performing the scheduled
maintenance), refer to the following procedure.
1. Turn the ignition switch to the ON position (do
not start the engine).
2. Fully push the accelerator pedal slowly, three times, within 10 seconds.
3. Turn the ignition switch to the OFF position.
NOTE:If the indicator message illuminates when you start
the vehicle, the oil change indicator system did not
reset. If necessary, repeat this procedure.
INSTRUMENT CLUSTER DISPLAY MAIN
M
ENU
The Main Menu is composed of several options
that can be selected using the control buttons
above.
NOTE:
The display mode of the menu items varies
depending on the type of display.
For some items, a submenu is provided.
In the Uconnect system, some items on the
menu are not shown on the instrument cluster
display Ú page 64.
Instrument Cluster Display Menu/
Submenu Items
The Menu is composed of the following items:
Speedometer
Trip
Instantaneous Info
Trip A
Trip B
Drive Mode Selector — If Equipped
Auto Mode
Sport Mode
All Weather Mode
3
22_FD_OM_EN_USC_t.book Page 65
Page 70 of 312
68GETTING TO KNOW YOUR INSTRUMENT PANEL
Lights
Doors and Locks
Engine OFF Procedure — If Equipped
Display
By selecting "Display," you can access the following
settings:
Screen Setup: Allows you to configure the
display screen.
Language: Allows you to select the language in
which to display the information/warnings.
Automatic Reset Trip B: Allows you to set the
options to reset the Trip B (never, always, every
two hours or every eight hours).
Phone Repetition: Allows you to select “On” or
“Off”. The instrument cluster display can also
display the information concerning phone
mode. The information that can be displayed is
the connection status of the mobile phone
(phone connected or disconnected), the active
telephone calls/incoming/on hold, and the
management of double calls (first incoming
second waiting, etc.).
Navigation Repetition: Allows you to select “On”
or “Off” on the instrument cluster display, infor -
mation relating to the navigation mode.
Units
By selecting the item "Units Of Measure,” you can
select the unit of measure used in the display. Possible options are:
US
Metric
Custom
Clock And Date
By selecting the item "clock and date," you can
adjust the clock.
Possible options are:
Set Time: Adjust hours/minutes.
Set Format: Adjust the time format "12h"
(12 hours) or "24h" (24 hours).
Set Date: Adjust day/month/year.
Security
By selecting the item “Security,” you can make the
following adjustments:
Speed Warning: Set the vehicle speed limit
(mph or km/h), which the driver is notified
through a visual and acoustic signaling (display
of a message and a symbol on the display).
Seat Belt Buzzer: This function is only viewable
when the Seat Belt Reminder (SBR) system is
active.
Hill Start Assist: Activation/Deactivation of the
Hill Start Assist system. Safety And Assistance
By selecting the item "Safety & Assistance," you
can make the following adjustments:
Full Brake Control: A selection of operating
modes of the Full Brake Control system.
Full Brake Control Sensitivity: A selection of the
"readiness" of intervention of the Full Brake
Control system, based on the distance to the
obstacle.
Park Assist: A selection of the type of informa
-
tion provided by Park Assist.
Park Assist Vol.: A selection of the volume of
acoustic signals provided by Park Assist.
Rain Sensing Wipers: Enabling/disabling the
automatic operation of wipers in the event of
rain.
LaneSense Warning — If Equipped: A selection
of the "readiness" of intervention of LaneSense.
Warning Buzzer Volume: Increase or decrease
the volume of the buzzer by selecting “Low”,
“Medium”, or “High”.
Maintenance Brakes — If Equipped: Activation
of the procedure to carry out braking system
maintenance.
Auto Park Brake — If Equipped: Enable/disable
auto-insertion of the Electric Parking Brake.
22_FD_OM_EN_USC_t.book Page 68
Page 76 of 312
74GETTING TO KNOW YOUR INSTRUMENT PANEL
position before engine start. If the bulb does not
come on when turning the ignition switch from OFF
to ON/RUN, have the condition checked promptly.
Certain conditions, such as a loose or missing gas
cap, poor quality fuel, etc., may illuminate the light
after engine start. The vehicle should be serviced if
the light stays on through several typical driving
styles. In most situations, the vehicle will drive
normally and will not require towing.
When the engine is running, the MIL may flash to
alert serious conditions that could lead to
immediate loss of power or severe catalytic
converter damage. The vehicle should be serviced
by an authorized dealer as soon as possible if this
occurs.
Service Warning Light — If Equipped
The “Maintenance Plan” includes vehicle
maintenance at fixed intervals. For
further information Ú page 235. This
message is displayed automatically
along with the warning light when the key is turned
to RUN - 1,242 miles (2,000 km) or 30 days before
these deadlines, and reappears every time the key
is turned to RUN. The indication will appear in
miles or kilometers according to the "Unit Of
Measurement" settings. When the next scheduled
service is approaching and the key is turned to
RUN, the word “Service” will appear on the display,
followed by the number of miles or kilometers left.
Contact an authorized dealership. The operations
in the “Maintenance Plan” will be performed and
the message will be reset.
Service Stop / Start System Warning
Light — If Equipped
This warning light will illuminate when the
Stop/Start system is not functioning
properly and service is required. Contact
an authorized dealer for service.
Tire Pressure Monitoring System (TPMS)
Warning Light
The warning light switches on and a
message is displayed to indicate that the
tire pressure is lower than the
recommended value and/or that slow
pressure loss is occurring. In these cases, optimal
tire duration and fuel consumption may not be
guaranteed.
Should one or more tires be in the condition
mentioned above, the display will show the
indications corresponding to each tire.
WARNING!
A malfunctioning catalytic converter, as refer -
enced above, can reach higher temperatures
than in normal operating conditions. This can
cause a fire if you drive slowly or park over flam -
mable substances such as dry plants, wood,
cardboard, etc. This could result in death or seri -
ous injury to the driver, occupants or others.
CAUTION!
Prolonged driving with the Malfunction Indicator
Light (MIL) on could cause damage to the vehi -
cle control system. It also could affect fuel econ -
omy and driveability. If the MIL is flashing,
severe catalytic converter damage and power
loss will soon occur. Immediate service is
required.
CAUTION!
Do not continue driving with one or more flat
tires as handling may be compromised. Stop the
vehicle, avoiding sharp braking and steering. If a
tire puncture occurs, repair immediately using
the dedicated tire repair kit and contact an
authorized dealer as soon as possible.
22_FD_OM_EN_USC_t.book Page 74