steering wheel FIAT BRAVO 2014 2.G Owners Manual
[x] Cancel search | Manufacturer: FIAT, Model Year: 2014, Model line: BRAVO, Model: FIAT BRAVO 2014 2.GPages: 275, PDF Size: 3.95 MB
Page 7 of 275
GETTING TO KNOW YOUR CAR
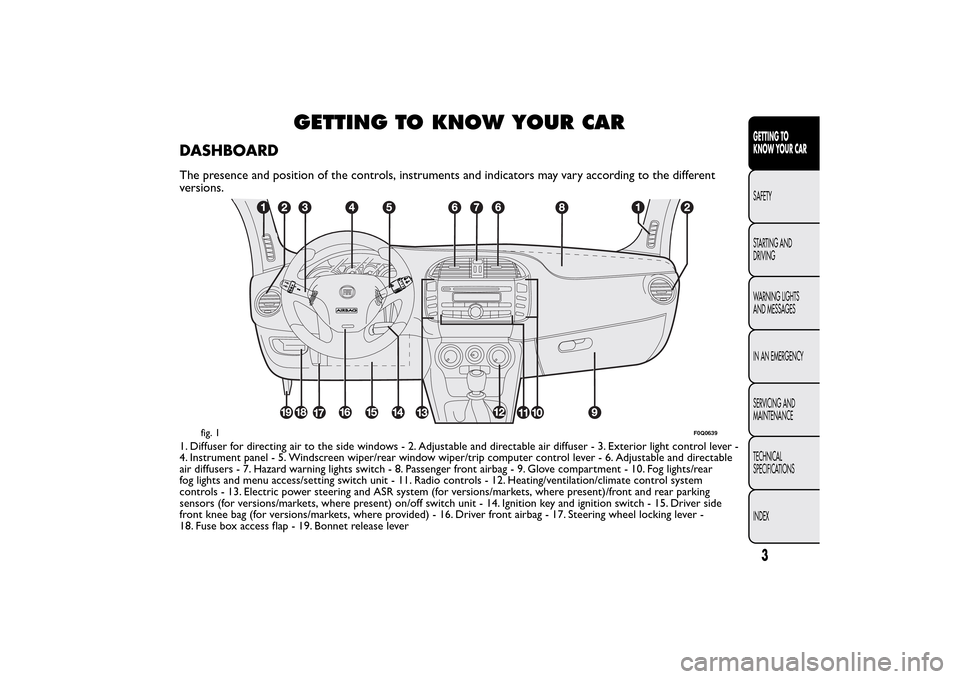
DASHBOARDThe presence and position of the controls, instruments and indicators may vary according to the different
versions.1. Diffuser for directing air to the side windows - 2. Adjustable and directable air diffuser - 3. Exterior light control lever -
4. Instrument panel - 5. Windscreen wiper/rear window wiper/trip computer control lever - 6. Adjustable and directable
air diffusers - 7. Hazard warning lights switch - 8. Passenger front airbag - 9. Glove compartment - 10. Fog lights/rear
fog lights and menu access/setting switch unit - 11. Radio controls - 12. Heating/ventilation/climate control system
controls - 13. Electric power steering and ASR system (for versions/markets, where present)/front and rear parking
sensors (for versions/markets, where present) on/off switch unit - 14. Ignition key and ignition switch - 15. Driver side
front knee bag (for versions/markets, where provided) - 16. Driver front airbag - 17. Steering wheel locking lever -
18. Fuse box access flap - 19. Bonnet release lever
fig. 1
F0Q0639
3GETTING TO
KNOW YOUR CARSAFETY
STARTING AND
DRIVING
WARNING LIGHTS
AND MESSAGES
IN AN EMERGENCY
SERVICING AND
MAINTENANCE
TECHNICAL
SPECIFICATIONS
INDEX
Page 20 of 275
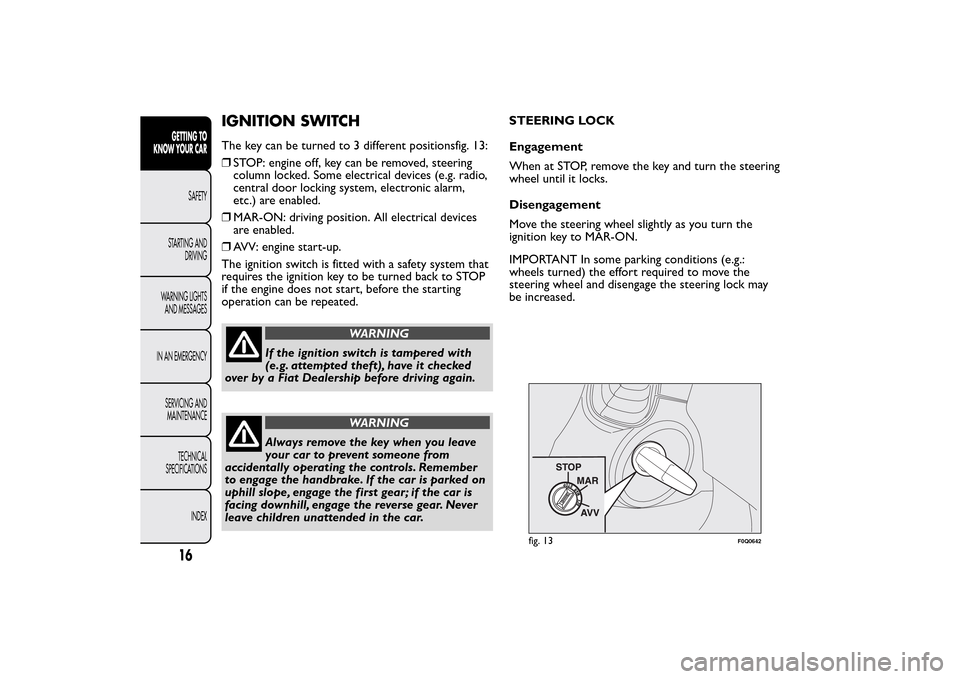
IGNITION SWITCHThe key can be turned to 3 different positionsfig. 13:
❒STOP: engine off, key can be removed, steering
column locked. Some electrical devices (e.g. radio,
central door locking system, electronic alarm,
etc.) are enabled.
❒MAR-ON: driving position. All electrical devices
are enabled.
❒AVV: engine start-up.
The ignition switch is fitted with a safety system that
requires the ignition key to be turned back to STOP
if the engine does not start, before the starting
operation can be repeated.
WARNING
If the ignition switch is tampered with
(e.g. attempted theft), have it checked
over by a Fiat Dealership before driving again.
WARNING
Always remove the key when you leave
your car to prevent someone from
accidentally operating the controls. Remember
to engage the handbrake. If the car is parked on
uphill slope, engage the first gear; if the car is
facing downhill, engage the reverse gear. Never
leave children unattended in the car.STEERING LOCK
Engagement
When at STOP, remove the key and turn the steering
wheel until it locks.
Disengagement
Move the steering wheel slightly as you turn the
ignition key to MAR-ON.
IMPORTANT In some parking conditions (e.g.:
wheels turned) the effort required to move the
steering wheel and disengage the steering lock may
be increased.
fig. 13
F0Q0642
16GETTING TO
KNOW YOUR CAR
SAFETY
STARTING AND
DRIVING
WARNING LIGHTS
AND MESSAGES
IN AN EMERGENCY
SERVICING AND
MAINTENANCE
TECHNICAL
SPECIFICATIONS
INDEX
Page 21 of 275
WARNING
It is absolutely forbidden to carr y out
any aftermarket operation involving
steering system or steering column
modifications (e.g.: installation of anti-theft
device) that could badly affect performance and
safety, invalidate the warranty and also result
in non-compliance of the car with type-
approval requirements.
WARNING
Never remove the key while the car is
moving.The steering wheel will lock
as soon as it is turned.This holds true for cars
being towed as well.
DISPLAYThe car is equipped with a multifunction display that,
according to the previously applied settings, will
show useful driving information.
When one of the front doors is opened, the display
is activated, showing the time and mileage for a
few seconds.
NoteWith a low outside temperature (below 0°C)
it may take longer than normal for information to
appear on the display.
17GETTING TO
KNOW YOUR CARSAFETY
STARTING AND
DRIVING
WARNING LIGHTS
AND MESSAGES
IN AN EMERGENCY
SERVICING AND
MAINTENANCE
TECHNICAL
SPECIFICATIONS
INDEX
Page 34 of 275
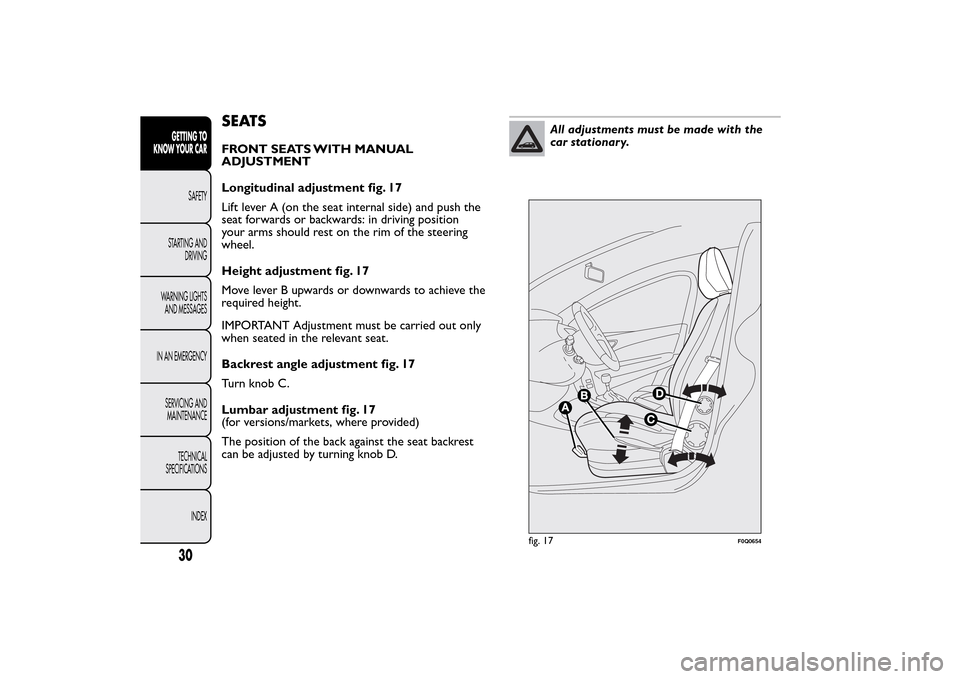
SEATSFRONT SEATS WITH MANUAL
ADJUSTMENT
Longitudinal adjustment fig. 17
Lift lever A (on the seat internal side) and push the
seat forwards or backwards: in driving position
your arms should rest on the rim of the steering
wheel.
Height adjustment fig. 17
Move lever B upwards or downwards to achieve the
required height.
IMPORTANT Adjustment must be carried out only
when seated in the relevant seat.
Backrest angle adjustment fig. 17
Turn knob C.
Lumbar adjustment fig. 17
(for versions/markets, where provided)
The position of the back against the seat backrest
can be adjusted by turning knob D.
All adjustments must be made with the
car stationary.
fig. 17
F0Q0654
30GETTING TO
KNOW YOUR CAR
SAFETY
STARTING AND
DRIVING
WARNING LIGHTS
AND MESSAGES
IN AN EMERGENCY
SERVICING AND
MAINTENANCE
TECHNICAL
SPECIFICATIONS
INDEX
Page 37 of 275
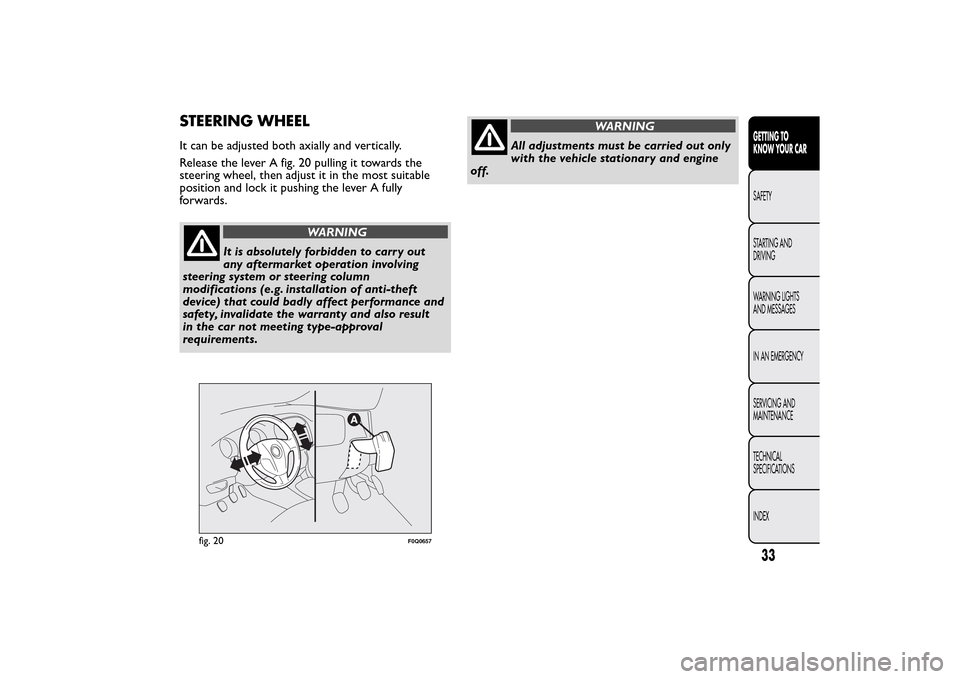
STEERING WHEELIt can be adjusted both axially and vertically.
Release the lever A fig. 20 pulling it towards the
steering wheel, then adjust it in the most suitable
position and lock it pushing the lever A fully
forwards.
WARNING
It is absolutely forbidden to carr y out
any aftermarket operation involving
steering system or steering column
modifications (e.g. installation of anti-theft
device) that could badly affect performance and
safety, invalidate the warranty and also result
in the car not meeting type-approval
requirements.
WARNING
All adjustments must be carried out only
with the vehicle stationary and engine
off.
fig. 20
F0Q0657
33GETTING TO
KNOW YOUR CARSAFETY
STARTING AND
DRIVING
WARNING LIGHTS
AND MESSAGES
IN AN EMERGENCY
SERVICING AND
MAINTENANCE
TECHNICAL
SPECIFICATIONS
INDEX
Page 56 of 275
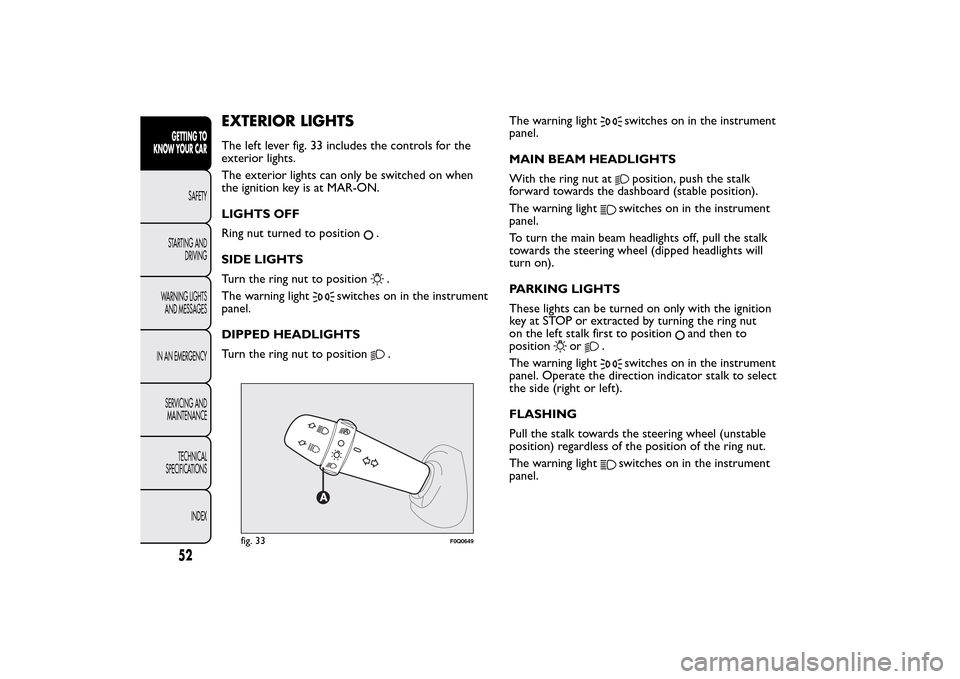
EXTERIOR LIGHTSThe left lever fig. 33 includes the controls for the
exterior lights.
The exterior lights can only be switched on when
the ignition key is at MAR-ON.
LIGHTS OFF
Ring nut turned to position
.
SIDE LIGHTS
Turn the ring nut to position.
The warning light
switches on in the instrument
panel.
DIPPED HEADLIGHTS
Turn the ring nut to position
.The warning light
switches on in the instrument
panel.
MAIN BEAM HEADLIGHTS
With the ring nut atposition, push the stalk
forward towards the dashboard (stable position).
The warning light
switches on in the instrument
panel.
To turn the main beam headlights off, pull the stalk
towards the steering wheel (dipped headlights will
turn on).
PARKING LIGHTS
These lights can be turned on only with the ignition
key at STOP or extracted by turning the ring nut
on the left stalk first to position
and then to
position
or
.
The warning light
switches on in the instrument
panel. Operate the direction indicator stalk to select
the side (right or left).
FLASHING
Pull the stalk towards the steering wheel (unstable
position) regardless of the position of the ring nut.
The warning lightswitches on in the instrument
panel.
fig. 33
F0Q0649
52GETTING TO
KNOW YOUR CAR
SAFETY
STARTING AND
DRIVING
WARNING LIGHTS
AND MESSAGES
IN AN EMERGENCY
SERVICING AND
MAINTENANCE
TECHNICAL
SPECIFICATIONS
INDEX
Page 57 of 275
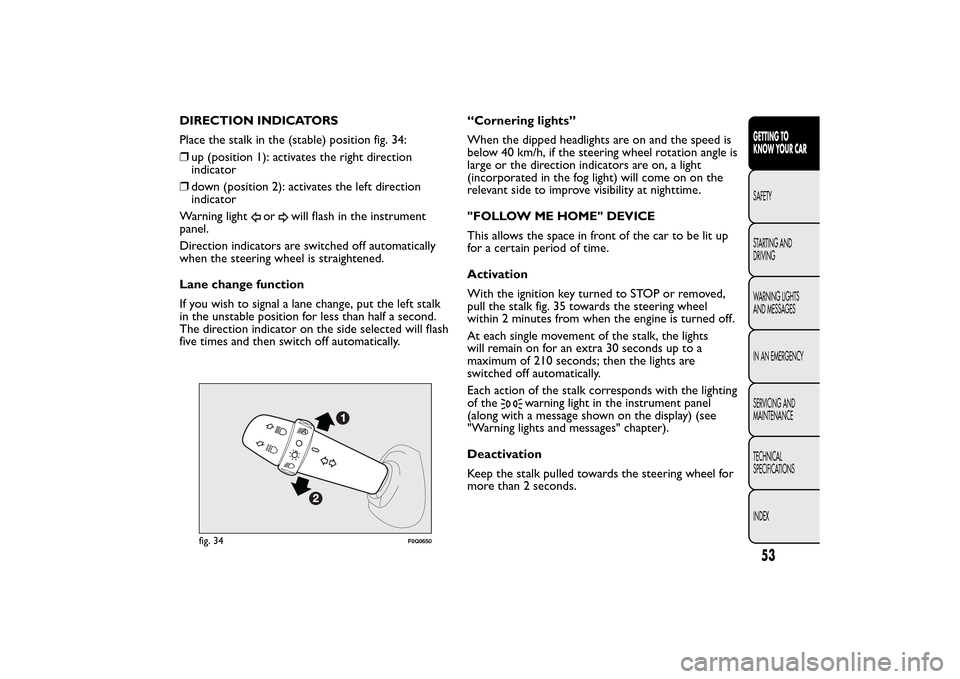
DIRECTION INDICATORS
Place the stalk in the (stable) position fig. 34:
❒up (position 1): activates the right direction
indicator
❒down (position 2): activates the left direction
indicator
Warning light
or
will flash in the instrument
panel.
Direction indicators are switched off automatically
when the steering wheel is straightened.
Lane change function
If you wish to signal a lane change, put the left stalk
in the unstable position for less than half a second.
The direction indicator on the side selected will flash
five times and then switch off automatically.“Cornering lights”
When the dipped headlights are on and the speed is
below 40 km/h, if the steering wheel rotation angle is
large or the direction indicators are on, a light
(incorporated in the fog light) will come on on the
relevant side to improve visibility at nighttime.
"FOLLOW ME HOME" DEVICE
This allows the space in front of the car to be lit up
for a certain period of time.
Activation
With the ignition key turned to STOP or removed,
pull the stalk fig. 35 towards the steering wheel
within 2 minutes from when the engine is turned off.
At each single movement of the stalk, the lights
will remain on for an extra 30 seconds up to a
maximum of 210 seconds; then the lights are
switched off automatically.
Each action of the stalk corresponds with the lighting
of the
warning light in the instrument panel
(along with a message shown on the display) (see
"Warning lights and messages" chapter).
Deactivation
Keep the stalk pulled towards the steering wheel for
more than 2 seconds.
fig. 34
F0Q0650
53GETTING TO
KNOW YOUR CARSAFETY
STARTING AND
DRIVING
WARNING LIGHTS
AND MESSAGES
IN AN EMERGENCY
SERVICING AND
MAINTENANCE
TECHNICAL
SPECIFICATIONS
INDEX
Page 60 of 275
Never use the windscreen wipers to
remove layers of snow or ice from the
windscreen. In such conditions, the
windscreen wipers may be subjected to excessive
stress and the motor protection, which prevents
operation for a few seconds, may intervene. If
operation is not restored, contact a Fiat
Dealership.
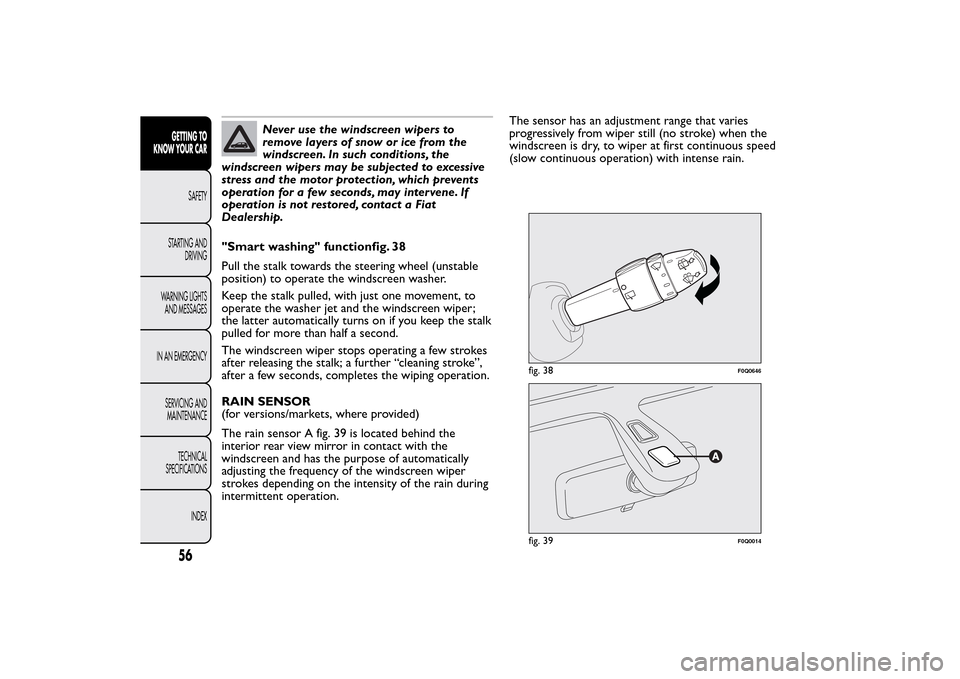
"Smart washing" functionfig. 38
Pull the stalk towards the steering wheel (unstable
position) to operate the windscreen washer.
Keep the stalk pulled, with just one movement, to
operate the washer jet and the windscreen wiper;
the latter automatically turns on if you keep the stalk
pulled for more than half a second.
The windscreen wiper stops operating a few strokes
after releasing the stalk; a further “cleaning stroke”,
after a few seconds, completes the wiping operation.
RAIN SENSOR
(for versions/markets, where provided)
The rain sensor A fig. 39 is located behind the
interior rear view mirror in contact with the
windscreen and has the purpose of automatically
adjusting the frequency of the windscreen wiper
strokes depending on the intensity of the rain during
intermittent operation.The sensor has an adjustment range that varies
progressively from wiper still (no stroke) when the
windscreen is dry, to wiper at first continuous speed
(slow continuous operation) with intense rain.
fig. 38
F0Q0646
fig. 39
F0Q0014
56GETTING TO
KNOW YOUR CAR
SAFETY
STARTING AND
DRIVING
WARNING LIGHTS
AND MESSAGES
IN AN EMERGENCY
SERVICING AND
MAINTENANCE
TECHNICAL
SPECIFICATIONS
INDEX
Page 97 of 275
ASR SYSTEM (Antislip Regulation)
This is integral to the ESP system and automatically
intervenes if one or both drive wheels slip, helping
the driver to control the car.
Depending on the slipping conditions, two different
control systems are activated:
❒if the slipping involves both drive wheels, the ASR
intervenes reducing the power transmitted by the
engine;
❒if the slipping only involves one of the drive
wheels, the ASR intervenes automatically braking
the wheel that is slipping.
The action of the ASR system is particularly helpful
in the following circumstances:
❒slipping of the inner wheel on bends due to
dynamic variations in the load or excessive
acceleration;
❒excessive power transmitted to the wheels, also in
relation to road surface conditions;
❒acceleration on slippery, snowy or icy road
surfaces;
❒loss of grip on wet road surfaces (aquaplaning).
MSR SYSTEM (ENGINE DRIVE
REGULATION)
This is an integral part of the ASR system that, in the
event of a sudden gear downshifting, cuts in and
provides torque to the engine thus preventing
excessive drive wheel drive which, especially in poor
grip conditions, can lead to loss of stability.ENGAGEMENT/DISENGAGEMENT OF THE
ASR SYSTEM
The ASR system switches on automatically each time
the engine is started.
When the system is active, a message is shown on
the display (see “Warning lights and messages”
chapter).
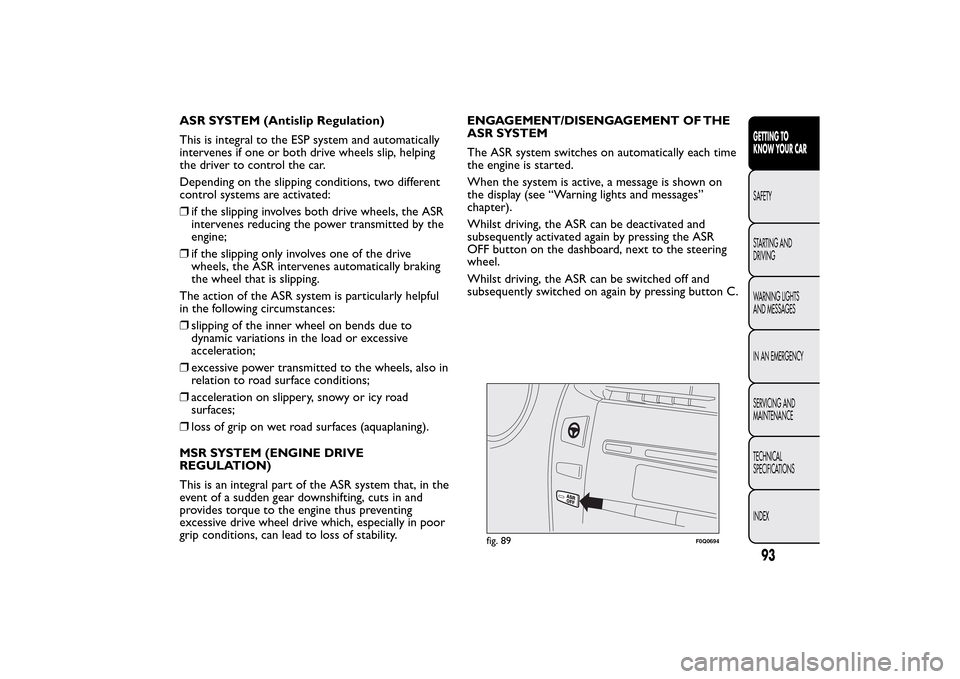
Whilst driving, the ASR can be deactivated and
subsequently activated again by pressing the ASR
OFF button on the dashboard, next to the steering
wheel.
Whilst driving, the ASR can be switched off and
subsequently switched on again by pressing button C.
fig. 89
F0Q0694
93GETTING TO
KNOW YOUR CARSAFETY
STARTING AND
DRIVING
WARNING LIGHTS
AND MESSAGES
IN AN EMERGENCY
SERVICING AND
MAINTENANCE
TECHNICAL
SPECIFICATIONS
INDEX
Page 101 of 275
RADIO TRANSMITTERS AND MOBILE
PHONES
Radio transmitter equipment (vehicle mobile phones,
CB radios etc.) cannot be used inside the car unless
a separate aerial is mounted externally.
IMPORTANT The use of these devices inside the
passenger compartment (without an external aerial)
may cause the electrical systems to malfunction.
This could compromise the safety of the car in
addition to constituting a potential hazard for
passengers' health.
In addition, transmission and reception of these
devices may be negatively affected by the shielding
effect of the car body. As far as the use of
EC-approved mobile phones is concerned (GSM,
GPRS, UMTS), follow the usage instructions provided
by the mobile phone manufacturer.
"DUALDRIVE" ELECTRIC POWER
STEERING SYSTEMThe car is equipped with an electrically controlled
power steering system called “Dualdrive”, working
only with the ignition key at MAR-ON and the
engine running, that customises steering force
according to the driving conditions.
IMPORTANT When turning the ignition key quickly,
full power steering functionality can be achieved after
1-2 seconds.
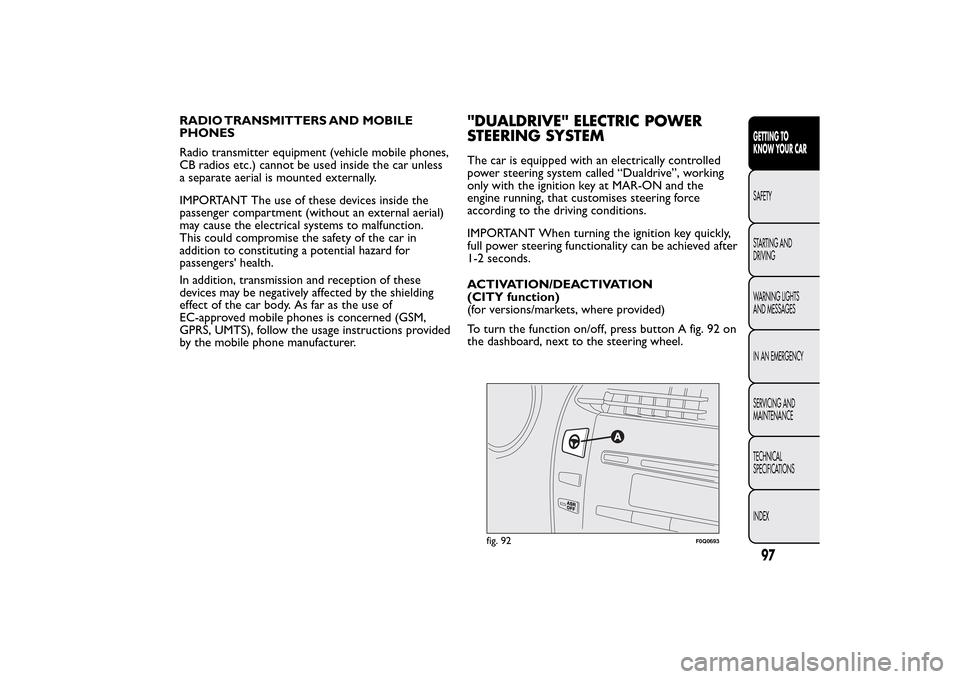
ACTIVATION/DEACTIVATION
(CITY function)
(for versions/markets, where provided)
To turn the function on/off, press button A fig. 92 on
the dashboard, next to the steering wheel.
fig. 92
F0Q0693
97GETTING TO
KNOW YOUR CARSAFETY
STARTING AND
DRIVING
WARNING LIGHTS
AND MESSAGES
IN AN EMERGENCY
SERVICING AND
MAINTENANCE
TECHNICAL
SPECIFICATIONS
INDEX