door panel FIAT CROMA 2008 2.G Owners Manual
[x] Cancel search | Manufacturer: FIAT, Model Year: 2008, Model line: CROMA, Model: FIAT CROMA 2008 2.GPages: 258, PDF Size: 5.86 MB
Page 5 of 258
4
SAFETY
DEVICES
CORRECT USE
OF THE CAR
WARNING
LIGHTS AND
MESSAGES
IN AN
EMERGENCY
CAR
MAINTENANCE
TECHNICAL
SPECIFICATIONS
INDEX
DASHBOARD
AND CONTROLSINSTRUMENT DASHBOARD........................................... 5
INSTRUMENT PANEL......................................................... 6
SYMBOLS................................................................................ 8
THE FIAT CODE SYSTEM.................................................. 9
THE KEYS............................................................................... 10
ALARM.................................................................................... 14
DEAD LOCK DEVICE......................................................... 16
IGNITION DEVICE.............................................................. 19
ON BOARD INSTRUMENTS............................................ 20
MULTIFUNCTIONAL DISPLAY ...................................... 22
RECONFIGURABLE MULTIFUNCTIONAL DISPLAY .. 25
DISPLAY FUNCTIONS........................................................ 28
TRIP COMPUTER................................................................. 36
SEATS....................................................................................... 39
HEAD RESTS.......................................................................... 42
STEERING WHEEL............................................................... 43
REAR VIEW MIRRORS ....................................................... 44
HEATING/AIR CONDITIONING SYSTEM................... 47
MANUAL AIR CONDITIONER........................................ 49
AUTOMATIC AIR CONDITIONER................................ 52
EXTERIOR LIGHTS.............................................................. 62
WINDOW CLEANING...................................................... 65CRUISE CONTROL............................................................. 68
CEILING LIGHTS.................................................................. 70
CONTROLS........................................................................... 71
INTERIOR EQUIPMENT..................................................... 74
SUN ROOF............................................................................. 78
DOORS................................................................................... 81
ELECTRIC WINDOW REGULATORS........................... 82
BOOT ...................................................................................... 84
ENGINE HOOD................................................................... 90
ROOF RACK/SKI RACK..................................................... 92
HEADLAMPS.......................................................................... 93
ABS SYSTEM........................................................................... 94
ESP SYSTEM............................................................................ 96
ASR SYSTEM.......................................................................... 97
EOBD SYSTEM...................................................................... 98
T.P.M.S. SYSTEM.................................................................... 99
CAR RADIO........................................................................... 100
USER PURCHASED ACCESSORIES................................. 101
PARKING SENSORS............................................................ 102
VEHICLE REFUELLING........................................................ 104
ENVIRONMENTAL PROTECTION................................. 105
DD D
A A
S S
H H
B B
O O
A A
R R
D D
A A
N N
D D
C C
O O
N N
T T
R R
O O
L L
S S
001-038 Croma TRW GB 28-05-2008 16:29 Pagina 4
Page 6 of 258
DASHBOARD
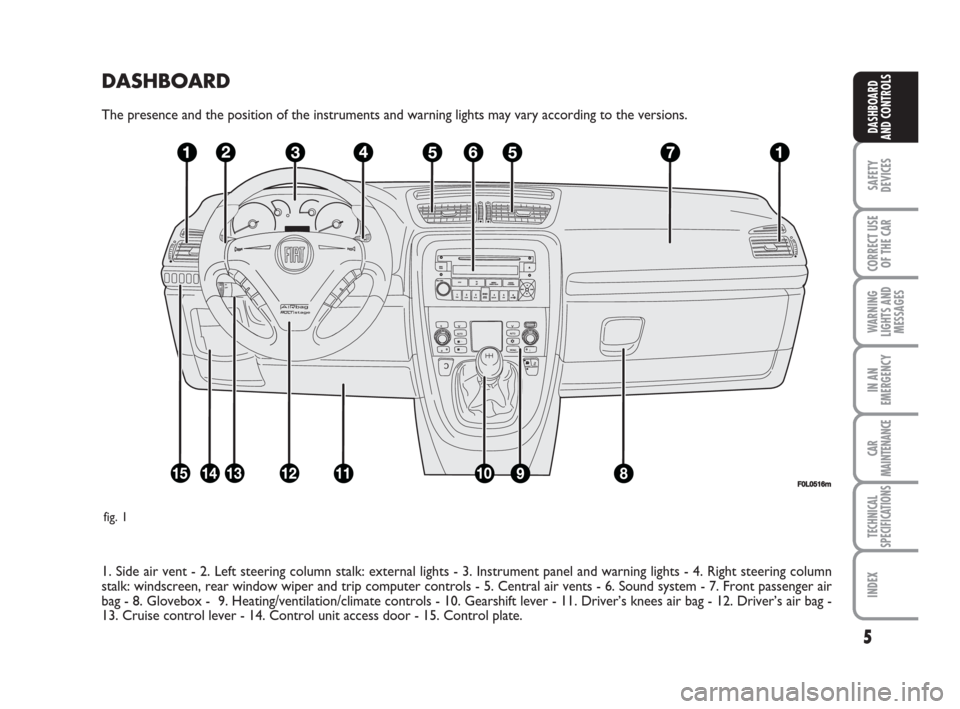
The presence and the position of the instruments and warning lights may vary according to the versions.
1. Side air vent - 2. Left steering column stalk: external lights - 3. Instrument panel and warning lights - 4. Right steering column
stalk: windscreen, rear window wiper and trip computer controls - 5. Central air vents - 6. Sound system - 7. Front passenger air
bag - 8. Glovebox - 9. Heating/ventilation/climate controls - 10. Gearshift lever - 11. Driver’s knees air bag - 12. Driver’s air bag -
13. Cruise control lever - 14. Control unit access door - 15. Control plate.
5
SAFETY
DEVICES
CORRECT USE
OF THE CAR
WARNING
LIGHTS AND
MESSAGES
IN AN
EMERGENCY
CAR
MAINTENANCE
TECHNICAL
SPECIFICATIONS
INDEX
DASHBOARD
AND CONTROLS
F0L0516m
fig. 1
001-038 Croma TRW GB 28-05-2008 16:29 Pagina 5
Page 17 of 258
16
SAFETY
DEVICES
CORRECT USE
OF THE CAR
WARNING
LIGHTS AND
MESSAGES
IN AN
EMERGENCY
CAR
MAINTENANCE
TECHNICAL
SPECIFICATIONS
INDEX
DASHBOARD
AND CONTROLS
Once the dead lock device
has been actuated, doors
cannot be opened from inside the car
in any way whatsoever. For this rea-
son, make sure there are no persons
left inside the car. INDICATIONS OF ATTEMPTS
TO BREAK IN
Any attempt to break in is indicated by
turning on of warning light
Y(if pro-
vided) on the instrument panel with the
relevant message on the display (see sec-
tion “Warning lights and messages”).
HOW TO CUT OFF THE ALARM
SYSTEM
To deactivate the alarm system com-
pletely (for instance during prolonged in-
activity of the car) simply lock the car us-
ing the emergency locking.
IMPORTANT To cut-out the alarm if re-
mote control batteries are down or the
system is failing, fit the key into the igni-
tion switch and turn it to ON.
DEAD LOCK DEVICE
(where provided)
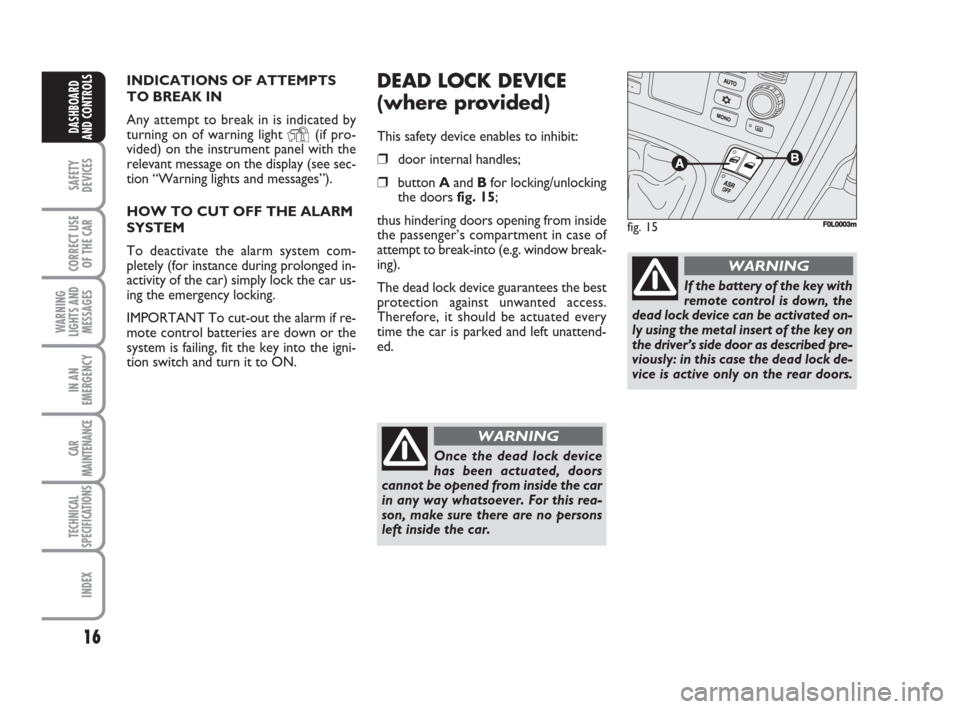
This safety device enables to inhibit:
❒door internal handles;
❒button Aand Bfor locking/unlocking
the doors fig. 15;
thus hindering doors opening from inside
the passenger’s compartment in case of
attempt to break-into (e.g. window break-
ing).
The dead lock device guarantees the best
protection against unwanted access.
Therefore, it should be actuated every
time the car is parked and left unattend-
ed.
fig. 15F0L0003m
WARNING
If the battery of the key with
remote control is down, the
dead lock device can be activated on-
ly using the metal insert of the key on
the driver’s side door as described pre-
viously: in this case the dead lock de-
vice is active only on the rear doors.
WARNING
001-038 Croma TRW GB 28-05-2008 16:30 Pagina 16
Page 23 of 258
22
SAFETY
DEVICES
CORRECT USE
OF THE CAR
WARNING
LIGHTS AND
MESSAGES
IN AN
EMERGENCY
CAR
MAINTENANCE
TECHNICAL
SPECIFICATIONS
INDEX
DASHBOARD
AND CONTROLS
MULTIFUNCTION
DISPLAY
(where provided)
The vehicle may have a multifunctional dis-
play that provides the user with useful in-
formation, based on what was previously
set, while driving.
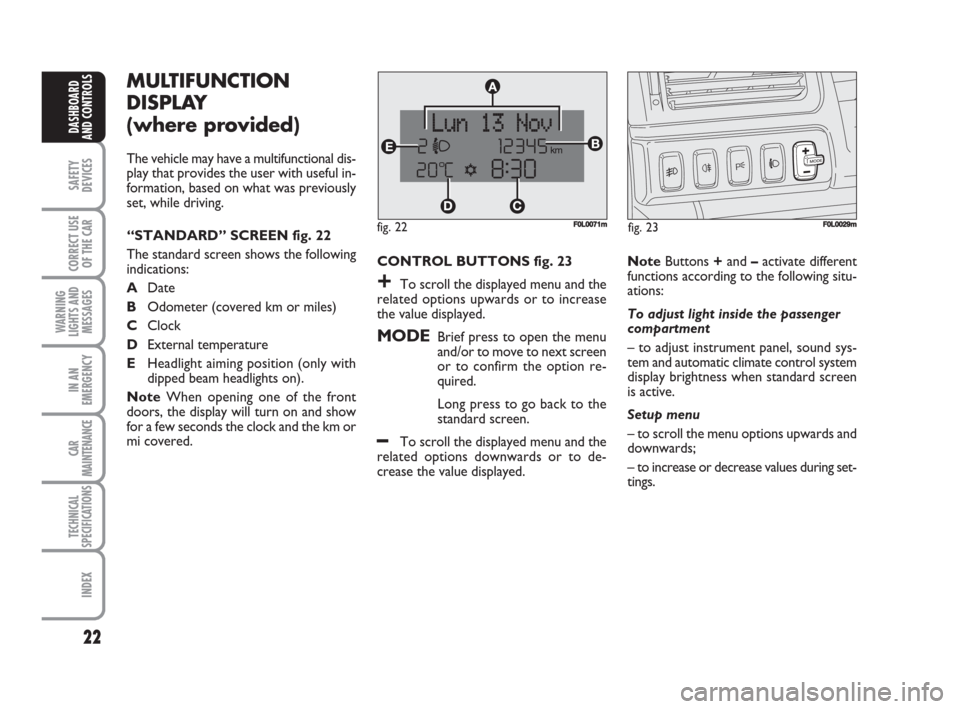
“STANDARD” SCREEN fig. 22
The standard screen shows the following
indications:
ADate
BOdometer (covered km or miles)
CClock
DExternal temperature
EHeadlight aiming position (only with
dipped beam headlights on).
NoteWhen opening one of the front
doors, the display will turn on and show
for a few seconds the clock and the km or
mi covered.CONTROL BUTTONS fig. 23
+To scroll the displayed menu and the
related options upwards or to increase
the value displayed.
MODEBrief press to open the menu
and/or to move to next screen
or to confirm the option re-
quired.
Long press to go back to the
standard screen.
–To scroll the displayed menu and the
related options downwards or to de-
crease the value displayed.NoteButtons +and –activate different
functions according to the following situ-
ations:
To adjust light inside the passenger
compartment
– to adjust instrument panel, sound sys-
tem and automatic climate control system
display brightness when standard screen
is active.
Setup menu
– to scroll the menu options upwards and
downwards;
– to increase or decrease values during set-
tings.
F0L0029mfig. 23 fig. 22F0L0071m
001-038 Croma TRW GB 28-05-2008 16:30 Pagina 22
Page 26 of 258
25
SAFETY
DEVICES
CORRECT USE
OF THE CAR
WARNING
LIGHTS AND
MESSAGES
IN AN
EMERGENCY
CAR
MAINTENANCE
TECHNICAL
SPECIFICATIONS
INDEX
DASHBOARD
AND CONTROLS
RECONFIGURABLE
MULTIFUNCTION
DISPLAY
(where provided)
The car can be provided with the recon-
figurable multifunction display that shows
useful information, according to the pre-
vious settings made, necessary when dri-
ving.
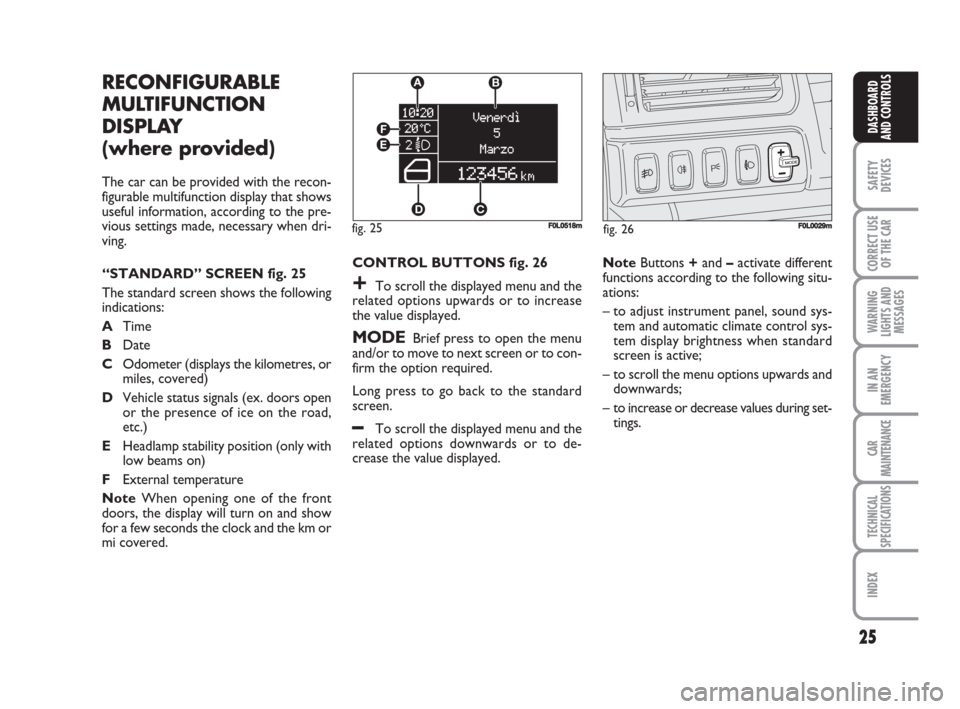
“STANDARD” SCREEN fig. 25
The standard screen shows the following
indications:
ATime
BDate
COdometer (displays the kilometres, or
miles, covered)
DVehicle status signals (ex. doors open
or the presence of ice on the road,
etc.)
EHeadlamp stability position (only with
low beams on)
FExternal temperature
NoteWhen opening one of the front
doors, the display will turn on and show
for a few seconds the clock and the km or
mi covered.CONTROL BUTTONS fig. 26
+To scroll the displayed menu and the
related options upwards or to increase
the value displayed.
MODEBrief press to open the menu
and/or to move to next screen or to con-
firm the option required.
Long press to go back to the standard
screen.
–To scroll the displayed menu and the
related options downwards or to de-
crease the value displayed.NoteButtons +and –activate different
functions according to the following situ-
ations:
– to adjust instrument panel, sound sys-
tem and automatic climate control sys-
tem display brightness when standard
screen is active;
– to scroll the menu options upwards and
downwards;
– to increase or decrease values during set-
tings.
F0L0029mfig. 26 fig. 25
EF
DC A
B
F0L0518m
001-038 Croma TRW GB 28-05-2008 16:30 Pagina 25
Page 82 of 258
81
SAFETY
DEVICES
CORRECT USE
OF THE CAR
WARNING
LIGHTS AND
MESSAGES
IN AN
EMERGENCY
CAR
MAINTENANCE
TECHNICAL
SPECIFICATIONS
INDEX
DASHBOARD
AND CONTROLS
DOORS
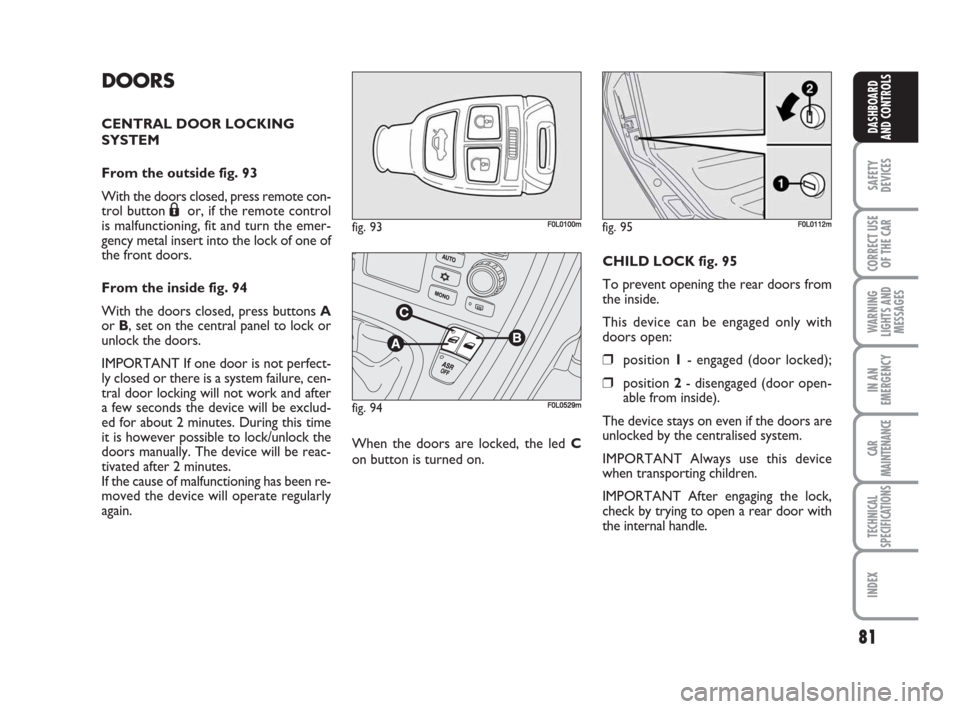
CENTRAL DOOR LOCKING
SYSTEM
From the outside fig. 93
With the doors closed, press remote con-
trol button
Áor, if the remote control
is malfunctioning, fit and turn the emer-
gency metal insert into the lock of one of
the front doors.
From the inside fig. 94
With the doors closed, press buttons A
or B, set on the central panel to lock or
unlock the doors.
IMPORTANT If one door is not perfect-
ly closed or there is a system failure, cen-
tral door locking will not work and after
a few seconds the device will be exclud-
ed for about 2 minutes. During this time
it is however possible to lock/unlock the
doors manually. The device will be reac-
tivated after 2 minutes.
If the cause of malfunctioning has been re-
moved the device will operate regularly
again.When the doors are locked, the led C
on button is turned on.CHILD LOCK fig. 95
To prevent opening the rear doors from
the inside.
This device can be engaged only with
doors open:
❒position 1- engaged (door locked);
❒position 2- disengaged (door open-
able from inside).
The device stays on even if the doors are
unlocked by the centralised system.
IMPORTANT Always use this device
when transporting children.
IMPORTANT After engaging the lock,
check by trying to open a rear door with
the internal handle.
fig. 93F0L0100mfig. 95F0L0112m
fig. 94F0L0529m
070-106 Croma TRW GB 29-05-2008 8:57 Pagina 81
Page 84 of 258
83
SAFETY
DEVICES
CORRECT USE
OF THE CAR
WARNING
LIGHTS AND
MESSAGES
IN AN
EMERGENCY
CAR
MAINTENANCE
TECHNICAL
SPECIFICATIONS
INDEX
DASHBOARD
AND CONTROLS
CONTROLS
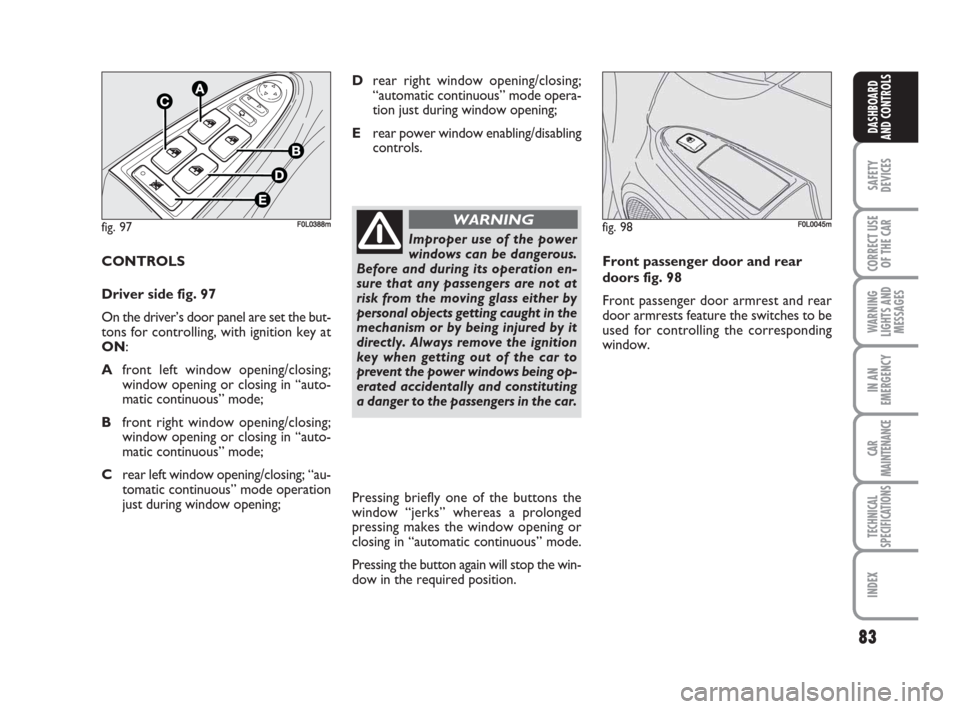
Driver side fig. 97
On the driver’s door panel are set the but-
tons for controlling, with ignition key at
ON:
Afront left window opening/closing;
window opening or closing in “auto-
matic continuous” mode;
Bfront right window opening/closing;
window opening or closing in “auto-
matic continuous” mode;
Crear left window opening/closing; “au-
tomatic continuous” mode operation
just during window opening;Pressing briefly one of the buttons the
window “jerks” whereas a prolonged
pressing makes the window opening or
closing in “automatic continuous” mode.
Pressing the button again will stop the win-
dow in the required position.Front passenger door and rear
doors fig. 98
Front passenger door armrest and rear
door armrests feature the switches to be
used for controlling the corresponding
window.
fig. 97F0L0388m
Improper use of the power
windows can be dangerous.
Before and during its operation en-
sure that any passengers are not at
risk from the moving glass either by
personal objects getting caught in the
mechanism or by being injured by it
directly. Always remove the ignition
key when getting out of the car to
prevent the power windows being op-
erated accidentally and constituting
a danger to the passengers in the car.
WARNINGfig. 98F0L0045m
Drear right window opening/closing;
“automatic continuous” mode opera-
tion just during window opening;
Erear power window enabling/disabling
controls.
070-106 Croma TRW GB 29-05-2008 8:57 Pagina 83
Page 85 of 258
84
SAFETY
DEVICES
CORRECT USE
OF THE CAR
WARNING
LIGHTS AND
MESSAGES
IN AN
EMERGENCY
CAR
MAINTENANCE
TECHNICAL
SPECIFICATIONS
INDEX
DASHBOARD
AND CONTROLS
BOOT
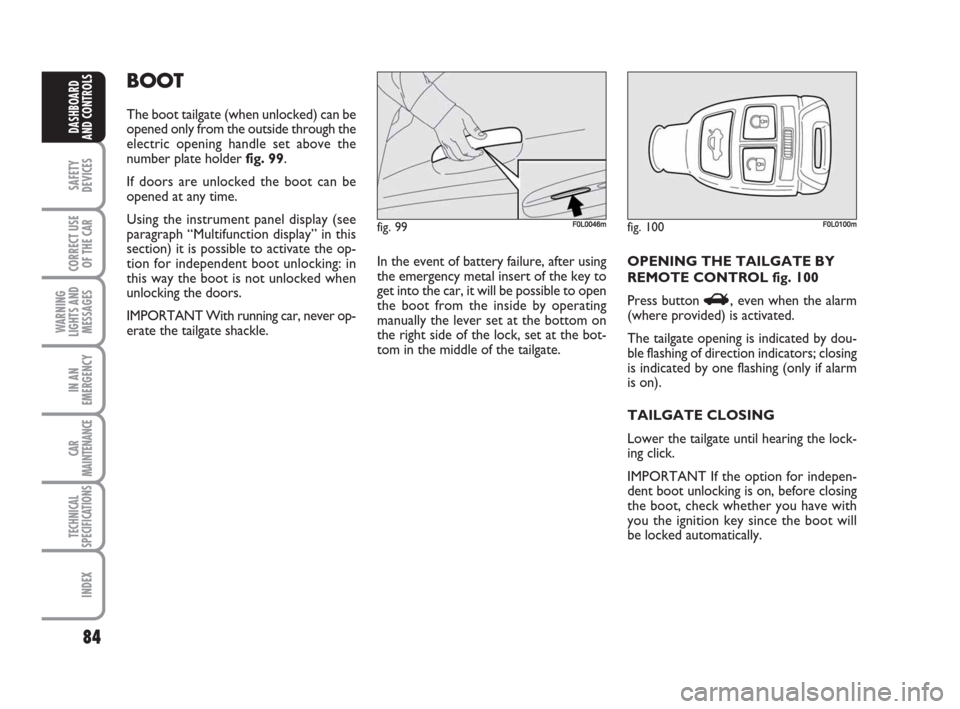
The boot tailgate (when unlocked) can be
opened only from the outside through the
electric opening handle set above the
number plate holder fig. 99.
If doors are unlocked the boot can be
opened at any time.
Using the instrument panel display (see
paragraph “Multifunction display” in this
section) it is possible to activate the op-
tion for independent boot unlocking: in
this way the boot is not unlocked when
unlocking the doors.
IMPORTANT With running car, never op-
erate the tailgate shackle.In the event of battery failure, after using
the emergency metal insert of the key to
get into the car, it will be possible to open
the boot from the inside by operating
manually the lever set at the bottom on
the right side of the lock, set at the bot-
tom in the middle of the tailgate. OPENING THE TAILGATE BY
REMOTE CONTROL fig. 100
Press button
R, even when the alarm
(where provided) is activated.
The tailgate opening is indicated by dou-
ble flashing of direction indicators; closing
is indicated by one flashing (only if alarm
is on).
TAILGATE CLOSING
Lower the tailgate until hearing the lock-
ing click.
IMPORTANT If the option for indepen-
dent boot unlocking is on, before closing
the boot, check whether you have with
you the ignition key since the boot will
be locked automatically.
fig. 99F0L0046mfig. 100F0L0100m
070-106 Croma TRW GB 29-05-2008 8:57 Pagina 84
Page 101 of 258
100
SAFETY
DEVICES
CORRECT USE
OF THE CAR
WARNING
LIGHTS AND
MESSAGES
IN AN
EMERGENCY
CAR
MAINTENANCE
TECHNICAL
SPECIFICATIONS
INDEX
DASHBOARD
AND CONTROLS
IMPORTANT NOTES ABOUT
THE T.P.M.S. SYSTEM
Failure indications will not be stored and
therefore will not be displayed when turn-
ing the engine off and on again. If failure
persists, the control unit will send warn-
ing indications to the instrument panel on-
ly after a few seconds when the car is
moving.
IMPORTANT T.P.M.S. system cannot in-
dicate sudden tyre pressure drops (e.g.:
tyre burst). In this event, brake the car
cautiously and avoid sudden steering.
IMPORTANT Replacing standard tyres
with winter tyres and vice versa involves
T.P.M.S. system set-up that shall be per-
formed at Fiat Dealerships only.
IMPORTANT The T.P.M.S. system re-
quires special equipment. Consult Fiat
Dealership to know what type of acces-
sories are compatible with the system
(wheels, wheel caps, etc.). Using other ac-
cessories could cause system malfunc-
tioning.IMPORTANT Tyre pressure could change
according to outside temperature. For this
reason the T.P.M.S. system could tem-
porarily indicate low tyre pressure. In this
event check pressure with cold tyres and
restore proper inflation values if required.
IMPORTANT If the car is fitted with
T.P.M.S. system, tyre and/or rim removal
and refitting operations involve special
precautions; to prevent damages or wrong
sensor refitting, contact Fiat Dealership to
have tyre and/or rim changed.
IMPORTANT If the car is fitted with
T.P.M.S. system, when changing a tyre,
change also the rubber seal of the valve.
Contact a Fiat Dealership.
IMPORTANT Strong radiofrequency
noise may inhibit regular TPMS system op-
eration; in this event, a dedicated message
will be displayed to warn the driver. This
message will disappear automatically as
soon as noise disappears.SOUND SYSTEM
(where provided)
For the operation of the radio with
CD/MP3 CD (where provided), read the
instructions for use given in the Supple-
ment attached to the Owner Handbook.
SOUND SYSTEM
(where provided)
The system includes:
❒2 tweeters (power 40W max. each),
located on front doors;
❒2 mid-woofers, (diameter 165 mm,
power 40W max. each), located on
front doors;
❒2 full-range speakers, (diameter 165
mm, power 40W max. each), located
on rear doors.
070-106 Croma TRW GB 29-05-2008 8:57 Pagina 100
Page 106 of 258
105
SAFETY
DEVICES
CORRECT USE
OF THE CAR
WARNING
LIGHTS AND
MESSAGES
IN AN
EMERGENCY
CAR
MAINTENANCE
TECHNICAL
SPECIFICATIONS
INDEX
DASHBOARD
AND CONTROLS
PROTECTING THE
ENVIRONMENT
The devices for curtailing petrol engine
emissions are the following:
❒three-way catalytic converter;
❒Lambda sensor;
❒fuel evaporation system.
In addition, do not let the engine run, even
for a test, with one or more spark plugs
disconnected.
The devices for curtailing diesel fuel en-
gine emissions are the following:
❒oxidising catalytic converter;
❒exhaust gas recirculation system
(E.G.R.);
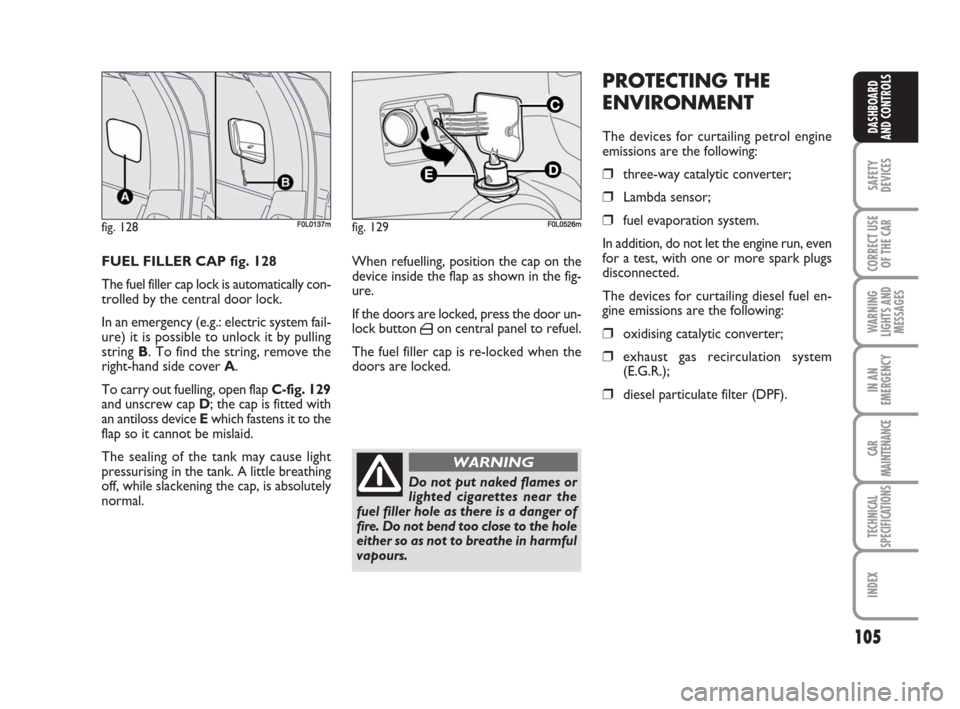
❒diesel particulate filter (DPF). FUEL FILLER CAP fig. 128
The fuel filler cap lock is automatically con-
trolled by the central door lock.
In an emergency (e.g.: electric system fail-
ure) it is possible to unlock it by pulling
string B. To find the string, remove the
right-hand side cover A.
To carry out fuelling, open flap C-fig. 129
and unscrew cap D; the cap is fitted with
an antiloss device Ewhich fastens it to the
flap so it cannot be mislaid.
The sealing of the tank may cause light
pressurising in the tank. A little breathing
off, while slackening the cap, is absolutely
normal.When refuelling, position the cap on the
device inside the flap as shown in the fig-
ure.
If the doors are locked, press the door un-
lock button
´on central panel to refuel.
The fuel filler cap is re-locked when the
doors are locked.
fig. 128F0L0137m
Do not put naked flames or
lighted cigarettes near the
fuel filler hole as there is a danger of
fire. Do not bend too close to the hole
either so as not to breathe in harmful
vapours.
WARNING
fig. 129F0L0526m
070-106 Croma TRW GB 29-05-2008 8:57 Pagina 105