headlights FIAT DOBLO 2008 1.G User Guide
[x] Cancel search | Manufacturer: FIAT, Model Year: 2008, Model line: DOBLO, Model: FIAT DOBLO 2008 1.GPages: 222, PDF Size: 3.39 MB
Page 131 of 222
130IN AN EMERGENCY
IF A BULB BURNS OUT
Modifications or repairs
to the electrical system
carried out incorrectly
and without bearing the features
of the system in mind can cause
malfunctions with the risk of fire.Only touch the metal
part when handling halo-
gen bulbs. If the transpar-
ent bulb is touched it reduces the
intensity of the light emitted and
can also reduce the life of the
bulb. If you touch the bulb acci-
dentally, rub it with a cloth moist-
ened with alcohol and leave it to
dry.
You should have the
bulbs replaced at a Fiat
Dealership. Always check
the height of the headlight beam
after changing a bulb.
Halogen bulbs contain
pressurised gas which, if
broken, may cause small
fragments of glass to be project-
ed outwards.
GENERAL INSTRUCTIONS
– When a light is not working, check
that it has not fused before changing
the bulb.
– For the location of the fuses, re-
fer to “If a fuse blows” in this chap-
ter.
– Before replacing a bulb that does
not work, check that the contacts are
not oxidised.
– Burnt-out bulbs must be replaced
with ones of the same type.
– Always check the height of the
headlight beam after changing a bulb.
IMPORTANTThe headlight inner
surface may be lightly misted over: this
is not a fault but a natural fact due to
low temperature and the level of air
humidity. It will disappear as soon the
headlights are turned on. The pres-
ence of drops inside the headlights
means water infiltration, therefore
contact Fiat Dealership.
119-148 Doblo GB 9-05-2008 12:09 Pagina 130
Page 132 of 222
131IN AN EMERGENCY
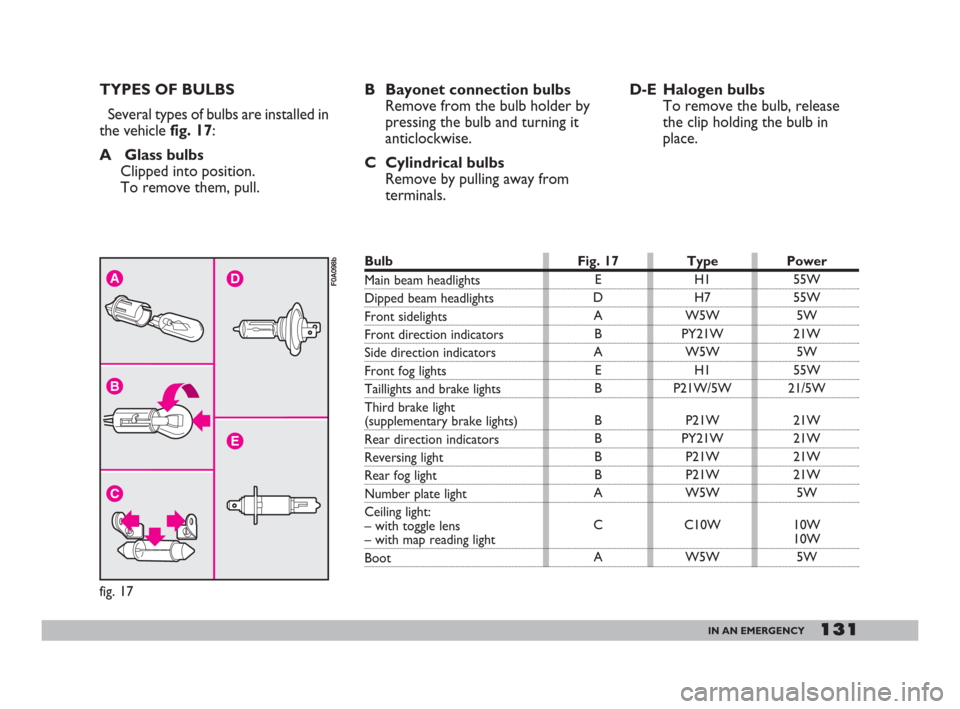
TYPES OF BULBS
Several types of bulbs are installed in
the vehicle fig. 17:
A Glass bulbs
Clipped into position.
To remove them, pull.B Bayonet connection bulbs
Remove from the bulb holder by
pressing the bulb and turning it
anticlockwise.
C Cylindrical bulbs
Remove by pulling away from
terminals.D-E Halogen bulbs
To remove the bulb, release
the clip holding the bulb in
place.
A
B
C
E
D
fig. 17
F0A098b
Fig. 17
E
D
A
B
A
E
B
B
B
B
B
A
C
APower
55W
55W
5W
21W
5W
55W
21/5W
21W
21W
21W
21W
5W
10W
10W
5W Type
H1
H7
W5W
PY21W
W5W
H1
P21W/5W
P21W
PY21W
P21W
P21W
W5W
C10W
W5WBulb
Main beam headlights
Dipped beam headlights
Front sidelights
Front direction indicators
Side direction indicators
Front fog lights
Taillights and brake lights
Third brake light
(supplementary brake lights)
Rear direction indicators
Reversing light
Rear fog light
Number plate light
Ceiling light:
– with toggle lens
– with map reading light
Boot
119-148 Doblo GB 9-05-2008 12:09 Pagina 131
Page 133 of 222
132IN AN EMERGENCY
See “If a bulb burns out” in this chap-
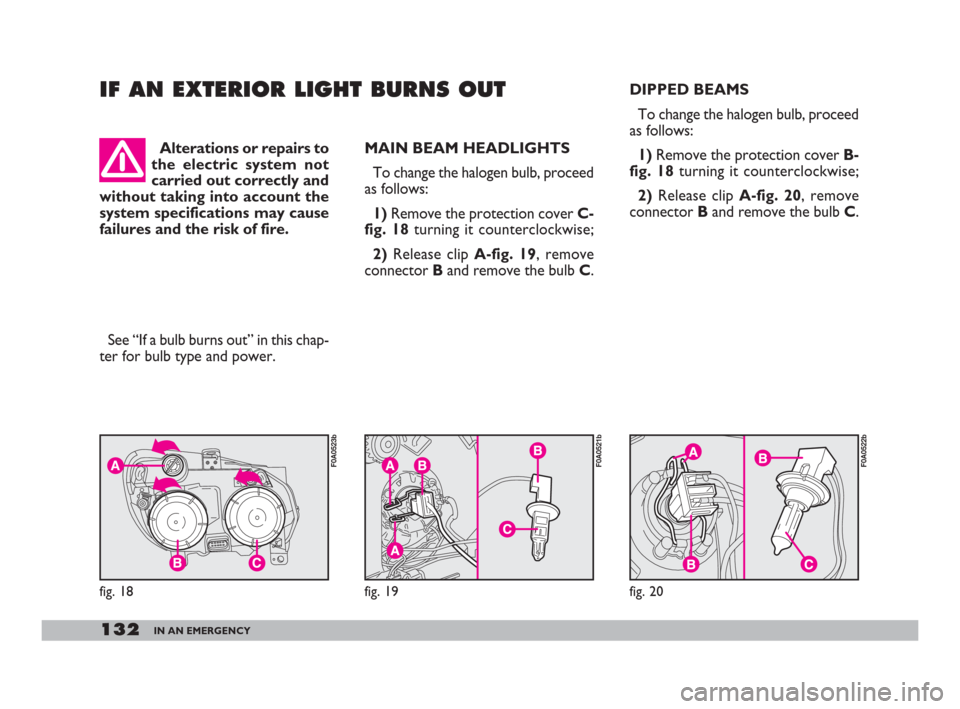
ter for bulb type and power.MAIN BEAM HEADLIGHTS
To change the halogen bulb, proceed
as follows:
1)Remove the protection cover C-
fig. 18turning it counterclockwise;
2)Release clip A-fig. 19, remove
connector Band remove the bulb C.DIPPED BEAMS
To change the halogen bulb, proceed
as follows:
1)Remove the protection cover B-
fig. 18turning it counterclockwise;
2)Release clip A-fig. 20, remove
connector Band remove the bulb C.
IF AN EXTERIOR LIGHT BURNS OUT
Alterations or repairs to
the electric system not
carried out correctly and
without taking into account the
system specifications may cause
failures and the risk of fire.
fig. 18
F0A0523b
fig. 19
F0A0521b
fig. 20
F0A0522b
119-148 Doblo GB 9-05-2008 12:09 Pagina 132
Page 148 of 222
147IN AN EMERGENCY
IF AN ACCIDENT
OCCURS
– It is important to keep calm.
– If you are not directly involved in
the accident, stop at least ten metres
away from the accident.
– If you are on a motorway, do not
obstruct the emergency lane with
your vehicle.
– Turn off the engine and turn on the
hazard lights.
– At night, illuminate the scene of the
accident with your headlights.
– Act carefully, you must not risk be-
ing run over.
– Mark the accident by putting the
red triangle at the regulatory distance
from the vehicle where it can be clear-
ly seen.
– Call for rescue making the infor-
mation you give as accurate as you
can. On the motorway use the special
column-mounted emergency phones. When towing the vehi-
cle, you must comply with
the specific traffic regula-
tions regarding the tow hitch and
how to tow on the road.
Before starting to tow,
turn the ignition key to
MAR and then to STOP.
Do not remove the key. If the key
is removed, the steering lock en-
gages automatically which pre-
vents the wheels being turned.
While the vehicle is be-
ing towed with the engine
off, remember that the
brake pedal and steering will re-
quire more effort as you no
longer have the benefit of the
power brakes and power steer-
ing. Do not use flexible cables to
tow. Avoid jerking. Whilst tow-
ing, ensure that the coupling to
the vehicle does not damage the
surrounding components.
fig. 47
F0A0417b
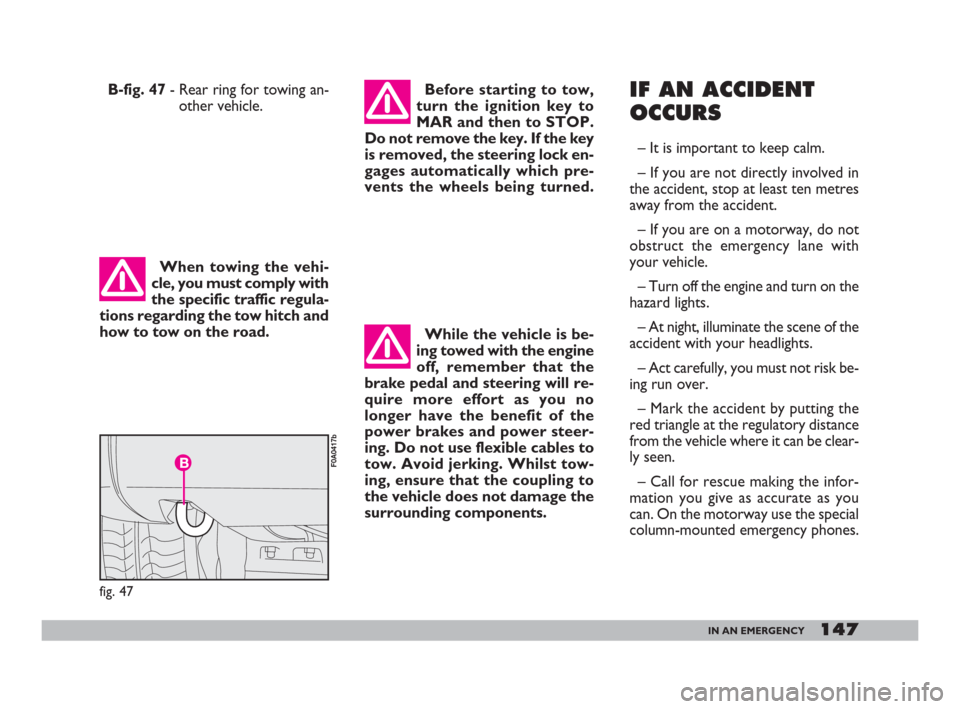
B-fig. 47- Rear ring for towing an-
other vehicle.
119-148 Doblo GB 9-05-2008 12:09 Pagina 147
Page 151 of 222
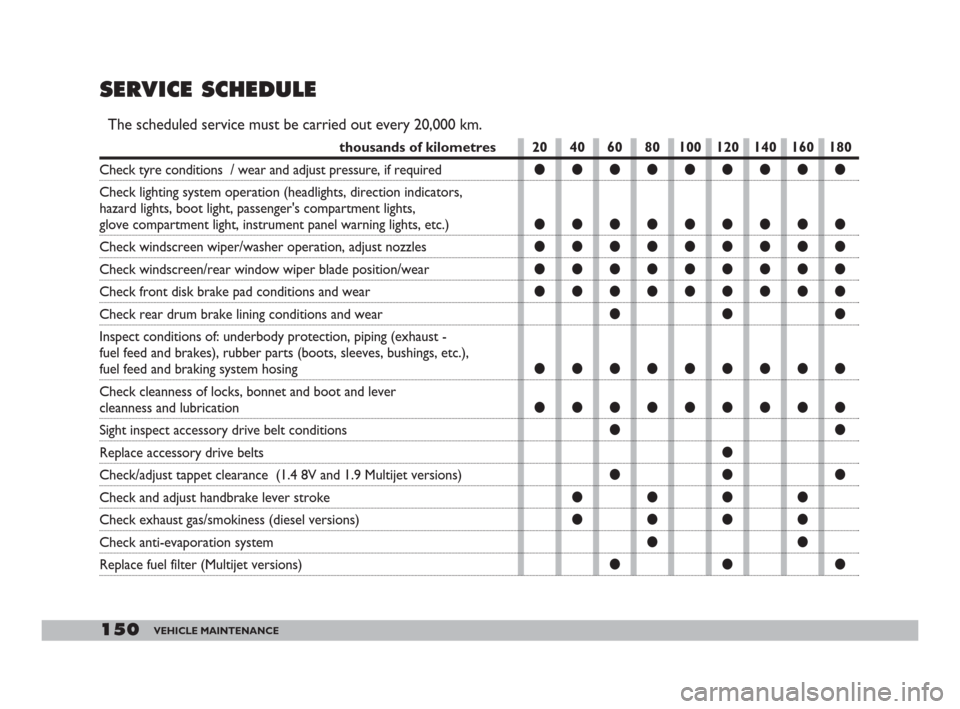
150VEHICLE MAINTENANCE
thousands of kilometres
Check tyre conditions / wear and adjust pressure, if required
Check lighting system operation (headlights, direction indicators,
hazard lights, boot light, passenger's compartment lights,
glove compartment light, instrument panel warning lights, etc.)
Check windscreen wiper/washer operation, adjust nozzles
Check windscreen/rear window wiper blade position/wear
Check front disk brake pad conditions and wear
Check rear drum brake lining conditions and wear
Inspect conditions of: underbody protection, piping (exhaust -
fuel feed and brakes), rubber parts (boots, sleeves, bushings, etc.),
fuel feed and braking system hosing
Check cleanness of locks, bonnet and boot and lever
cleanness and lubrication
Sight inspect accessory drive belt conditions
Replace accessory drive belts
Check/adjust tappet clearance (1.4 8V and 1.9 Multijet versions)
Check and adjust handbrake lever stroke
Check exhaust gas/smokiness (diesel versions)
Check anti-evaporation system
Replace fuel filter (Multijet versions)
SERVICE SCHEDULE
The scheduled service must be carried out every 20,000 km.
20 40 60 80 100 120 140 160 180
●●●●●●●●●
●●●●●●●●●
●●●●●●●●●
●●●●●●●●●
●●●●●●●●●
●●●
●●●●●●●●●
●●●●●●●●●
●●
●
●●●
●●●●
●●●●
●●
●●●
149-173 Doblo GB 9-05-2008 12:10 Pagina 150
Page 173 of 222
172VEHICLE MAINTENANCE
Detergents pollute wa-
ter. The vehicle must
therefore be washed in an
area equipped for the collection
and purification of the liquids
used while washing.
IMPORTANT The engine com-
partment should be washed while the
engine is cold and with the ignition key
at STOP. After washing, make sure
that the various protections (e.g. rub-
ber boots and various guards) have
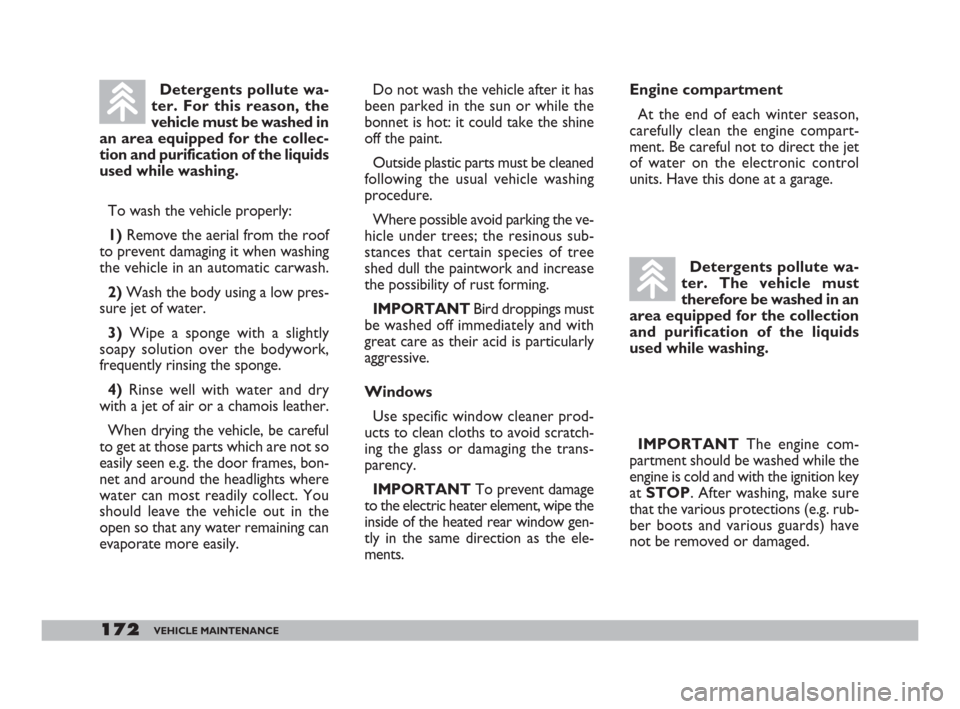
not be removed or damaged. To wash the vehicle properly:
1) Remove the aerial from the roof
to prevent damaging it when washing
the vehicle in an automatic carwash.
2) Wash the body using a low pres-
sure jet of water.
3)Wipe a sponge with a slightly
soapy solution over the bodywork,
frequently rinsing the sponge.
4)Rinse well with water and dry
with a jet of air or a chamois leather.
When drying the vehicle, be careful
to get at those parts which are not so
easily seen e.g. the door frames, bon-
net and around the headlights where
water can most readily collect. You
should leave the vehicle out in the
open so that any water remaining can
evaporate more easily.Detergents pollute wa-
ter. For this reason, the
vehicle must be washed in
an area equipped for the collec-
tion and purification of the liquids
used while washing.
Engine compartment
At the end of each winter season,
carefully clean the engine compart-
ment. Be careful not to direct the jet
of water on the electronic control
units. Have this done at a garage. Do not wash the vehicle after it has
been parked in the sun or while the
bonnet is hot: it could take the shine
off the paint.
Outside plastic parts must be cleaned
following the usual vehicle washing
procedure.
Where possible avoid parking the ve-
hicle under trees; the resinous sub-
stances that certain species of tree
shed dull the paintwork and increase
the possibility of rust forming.
IMPORTANTBird droppings must
be washed off immediately and with
great care as their acid is particularly
aggressive.
Windows
Use specific window cleaner prod-
ucts to clean cloths to avoid scratch-
ing the glass or damaging the trans-
parency.
IMPORTANTTo prevent damage
to the electric heater element, wipe the
inside of the heated rear window gen-
tly in the same direction as the ele-
ments.
149-173 Doblo GB 9-05-2008 12:10 Pagina 172
Page 206 of 222
205TECHNICAL SPECIFICATIONS205
PRACTICAL TIPS TO
REDUCE CONSUMPTION
AND ENVIRONMENTAL
POLLUTION
Vehicle conditions
1. Have checks and adjustments
carried out in accordance with the
“Scheduled Service Plan”.
2. Check the tyre pressure at inter-
vals of not more than 4 weeks (see
“Tyre pressure”). Too low tyre pres-
sure increases consumption as the
rolling resistance increases. In these
conditions the tyres wear faster and
performance deteriorates.
3. Use winter tyresonly in the sea-
sons where dictated by the climatic
conditions. Winter tyres not only in-
crease consumption but also tyre
noise.4. Do not travel in heavy load con-
ditions(vehicle overloaded): The
weight of the vehicle (especially when
driving in town) and its trim greatly af-
fect fuel consumption and stability.
5. Remove roof racks or ski racks
after use. These accessories reduce
the aerodynamics of the vehicle and
have a negative effect on fuel con-
sumption.
6. Ideally use a trailerto transport
particularly bulky objects.
7. It is preferable to use the air vents:
driving with the window open has a
negative effect on the aerodynamics of
the vehicle.
8. Use the electrical devices only for
the time strictly necessary. The rear
heated window, additional headlights,
windscreen wipers and heater fan
need a considerable amount of ener-
gy, consequently increasing fuel con-
sumption (up to 25% more in the ur-
ban cycle).9. Using the air-conditioning in-
creases consumption (up to 30% more
on average): use the air vents when
the outside temperature permits.
Driving style
1. After starting the engineit is
advisable to set off immediately and
slowly avoiding revving up the engine.
Do not warm up the engine with the
vehicle stationary either at idle or at
high speed: in these conditions the en-
gine in fact warms up more slowly, in-
creasing consumption, emissions and
wear of the mechanical devices.
2. Avoid revving upwhen starting
at traffic lights or before turning off the
engine. This action, like double-de-
clutching, is unnecessary and causes in-
creased fuel consumption and pollu-
tion.
174-211 Doblo GB 16-12-2008 14:26 Pagina 205
Page 214 of 222
213INDEX
- rear window ............................. 61
- windscreen ............................... 60
Digital clock .......................... 26-27
Dimensions ................................... 187
Direction indicators
- control ...................................... 64
- front bulb replacement .......... 133
- rear bulb replacement ........... 134
- side bulb replacement ............ 134
Door lock/unlock
remote control ............................. 8
Double ladder (partitions) ......... 51
Driver’s protection ladder
(partitions)................................... 51
Driving your vehicle .................... 106
EBD electronic brake force
distributor ................................... 90
Electric windows .......................... 74
Electronic brake force
distributor EBD .......................... 90
Electronic control units .............. 166
Engine
- fuel feed ..................................... 181
- identification code .................. 176
- ignition ...................................... 181
- specifications ............................ 179Engine compartment
- washing ...................................... 172
Engine coolant gauge ................... 25
Engine coolant level ..................... 159
Engine oil
- checking the level.................... 157
- consumption............................. 158
- specifications ............................ 202
Engine oil level .............................. 157
EOBD system................................ 97
Evaporation system...................... 104
Exhaust gas recirculation ............ 104
Extending the boot ...................... 80
Fiat CODE system ..................... 6
First aid kit ..................................... 148
Follow me home ......................... 66
Front doors ................................... 74
Front foglights
- bulb replacement ................... 133
- control button ......................... 68
Fuel
- at the filling station ................. 102
- capacities .................................. 200
- fuel cut-off switch ................... 69
- gauge .......................................... 25
Fuel cap........................................... 103Fuel consumption ......................... 204
Fuel cut-off switch........................ 69
Fuses
- dashboard fusebox.................. 139
- engine compartment
fusebox ...................................... 140
- replacement.............................. 138
- table............................................ 141
Gearbox
- gearbox use .............................. 109
- technical characteristics ........ 182
Getting to know your vehicle ... 6
Glove compartment .................... 69
Handbrake .......................... 107-182
Hazard lights.................................. 68
Headlight beam corrector.......... 88
Headlight slant
(electrical corrector) ................ 88
Headlights
- adjusting the headlights
abroad........................................ 89
- beam corrector ....................... 88
- beam direction......................... 89
- slant compensation ................. 88
Head restraints
212-220 Doblo GB 16-12-2008 14:26 Pagina 213
Page 215 of 222
214INDEX
- front ........................................... 54
- rear ............................................. 54
Heated rear window ................... 68
Heating............................................ 57
Hydraulic power steering
- fluid level ................................... 160
Identification data ....................... 174
If an accident occurs .................... 147
- first aid kit ................................. 148
- if anyone is injured.................. 148
Ignition switch ............................... 20
In an emergency ........................... 119
Individual settings ......................... 48
Instrument panel .......................... 22
Instruments.................................... 23
Interior equipment....................... 69
Interiors.......................................... 173
- cleaning seats
and plastic parts....................... 173
Jack................................................ 122
Jacking the vehicle ........................ 145
Keys.............................................. 6
- duplicate copies ....................... 8
Lambda sensors .......................... 104
Levels
- checking..................................... 154
Loading ramps .............................. 87
Lubricants....................................... 202
Main beam headlights
- bulb replacement ...................... 131
- control ......................................... 64
- flashing ........................................... 64
Manual climate control system
- air distribution ............................ 59
- climatic comfort ......................... 62
- controls ....................................... 61
- cooling .......................................... 61
- maintenance ............................... 63
Model plate ....................................... 174
Number plate light .................... 136
Paint ............................................ 171
Parking ............................................ 107
Parking sensors ............................. 101
Partitions ....................................... 51
- double ladder ........................... 51
- driver’s protection ladder ..... 51
- fixed panelled partition .......... 50- fixed partition with window . 51
Performance ............................... 186
Pollen filter .................................... 161
Power steering fluid level ........... 160
Pretensioners ............................... 11
Prolonged vehicle inactivity ....... 117
Protecting the environment ...... 104
Radio transmitters .................... 100
Radio-frequency
remote control ............................. 8
- battery replacement ............... 9
- homologation numbers.......... 206
Rear double doors ....................... 77
Rear foglight
- bulb replacement ................... 134
- control button ......................... 68
Rear side windows ....................... 72
Rear window shelf ....................... 71
Rear window washer
- control ...................................... 65
- fluid level ................................... 159
Rear window wiper
- blade ........................................... 169
- control ...................................... 65
- nozzle......................................... 170
- smart wash ............................... 66
212-220 Doblo GB 16-12-2008 14:26 Pagina 214