ECU FIAT DOBLO COMBI 2015 2.G User Guide
[x] Cancel search | Manufacturer: FIAT, Model Year: 2015, Model line: DOBLO COMBI, Model: FIAT DOBLO COMBI 2015 2.GPages: 323, PDF Size: 46.77 MB
Page 128 of 323
ISOFIX CHILD
RESTRAINT SYSTEM
SETUP
(for versions/markets, where
provided)
Only for vehicles designed to carry
people, (homologation M1),
provision has been made on some
versions to fit a Universal Isofix child
restraint system, a new European
standardised system for carrying
children safely.
Isofix systems can be fitted
alongside a traditional child restraint
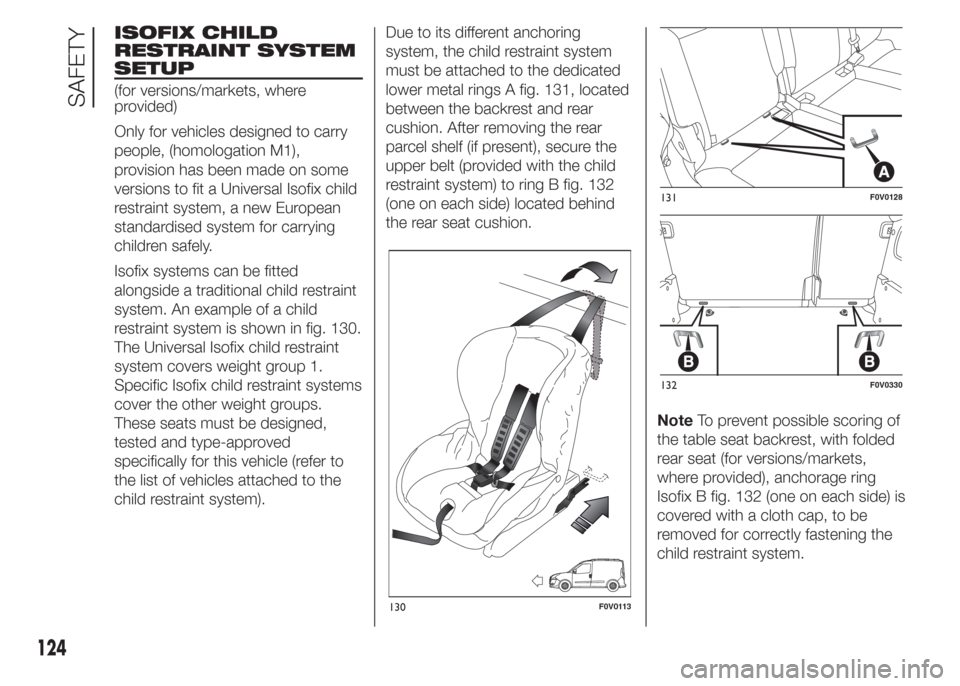
system. An example of a child
restraint system is shown in fig. 130.
The Universal Isofix child restraint
system covers weight group 1.
Specific Isofix child restraint systems
cover the other weight groups.
These seats must be designed,
tested and type-approved
specifically for this vehicle (refer to
the list of vehicles attached to the
child restraint system).Due to its different anchoring
system, the child restraint system
must be attached to the dedicated
lower metal rings A fig. 131, located
between the backrest and rear
cushion. After removing the rear
parcel shelf (if present), secure the
upper belt (provided with the child
restraint system) to ring B fig. 132
(one on each side) located behind
the rear seat cushion.
NoteTo prevent possible scoring of
the table seat backrest, with folded
rear seat (for versions/markets,
where provided), anchorage ring
Isofix B fig. 132 (one on each side) is
covered with a cloth cap, to be
removed for correctly fastening the
child restraint system.
130F0V0113
131F0V0128
132F0V0330
124
SAFETY
Page 142 of 323
HANDBRAKE
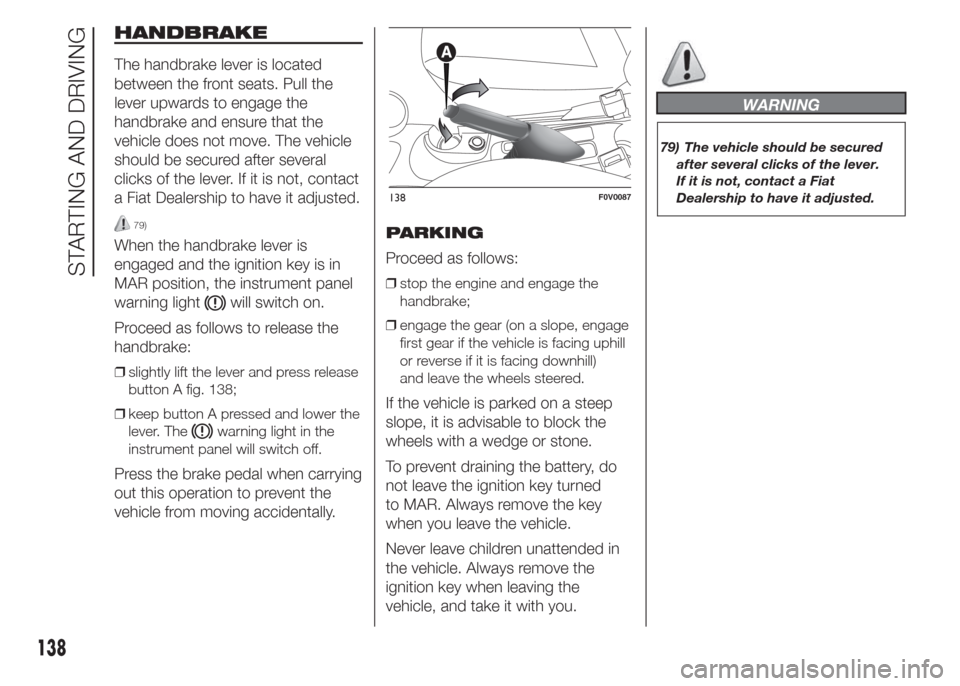
The handbrake lever is located
between the front seats. Pull the
lever upwards to engage the
handbrake and ensure that the
vehicle does not move. The vehicle
should be secured after several
clicks of the lever. If it is not, contact
a Fiat Dealership to have it adjusted.
79)
When the handbrake lever is
engaged and the ignition key is in
MAR position, the instrument panel
warning light
will switch on.
Proceed as follows to release the
handbrake:
❒slightly lift the lever and press release
button A fig. 138;
❒keep button A pressed and lower the
lever. The
warning light in the
instrument panel will switch off.
Press the brake pedal when carrying
out this operation to prevent the
vehicle from moving accidentally.PARKING
Proceed as follows:
❒stop the engine and engage the
handbrake;
❒engage the gear (on a slope, engage
first gear if the vehicle is facing uphill
or reverse if it is facing downhill)
and leave the wheels steered.
If the vehicle is parked on a steep
slope, it is advisable to block the
wheels with a wedge or stone.
To prevent draining the battery, do
not leave the ignition key turned
to MAR. Always remove the key
when you leave the vehicle.
Never leave children unattended in
the vehicle. Always remove the
ignition key when leaving the
vehicle, and take it with you.
WARNING
79) The vehicle should be secured
after several clicks of the lever.
If it is not, contact a Fiat
Dealership to have it adjusted.
138F0V0087
138
STARTING AND DRIVING
Page 171 of 323
REPLACING AN
INTERIOR BULB
For the type of bulb and power
rating, see "Changing a bulb".
FRONT ROOF LIGHT
Roof light with
movable lens
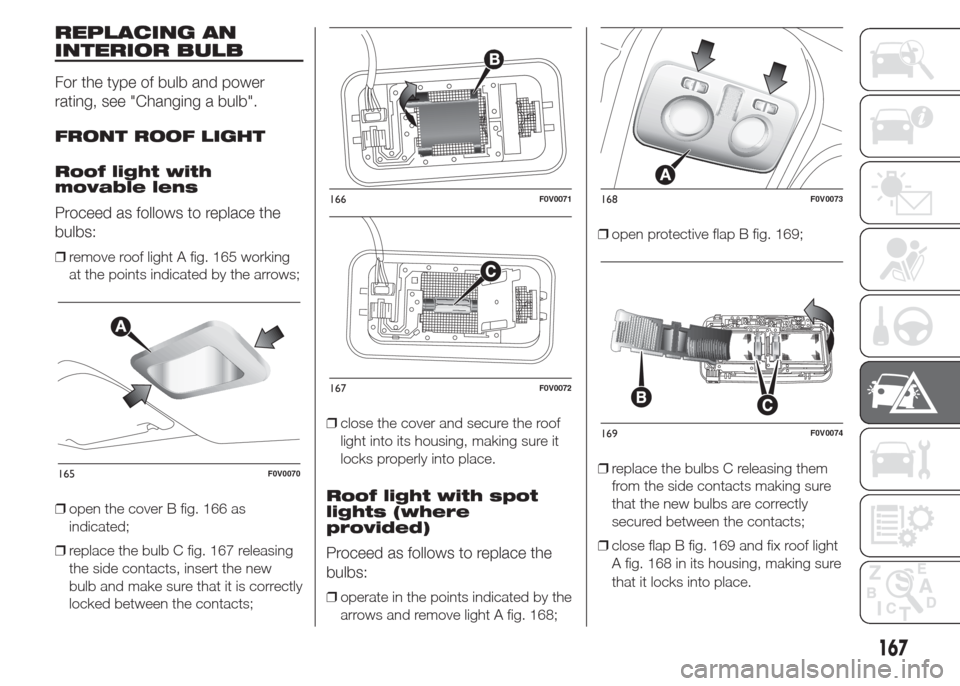
Proceed as follows to replace the
bulbs:
❒remove roof light A fig. 165 working
at the points indicated by the arrows;
❒open the cover B fig. 166 as
indicated;
❒replace the bulb C fig. 167 releasing
the side contacts, insert the new
bulb and make sure that it is correctly
locked between the contacts;❒close the cover and secure the roof
light into its housing, making sure it
locks properly into place.
Roof light with spot
lights (where
provided)
Proceed as follows to replace the
bulbs:
❒operate in the points indicated by the
arrows and remove light A fig. 168;❒open protective flap B fig. 169;
❒replace the bulbs C releasing them
from the side contacts making sure
that the new bulbs are correctly
secured between the contacts;
❒close flap B fig. 169 and fix roof light
A fig. 168 in its housing, making sure
that it locks into place.
165F0V0070
166F0V0071
167F0V0072
168F0V0073
169F0V0074
167
Page 172 of 323
REAR ROOF LIGHT
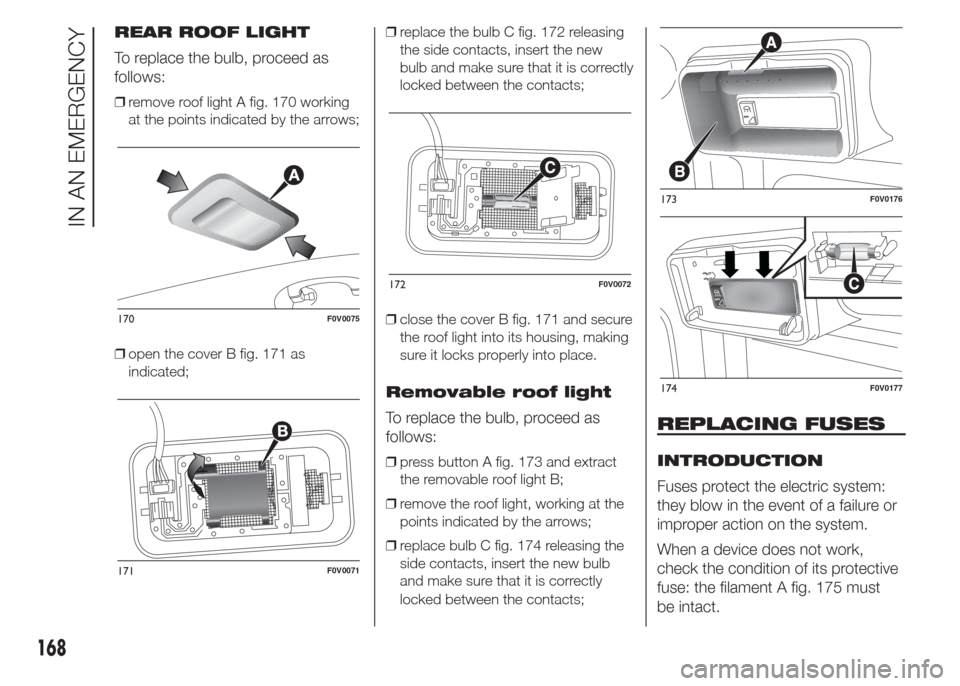
To replace the bulb, proceed as
follows:
❒remove roof light A fig. 170 working
at the points indicated by the arrows;
❒open the cover B fig. 171 as
indicated;❒replace the bulb C fig. 172 releasing
the side contacts, insert the new
bulb and make sure that it is correctly
locked between the contacts;
❒close the cover B fig. 171 and secure
the roof light into its housing, making
sure it locks properly into place.
Removable roof light
To replace the bulb, proceed as
follows:
❒press button A fig. 173 and extract
the removable roof light B;
❒remove the roof light, working at the
points indicated by the arrows;
❒replace bulb C fig. 174 releasing the
side contacts, insert the new bulb
and make sure that it is correctly
locked between the contacts;
REPLACING FUSES
INTRODUCTION
Fuses protect the electric system:
they blow in the event of a failure or
improper action on the system.
When a device does not work,
check the condition of its protective
fuse: the filament A fig. 175 must
be intact.
170F0V0075
171F0V0071
172F0V0072
173F0V0176
174F0V0177
168
IN AN EMERGENCY
Page 182 of 323
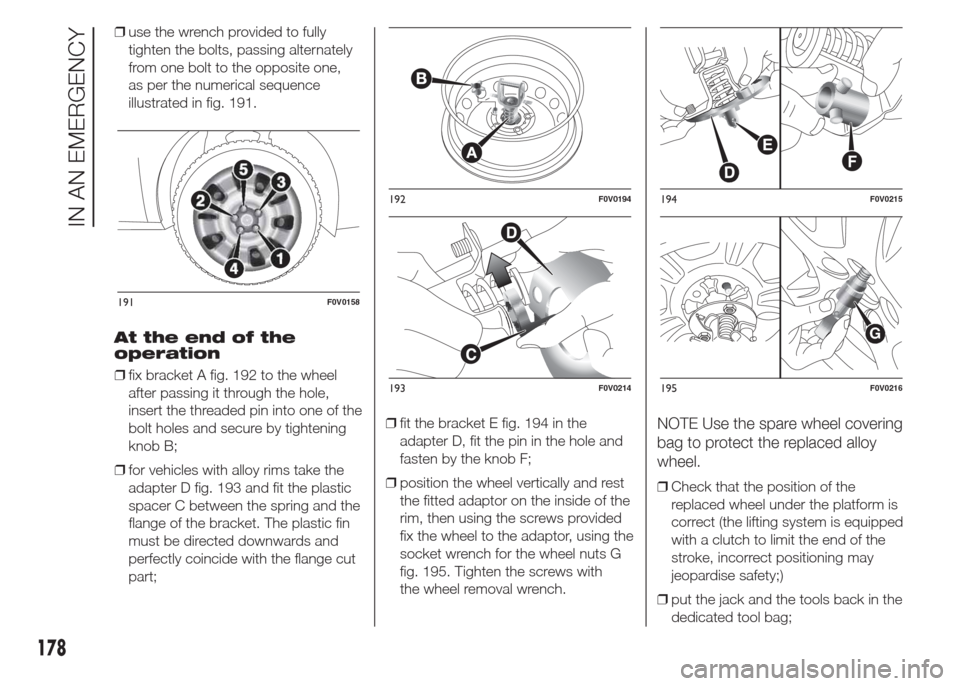
❒use the wrench provided to fully
tighten the bolts, passing alternately
from one bolt to the opposite one,
as per the numerical sequence
illustrated in fig. 191.
At the end of the
operation
❒fix bracket A fig. 192 to the wheel
after passing it through the hole,
insert the threaded pin into one of the
bolt holes and secure by tightening
knob B;
❒for vehicles with alloy rims take the
adapter D fig. 193 and fit the plastic
spacer C between the spring and the
flange of the bracket. The plastic fin
must be directed downwards and
perfectly coincide with the flange cut
part;❒fit the bracket E fig. 194 in the
adapter D, fit the pin in the hole and
fasten by the knob F;
❒position the wheel vertically and rest
the fitted adaptor on the inside of the
rim, then using the screws provided
fix the wheel to the adaptor, using the
socket wrench for the wheel nuts G
fig. 195. Tighten the screws with
the wheel removal wrench.
NOTE Use the spare wheel covering
bag to protect the replaced alloy
wheel.
❒Check that the position of the
replaced wheel under the platform is
correct (the lifting system is equipped
with a clutch to limit the end of the
stroke, incorrect positioning may
jeopardise safety;)
❒put the jack and the tools back in the
dedicated tool bag;
191F0V0158
192F0V0194
193F0V0214
194F0V0215
G
195F0V0216
178
IN AN EMERGENCY
Page 183 of 323
❒reposition the tool bag behind the left
side seat (Cargo versions) or, resting
the bottom of the bag against the
side panel, in the compartment inside
the rear right side (Doblò/Doblò
Combi versions).
WARNING
108) The spare wheel (where
provided) is specifically for your
vehicle. Therefore, it must not be
used on other models. Do not
use spare wheels of other models
on your vehicle. The spare wheel
must be used only in an
emergency. Use of the spare
wheel must kept to the minimum
necessary.109) Use your hazard lights, warning
triangle, etc. to show that your
vehicle is stationary according to
the regulations in force.
Passengers should get out of the
vehicle, particularly if it is heavily
loaded, and wait for the wheel
to be changed away from the
traffic. If you are on a slope or
uneven surface, place wedges or
other suitable objects under the
wheels to secure the vehicle.
Have the wheel repaired and
refitted as soon as possible. Do
not apply grease to the bolt
threads before assembly: they
might spontaneously unscrew.
110) Use the jack only to replace
wheels on the vehicle with which
it is supplied or on other vehicles
of the same model. Never use
the jack for other purposes, such
as lifting other models. Never
use the jack to carry out repairs
under the vehicle. Incorrect
positioning of the jack may cause
the lifted vehicle to fall. Do not
use the jack for loads higher than
those shown on the label.111) Incorrect hub cap assembly
may cause it to come off when the
vehicle is moving. Never tamper
with the inflation valve. Never
introduce tools of any kind
between rim and tyre. Check tyre
and spare wheel pressures
regularly, referring to the values
shown in the "Technical
specifications" section.
179
Page 186 of 323
BOTTLE
REPLACEMENT
PROCEDURE
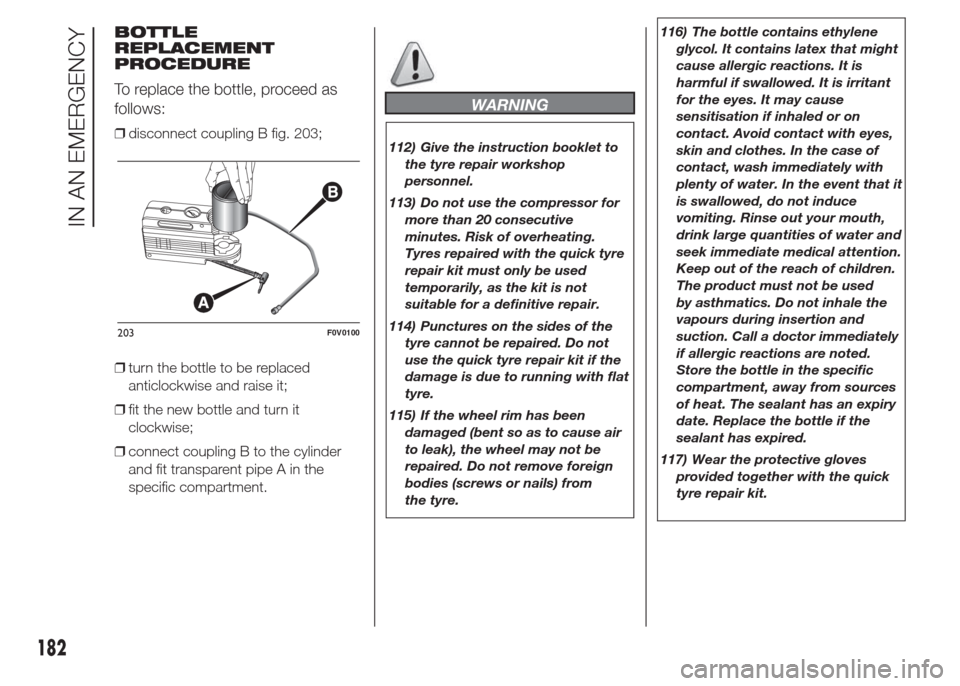
To replace the bottle, proceed as
follows:
❒disconnect coupling B fig. 203;
❒turn the bottle to be replaced
anticlockwise and raise it;
❒fit the new bottle and turn it
clockwise;
❒connect coupling B to the cylinder
and fit transparent pipe A in the
specific compartment.
WARNING
112) Give the instruction booklet to
the tyre repair workshop
personnel.
113) Do not use the compressor for
more than 20 consecutive
minutes. Risk of overheating.
Tyres repaired with the quick tyre
repair kit must only be used
temporarily, as the kit is not
suitable for a definitive repair.
114) Punctures on the sides of the
tyre cannot be repaired. Do not
use the quick tyre repair kit if the
damage is due to running with flat
tyre.
115) If the wheel rim has been
damaged (bent so as to cause air
to leak), the wheel may not be
repaired. Do not remove foreign
bodies (screws or nails) from
the tyre.116) The bottle contains ethylene
glycol. It contains latex that might
cause allergic reactions. It is
harmful if swallowed. It is irritant
for the eyes. It may cause
sensitisation if inhaled or on
contact. Avoid contact with eyes,
skin and clothes. In the case of
contact, wash immediately with
plenty of water. In the event that it
is swallowed, do not induce
vomiting. Rinse out your mouth,
drink large quantities of water and
seek immediate medical attention.
Keep out of the reach of children.
The product must not be used
by asthmatics. Do not inhale the
vapours during insertion and
suction. Call a doctor immediately
if allergic reactions are noted.
Store the bottle in the specific
compartment, away from sources
of heat. The sealant has an expiry
date. Replace the bottle if the
sealant has expired.
117) Wear the protective gloves
provided together with the quick
tyre repair kit.
203F0V0100
182
IN AN EMERGENCY
Page 211 of 323
129) Do not travel with the
windscreen washer fluid reservoir
empty: the windscreen washer
is essential for improving visibility.
Some commercial windscreen
washer additives are flammable.
The engine compartment contains
hot parts which could cause a
fire if they come into contact with
these additives.
130) Brake fluid is poisonous and
highly corrosive. In the event of
accidental contact, immediately
wash the affected parts with
water and mild soap. Then rinse
thoroughly. Consult a doctor
immediately if you swallow the
fluid.
131) The symbol
on the container
indicates a synthetic brake fluid,
which is different from a mineral
fluid. Using a mineral-type fluid
will damage the special rubber
seals of the braking system
beyond repair.
132) Prevent power steering fluid
from coming into contact with
hot engine parts: it is flammable.
IMPORTANT
31) When topping up, take care not
to mix up the various types of
fluids: they are not compatible
with each other and could
seriously damage the vehicle.
32) Do not add oil with specifications
other than those of the oil already
in the engine.
33) PARAFLU
UPanti-freeze is used
in the engine cooling system. Use
the same fluid as in the cooling
system when topping up.
PARAFLU
UPcannot be mixed with
any other type of fluid. If this
happens, do not start the engine
and contact a Fiat Dealership.
34) Avoid allowing brake fluid, which
is extremely corrosive, to come
into contact with painted areas.
Should it happen, wash
immediately with water.
35) Do not press the power steering
end of travel lock for longer than 8
consecutive seconds with the
engine running because it will
cause noise and risk damaging
the system.
IMPORTANT
3) Used engine oil and oil filters
contain substances which are
harmful to the environment. It is
advisable to have oil and filters
changed by a Fiat Dealership,
where they will be disposed of
properly and in accordance with
the law.
4) Power steering fluid consumption
is extremely low; if another top-up
is required after only a short
period of time, have the system
checked for leaks at a Fiat
Dealership.
207