headlights FIAT DOBLO COMBI 2015 2.G User Guide
[x] Cancel search | Manufacturer: FIAT, Model Year: 2015, Model line: DOBLO COMBI, Model: FIAT DOBLO COMBI 2015 2.GPages: 323, PDF Size: 46.77 MB
Page 110 of 323
14) The presence of water in the supply circuit may cause severe damage to the injection system and irregular engine
operation. If the
warning light switches on (on some versions together with the dedicated message on the
display), contact a Fiat Dealership as soon as possible to have the system bled. If the above indication occurs
immediately after refuelling, water may have entered the tank: turn the engine off immediately and contact a Fiat
Dealership.
15) During regeneration, the fan may be activated.
WARNING
52) Always drive at a speed appropriate to the traffic conditions, the weather and traffic regulations. The engine may be
stopped if the DPF light is on; however, repeated interruption of the regeneration process may result in premature
deterioration of the engine oil. For this reason, always wait until the warning light switches off before stopping the
engine as described above. It is not advisable to complete DPF regeneration with the vehicle stationary.
Warning lights on
panelWhat it means What to do
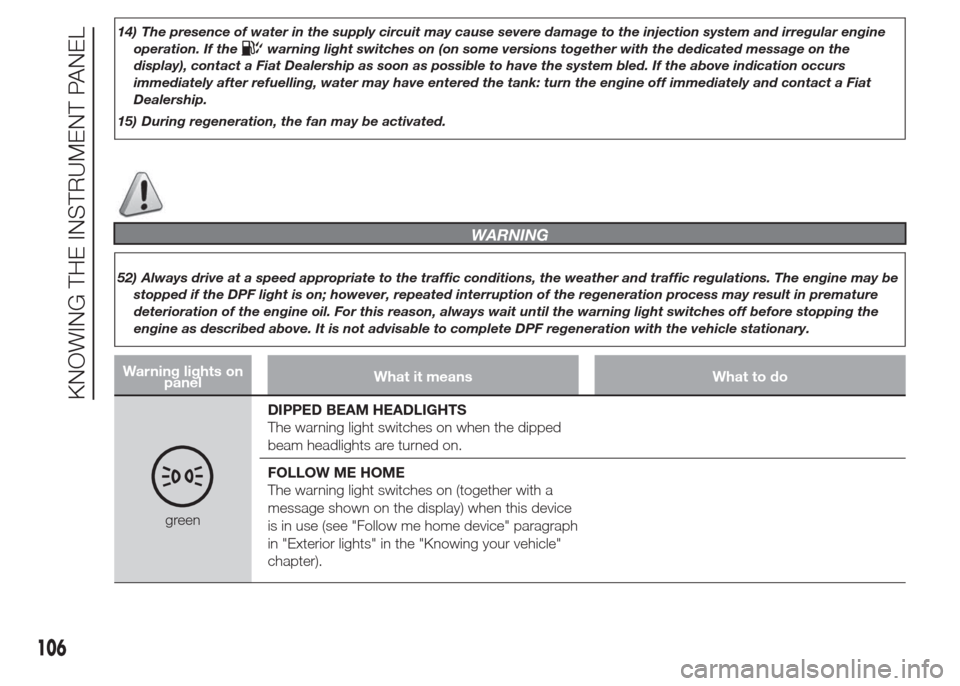
greenDIPPED BEAM HEADLIGHTS
The warning light switches on when the dipped
beam headlights are turned on.
FOLLOW ME HOME
The warning light switches on (together with a
message shown on the display) when this device
is in use (see "Follow me home device" paragraph
in "Exterior lights" in the "Knowing your vehicle"
chapter).
106
KNOWING THE INSTRUMENT PANEL
Page 112 of 323
Warning lights on
panelWhat it means What to do
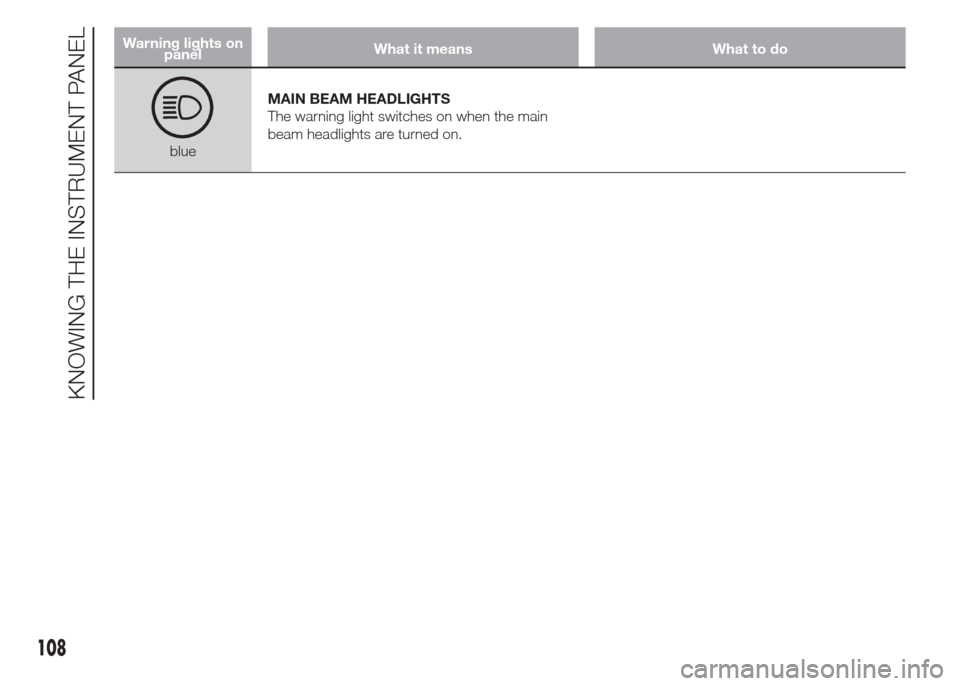
blueMAIN BEAM HEADLIGHTS
The warning light switches on when the main
beam headlights are turned on.
108
KNOWING THE INSTRUMENT PANEL
Page 158 of 323
IMPORTANT
22) For diesel engines, use only
diesel fuel for motor vehicles
in accordance with EN590
European specifications. The use
of other products or mixtures
may damage the engine beyond
repair and consequently invalidate
the warranty, due to the damage
caused. If you accidentally refuel
with another type of fuel, do not
start the engine, and drain the
tank. If the engine has run, even
for a very short time, you will need
to have the entire fuel supply
system emptied in addition to the
tank.
23) Do not bring naked flames or lit
cigarettes near the fuel tank filler:
fire risk. Keep your face away
from the fuel filler to prevent
breathing in harmful vapours.
SAVING FUEL
Some useful tips are given below for
fuel saving and reducing harmful
emissions of CO2 and other
pollutants (nitrogen oxides, unburnt
hydrocarbons, Particulate Matter
(PM), etc.).
PRACTICAL ADVICE
FOR REDUCING FUEL
CONSUMPTION AND
HARMFUL EMISSIONS
Vehicle conditions
❒Have checks and adjustments for
vehicle maintenancecarried out
in accordance with the “Scheduled
servicing plan”.
❒Checktyrepressure regularly, at
least once every four weeks.
Excessively low pressures will
increase consumption because
rolling resistance will be higher. In
addition, this wears the tyre more
quickly and impairs performance.
❒Only usesnow tyreswhen
the weather conditions make them
absolutely necessary. They increase
consumption and noise.❒Do not travel witha heavy load: the
weight of the vehicle (especially when
driving in town) and its geometry
greatly affect fuel consumption and
stability.
❒Removeroof racks or ski racks
after use. These accessories reduce
the vehicle's aerodynamic
penetration and have a negative
effect on fuel consumption.
❒When transporting particularly large
objects, use atrailerif possible.
❒Use the vehicle's air vents if possible:
travelling with the windows open
impairs aerodynamics.
❒Use electrical devices only for the
amount of time needed. The vehicle’s
heated rear window, additional
headlights, screen wipers and heater
fan require a considerable amount
of energy; this increases fuel
consumption (by up to +25% in an
urban cycle).
❒Air conditioning leads to higher fuel
consumption (on average up to
+30%). If the temperature outside is
not too extreme, try and use the
air vents.
154
STARTING AND DRIVING
Page 164 of 323
HAZARD WARNING
LIGHTS
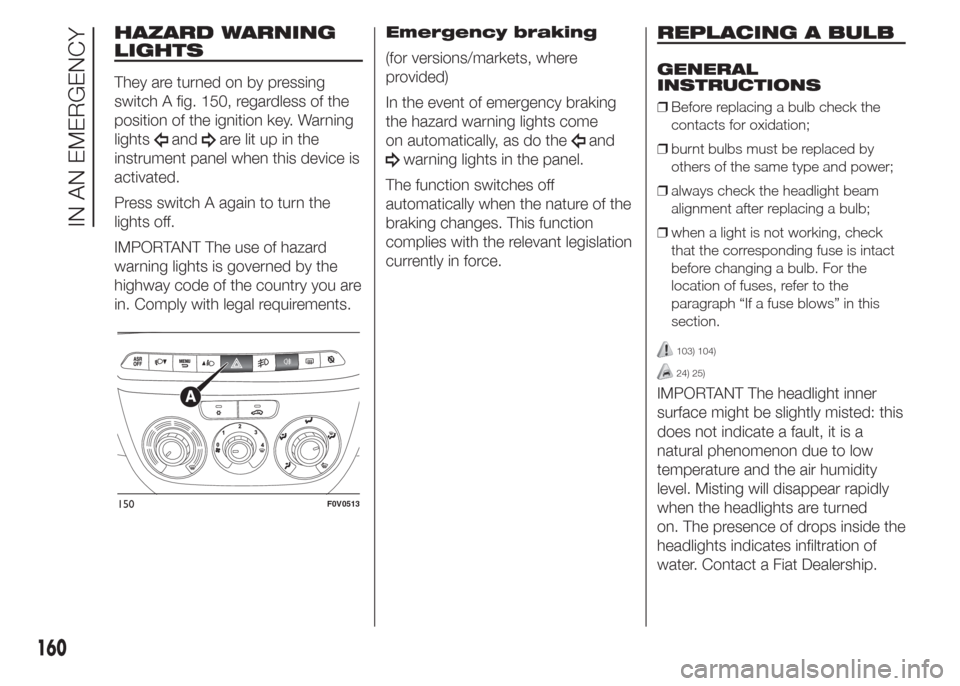
They are turned on by pressing
switch A fig. 150, regardless of the
position of the ignition key. Warning
lights
andare lit up in the
instrument panel when this device is
activated.
Press switch A again to turn the
lights off.
IMPORTANT The use of hazard
warning lights is governed by the
highway code of the country you are
in. Comply with legal requirements.Emergency braking
(for versions/markets, where
provided)
In the event of emergency braking
the hazard warning lights come
on automatically, as do theand
warning lights in the panel.
The function switches off
automatically when the nature of the
braking changes. This function
complies with the relevant legislation
currently in force.
REPLACING A BULB
GENERAL
INSTRUCTIONS
❒Before replacing a bulb check the
contacts for oxidation;
❒burnt bulbs must be replaced by
others of the same type and power;
❒always check the headlight beam
alignment after replacing a bulb;
❒when a light is not working, check
that the corresponding fuse is intact
before changing a bulb. For the
location of fuses, refer to the
paragraph “If a fuse blows” in this
section.
103) 104)
24) 25)
IMPORTANT The headlight inner
surface might be slightly misted: this
does not indicate a fault, it is a
natural phenomenon due to low
temperature and the air humidity
level. Misting will disappear rapidly
when the headlights are turned
on. The presence of drops inside the
headlights indicates infiltration of
water. Contact a Fiat Dealership.
150F0V0513
160
IN AN EMERGENCY
Page 166 of 323
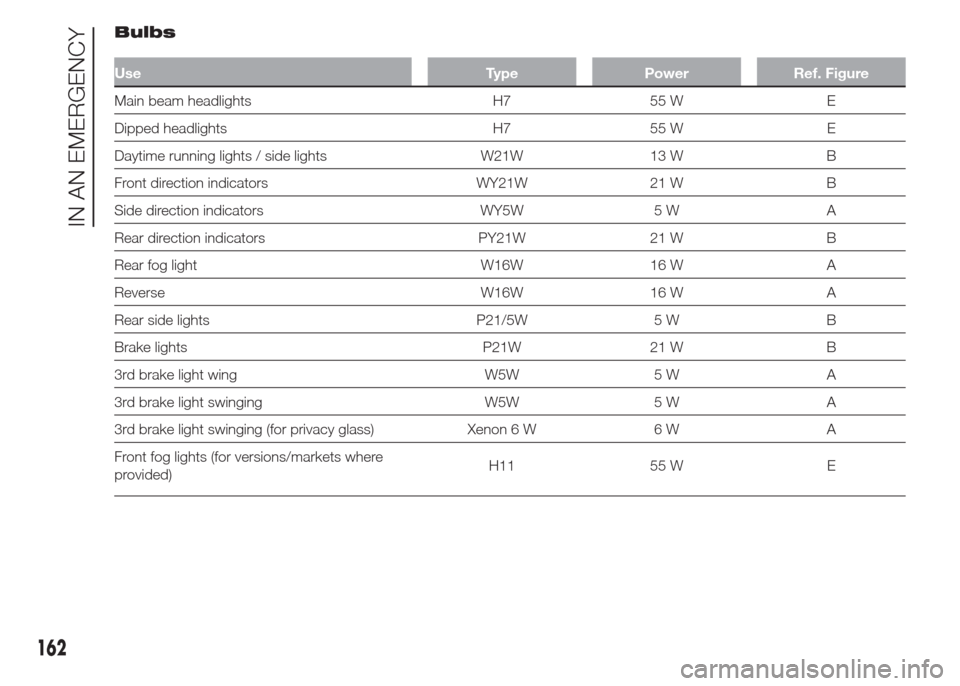
Bulbs
Use Type Power Ref. Figure
Main beam headlights H7 55 W E
Dipped headlights H7 55 W E
Daytime running lights / side lights W21W 13 W B
Front direction indicators WY21W 21 W B
Side direction indicators WY5W 5 W A
Rear direction indicators PY21W 21 W B
Rear fog light W16W 16 W A
Reverse W16W 16 W A
Rear side lights P21/5W 5 W B
Brake lights P21W 21 W B
3rd brake light wing W5W 5 W A
3rd brake light swinging W5W 5 W A
3rd brake light swinging (for privacy glass) Xenon 6 W 6 W A
Front fog lights (for versions/markets where
provided)H11 55 W E
162
IN AN EMERGENCY
Page 167 of 323
REPLACING AN
EXTERIOR BULB
For the type of bulb and relevant
power rating, see “Changing a
bulb”.
FRONT LIGHT
CLUSTERS
The front light clusters contain side
light, daytime running light, dipped,
main beam and direction indicator
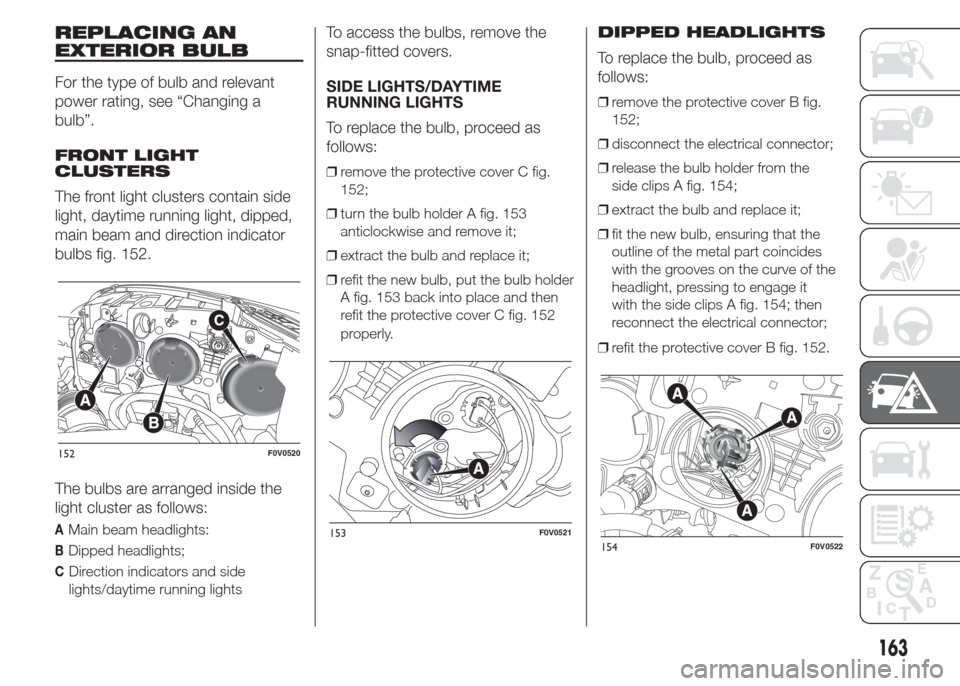
bulbs fig. 152.
The bulbs are arranged inside the
light cluster as follows:
AMain beam headlights:
BDipped headlights;
CDirection indicators and side
lights/daytime running lights
To access the bulbs, remove the
snap-fitted covers.
SIDE LIGHTS/DAYTIME
RUNNING LIGHTS
To replace the bulb, proceed as
follows:
❒remove the protective cover C fig.
152;
❒turn the bulb holder A fig. 153
anticlockwise and remove it;
❒extract the bulb and replace it;
❒refit the new bulb, put the bulb holder
A fig. 153 back into place and then
refit the protective cover C fig. 152
properly.
DIPPED HEADLIGHTS
To replace the bulb, proceed as
follows:
❒remove the protective cover B fig.
152;
❒disconnect the electrical connector;
❒release the bulb holder from the
side clips A fig. 154;
❒extract the bulb and replace it;
❒fit the new bulb, ensuring that the
outline of the metal part coincides
with the grooves on the curve of the
headlight, pressing to engage it
with the side clips A fig. 154; then
reconnect the electrical connector;
❒refit the protective cover B fig. 152.
152F0V0520
153F0V0521154F0V0522
163
Page 168 of 323
DIRECTION
INDICATORS
Front
To replace the bulb, proceed as
follows:
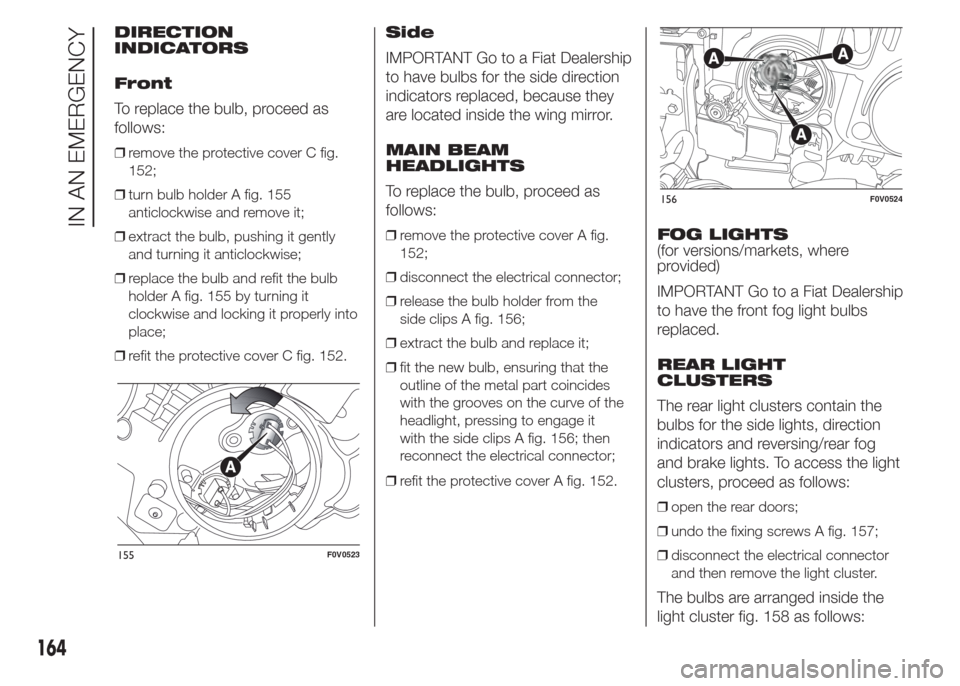
❒remove the protective cover C fig.
152;
❒turn bulb holder A fig. 155
anticlockwise and remove it;
❒extract the bulb, pushing it gently
and turning it anticlockwise;
❒replace the bulb and refit the bulb
holder A fig. 155 by turning it
clockwise and locking it properly into
place;
❒refit the protective cover C fig. 152.
Side
IMPORTANT Go to a Fiat Dealership
to have bulbs for the side direction
indicators replaced, because they
are located inside the wing mirror.
MAIN BEAM
HEADLIGHTS
To replace the bulb, proceed as
follows:
❒remove the protective cover A fig.
152;
❒disconnect the electrical connector;
❒release the bulb holder from the
side clips A fig. 156;
❒extract the bulb and replace it;
❒fit the new bulb, ensuring that the
outline of the metal part coincides
with the grooves on the curve of the
headlight, pressing to engage it
with the side clips A fig. 156; then
reconnect the electrical connector;
❒refit the protective cover A fig. 152.FOG LIGHTS
(for versions/markets, where
provided)
IMPORTANT Go to a Fiat Dealership
to have the front fog light bulbs
replaced.
REAR LIGHT
CLUSTERS
The rear light clusters contain the
bulbs for the side lights, direction
indicators and reversing/rear fog
and brake lights. To access the light
clusters, proceed as follows:
❒open the rear doors;
❒undo the fixing screws A fig. 157;
❒disconnect the electrical connector
and then remove the light cluster.
The bulbs are arranged inside the
light cluster fig. 158 as follows:
155F0V0523
156F0V0524
164
IN AN EMERGENCY
Page 175 of 323
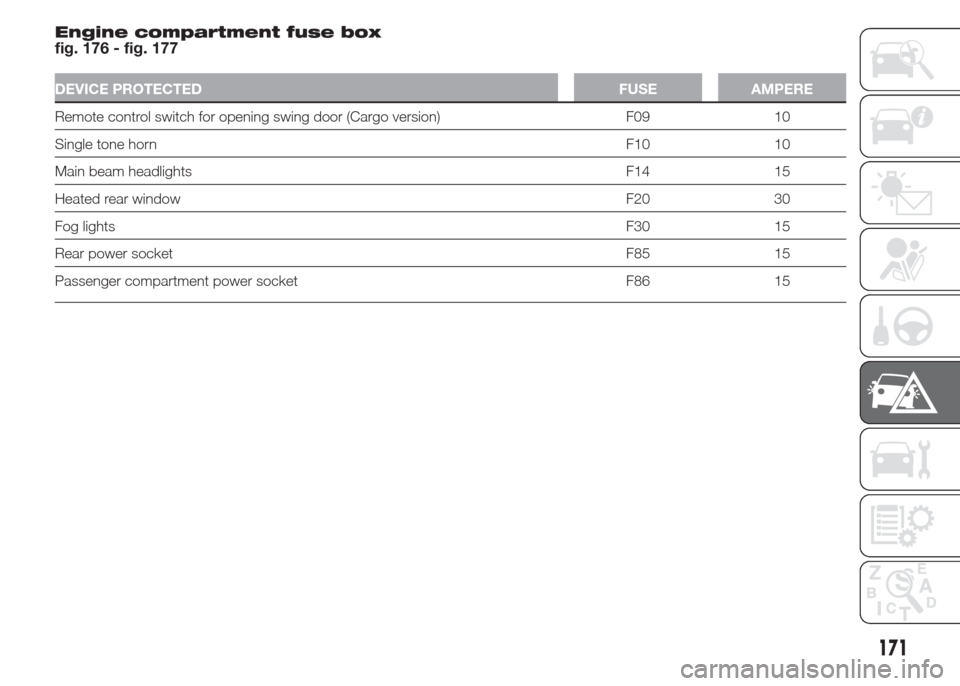
Engine compartment fuse box
fig. 176 - fig. 177
DEVICE PROTECTED FUSE AMPERE
Remote control switch for opening swing door (Cargo version) F09 10
Single tone hornF10 10
Main beam headlights F14 15
Heated rear window F20 30
Fog lightsF30 15
Rear power socket F85 15
Passenger compartment power socket F86 15
171
Page 195 of 323
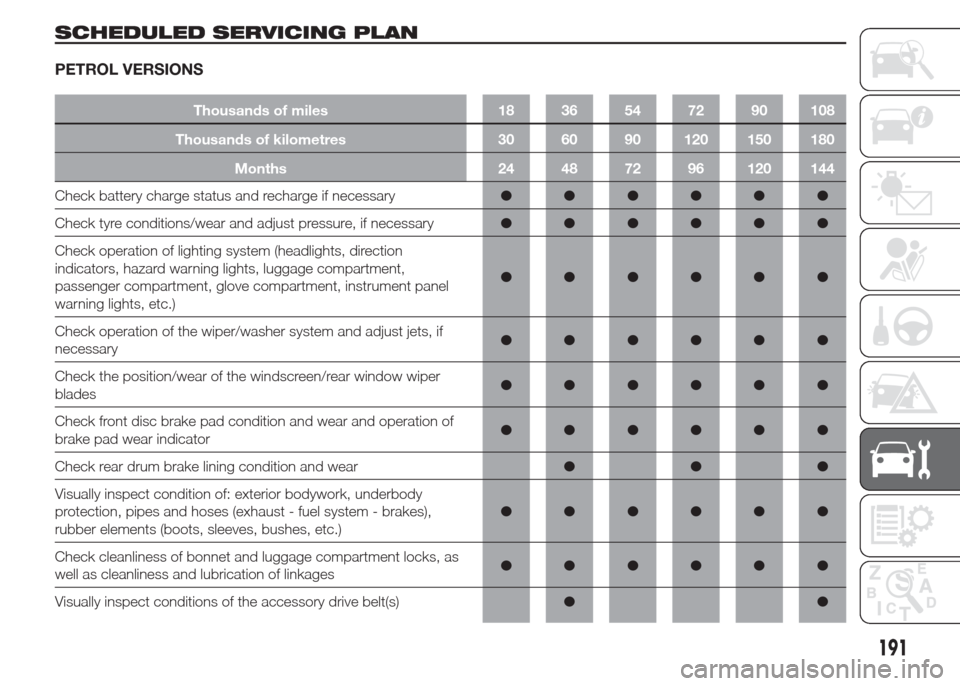
SCHEDULED SERVICING PLAN
PETROL VERSIONS
Thousands of miles 18 36 54 72 90 108
Thousands of kilometres 30 60 90 120 150 180
Months 24 48 72 96 120 144
Check battery charge status and recharge if necessary●●●●●●
Check tyre conditions/wear and adjust pressure, if necessary●●●●●●
Check operation of lighting system (headlights, direction
indicators, hazard warning lights, luggage compartment,
passenger compartment, glove compartment, instrument panel
warning lights, etc.)●●●●●●
Check operation of the wiper/washer system and adjust jets, if
necessary●●●●●●
Check the position/wear of the windscreen/rear window wiper
blades●●●●●●
Check front disc brake pad condition and wear and operation of
brake pad wear indicator●●●●●●
Check rear drum brake lining condition and wear●●●
Visually inspect condition of: exterior bodywork, underbody
protection, pipes and hoses (exhaust - fuel system - brakes),
rubber elements (boots, sleeves, bushes, etc.)●●●●●●
Check cleanliness of bonnet and luggage compartment locks, as
well as cleanliness and lubrication of linkages●●●●●●
Visually inspect conditions of the accessory drive belt(s)●●
191
Page 198 of 323
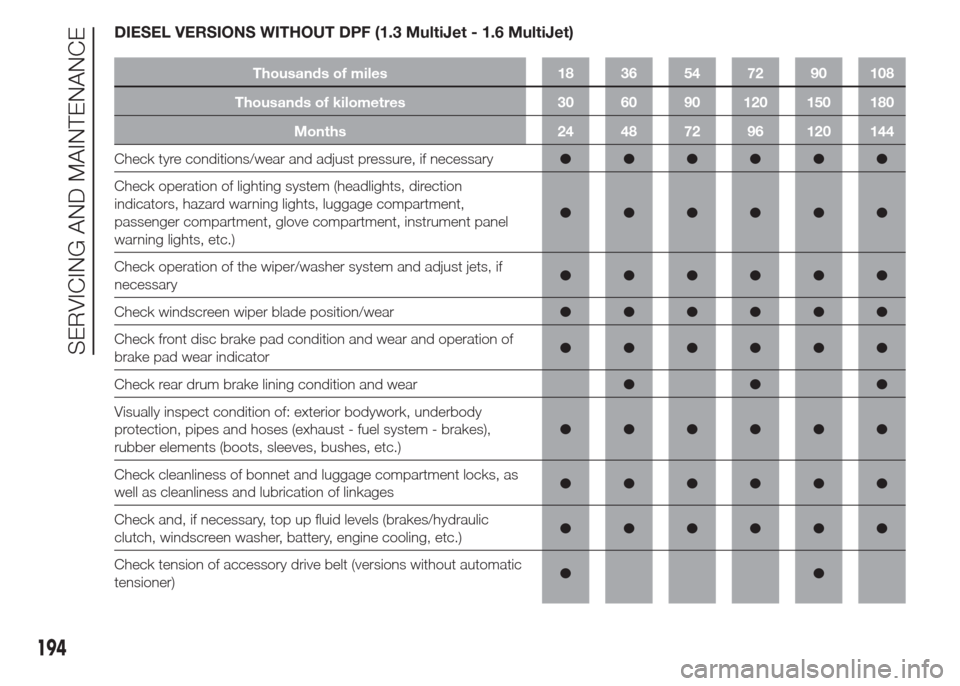
DIESEL VERSIONS WITHOUT DPF (1.3 MultiJet - 1.6 MultiJet)
Thousands of miles 18 36 54 72 90 108
Thousands of kilometres 30 60 90 120 150 180
Months 24 48 72 96 120 144
Check tyre conditions/wear and adjust pressure, if necessary●●●●●●
Check operation of lighting system (headlights, direction
indicators, hazard warning lights, luggage compartment,
passenger compartment, glove compartment, instrument panel
warning lights, etc.)●●●●●●
Check operation of the wiper/washer system and adjust jets, if
necessary●●●●●●
Check windscreen wiper blade position/wear●●●●●●
Check front disc brake pad condition and wear and operation of
brake pad wear indicator●●●●●●
Check rear drum brake lining condition and wear●●●
Visually inspect condition of: exterior bodywork, underbody
protection, pipes and hoses (exhaust - fuel system - brakes),
rubber elements (boots, sleeves, bushes, etc.)●●●●●●
Check cleanliness of bonnet and luggage compartment locks, as
well as cleanliness and lubrication of linkages●●●●●●
Check and, if necessary, top up fluid levels (brakes/hydraulic
clutch, windscreen washer, battery, engine cooling, etc.)●●●●●●
Check tension of accessory drive belt (versions without automatic
tensioner)●●
194
SERVICING AND MAINTENANCE