mirror controls FIAT DOBLO COMBI 2015 2.G Owners Manual
[x] Cancel search | Manufacturer: FIAT, Model Year: 2015, Model line: DOBLO COMBI, Model: FIAT DOBLO COMBI 2015 2.GPages: 323, PDF Size: 46.77 MB
Page 7 of 323
USE OF THE OWNER HANDBOOK
OPERATING INSTRUCTIONS
Each time direction instructions (left/right or forwards/backwards) about the vehicle are given, these must be
intended as regarding an occupant in the driver's seat. Special cases not complying with this rule will be specified as
appropriate in the text.
The figures in the Owner Handbook are provided by way of example only: this might imply that some details of the
image do not correspond to the actual arrangement of your vehicle. In addition, the Handbook has been conceived
considering vehicles with steering wheel on the left side; it is therefore possible that on vehicles with steering wheel
on the right side, the position or construction of some controls is not exactly mirror-like with respect to the figure.
To identify the chapter with the information needed you can consult the index at the end of this Owner Handbook.
Chapters can be rapidly identified with dedicated graphic tabs, at the side of each odd page. A few pages further
there is a key for getting to know the chapter order and the relevant symbols in the tabs. There is in any case a
textual indication of the current chapter at the side of each even page.
WARNINGS AND PRECAUTIONS
While reading this Owner Handbook you will find a series ofWARNINGSto prevent procedures that could damage
your vehicle.
There are alsoPRECAUTIONSthat must be carefully followed to prevent incorrect use of the components of the
vehicle, which could cause accidents or injuries.
Therefore allWARNINGSandPRECAUTIONSmust always be carefully followed.
WARNINGSandPRECAUTIONSare recalled in the text with the following symbols:
personal safety;
vehicle integrity;
environmental protection.
NOTE These symbols, when necessary, are indicated besides the title or at the end of the line and are followed by a
number. That number recalls the corresponding warning at the end of the relevant section.
Page 17 of 323
KNOW YOUR VEHICLE
In-depth knowledge of your new
vehicle starts here.
The booklet that you are reading
simply and directly explains how it is
made and how it works.
That’s why we advise you to read it
seated comfortably on board, so
that you can see what is described
here for yourself.THE KEYS....................................... 14
IGNITION DEVICE ........................... 17
SYMBOLS ...................................... 18
THE FIAT CODE SYSTEM ............... 18
DOORS ........................................... 19
SEATS ............................................ 24
PARTITIONS ................................... 29
HEAD RESTRAINTS ........................ 31
STEERING WHEEL ......................... 32
REAR VIEW MIRRORS .................... 32
EXTERIOR LIGHTS ......................... 34
INTERIOR LIGHTS .......................... 36
WINDSCREEN/REAR WINDOW
WIPER ............................................ 40
HEATING AND VENTILATION
SYSTEM ......................................... 42
DIFFUSERS..................................... 43
HEATING AND VENTILATION.......... 44
MANUAL CLIMATE CONTROL
SYSTEM ......................................... 47
AUTOMATIC CLIMATE CONTROL
SYSTEM ......................................... 50
ELECTRIC WINDOWS .................... 56
CONTROLS .................................... 58
BONNET ......................................... 59
BOOT ............................................. 60
INTERIOR FITTINGS ....................... 64
ROOF RACK/SKI RACK .................. 68HEADLIGHTS.................................. 69
RADIO............................................. 70
PROTECTING THE
ENVIRONMENT .............................. 71
13
Page 38 of 323
WARNING
26) When driving, these mirrors must
always be in position A fig. 51. As
door mirrors are curved, they
may slightly alter the perception
of distance.
EXTERIOR LIGHTS
IN BRIEF
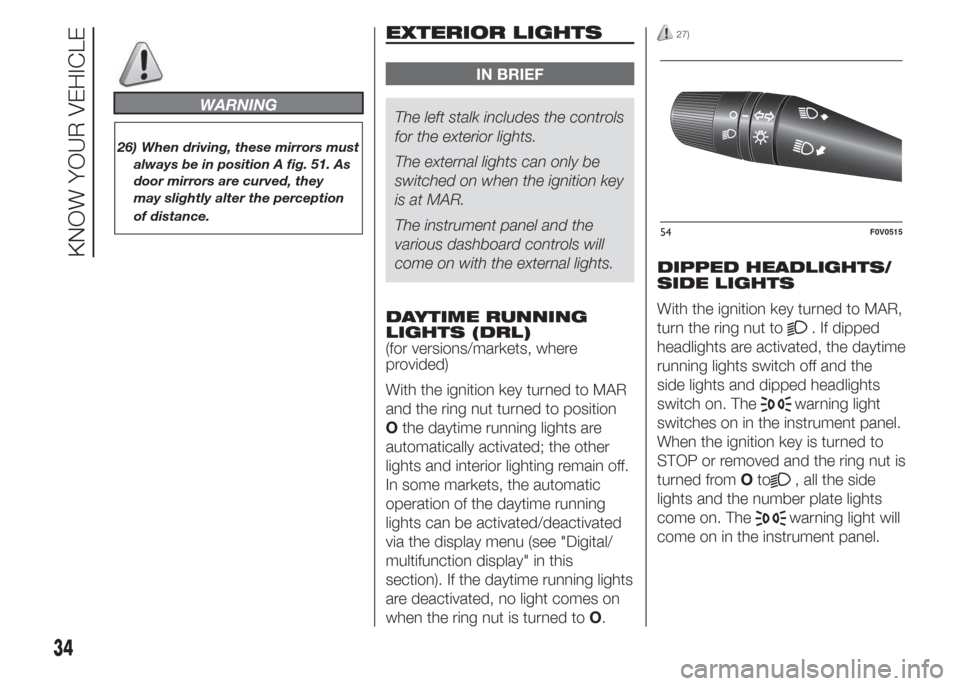
The left stalk includes the controls
for the exterior lights.
The external lights can only be
switched on when the ignition key
is at MAR.
The instrument panel and the
various dashboard controls will
come on with the external lights.
DAYTIME RUNNING
LIGHTS (DRL)
(for versions/markets, where
provided)
With the ignition key turned to MAR
and the ring nut turned to position
Othe daytime running lights are
automatically activated; the other
lights and interior lighting remain off.
In some markets, the automatic
operation of the daytime running
lights can be activated/deactivated
via the display menu (see "Digital/
multifunction display" in this
section). If the daytime running lights
are deactivated, no light comes on
when the ring nut is turned toO.
27)
DIPPED HEADLIGHTS/
SIDE LIGHTS
With the ignition key turned to MAR,
turn the ring nut to
. If dipped
headlights are activated, the daytime
running lights switch off and the
side lights and dipped headlights
switch on. The
warning light
switches on in the instrument panel.
When the ignition key is turned to
STOP or removed and the ring nut is
turned fromOto
, all the side
lights and the number plate lights
come on. The
warning light will
come on in the instrument panel.
54F0V0515
34
KNOW YOUR VEHICLE
Page 52 of 323
PASSENGER
COMPARTMENT
HEATING
Proceed as follows:
❒turn knob A to the red section;
❒turn knob B to the required speed;
❒turn knob C to:
to warm the feet and demist the
windscreen at the same time
warms the feet and keeps the face
cool (bi-level function)
to warm the feet of those in the front
and rear seats.
❒to turn off internal air recirculation
(button E LED off).
FAST FRONT WINDOW
DEMISTING/
DEFROSTING
Proceed as follows:
❒press thebutton
❒turn knob A fully to the right;
❒turn knob B to
;
❒turn knob C to
;
❒
to turn off internal air recirculation
(button E LED off).After demisting/defrosting, operate
the controls to maintain optimum
visibility conditions.
Window demisting
In the event of considerable external
moisture and/or rain and/or large
differences in temperature inside
and outside the passenger
compartment, perform the following
preventive window demisting
procedure:
❒press thebutton
❒to turn off internal air recirculation
(button E LED off);
❒turn knob A to the red section;
❒turn knob B to the second speed
level;
❒turn knob C to
or toif the
windows do not show signs of
misting up deactivate the internal air
recirculation (LED on button E off)
The climate control system is very
useful for demisting the windows
more quickly: just carry out the
above procedure and activate the
system by pressing the
button.HEATED REAR WINDOW
AND DOOR MIRRORS
DEMISTING/
DEFROSTING
(for versions/markets, where
provided)
Press button F
to activate: when
this function is activated, the LED
on button F
lights up.
This function is timed and will turn
off automatically after 20 minutes.
Press button F
again to switch
the function off in advance.
IMPORTANT Do not apply stickers
on the inside of the rear window
over the heating filaments to avoid
damage.
ADJUSTING THE FAN
SPEED
To ventilate the passenger
compartment well, proceed as
follows:
❒fully open the central and side air
diffusers;
❒turn knob A to the blue section;
❒turn knob B to the required speed;
❒turn knob C to
❒to turn off internal air recirculation
(button E LED off).
48
KNOW YOUR VEHICLE
Page 54 of 323
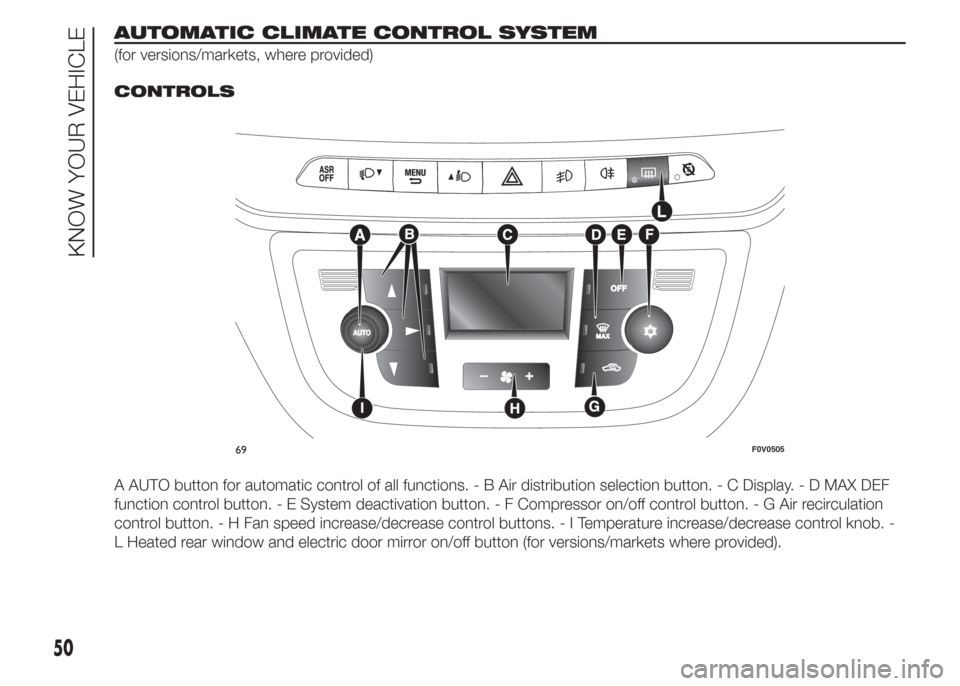
AUTOMATIC CLIMATE CONTROL SYSTEM
(for versions/markets, where provided).
CONTROLS
A AUTO button for automatic control of all functions. - B Air distribution selection button. - C Display. - D MAX DEF
function control button. - E System deactivation button. - F Compressor on/off control button. - G Air recirculation
control button. - H Fan speed increase/decrease control buttons.-ITemperature increase/decrease control knob. -
L Heated rear window and electric door mirror on/off button (for versions/markets where provided).
69F0V0505
50
KNOW YOUR VEHICLE
Page 56 of 323
❒air recirculation, to keep the
function always either on or off;
❒
to speed up demisting/defrosting
of windscreen, rear window and
external rear view mirrors.
During fully automatic system
operation, you can change the set
temperature, air distribution and fan
speed at any time by using the
relevant buttons or knobs: the
system will automatically change its
settings to adjust to the new
requirements.During fully automatic operation
(FULL AUTO), the word FULL will
disappear if the air distribution
and/or flow rate and/or engagement
of the compressor and/or
recirculation settings are changed. In
this way, the functions will switch
from automatic to manual control
until the AUTO button is pressed
again. With one or more functions
turned on manually, the adjustment
of the intake air temperature
continues to be managed
automatically, except with the
compressor switched off: if this is
the case, the temperature of the air
sent into the passenger
compartment cannot be lower than
that of the outside air.
CONTROLS
Air temperature
adjustment knob (I)
Turn the knob either clockwise or
anticlockwise to increase or lower
the requested temperature in the
passenger compartment.
The set temperature is shown on
the display.Turn the knob either fully to the right
or fully to the left to the extreme HI
or LO position to turn the maximum
heating or maximum cooling
functions on:❒HI function (maximum heating):
select by turning the temperature
knob clockwise beyond the
maximum value (32°C).
This function may be used to heat
up the passenger compartment
exploiting the system potential to
the maximum. In this condition, the
system stops controlling the
temperature automatically and sets
the air mixing to maximum heating.
The air speed and distribution are
fixed.
In particular, if the heating fluid is not
sufficiently hot, the maximum fan
speed does not come on straight
away in order to limit the intake
of insufficiently hot air to the
passenger compartment.
All manual settings will be allowed
when this function is on.
To switch the function off, simply
turn the temperature knob
anticlockwise and set the required
temperature.
52
KNOW YOUR VEHICLE
Page 319 of 323
INDEX
A
BS .............................................. 110
Accessories purchased by the
owner .......................................... 5
Active safety systems ..................... 110
Advice for preserving the
bodywork..................................... 216
Air cleaner/pollen filter .................... 208
Ashtray .......................................... 67
ASR system ................................... 113
Automatic climate control
system ......................................... 50
Battery .......................................... 208
Battery recharging.......................... 210
Blades ........................................... 212
Bodywork ...................................... 216
Bodywork paint identification
plate............................................. 222
Bodywork version .......................... 224
Bonnet ........................................... 59
Boot............................................... 60
Brake fluid ...................................... 206
Brakes
– specifications ............................ 230
Bump starting ................................ 184
Carrying children safely ................. 120
– child restraint systems ............... 126
Changing a wheel .......................... 175
Chassis marking ............................ 222Child restraint systems
(compliance for use) ..................... 122
Child safety device ......................... 20
Cigar lighter.................................... 67
CO2 emissions............................... 296
Control panel and on-board
instruments .................................. 74
Controls ......................................... 58
Cruise Control ................................ 148
Daytime running lights .................. 34
Dead lock ...................................... 15
Demanding vehicle use .................. 198
Diesel filter ..................................... 208
Diffusers ......................................... 43
Digital display ................................. 77
– Control buttons ......................... 77
– Set-up menu ............................. 77
Dimensions .................................... 240
Dipped headlights .................... 34-163
Direction indicators ................... 35-164
Door mirrors ................................... 33
Doors ............................................. 19
Draining condensation (MultiJet
versions) ...................................... 208
Driver side armrest ......................... 64
Driver's side front airbag ................ 128
Electric windows .......................... 56
– Initialisation................................ 57
Emergency starting ................ 137-183
Engine codes ................................. 224Engine compartment control unit
fuses ............................................ 169
Engine compartment...................... 199
Engine coolant ............................... 205
Engine
– technical specifications.............. 226
Engine marking .............................. 223
Engine oil ....................................... 205
EOBD system ................................ 91
ESC system ................................... 112
Exterior lights ................................. 34
Fastening the tow hook................. 186
Fiat CODE system.......................... 18
Fix&Go automatic quick tyre
repair kit ....................................... 180
Fluids and lubricants ...................... 277
Fog lights ................................. 58-164
Follow Me Home device ................. 35
Follow Me Home ............................ 35
Front airbags .................................. 127
Front bench .................................. 28
Front light clusters .......................... 163
Front roof light ................................ 167
Fuel consumption .......................... 281
Fuel cut-off system......................... 185
Fuses on compartment wired
casing .......................................... 170
Glove compartment ...................... 64
Handbrake.................................... 138