key FIAT DOBLO COMBI 2016 2.G Workshop Manual
[x] Cancel search | Manufacturer: FIAT, Model Year: 2016, Model line: DOBLO COMBI, Model: FIAT DOBLO COMBI 2016 2.GPages: 298, PDF Size: 25.92 MB
Page 133 of 298
"ENERGY SAVING"
FUNCTION
(for versions/markets, where provided)
If, after the engine has been
automatically restarted, the driver does
not take any action for a period of
about 3 minutes, the Start&Stop
system will definitively stop the engine
to avoid fuel consumption.
The engine can only be started using
the key in such cases. N.B.: In any
case, it is possible to keep the engine
running by deactivating the Start&Stop
system.
IRREGULAR OPERATION
In the case of malfunctions the
Start&Stop system is disabled.
The driver is informed of the problem by
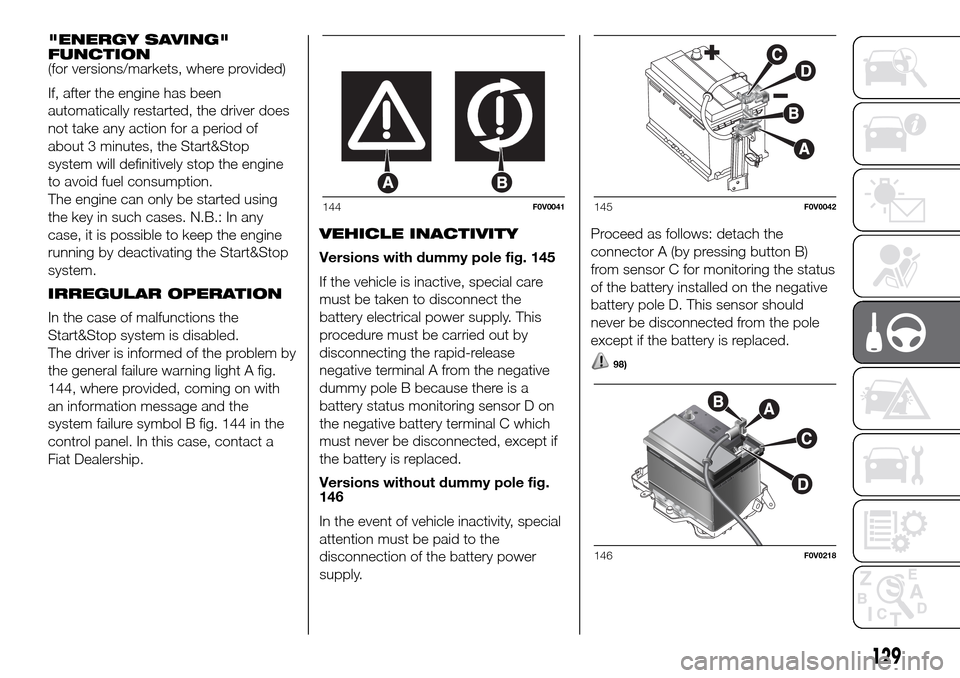
the general failure warning light A fig.
144, where provided, coming on with
an information message and the
system failure symbol B fig. 144 in the
control panel. In this case, contact a
Fiat Dealership.VEHICLE INACTIVITY
Versions with dummy pole fig. 145
If the vehicle is inactive, special care
must be taken to disconnect the
battery electrical power supply. This
procedure must be carried out by
disconnecting the rapid-release
negative terminal A from the negative
dummy pole B because there is a
battery status monitoring sensor D on
the negative battery terminal C which
must never be disconnected, except if
the battery is replaced.
Versions without dummy pole fig.
146
In the event of vehicle inactivity, special
attention must be paid to the
disconnection of the battery power
supply.Proceed as follows: detach the
connector A (by pressing button B)
from sensor C for monitoring the status
of the battery installed on the negative
battery pole D. This sensor should
never be disconnected from the pole
except if the battery is replaced.
98)
144F0V0041145F0V0042
146F0V0218
129
Page 134 of 298
EMERGENCY STARTING
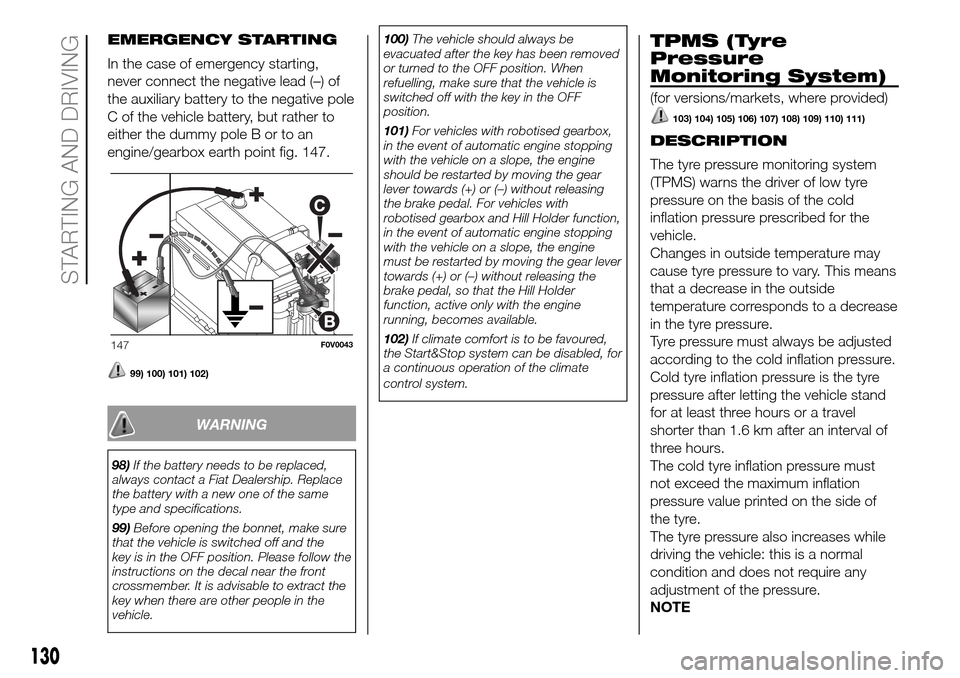
In the case of emergency starting,
never connect the negative lead (–) of
the auxiliary battery to the negative pole
C of the vehicle battery, but rather to
either the dummy pole B or to an
engine/gearbox earth point fig. 147.
99) 100) 101) 102)
WARNING
98)If the battery needs to be replaced,
always contact a Fiat Dealership. Replace
the battery with a new one of the same
type and specifications.
99)Before opening the bonnet, make sure
that the vehicle is switched off and the
key is in the OFF position. Please follow the
instructions on the decal near the front
crossmember. It is advisable to extract the
key when there are other people in the
vehicle.100)The vehicle should always be
evacuated after the key has been removed
or turned to the OFF position. When
refuelling, make sure that the vehicle is
switched off with the key in the OFF
position.
101)For vehicles with robotised gearbox,
in the event of automatic engine stopping
with the vehicle on a slope, the engine
should be restarted by moving the gear
lever towards (+) or (–) without releasing
the brake pedal. For vehicles with
robotised gearbox and Hill Holder function,
in the event of automatic engine stopping
with the vehicle on a slope, the engine
must be restarted by moving the gear lever
towards (+) or (–) without releasing the
brake pedal, so that the Hill Holder
function, active only with the engine
running, becomes available.
102)If climate comfort is to be favoured,
the Start&Stop system can be disabled, for
a continuous operation of the climate
control system.
TPMS (Tyre
Pressure
Monitoring System)
(for versions/markets, where provided)
103) 104) 105) 106) 107) 108) 109) 110) 111)
DESCRIPTION
The tyre pressure monitoring system
(TPMS) warns the driver of low tyre
pressure on the basis of the cold
inflation pressure prescribed for the
vehicle.
Changes in outside temperature may
cause tyre pressure to vary. This means
that a decrease in the outside
temperature corresponds to a decrease
in the tyre pressure.
Tyre pressure must always be adjusted
according to the cold inflation pressure.
Cold tyre inflation pressure is the tyre
pressure after letting the vehicle stand
for at least three hours or a travel
shorter than 1.6 km after an interval of
three hours.
The cold tyre inflation pressure must
not exceed the maximum inflation
pressure value printed on the side of
the tyre.
The tyre pressure also increases while
driving the vehicle: this is a normal
condition and does not require any
adjustment of the pressure.
NOTE
147F0V0043
130
STARTING AND DRIVING
Page 135 of 298
The TPMS does not replace the
normal tyre maintenance service and
does not indicate any fault in a tyre.
Therefore, the TPMS should not be
used as pressure switch while adjusting
the tyre inflation pressure.
Driving with insufficient tyre pressure
causes their overheating and can
result in tyre failure. The low inflation
pressure reduces fuel efficiency and
tyre tread life and may also affect
handling and braking performance of
the vehicle.
The TPMS does not replace the
correct tyre maintenance. It is up to the
driver to maintain the correct tyre
pressure level measuring it with
a suitable pressure switch. This is
necessary even if the decrease in the
inflation pressure value does not cause
the tyre pressure control warning light
to switch on.
The TPMS warns the driver of any
condition of insufficient tyre pressure
If this drops below the insufficient
pressure limit for any reason including
low temperature and normal pressure
loss of the tyre.
The seasonal temperature changes
affect tyre pressure.The TPMS uses wireless devices with
electronic sensors mounted on the
wheel rims to constantly monitor the
value of tyre pressure. The sensors
mounted on each wheel as part of the
valve stem transmit various information
of the tyres to the receiver module, in
order to calculate the pressure.
IMPORTANT Monitoring and
maintaining the correct pressure in all
four tyres are particularly important.
Tyre pressure monitoring system
low pressure warning
The system warns the driver if one or
more tyres are flat by switching on
the warning light
on the instrument
panel (together with a warning message
and an acoustic signal).The TPMS continues to advise the
driver of the low tyre pressure condition
until this is corrected; the warning
continues until the pressure
corresponds or exceeds the pressure
prescribed for the cold tyres. When the
tyre low pressure control warning
light
switches on constantly, the
inflation pressure must be adjusted until
it reaches the pressure prescribed for
cold tyres. After the automatic update
of the system, the tyre pressure control
warning light switches off. You may
need to drive the vehicle for about 20
minutes at a speed higher than 20
km/h to allow the TPMS to receive this
information.
IMPORTANT In the case of deflation of
more than one tyre sequentially, without
switching off and on the engine, from
the second tyre involved the acoustic
signal is not activated, only the
dedicated signal is shown on the
display.
To prevent the signal from being stored
in the event of pressure loss of a
subsequent tyre (with deactivation of
the acoustic signal), the ignition key
must be turned to MAR and then to
STOP, each time pressure is restored.
131
Page 138 of 298
Storing vehicle speed
Proceed as follows:
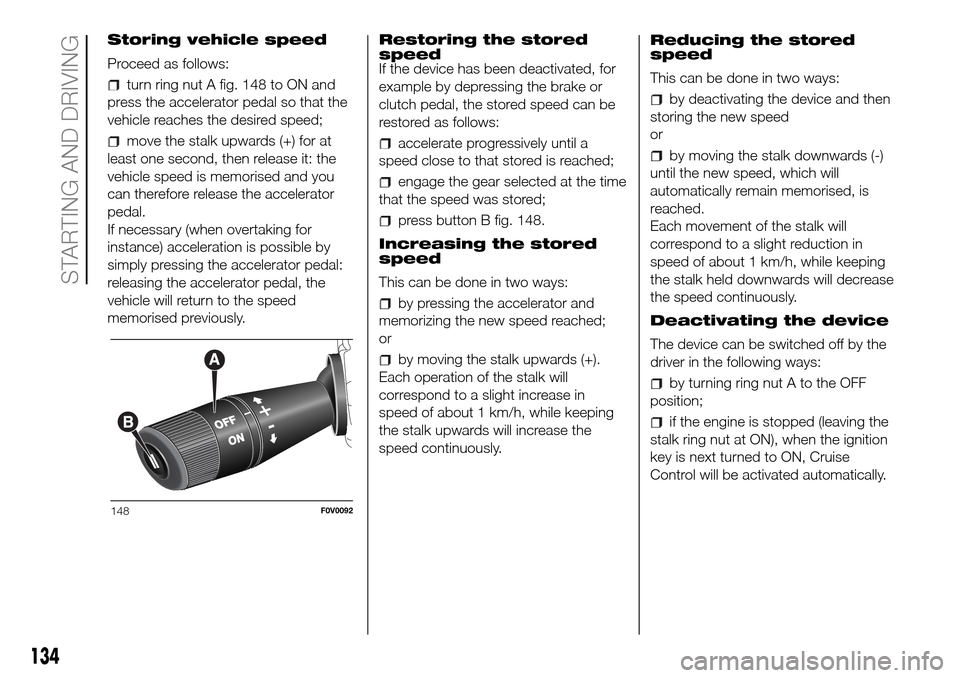
turn ring nut A fig. 148 to ON and
press the accelerator pedal so that the
vehicle reaches the desired speed;
move the stalk upwards (+) for at
least one second, then release it: the
vehicle speed is memorised and you
can therefore release the accelerator
pedal.
If necessary (when overtaking for
instance) acceleration is possible by
simply pressing the accelerator pedal:
releasing the accelerator pedal, the
vehicle will return to the speed
memorised previously.Restoring the stored
speed
If the device has been deactivated, for
example by depressing the brake or
clutch pedal, the stored speed can be
restored as follows:accelerate progressively until a
speed close to that stored is reached;
engage the gear selected at the time
that the speed was stored;
press button B fig. 148.
Increasing the stored
speed
This can be done in two ways:
by pressing the accelerator and
memorizing the new speed reached;
or
by moving the stalk upwards (+).
Each operation of the stalk will
correspond to a slight increase in
speed of about 1 km/h, while keeping
the stalk upwards will increase the
speed continuously.Reducing the stored
speed
This can be done in two ways:
by deactivating the device and then
storing the new speed
or
by moving the stalk downwards (-)
until the new speed, which will
automatically remain memorised, is
reached.
Each movement of the stalk will
correspond to a slight reduction in
speed of about 1 km/h, while keeping
the stalk held downwards will decrease
the speed continuously.
Deactivating the device
The device can be switched off by the
driver in the following ways:
by turning ring nut A to the OFF
position;
if the engine is stopped (leaving the
stalk ring nut at ON), when the ignition
key is next turned to ON, Cruise
Control will be activated automatically.
148F0V0092
134
STARTING AND DRIVING
Page 142 of 298
REFUELLING THE
VEHICLE
PETROL ENGINES
Only use unleaded petrol, with an
octane number (R.O.N.) not lower than
95.
IMPORTANT An inefficient catalytic
converter leads to harmful exhaust
emissions, thus contributing to air
pollution.
IMPORTANT Never use leaded petrol,
even in small amounts or in an
emergency, as this would damage the
catalytic converter beyond repair.
DIESEL ENGINES
Operation at low temperatures
If the outside temperature is very low,
the diesel thickens due to the formation
of paraffin clots with consequent
defective operation of the fuel supply
system.
In order to avoid these problems,
different types of diesel are distributed
according to the season: summer type,
winter type and arctic type (cold/
mountain areas). If refuelling with diesel
fuel whose specifications are not
suitable for the current temperature, it is
advisable to mix TUTELA DIESEL ART
additive in the proportions shown on
the container. Pour the additive into the
tank before the diesel fuel.When using or parking the vehicle for a
long time in the mountains or cold
areas, it is advisable to refuel using
locally available diesel fuel.
In this case, it is also advisable to keep
the tank over 50% full.
22)
FILLING THE TANK
To fill the tank completely, top up twice
after the first click of the fuel supply
gun. Further top ups could cause faults
in the fuel supply system.
FUEL TANK PLUG
Opening
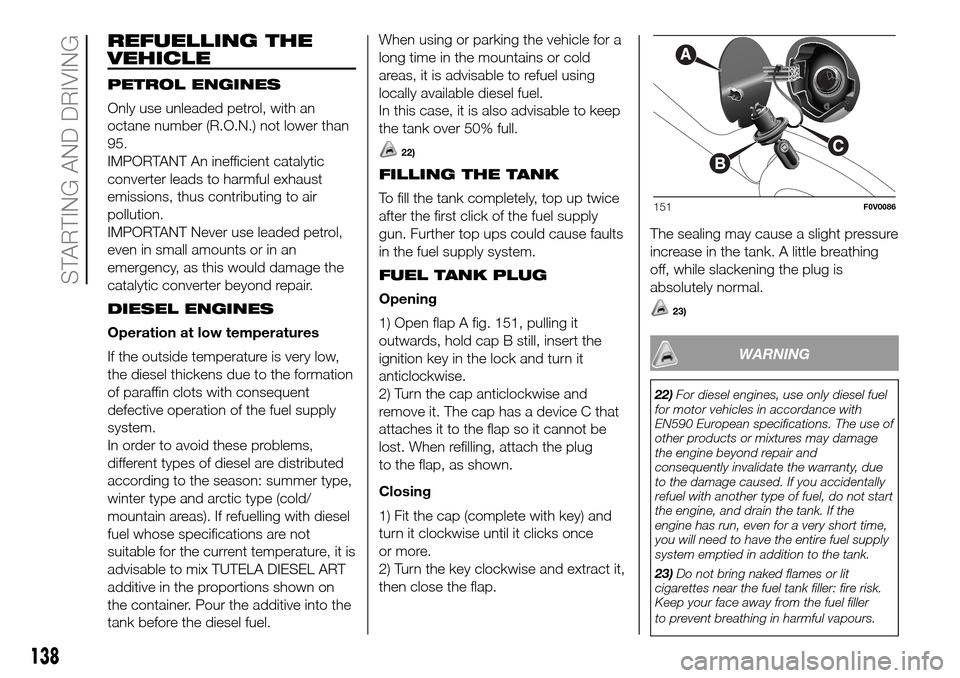
1) Open flap A fig. 151, pulling it
outwards, hold cap B still, insert the
ignition key in the lock and turn it
anticlockwise.
2) Turn the cap anticlockwise and
remove it. The cap has a device C that
attaches it to the flap so it cannot be
lost. When refilling, attach the plug
to the flap, as shown.
Closing
1) Fit the cap (complete with key) and
turn it clockwise until it clicks once
or more.
2) Turn the key clockwise and extract it,
then close the flap.The sealing may cause a slight pressure
increase in the tank. A little breathing
off, while slackening the plug is
absolutely normal.
23)
WARNING
22)For diesel engines, use only diesel fuel
for motor vehicles in accordance with
EN590 European specifications. The use of
other products or mixtures may damage
the engine beyond repair and
consequently invalidate the warranty, due
to the damage caused. If you accidentally
refuel with another type of fuel, do not start
the engine, and drain the tank. If the
engine has run, even for a very short time,
you will need to have the entire fuel supply
system emptied in addition to the tank.
23)Do not bring naked flames or lit
cigarettes near the fuel tank filler: fire risk.
Keep your face away from the fuel filler
to prevent breathing in harmful vapours.
151F0V0086
138
STARTING AND DRIVING
Page 148 of 298
HAZARD WARNING
LIGHTS
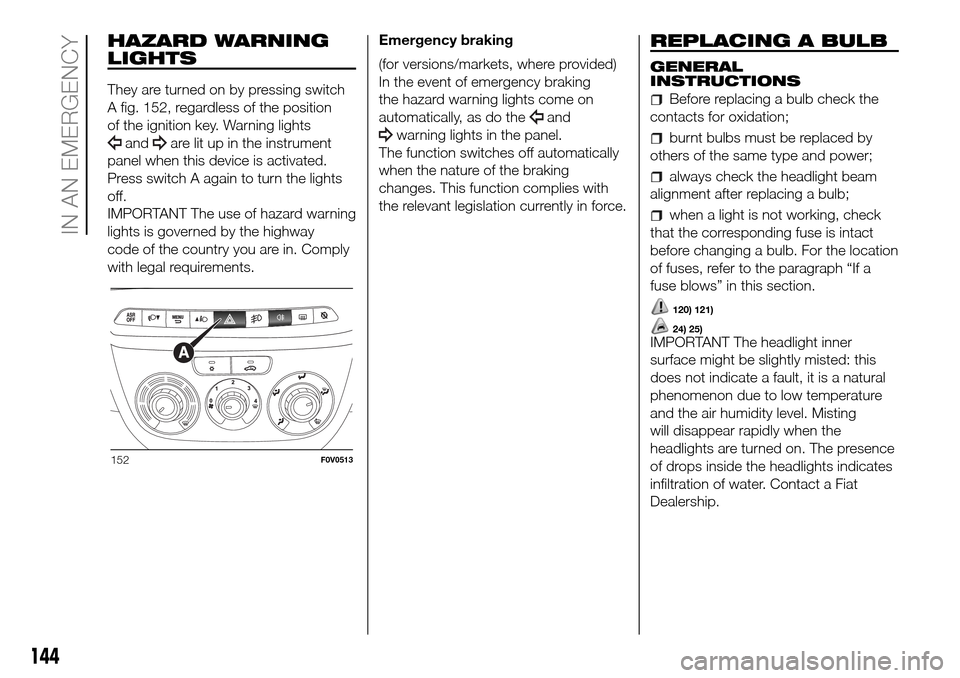
They are turned on by pressing switch
A fig. 152, regardless of the position
of the ignition key. Warning lights
andare lit up in the instrument
panel when this device is activated.
Press switch A again to turn the lights
off.
IMPORTANT The use of hazard warning
lights is governed by the highway
code of the country you are in. Comply
with legal requirements.Emergency braking
(for versions/markets, where provided)
In the event of emergency braking
the hazard warning lights come on
automatically, as do the
and
warning lights in the panel.
The function switches off automatically
when the nature of the braking
changes. This function complies with
the relevant legislation currently in force.
REPLACING A BULB
GENERAL
INSTRUCTIONS
Before replacing a bulb check the
contacts for oxidation;
burnt bulbs must be replaced by
others of the same type and power;
always check the headlight beam
alignment after replacing a bulb;
when a light is not working, check
that the corresponding fuse is intact
before changing a bulb. For the location
of fuses, refer to the paragraph “If a
fuse blows” in this section.
120) 121)
24) 25)IMPORTANT The headlight inner
surface might be slightly misted: this
does not indicate a fault, it is a natural
phenomenon due to low temperature
and the air humidity level. Misting
will disappear rapidly when the
headlights are turned on. The presence
of drops inside the headlights indicates
infiltration of water. Contact a Fiat
Dealership.
152F0V0513
144
IN AN EMERGENCY
Page 161 of 298
DEVICE PROTECTED FUSE AMPERE
Heated driver seatF1 10
Heated passenger seatF2 10
Cigar lighterF3 15
Third power socket on dashboard F4 20
Driver's side rear electric window F5 20
Passenger's side rear electric window F6 20
WARNING
26)Never replace a blown fuse with metal wires or other material.
27)If you need to wash the engine compartment, take care not to directly hit the fuse box and the window wiper motors with the water jet.
WARNING
122)If the replaced fuse blows again, contact a Fiat Dealership.
123)Never replace a fuse with another with a higher amp rating; DANGER OF FIRE. If a general protection fuse (MEGA-FUSE, MIDI-FUSE) is
activated, contact a Fiat Dealership. Before replacing a fuse, make sure that the ignition key has been removed and that all the other services
are switched off and/or disengaged.
124)Contact a Fiat Dealership if a safety system (airbags, brakes), engine system (engine, gearbox) or steering system general protection
fuse blows.
157
Page 170 of 298
IMPORTANT Remember that the brake
booster and the electric power steering
system are not active until the engine
is started, so you will need to apply
much more force to the brake pedal or
steering wheel.
WARNING
29)Never use a fast battery-charger for
emergency starting of the engine as this
could damage the electronic systems
of your vehicle, particularly the ignition and
fuel supply control units.
WARNING
131)This procedure must be performed by
qualified personnel as incorrect actions
may cause high-intensity electrical
discharge. Furthermore, battery fluid is
poisonous and corrosive: avoid contact
with skin and eyes. Keep naked flames
away from the battery. No smoking. Do not
cause sparks.
FUEL CUT-OFF
SYSTEM
This intervenes in the case of an impact
causing:
the fuel supply cut-off with the
engine consequently switching off;
the automatic unlocking of the
doors;
the switching on of the interior lights;
switching on of the hazard warning
lights (to deactivate the lights press
the dedicated button on the
dashboard).
132)When the system has been triggered,
the message “Fuel cut off, see
handbook” is displayed on some
versions.
Check carefully for fuel leaks, for
instance in the engine compartment,
under the vehicle or near the tank area.
After a collision, turn the ignition key
to STOP to prevent the battery from
running down.
The following procedure should be
carried out to restore the correct
operation of the vehicle:
turn the ignition key to the MAR
position;
activate the right direction indicator;
deactivate the right direction
indicator;
activate the left direction indicator;
deactivate the left direction indicator;
activate the right direction indicator;
deactivate the right direction
indicator;
activate the left direction indicator;
deactivate the left direction indicator;
turn the ignition key to the OFF
position.
WARNING
132)If, after an impact, you smell fuel or
notice leaks from the fuel supply system,
do not reactivate the system to avoid
the risk of fire.
166
IN AN EMERGENCY
Page 171 of 298
LIFTING THE
VEHICLE
If the vehicle needs to be lifted, go to a
Fiat Dealership which is equipped
with the arm hoist or workshop lift.
TOWING THE
VEHICLE
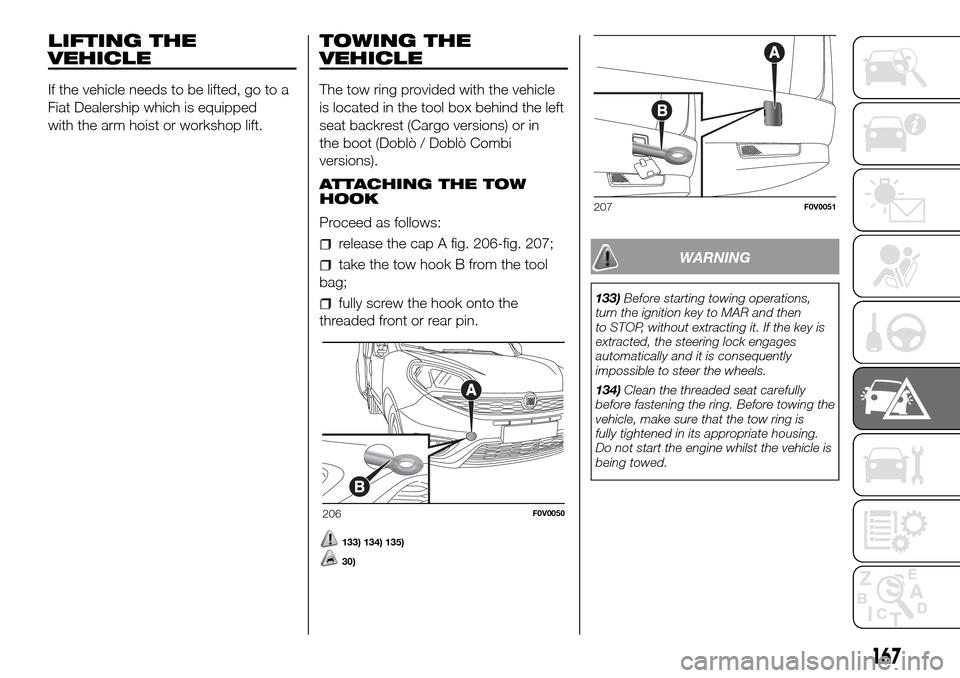
The tow ring provided with the vehicle
is located in the tool box behind the left
seat backrest (Cargo versions) or in
the boot (Doblò / Doblò Combi
versions).
ATTACHING THE TOW
HOOK
Proceed as follows:
release the cap A fig. 206-fig. 207;
take the tow hook B from the tool
bag;
fully screw the hook onto the
threaded front or rear pin.
133) 134) 135)
30)
WARNING
133)Before starting towing operations,
turn the ignition key to MAR and then
to STOP, without extracting it. If the key is
extracted, the steering lock engages
automatically and it is consequently
impossible to steer the wheels.
134)Clean the threaded seat carefully
before fastening the ring. Before towing the
vehicle, make sure that the tow ring is
fully tightened in its appropriate housing.
Do not start the engine whilst the vehicle is
being towed.
206F0V0050
207F0V0051
167
Page 201 of 298
To correctly wash the vehicle, proceed
as follows:
wash the bodywork using a low
pressure jet of water;
wipe a sponge with a slightly soapy
solution over the bodywork, frequently
rinsing the sponge;
rinse well with water and dry with a
jet of air or a chamois.
If you put the vehicle through a car
wash, follow these recommendations:
– remove the aerial from the roof so
it does not get damaged;
– water added to a soapy solution
should be used for washing;
– rinse thoroughly to avoid soap marks
staying on the bodywork or less visible
parts.
39)Dry the less visible parts with special
care, such as the door frames, bonnet
and the headlight frames, where water
may stagnate more easily. It is a good
idea to leave the vehicle outdoors
for a while after washing it to give water
time to evaporate.
Do not wash the vehicle after it has
been left in the sun or with the bonnet
hot: this may alter the shine of the
paintwork.Exterior plastic parts should be cleaned
in the same way as the rest of the
vehicle. Where possible, do not park
the vehicle under trees; the resinous
substances released by many species
give the paint a dull appearance and
increase the possibility of corrosion.
IMPORTANT Bird droppings should be
washed off immediately and thoroughly
as the acid they contain is particularly
aggressive.
5)
Windows
To clean glasses, use specific cleaning
products. Use clean cloths to avoid
scratching the glass or damaging the
transparency.
IMPORTANT Wipe the inside surface of
the rear window gently with a cloth in
the direction of the filaments to avoid
damaging the heater coils.
Engine compartment
At the end of each winter, thoroughly
wash the engine compartment, taking
care to avoid spraying the water jet
directly onto the electronic control units
and the relay/fuse box on the left side
of the engine compartment (driving
direction). Have this operation
performed at a specialised workshop.IMPORTANT The washing should take
place with the engine cold and the
ignition key in the STOP position. After
the washing operation, make sure
that the various protections (e.g. rubber
caps and guards) have not been
removed or damaged.
Headlights
IMPORTANT Never use aromatic
substances (e.g. petrol) or ketones (e.g.
acetone) for cleaning the plastic lenses
of the front headlights.
WARNING
39)Some car washes with old-style blades
and/or in a poor state of repair can
damage the paintwork, facilitating the
formation of lines that give the paint
a dull/misty appearance, especially on dark
colours. If this happens, lightly polish the
paintwork with appropriate products.
WARNING
5)Detergents cause water pollution. The
vehicle should be washed in areas
equipped for collecting and purifying the
liquid used in the washing process.
197