Date FIAT DOBLO COMBI 2016 2.G Owners Manual
[x] Cancel search | Manufacturer: FIAT, Model Year: 2016, Model line: DOBLO COMBI, Model: FIAT DOBLO COMBI 2016 2.GPages: 298, PDF Size: 25.92 MB
Page 6 of 298
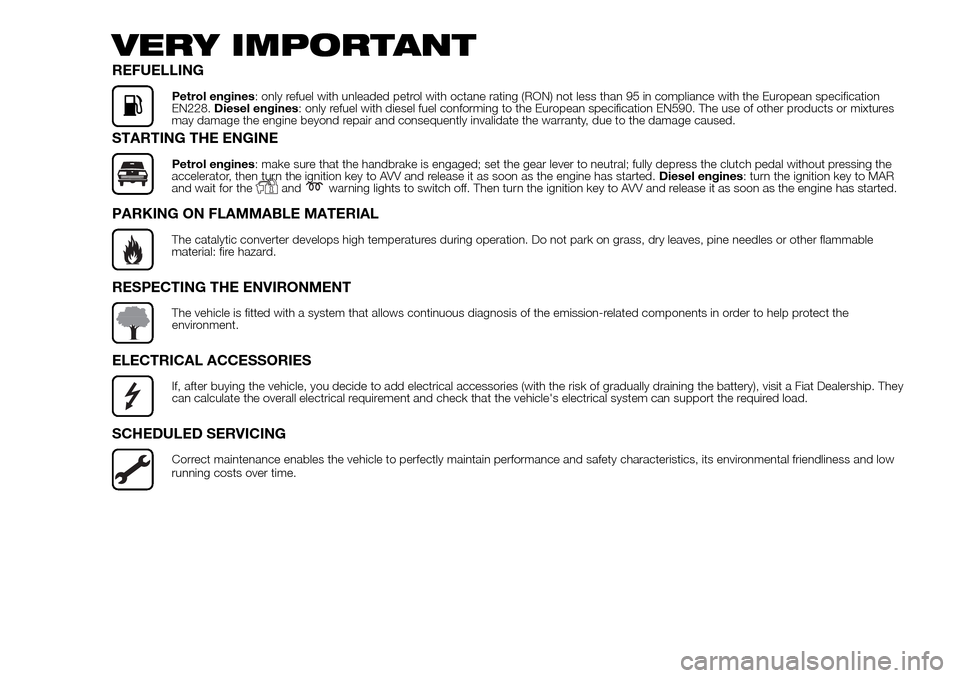
VERY IMPORTANT
REFUELLING
Petrol engines: only refuel with unleaded petrol with octane rating (RON) not less than 95 in compliance with the European specification
EN228.Diesel engines: only refuel with diesel fuel conforming to the European specification EN590. The use of other products or mixtures
may damage the engine beyond repair and consequently invalidate the warranty, due to the damage caused.
STARTING THE ENGINE
Petrol engines: make sure that the handbrake is engaged; set the gear lever to neutral; fully depress the clutch pedal without pressing the
accelerator, then turn the ignition key to AVV and release it as soon as the engine has started.Diesel engines: turn the ignition key to MAR
and wait for the
andwarning lights to switch off. Then turn the ignition key to AVV and release it as soon as the engine has started.
PARKING ON FLAMMABLE MATERIAL
The catalytic converter develops high temperatures during operation. Do not park on grass, dry leaves, pine needles or other flammable
material: fire hazard.
RESPECTING THE ENVIRONMENT
The vehicle is fitted with a system that allows continuous diagnosis of the emission-related components in order to help protect the
environment.
ELECTRICAL ACCESSORIES
If, after buying the vehicle, you decide to add electrical accessories (with the risk of gradually draining the battery), visit a Fiat Dealership. They
can calculate the overall electrical requirement and check that the vehicle's electrical system can support the required load.
SCHEDULED SERVICING
Correct maintenance enables the vehicle to perfectly maintain performance and safety characteristics, its environmental friendliness and low
running costs over time.
Page 77 of 298
Adjusting the buzzer
volume (bUZZ)
This function is used to adjust the
volume of the audible signal (buzzer)
that sounds in the event of failure/
warning indications and when
the MENU ESC,
andbuttons are
pressed.
To set the desired volume, proceed as
follows:
- press theMENU
button briefly:
the display will show the wording
(bUZZ);
- press
orto select the required
volume (adjustable over 8 levels).
- press theMENU
button briefly to
return to the menu screen or hold the
button down to return to the standard
screen without storing.
Activation/Deactivation
of passenger side front
and chest/head side
protection (side bags)
airbags (BAG P)
(for versions/markets, where
provided)
This function allows the passenger side
airbag to be activated/deactivated.
Proceed as follows:
- press theMENU
button and, after
the message BAG P OFF (to
deactivate) or BAG P On (to activate) is
displayed by pressing buttons
or
, pressMENUagain;- a confirmation message will appear
on the display;
- press the
orbuttons to select
(YES) (confirming activation/
deactivation) or (no) (to abort);
- press theMENU
button briefly: a
message confirming the selection will
be displayed and you will return to
the menu screen or, pressing the button
for longer, you will return to the
standard screen without saving.
Daytime running lights
(DRL)
This function allows you to activate/
deactivate the daytime running lights.
Proceed as follows to activate or
deactivate this function:
- press theMENU
button briefly:
the display will show the wording DRL;
- press the
orbutton to activate
(On) or deactivate (Off) the daytime
running lights;
- press theMENU
button briefly to
return to the submenu screen or hold
the button down to return to the main
menu screen without saving;
MULTIFUNCTION
DISPLAY
(for versions/markets, where provided)
The vehicle may be equipped with a
multifunction display that gives the
driver useful information depending on
the previous settings.
STANDARD SCREEN
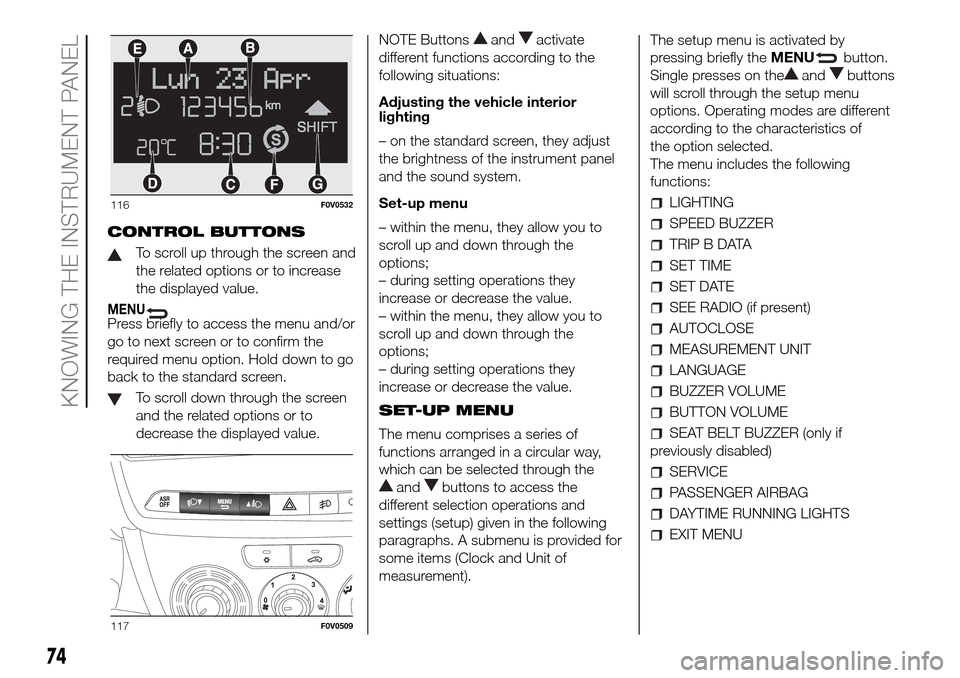
The standard screen fig. 116 can
display the following information:
ADate
BMilometer (distance covered in km or
miles).
CTime (always displayed, even with the
key extracted and the front doors
closed).
DOutside temperature.
EHeadlamp alignment position (only
with dipped headlamps on).
FStart&Stop function indication (for
versions/markets, where provided).
GGear Shift Indication (for versions/
markets, where provided).
NoteWhen one of the front doors is
opened, the display is activated,
showing the time and mileage for a few
seconds.
73
Page 78 of 298
CONTROL BUTTONS
To scroll up through the screen and
the related options or to increase
the displayed value.
MENUPress briefly to access the menu and/or
go to next screen or to confirm the
required menu option. Hold down to go
back to the standard screen.
To scroll down through the screen
and the related options or to
decrease the displayed value.NOTE Buttons
andactivate
different functions according to the
following situations:
Adjusting the vehicle interior
lighting
– on the standard screen, they adjust
the brightness of the instrument panel
and the sound system.
Set-up menu
– within the menu, they allow you to
scroll up and down through the
options;
– during setting operations they
increase or decrease the value.
– within the menu, they allow you to
scroll up and down through the
options;
– during setting operations they
increase or decrease the value.
SET-UP MENU
The menu comprises a series of
functions arranged in a circular way,
which can be selected through the
andbuttons to access the
different selection operations and
settings (setup) given in the following
paragraphs. A submenu is provided for
some items (Clock and Unit of
measurement).The setup menu is activated by
pressing briefly theMENU
button.
Single presses on the
andbuttons
will scroll through the setup menu
options. Operating modes are different
according to the characteristics of
the option selected.
The menu includes the following
functions:
LIGHTING
SPEED BUZZER
TRIP B DATA
SET TIME
SET DATE
SEE RADIO (if present)
AUTOCLOSE
MEASUREMENT UNIT
LANGUAGE
BUZZER VOLUME
BUTTON VOLUME
SEAT BELT BUZZER (only if
previously disabled)
SERVICE
PASSENGER AIRBAG
DAYTIME RUNNING LIGHTS
EXIT MENU
116F0V0532
117F0V0509
74
KNOWING THE INSTRUMENT PANEL
Page 80 of 298
– press buttonMENUbriefly to
return to the menu screen or hold the
button down to return to the standard
screen without storing.
Trip B data (Activating
Trip B)
This function can be used to activate
(On) or deactivate (Off) the Trip B
display (partial trip).
For more information see the "Trip
computer" section.
Proceed as follows to switch the
function on/off:
– press theMENU
button briefly to
make the display flash On or Off
according to the previous setting;
– press the
orbutton to select;
– press theMENU
button briefly to
return to the menu screen or hold the
button down to return to the standard
screen without storing.
Set Time (Setting the
clock)
This function enables the clock to be
set through two submenus: "Time" and
"Format".
To carry out the adjustment, proceed as
follows:
– briefly pressMENU
; the display
will show the two sub-menus “Time”
and “Mode”;
– press the
orbutton to switch
between the two submenus;– select the required option and then
pressMENU
briefly;
– if selecting the “Time” submenu,
briefly pressMENU
, the “hours”
will flash on the display;
– press the
orbutton to make the
adjustment;
– briefly press theMENU
button;
the “minutes” will flash on the display;
– press the
orbutton for setting.
NOTE The setting will increase or
decrease by one unit each time the
orbutton is pressed. Hold down
the button to increase/decrease the
setting rapidly and automatically.
Complete the adjustment with single
presses of the button when you
approach the desired value.
– when you select “Mode”, pressing the
MENU
button makes the mode
flash on the display;
– press the
orbutton to select
"24h" or "12h".
When you have made the required
settings, press theMENU
button
briefly to go back to the submenu
screen or hold the button down to go
back to the main menu screen without
saving.
– hold theMENU
button down
again to return to the standard screen
or to the main menu according to
where you are in the menu.Set Date (Setting the
date)
Using this function you can update the
date (day - month - year).
Proceed as follows to update:
– briefly press theMENU
button:
“year” will flash on the display;
– press the
orbutton to make the
adjustment;
– briefly press theMENU
button:
"month" will flash on the display;
– press the
orbutton to make the
adjustment;
– briefly press theMENU
button:
“day” will flash on the display;
– press the
orbutton for setting.
NOTE The setting will increase or
decrease by one unit each time the
orbutton is pressed. Hold down
the button to increase/decrease the
setting rapidly and automatically.
Complete the adjustment with single
presses of the button when you
approach the desired value.
– press theMENU
button briefly to
return to the menu screen or hold the
button down to return to the standard
screen without storing.
76
KNOWING THE INSTRUMENT PANEL
Page 84 of 298
TRIP COMPUTER
IN BRIEF
The Trip computer is used to display
information on vehicle operation
when the ignition key is turned to
MAR. This function allows you to
define two separate trips, called "Trip
A" and "Trip B", for monitoring the
"complete mission" (journey) of
the vehicle in a reciprocally
independent manner. Both functions
can be reset (reset means start of
a new journey).
"Trip A" can be used to display the
values relating to:
External temperature
Range
Distance travelled A
Average consumption A
Instant consumption
Average speed A
Trip time A (driving time)
Reset Trip A
"Trip B", available on multifunction
display only, is used to display
the values relating to:
Distance travelled B
Average consumption B
Average speed B
Trip time B (driving time)
Trip B reset
11)
Values displayed
External temperature
Indicates the temperature outside the
vehicle passenger compartment.
Range (for versions/markets, where
provided)
This indicates the distance that can still
be travelled with the fuel in the tank,
assuming that driving style remains
unvaried. The display will show the
reading "----"when the following
events take place:
range is lower than 50 km (or
corresponding figure in mi)
vehicle is left parked with the engine
running for a long time
IMPORTANT The range can be affected
by several factors: driving style (see
paragraph “Driving style” in the
“Starting and driving” section), type of
route (motorway, towns and cities,
mountain roads, etc…), usage
conditions (load, tyre pressures, etc…).
Trip planning must therefore take the
above into account.Distance travelled
This value shows the distance travelled
from the start of the new journey.
Average consumption (for versions/
markets, where provided)
This value shows the approximate
average fuel consumption from the start
of the new journey.
Instant consumption (for versions/
markets where provided)
This value shows the fuel consumption.
The value is constantly updated. The
display will show "----"ifthevehicle is
parked with the engine running.
Average speed
This value shows the vehicle's average
speed based on the overall time
elapsed since the start of the new
journey.
80
KNOWING THE INSTRUMENT PANEL
Page 92 of 298
Warning lights on
panelWhat it means What to do
redINCOMPLETE DOOR LOCKING
On certain versions, the warning light turns on when one or more doors or the
boot are not properly closed.
A buzzer will sound when doors/tailgate are open and the vehicle is moving.
WARNING
48)If thewarning light does not switch on when the key is turned to MAR or if it stays on when driving (together with the message on the
display), there may be a fault in the restraint systems; in this case, the airbags or pretensioners may not deploy in the event of an accident
or, in a lower number of cases, they could deploy erroneously. Before continuing, contact a Fiat Dealership to have the system checked
immediately.
49)Failure of the
warning light is indicated by thewarning light coming on. In this case, thewarning light may not indicate a fault in
the restraint systems. Before continuing, contact a Fiat Dealership to have the system checked immediately.
50)Deteriorated engine oil must be replaced as soon as possible after the
warning light comes on, and never more than 500 km after it
first switches on. Failure to observe the above indications may result in severe damage to the engine and invalidate the warranty. Remember
that when this warning light comes on, it does not mean that the level of engine oil is low, so if it flashes you do not need to top up the engine
oil.
51)If the
warning light flashes when driving, contact a Fiat Dealership.
88
KNOWING THE INSTRUMENT PANEL
Page 110 of 298
SBR SYSTEM
This system consists of a device which,
through the
warning light coming
on the instrument panel and,
depending on vehicle conditions, an
acoustic signal, warns the driver and
front passenger if their seat belts have
not been fastened (for versions where
provided).
If the driver side and/or the passenger
side seat belts are not fastened (with
passenger seated), when 20 km/h
is exceeded or when travelling at
a speed between 10 and 20 km/h for
longer than 5 seconds, an acoustic
signal sequence will be started
(continuous acoustic signal for the first
6 seconds followed by about 90
seconds of intermittent beeping and the
warning light will flash).
At the end of the cycle the
warning
light will stay on fixed until the engine is
switched off or the seat belts are
fastened.
For permanent deactivation, contact a
Fiat Dealership.
The SBR system can also be
reactivated through the setup menu.
PRE-TENSIONERS
To increase the protective efficiency of
the front seat belts, the vehicle is fitted
with pretensioners. These devices, in
the event of a violent head-on crash or
side impact, rewind the seat belts a
few centimetres. In this way, they
ensure that the belts fit tightly to the
wearer before the restraining action
begins.
IMPORTANT To obtain the highest
degree of protection from the action of
the pretensioner, wear the seat belt
tight to the chest and pelvis.
A slight discharge of smoke may be
produced during the activation of the
pretensioner which is not harmful and
does not involve any fire hazard.
The pretensioner does not require any
maintenance or lubrication. Anything
that modifies its original conditions
invalidates its efficiency. If, due to
unusual natural events (floods, sea
storms, etc.), the device has been
affected by water and mud, it must
absolutely be replaced.
65)
16)
LOAD LIMITERS
(for versions/markets, where provided)
To increase passenger safety, the
front and rear seat belt retractors (for
versions/markets where provided)
contain a load limiter which controls the
force acting on the chest and
shoulders during the belt restraining
action in the event of a frontal collision.
GENERAL WARNINGS
FOR USING THE SEAT
BELTS
The driver is responsible for respecting
(and ensuring that all the other
passengers also respect) the local laws
in force regarding the use of seat belts.
Always fasten the seat belts before
setting off.
Seat belts must also be worn by
pregnant mothers: the risk of injury in
the event of an accident is greatly
reduced for them and the unborn child
if they are wearing a seat belt. Pregnant
women must position the lower part
of the belt very low down so that it
passes over the pelvis and under the
abdomen (see fig. 124).
106
SAFETY
Page 135 of 298
The TPMS does not replace the
normal tyre maintenance service and
does not indicate any fault in a tyre.
Therefore, the TPMS should not be
used as pressure switch while adjusting
the tyre inflation pressure.
Driving with insufficient tyre pressure
causes their overheating and can
result in tyre failure. The low inflation
pressure reduces fuel efficiency and
tyre tread life and may also affect
handling and braking performance of
the vehicle.
The TPMS does not replace the
correct tyre maintenance. It is up to the
driver to maintain the correct tyre
pressure level measuring it with
a suitable pressure switch. This is
necessary even if the decrease in the
inflation pressure value does not cause
the tyre pressure control warning light
to switch on.
The TPMS warns the driver of any
condition of insufficient tyre pressure
If this drops below the insufficient
pressure limit for any reason including
low temperature and normal pressure
loss of the tyre.
The seasonal temperature changes
affect tyre pressure.The TPMS uses wireless devices with
electronic sensors mounted on the
wheel rims to constantly monitor the
value of tyre pressure. The sensors
mounted on each wheel as part of the
valve stem transmit various information
of the tyres to the receiver module, in
order to calculate the pressure.
IMPORTANT Monitoring and
maintaining the correct pressure in all
four tyres are particularly important.
Tyre pressure monitoring system
low pressure warning
The system warns the driver if one or
more tyres are flat by switching on
the warning light
on the instrument
panel (together with a warning message
and an acoustic signal).The TPMS continues to advise the
driver of the low tyre pressure condition
until this is corrected; the warning
continues until the pressure
corresponds or exceeds the pressure
prescribed for the cold tyres. When the
tyre low pressure control warning
light
switches on constantly, the
inflation pressure must be adjusted until
it reaches the pressure prescribed for
cold tyres. After the automatic update
of the system, the tyre pressure control
warning light switches off. You may
need to drive the vehicle for about 20
minutes at a speed higher than 20
km/h to allow the TPMS to receive this
information.
IMPORTANT In the case of deflation of
more than one tyre sequentially, without
switching off and on the engine, from
the second tyre involved the acoustic
signal is not activated, only the
dedicated signal is shown on the
display.
To prevent the signal from being stored
in the event of pressure loss of a
subsequent tyre (with deactivation of
the acoustic signal), the ignition key
must be turned to MAR and then to
STOP, each time pressure is restored.
131
Page 141 of 298
OPERATION WITH
TRAILER
Parking sensor operation is
automatically deactivated when the
electric cable plug of the trailer is
inserted into the vehicle tow hook
socket. The sensors are automatically
reactivated when the trailer's cable plug
is removed.
IMPORTANT
If you wish to leave the tow hook fitted
without towing a trailer, it is advisable to
contact a Fiat Dealership for the
relevant system update operations
because the tow hook could be
detected as an obstacle by the central
sensors.
GENERAL WARNINGS
115)
When parking, take the utmost care
over obstacles that may be above or
under the sensor.
Sometimes, objects located very
near the rear of the vehicle are not
detected and could therefore damage
the vehicle or be damaged themselves.
The following conditions may influence
the performance of the parking
assistance system:
Reduced sensor sensitivity and a
reduction in the parking assistance
system performance could be due to
the presence on the surface of the
sensor of: ice, snow, mud, thick paint.
The sensor may detect a non-
existent obstacle (echo noise) due to
mechanical noises, for example when
washing the vehicle, in case of rain,
strong wind, hail.
The signals sent out by the sensors
can be altered by dirt, snow or ice
deposited on the sensors or by
ultrasound systems (e.g. truck
pneumatic brakes or pneumatic drills)
near the vehicle.
The performance of the parking
assistance system may also be affected
by the position of the sensors. For
example by a change in the ride setting
(caused by the wear of the shock
absorbers, suspension), changing the
tyres, overloading the vehicle and
carrying out specific tuning operations
that require the vehicle to be lowered.
Detection of obstacles in the upper
part of the vehicle (particularly in the
case of vans or chassis cabs) may not
be guaranteed because the system
detects obstacles that could strike the
lower part of the vehicle.
The parking sensors work properly
with the swing doors closed.
If they are open, they can cause the
system to send false signals: always
close the rear doors.
Do not apply stickers to the sensors.
WARNING
114)The sensors must be clean of mud,
dirt, snow and ice in order for the system
to work. Be careful not to scratch or
damage the sensors while cleaning them.
Avoid using dry, rough or hard cloths.
The sensors must be washed using clean
water, with the addition of car shampoo
if necessary. When using special washing
equipment such as high pressure jets or
steam cleaning, clean the sensors very
quickly keeping the jet more than 10 cm
away.
115)Parking manoeuvres, however, are
always the driver’s responsibility. While
carrying out these manoeuvres, always
make sure that no people (especially
children) or animals are in the area
concerned. The parking sensor is designed
to assist drivers, who must still never
allow their attention to lapse during
potentially dangerous manoeuvres even if
performed at low speed.
137
Page 142 of 298
REFUELLING THE
VEHICLE
PETROL ENGINES
Only use unleaded petrol, with an
octane number (R.O.N.) not lower than
95.
IMPORTANT An inefficient catalytic
converter leads to harmful exhaust
emissions, thus contributing to air
pollution.
IMPORTANT Never use leaded petrol,
even in small amounts or in an
emergency, as this would damage the
catalytic converter beyond repair.
DIESEL ENGINES
Operation at low temperatures
If the outside temperature is very low,
the diesel thickens due to the formation
of paraffin clots with consequent
defective operation of the fuel supply
system.
In order to avoid these problems,
different types of diesel are distributed
according to the season: summer type,
winter type and arctic type (cold/
mountain areas). If refuelling with diesel
fuel whose specifications are not
suitable for the current temperature, it is
advisable to mix TUTELA DIESEL ART
additive in the proportions shown on
the container. Pour the additive into the
tank before the diesel fuel.When using or parking the vehicle for a
long time in the mountains or cold
areas, it is advisable to refuel using
locally available diesel fuel.
In this case, it is also advisable to keep
the tank over 50% full.
22)
FILLING THE TANK
To fill the tank completely, top up twice
after the first click of the fuel supply
gun. Further top ups could cause faults
in the fuel supply system.
FUEL TANK PLUG
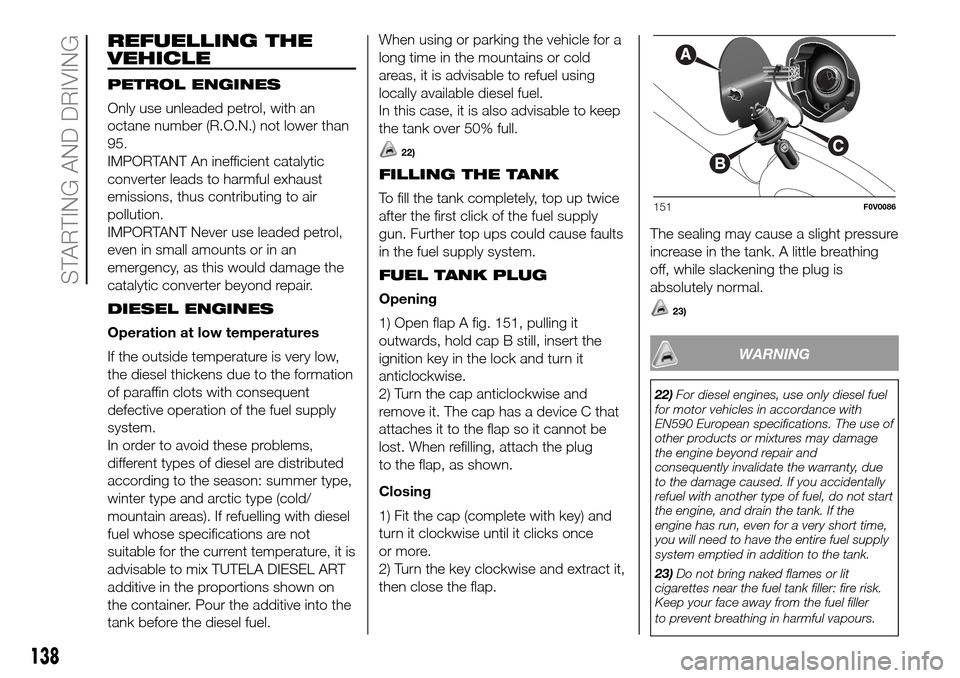
Opening
1) Open flap A fig. 151, pulling it
outwards, hold cap B still, insert the
ignition key in the lock and turn it
anticlockwise.
2) Turn the cap anticlockwise and
remove it. The cap has a device C that
attaches it to the flap so it cannot be
lost. When refilling, attach the plug
to the flap, as shown.
Closing
1) Fit the cap (complete with key) and
turn it clockwise until it clicks once
or more.
2) Turn the key clockwise and extract it,
then close the flap.The sealing may cause a slight pressure
increase in the tank. A little breathing
off, while slackening the plug is
absolutely normal.
23)
WARNING
22)For diesel engines, use only diesel fuel
for motor vehicles in accordance with
EN590 European specifications. The use of
other products or mixtures may damage
the engine beyond repair and
consequently invalidate the warranty, due
to the damage caused. If you accidentally
refuel with another type of fuel, do not start
the engine, and drain the tank. If the
engine has run, even for a very short time,
you will need to have the entire fuel supply
system emptied in addition to the tank.
23)Do not bring naked flames or lit
cigarettes near the fuel tank filler: fire risk.
Keep your face away from the fuel filler
to prevent breathing in harmful vapours.
151F0V0086
138
STARTING AND DRIVING