handbrake FIAT DOBLO COMBI 2016 2.G Owners Manual
[x] Cancel search | Manufacturer: FIAT, Model Year: 2016, Model line: DOBLO COMBI, Model: FIAT DOBLO COMBI 2016 2.GPages: 298, PDF Size: 25.92 MB
Page 6 of 298
VERY IMPORTANT
REFUELLING
Petrol engines: only refuel with unleaded petrol with octane rating (RON) not less than 95 in compliance with the European specification
EN228.Diesel engines: only refuel with diesel fuel conforming to the European specification EN590. The use of other products or mixtures
may damage the engine beyond repair and consequently invalidate the warranty, due to the damage caused.
STARTING THE ENGINE
Petrol engines: make sure that the handbrake is engaged; set the gear lever to neutral; fully depress the clutch pedal without pressing the
accelerator, then turn the ignition key to AVV and release it as soon as the engine has started.Diesel engines: turn the ignition key to MAR
and wait for the
andwarning lights to switch off. Then turn the ignition key to AVV and release it as soon as the engine has started.
PARKING ON FLAMMABLE MATERIAL
The catalytic converter develops high temperatures during operation. Do not park on grass, dry leaves, pine needles or other flammable
material: fire hazard.
RESPECTING THE ENVIRONMENT
The vehicle is fitted with a system that allows continuous diagnosis of the emission-related components in order to help protect the
environment.
ELECTRICAL ACCESSORIES
If, after buying the vehicle, you decide to add electrical accessories (with the risk of gradually draining the battery), visit a Fiat Dealership. They
can calculate the overall electrical requirement and check that the vehicle's electrical system can support the required load.
SCHEDULED SERVICING
Correct maintenance enables the vehicle to perfectly maintain performance and safety characteristics, its environmental friendliness and low
running costs over time.
Page 20 of 298
2) 3)
WARNING
1)Press button B only with the key away
from your body, specifically from your eyes
and from objects which could get
damaged (e.g. your clothes). Do not leave
the key unattended to prevent people,
especially children, from inadvertently
pressing the button.
2)Once the dead lock system is engaged it
is impossible to open the doors from
inside the vehicle. Therefore, before
engaging the system check that there is no
one left inside.
3)If the remote control battery is flat, the
system can only be turned on by inserting
the metal key in the door lock: in this case,
the device remains active for the rear
doors only.
WARNING
1)Used batteries are harmful to the
environment. You can dispose of them
either in the correct containers as specified
by law or by taking them to a Fiat
Dealership, which will deal with their
disposal.
IGNITION DEVICE
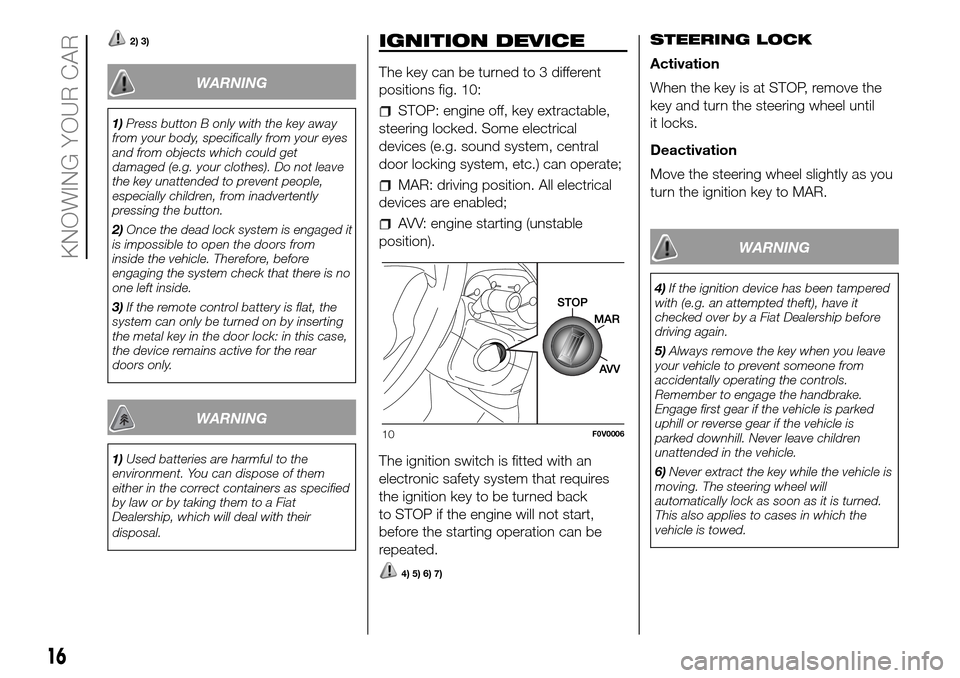
The key can be turned to 3 different
positions fig. 10:
STOP: engine off, key extractable,
steering locked. Some electrical
devices (e.g. sound system, central
door locking system, etc.) can operate;
MAR: driving position. All electrical
devices are enabled;
AVV: engine starting (unstable
position).
The ignition switch is fitted with an
electronic safety system that requires
the ignition key to be turned back
to STOP if the engine will not start,
before the starting operation can be
repeated.
4) 5) 6) 7)
STEERING LOCK
Activation
When the key is at STOP, remove the
key and turn the steering wheel until
it locks.
Deactivation
Move the steering wheel slightly as you
turn the ignition key to MAR.
WARNING
4)If the ignition device has been tampered
with (e.g. an attempted theft), have it
checked over by a Fiat Dealership before
driving again.
5)Always remove the key when you leave
your vehicle to prevent someone from
accidentally operating the controls.
Remember to engage the handbrake.
Engage first gear if the vehicle is parked
uphill or reverse gear if the vehicle is
parked downhill. Never leave children
unattended in the vehicle.
6)Never extract the key while the vehicle is
moving. The steering wheel will
automatically lock as soon as it is turned.
This also applies to cases in which the
vehicle is towed.
10F0V0006
16
KNOWING YOUR CAR
Page 71 of 298
KNOWING THE INSTRUMENT PANEL
This section of the booklet gives you all
the information you need to
understand, interpret and use the
instrument panel correctly.CONTROL PANEL AND
ON-BOARD INSTRUMENTS ........... 68
DIGITAL DISPLAY............................ 70
MULTIFUNCTION DISPLAY ............. 73
TRIP COMPUTER ........................... 80
EOBD SYSTEM............................... 82
WARNING LIGHTS AND
MESSAGES .................................... 83
- LOW BRAKE FLUID/HANDBRAKE
ENGAGED .......................................... 83
- EBD FAILURE .................................. 84
- AIRBAG FAILURE ............................. 84
- SEAT BELTS NOT FASTENED .......... 85
- ENGINE COOLANT TEMPERATURE
TOO HIGH .......................................... 85
- LOW BATTERY CHARGE ................. 86
- LOW ENGINE OIL PRESSURE ......... 87
-ENGINE OIL DETERIORATED ........... 87
-LOW ENGINE OIL LEVEL .................. 87
-INCOMPLETE DOOR LOCKING ........ 88
- INJECTION/EOBD SYSTEM
FAILURE ............................................. 89
- ABS FAILURE ................................... 90
-FUEL RESERVE ................................ 90
- GLOW PLUG PREHEATING/GLOW
PLUG PREHEATING FAILURE ............ 91
- WATER IN DIESEL FILTER ................ 91
-VEHICLE PROTECTION SYSTEM
FAILURE - FIAT CODE ........................ 92
- REAR FOG LIGHTS .......................... 92
-GENERIC FAILURE INDICATION ....... 92
-DPF (PARTICULATE FILTER)
CLEANING UNDERWAY ..................... 93
-WORN BRAKE PADS ........................ 94
-ASR SYSTEM DEACTIVATED ............ 94- TRACTION PLUS SYSTEM
ACTIVATION ....................................... 95
- TPMS ............................................... 95
-PARKING SENSOR FAILURE ............ 96
-START&STOP SYSTEM FAILURE ...... 96
- DIPPED BEAM HEADLIGHTS .......... 97
- FOLLOW ME HOME ........................ 97
- LEFT-HAND DIRECTION INDICATOR
............................................................ 97
- RIGHT-HAND DIRECTION
INDICATOR ........................................ 97
-FOG LIGHTS ..................................... 98
- CRUISE CONTROL .......................... 98
- MAIN BEAM HEADLIGHTS .............. 98
67
Page 87 of 298
WARNING LIGHTS AND MESSAGES
The warning light switches on together with (where the instrument panel permits) a specific message and/or acoustic signal.
These indications are indicative and precautionary and as such must not be considered as exhaustive and/or alternative to the
information contained in the Owner Handbook, which you are advised to read carefully in all cases. Always refer to the
information in this chapter in the event of a failure indication.
IMPORTANT Failure indications displayed are divided into two categories: serious and less serious failures. Serious faults are
indicated by a repeated and prolonged warning "cycle". Less serious faults are indicated by a warning "cycle" with a shorter
duration. The display cycle of both categories can be interrupted. The instrument panel warning light will stay on until the cause
of the malfunction is eliminated.
Warning lights on
panelWhat it means What to do
redLOW BRAKE FLUID/HANDBRAKE ENGAGED
The warning light switches on when the key is turned to
MAR, but it should switch off after a few seconds.
Low brake fluid level
The warning light switches on when the brake fluid in
the reservoir falls below the minimum level, possibly due
to a leak in the circuit.Restore the brake fluid level, then check that the
warning light has switched off.
If the warning light turns on when travelling (on certain
versions together with the message on the display) stop
the vehicle immediately and contact a Fiat Dealership.
Handbrake engaged
The warning light switches on when the handbrake is
engaged.Release the handbrake, then check that the warning
light has switched off.
If the warning light stays on, contact a Fiat Dealership.
83
Page 106 of 298
SYSTEM ACTIVATION
The ESC system is automatically
activated when the vehicle is started.
FAULT INDICATIONS
In the event of a fault, the ESC will be
automatically switched off and the
warning light will come on
permanently on the instrument panel,
along with a message on the
multifunction display (for versions/
markets where provided) (see "Warning
lights and messages" section). The
LED on the ASR OFF button will also
light up. Contact a Fiat Dealership
as soon as possible.
57)
HILL HOLDER SYSTEM
This system is an integral part of the
ESC system and facilitates starting on
slopes. It is automatically activated
in the following conditions:
uphill: vehicle stationary on a road
with a gradient higher than 5%, engine
running, brake pressed and gearbox
in neutral or gear (other than reverse)
engaged;
downhill: vehicle stationary on a road
with a gradient higher than 5%, engine
running, brake pressed and reverse
gear engaged.When setting off, the ESC system
control unit maintains the braking
pressure at the wheels until the torque
necessary for starting is reached, or
in any case for a maximum of 1.75
seconds, allowing your right foot to be
moved easily from the brake pedal to
the accelerator.
If the vehicle has not departed after
1.75 seconds, the system will
deactivate automatically by gradually
releasing the brake force.
During this release stage, the typical
brake disengagement noise indicating
that the vehicle is going to move
imminently will be heard.
Fault indications
Any system fault is indicated by the
turning on of the
warning light on
the instrument panel with digital display
and the
warning light on the
instrument panel with multifunction
display (for versions/markets where
provided) (see section “Warning lights
and messages”).
IMPORTANT The Hill Holder system is
not a parking brake, therefore do not
leave the vehicle without activating the
handbrake, switching off the engine
and engaging first gear.
58)
ASR SYSTEM (Antislip
Regulator)
This is a traction control system that
cuts in automatically every time one or
both drive wheels slip.
Depending on the slipping conditions,
two different control systems are
activated:
if the slipping involves both drive
wheels, the ASR intervenes reducing
the power transmitted by the engine;
if the slipping only involves one
of the drive wheels, it intervenes
automatically braking the wheel that is
slipping.
The action of the ASR system is
particularly helpful in the following
circumstances:
slipping of the inner wheel on bends
due to dynamic variations in the load
or excessive acceleration;
excessive power transmitted to the
wheels, also in relation to road surface
conditions;
acceleration on slippery, snowy or
icy road surfaces;
in the case of loss of grip on a wet
surface (aquaplaning).
102
SAFETY
Page 127 of 298
STARTING AND DRIVING
Let’s get to the "heart" of the vehicle:
seeing how you can exploit all of its
potential to the full.
We’ll look at how to drive it safely in any
situation, so that it can be a welcome
companion, with our comfort and
our wallets in mind.STARTING THE ENGINE .................124
HANDBRAKE ..................................125
USING THE GEARBOX ...................126
START&STOP SYSTEM ..................127
TPMS (TYRE PRESSURE
MONITORING SYSTEM) .................130
SPEED BLOCK ...............................133
CRUISE CONTROL .........................133
TRACTION PLUS SYSTEM .............135
PARKING SENSORS.......................136
REFUELLING THE VEHICLE ...........138
SAVING FUEL .................................139
TOWING TRAILERS ........................140
SNOW TYRES ................................141
SNOW CHAINS...............................141
123
Page 128 of 298
STARTING THE
ENGINE
The vehicle is fitted with an immobiliser:
if the engine fails to start, see the
paragraph on “The Fiat CODE system”
in the “Dashboard and controls”
section.
The engine may be noisier during the
first few seconds of operation,
especially after a long period of
inactivity. This is due to the hydraulic
tappets, the timing system chosen for
petrol engine versions to reduce the
number of servicing interventions, and
affects neither functionality nor reliability.
17) 18)
95)
PROCEDURE FOR
PETROL VERSIONS
Proceed as follows:
engage the handbrake;
put the gear lever into neutral;
fully depress the clutch pedal,
without touching the accelerator;
turn the ignition key to AVV and
release it as soon as the engine starts.
If the engine does not start at the
first attempt, return the ignition key to
STOP before repeating the starting
procedure.
If, when the ignition key is on MAR, the
instrument panel warning light
remains on together with warning
light
, turn the key to STOP and
then back to MAR; if the warning light
remains on, try the other keys provided
with the vehicle. If you are still unable
to start the engine, perform the
emergency starting procedure (see
"Emergency starting" in the "In an
emergency" chapter) and contact a Fiat
Dealership.PROCEDURE FOR DIESEL
VERSIONS
Proceed as follows:
engage the handbrake;
put the gear lever into neutral;
turn the ignition key to MAR: the
warning lights
andon the
instrument panel will turn on;
wait for the warning lightsand
to switch off. The hotter the engine
is, the quicker this will happen;
fully depress the clutch pedal,
without touching the accelerator;
turn the ignition key to AVV as soon
as warning light
switches off.
Waiting too long will waste the heating
work carried out by the glow plugs.
Release the key as soon as the engine
starts.
IMPORTANT With the engine cold, the
accelerator pedal must be fully released
when you turn the ignition key to AVV.
If the engine does not start at the
first attempt, return the ignition key to
STOP before repeating the starting
procedure.
If, when the ignition key is at MAR the
warning light remains lit, turn the
key to STOP and then back to MAR; if
the warning light remains lit, try with the
other keys provided with the vehicle. If
you still cannot start the engine, contact
a Fiat Dealership.
124
STARTING AND DRIVING
Page 129 of 298
19)
WARMING UP THE
ENGINE JUST AFTER IT
HAS STARTED
Proceed as follows:
drive off slowly, letting the engine
turn at medium revs. Do not accelerate
abruptly;
do not demand full performance at
first. Wait until the engine coolant
temperature gauge starts moving.
EMERGENCY STARTING
If the instrument panel warning light
stays on steadily, you can perform
an emergency starting by using the
code on the CODE card (see the “In an
emergency” section).
20)
STOPPING THE ENGINE
Turn the ignition key to STOP while the
engine is idling.
IMPORTANT After a taxing drive, you
should allow the engine to “catch
its breath” before turning it off by letting
it idle to allow the temperature in the
engine compartment to fall.
WARNING
17)It is advisable not to demand maximum
performance from your vehicle (e.g.
excessive acceleration, long distances at
high speeds, excessively intense braking,
etc.) during the initial period of use.
18)When the engine is off, do not leave
the key turned to MAR to prevent
unnecessary electrical consumption from
draining the battery.
19)If the indicator flashes for 60
seconds after starting or during an
extended towing period, this indicates
a problem in the glow plug preheating
system. Use the vehicle normally if the
engine starts, but contact a Fiat Dealership
as soon as possible.
20)Never start the engine by pushing,
towing or driving downhill. This could
cause fuel to flow into the catalytic
converter and damage it beyond repair.
WARNING
95)It is dangerous to run the engine in
enclosed areas. The engine takes in
oxygen and releases carbon dioxide,
carbon monoxide and other toxic gases.
HANDBRAKE
The handbrake lever is located between
the front seats. Pull the lever upwards
to engage the handbrake and ensure
that the vehicle does not move. The
vehicle should be secured after several
clicks of the lever. If it is not, contact
a Fiat Dealership to have it adjusted.
96)When the handbrake lever is engaged
and the ignition key is in MAR position,
the instrument panel warning light
will switch on.
Proceed as follows to release the
handbrake:
slightly lift the lever and press
release button A fig. 140;
keep button A pressed and lower
the lever. The
warning light in the
instrument panel will switch off.
Press the brake pedal when carrying
out this operation to prevent the vehicle
from moving accidentally.
PARKING
Proceed as follows:
stop the engine and engage the
handbrake;
engage the gear (on a slope, engage
first gear if the vehicle is facing uphill
or reverse if it is facing downhill) and
leave the wheels steered.
125
Page 131 of 298
START&STOP
SYSTEM
IN BRIEF
The Start&Stop device automatically
stops the engine each time the
vehicle is stationary and starts it
again when the driver wants to move
off.
This improves the efficiency of the
vehicle by reducing fuel consumption,
the emission of harmful gases and
noise pollution.
OPERATING MODE
Engine stopping mode
WITH MANUAL GEARBOX
With the vehicle stationary, the engine
stops with the gearbox in neutral and
the clutch pedal released.
WITH ROBOTIZED GEARBOX
The engine cuts out if the vehicle stops
with the brake pedal pressed.
This condition can be maintained even
if the brake pedal is not depressed, if
the gear lever is in position N.NOTE: The engine can only be stopped
automatically after a speed of about
10 km/h is reached, to prevent the
engine from being repeatedly stopped
when driving at walking pace.
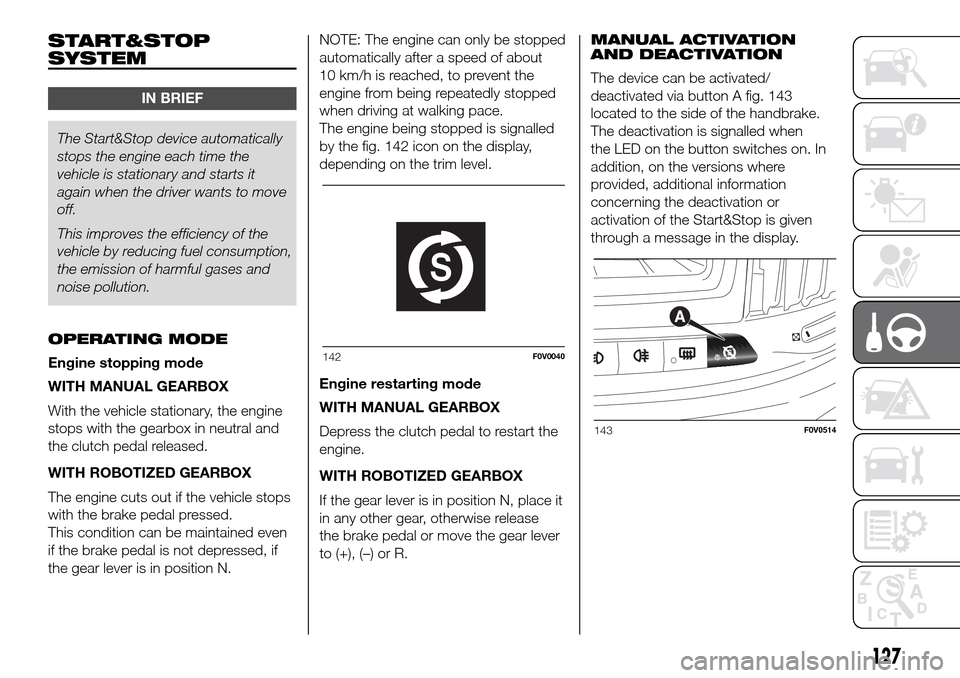
The engine being stopped is signalled
by the fig. 142 icon on the display,
depending on the trim level.
Engine restarting mode
WITH MANUAL GEARBOX
Depress the clutch pedal to restart the
engine.
WITH ROBOTIZED GEARBOX
If the gear lever is in position N, place it
in any other gear, otherwise release
the brake pedal or move the gear lever
to (+), (–) or R.MANUAL ACTIVATION
AND DEACTIVATION
The device can be activated/
deactivated via button A fig. 143
located to the side of the handbrake.
The deactivation is signalled when
the LED on the button switches on. In
addition, on the versions where
provided, additional information
concerning the deactivation or
activation of the Start&Stop is given
through a message in the display.
142F0V0040
143F0V0514
127
Page 162 of 298
CHANGING A WHEEL
The vehicle is originally equipped with
the Fix&Go automatic quick tyre repair
kit (see instructions in the next section).
As an alternative, the vehicle may
have a normal-sized spare wheel.
Wheel changing and correct use of the
jack and spare wheel call for some
precautions, as listed below.
125) 126) 127) 128)
Note for one-way tyres
One-way tyres have a few arrows on
the side indicating the rotation direction.
If a wheel is changed (when punctured,
for example) the direction of the arrows
on the spare wheel tyre may not
coincide with the rotation direction of
the wheel to be replaced.
In these conditions, too, the tyre still
maintains its safety features.
Anyway, it is recommended to have the
wheel repaired and refitted as soon as
possible, as the best performance is
achieved when the rotation direction of
all tyres coincides with the one
indicated by the arrows.
Please note that:
the jack weight is 4 kg;
the jack requires no adjustment;
the jack cannot be repaired and in
the event of a fault it must be replaced
by another original one;
no tool other than its cranking
device may be fitted on the jack.
To change a wheel, proceed as follows:
stop the vehicle in a position that is
not dangerous for oncoming traffic
where you can change the wheel safely.
The ground should be flat if possible,
and sufficiently firm;
stop the engine and pull the
handbrake;
engage first gear or reverse;
wear the reflective safety jacket
(compulsory by law in certain countries)
before getting out of the vehicle;
indicate that the vehicle has broken
down using the devices required by
the law in the current country (e.g.
warning triangle, hazard lights, etc.);
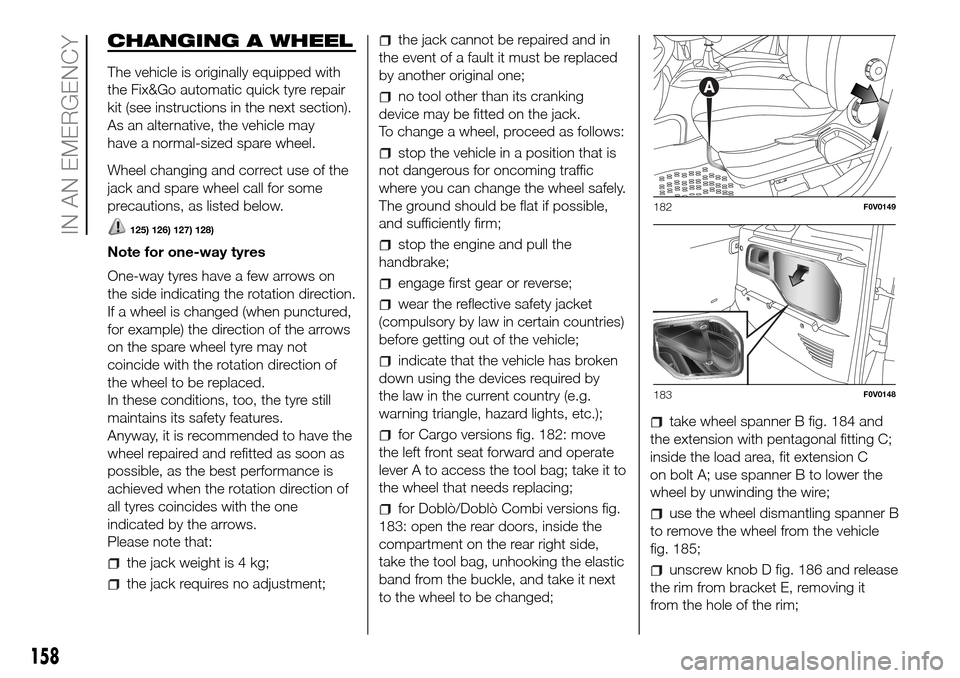
for Cargo versions fig. 182: move
the left front seat forward and operate
lever A to access the tool bag; take it to
the wheel that needs replacing;
for Doblò/Doblò Combi versions fig.
183: open the rear doors, inside the
compartment on the rear right side,
take the tool bag, unhooking the elastic
band from the buckle, and take it next
to the wheel to be changed;
take wheel spanner B fig. 184 and
the extension with pentagonal fitting C;
inside the load area, fit extension C
on bolt A; use spanner B to lower the
wheel by unwinding the wire;
use the wheel dismantling spanner B
to remove the wheel from the vehicle
fig. 185;
unscrew knob D fig. 186 and release
the rim from bracket E, removing it
from the hole of the rim;
182F0V0149
183F0V0148
158
IN AN EMERGENCY