technical specifications FIAT DOBLO COMBI 2016 2.G Owners Manual
[x] Cancel search | Manufacturer: FIAT, Model Year: 2016, Model line: DOBLO COMBI, Model: FIAT DOBLO COMBI 2016 2.GPages: 298, PDF Size: 25.92 MB
Page 13 of 298
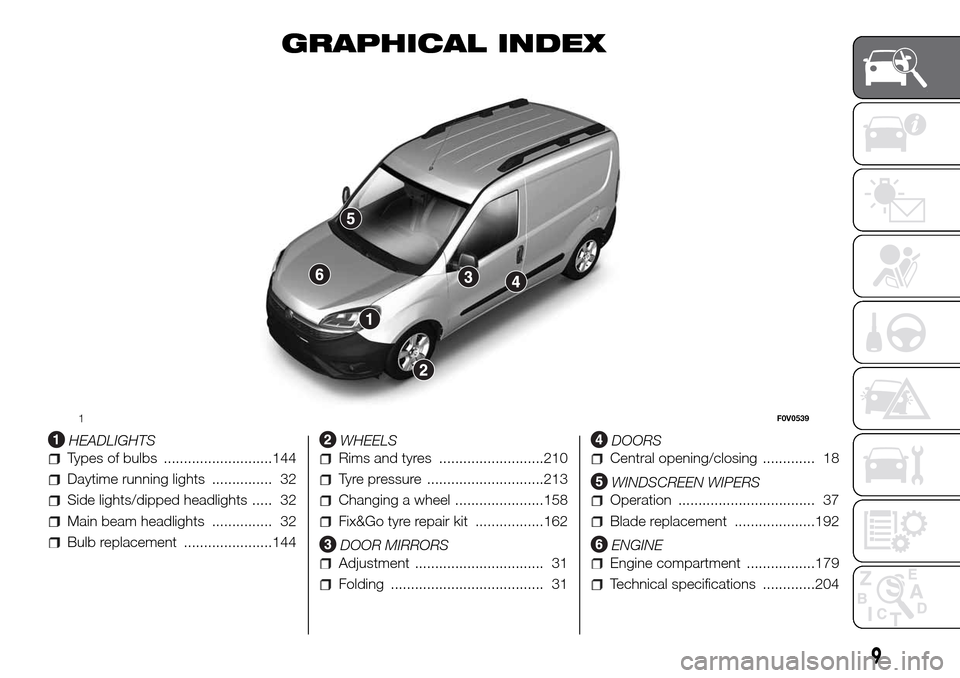
GRAPHICAL INDEX
.
HEADLIGHTS
Types of bulbs ...........................144
Daytime running lights ............... 32
Side lights/dipped headlights ..... 32
Main beam headlights ............... 32
Bulb replacement ......................144
WHEELS
Rims and tyres ..........................210
Tyre pressure .............................213
Changing a wheel ......................158
Fix&Go tyre repair kit .................162
DOOR MIRRORS
Adjustment ................................ 31
Folding ...................................... 31
DOORS
Central opening/closing ............. 18
WINDSCREEN WIPERS
Operation .................................. 37
Blade replacement ....................192
ENGINE
Engine compartment .................179
Technical specifications .............204
1F0V0539
9
Page 63 of 298
SECURING YOUR LOAD
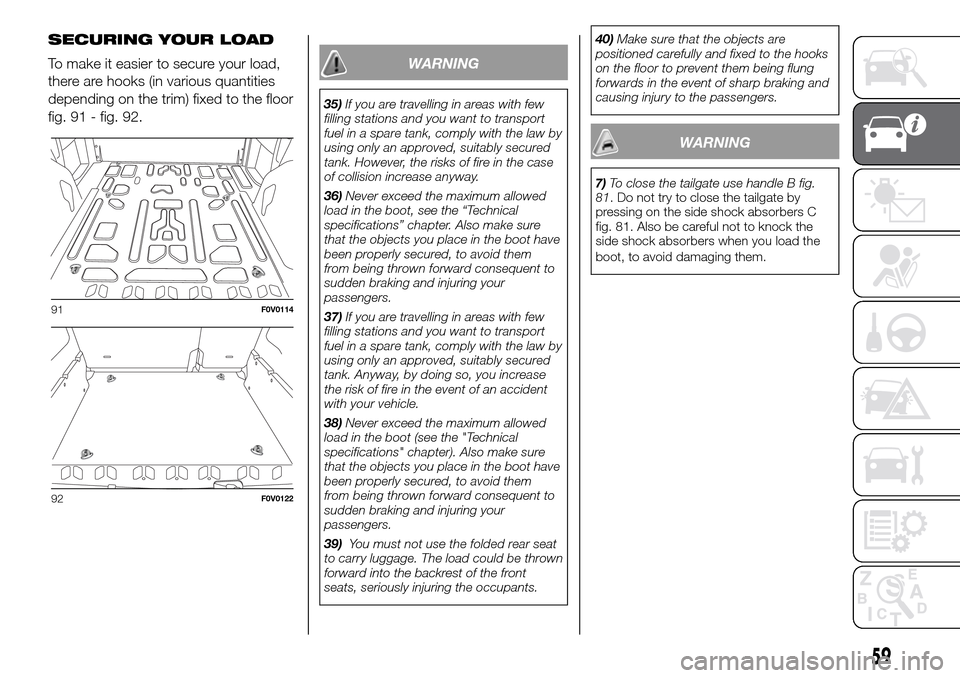
To make it easier to secure your load,
there are hooks (in various quantities
depending on the trim) fixed to the floor
fig. 91 - fig. 92.
WARNING
35)If you are travelling in areas with few
filling stations and you want to transport
fuel in a spare tank, comply with the law by
using only an approved, suitably secured
tank. However, the risks of fire in the case
of collision increase anyway.
36)Never exceed the maximum allowed
load in the boot, see the “Technical
specifications” chapter. Also make sure
that the objects you place in the boot have
been properly secured, to avoid them
from being thrown forward consequent to
sudden braking and injuring your
passengers.
37)If you are travelling in areas with few
filling stations and you want to transport
fuel in a spare tank, comply with the law by
using only an approved, suitably secured
tank. Anyway, by doing so, you increase
the risk of fire in the event of an accident
with your vehicle.
38)Never exceed the maximum allowed
load in the boot (see the "Technical
specifications" chapter). Also make sure
that the objects you place in the boot have
been properly secured, to avoid them
from being thrown forward consequent to
sudden braking and injuring your
passengers.
39)You must not use the folded rear seat
to carry luggage. The load could be thrown
forward into the backrest of the front
seats, seriously injuring the occupants.40)Make sure that the objects are
positioned carefully and fixed to the hooks
on the floor to prevent them being flung
forwards in the event of sharp braking and
causing injury to the passengers.
WARNING
7)To close the tailgate use handle B fig.
81. Do not try to close the tailgate by
pressing on the side shock absorbers C
fig. 81. Also be careful not to knock the
side shock absorbers when you load the
boot, to avoid damaging them.
91F0V0114
92F0V0122
59
Page 67 of 298
WARNING
41)Never travel with the glove
compartment open: it could injure the
passenger in the event of a crash.
42)The cigar lighter becomes very hot.
Handle it carefully and make sure that
children don't touch it: risk of fire and/or
burning.
43)Do not use the ashtray as a waste
paper basket: it may catch fire in contact
with cigarette stubs.
ROOF RACK/SKI
RACK
44) 45)
8) 9)
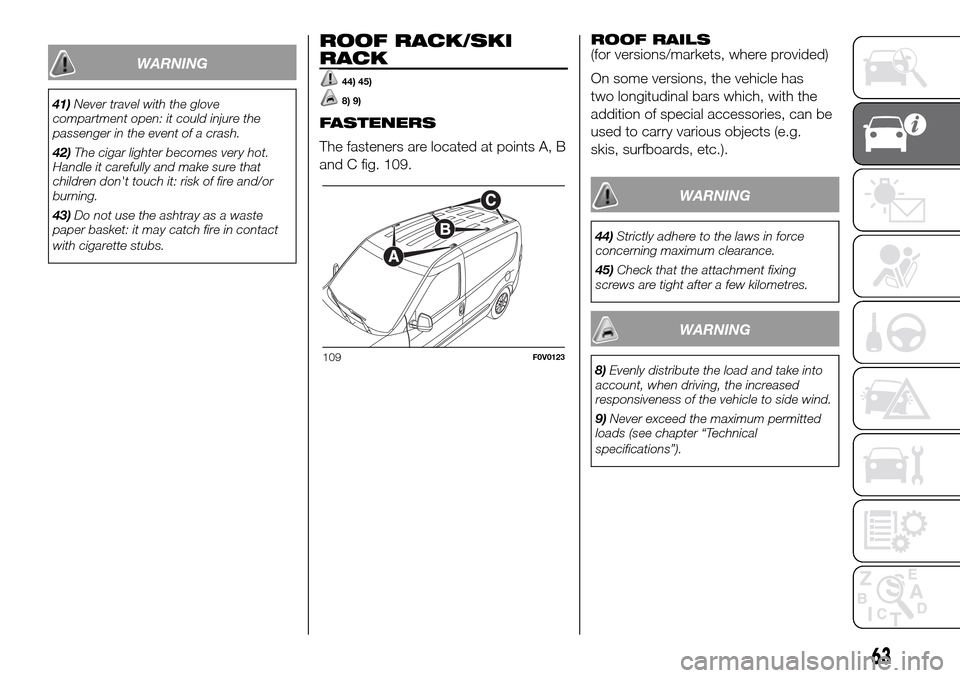
FASTENERS
The fasteners are located at points A, B
and C fig. 109.ROOF RAILS
(for versions/markets, where provided)
On some versions, the vehicle has
two longitudinal bars which, with the
addition of special accessories, can be
used to carry various objects (e.g.
skis, surfboards, etc.).
WARNING
44)Strictly adhere to the laws in force
concerning maximum clearance.
45)Check that the attachment fixing
screws are tight after a few kilometres.
WARNING
8)Evenly distribute the load and take into
account, when driving, the increased
responsiveness of the vehicle to side wind.
9)Never exceed the maximum permitted
loads (see chapter “Technical
specifications”).109F0V0123
63
Page 145 of 298
SNOW TYRES
Fiat Dealerships will be happy to
provide advice concerning the most
suitable type of tyres for the customer's
requirements.
For the type of tyre to be used, inflation
pressures and the specifications of
snow tyres, follow the instructions given
in the "Wheels" paragraph of the
"Technical specifications" section.
The winter features of these tyres are
reduced considerably when the tread
depth is below 4 mm. Replace them in
this case.
Due to snow tyre characteristics, under
normal conditions of use or on long
motorway journeys, the performance of
these tyres is lower than that of
standard tyres. Limit performance
according to the use for which they
were approved.
IMPORTANT When using snow tyres
with a maximum speed index below the
one that can be reached by the vehicle
(increased by 5%), place a notice in
the passenger compartment, plainly in
view, which states the maximum speed
allowed by the snow tyres (as per EC
Directive).
All four tyres should be the same (brand
and track) to ensure greater safety
when driving and braking as well as a
good manoeuvrability.Remember that you should not change
the rotation direction of the tyres.118)
WARNING
118)The max. speed for snow tyres with
“Q” marking is 160 km/h. The Road Traffic
Code speed limits must however be
always strictly observed.
SNOW CHAINS
The use of snow chains should be in
compliance with local regulations.
The snow chains may be applied only
onto the front wheel (drive wheels).
Check the tension of the snow chains
after the first few metres have been
driven.
119)
WARNING
119)Keep your speed down when snow
chains are fitted; do not exceed 50 km/h.
Avoid potholes, steps and pavements
and avoid driving for long distances on
roads not covered with snow to prevent
damaging the vehicle and the roadbed.
141
Page 149 of 298
TYPES OF BULBS
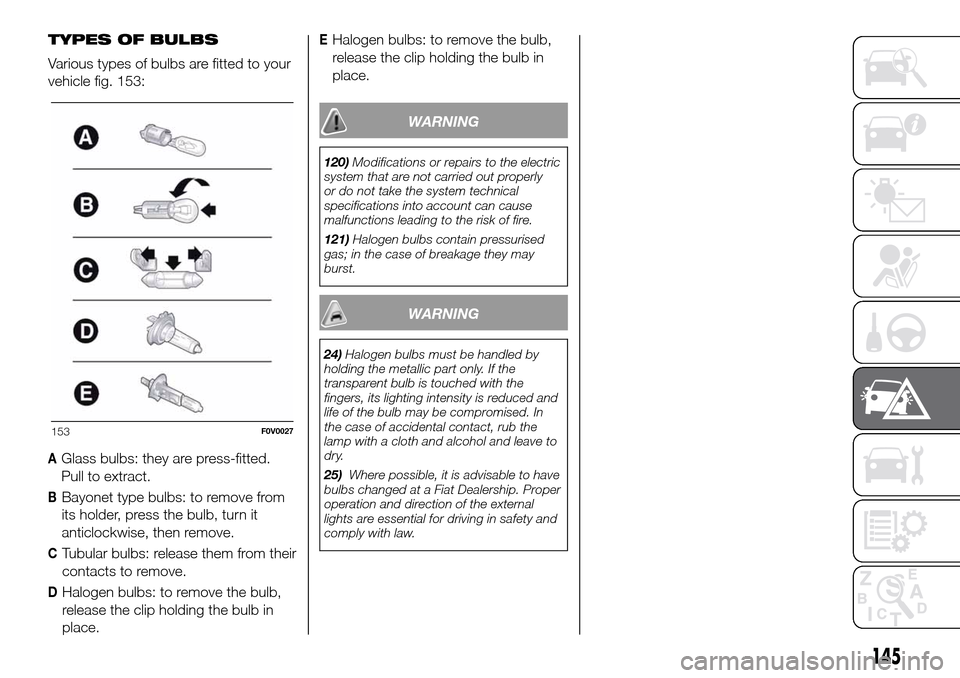
Various types of bulbs are fitted to your
vehicle fig. 153:
AGlass bulbs: they are press-fitted.
Pull to extract.
BBayonet type bulbs: to remove from
its holder, press the bulb, turn it
anticlockwise, then remove.
CTubular bulbs: release them from their
contacts to remove.
DHalogen bulbs: to remove the bulb,
release the clip holding the bulb in
place.
EHalogen bulbs: to remove the bulb,
release the clip holding the bulb in
place.
WARNING
120)Modifications or repairs to the electric
system that are not carried out properly
or do not take the system technical
specifications into account can cause
malfunctions leading to the risk of fire.
121)Halogen bulbs contain pressurised
gas; in the case of breakage they may
burst.
WARNING
24)Halogen bulbs must be handled by
holding the metallic part only. If the
transparent bulb is touched with the
fingers, its lighting intensity is reduced and
life of the bulb may be compromised. In
the case of accidental contact, rub the
lamp with a cloth and alcohol and leave to
dry.
25)Where possible, it is advisable to have
bulbs changed at a Fiat Dealership. Proper
operation and direction of the external
lights are essential for driving in safety and
comply with law.
153F0V0027
145
Page 166 of 298
126)Use your hazard lights, warning
triangle, etc. to show that your vehicle is
stationary according to the regulations
in force. Passengers should get out of the
vehicle, particularly if it is heavily loaded,
and wait for the wheel to be changed away
from the traffic. If you are on a slope or
uneven surface, place wedges or other
suitable objects under the wheels to secure
the vehicle. Have the wheel repaired and
refitted as soon as possible. Do not apply
grease to the bolt threads before
assembly: they might spontaneously
unscrew.
127)Use the jack only to replace wheels
on the vehicle with which it is supplied
or on other vehicles of the same model.
Never use the jack for other purposes,
such as lifting other models. Never use the
jack to carry out repairs under the vehicle.
Incorrect positioning of the jack may cause
the lifted vehicle to fall. Do not use the
jack for loads higher than those shown on
the label.
128)Incorrect hub cap assembly may
cause it to come off when the vehicle is
moving. Never tamper with the inflation
valve. Never introduce tools of any kind
between rim and tyre. Check tyre and
spare wheel pressures regularly, referring to
the values shown in the "Technical
specifications" section.FIX&GO AUTOMATIC
KIT
(where provided)
DESCRIPTION
28)
129) 130)The quick repair kit Fix&Go automatic is
contained in a suitable bag inside the
compartment on the right rear side
or, for Cargo versions, under the
passenger seat (for versions with fixed
or movable seat), or in the glove
compartment (for versions with folding
seat).
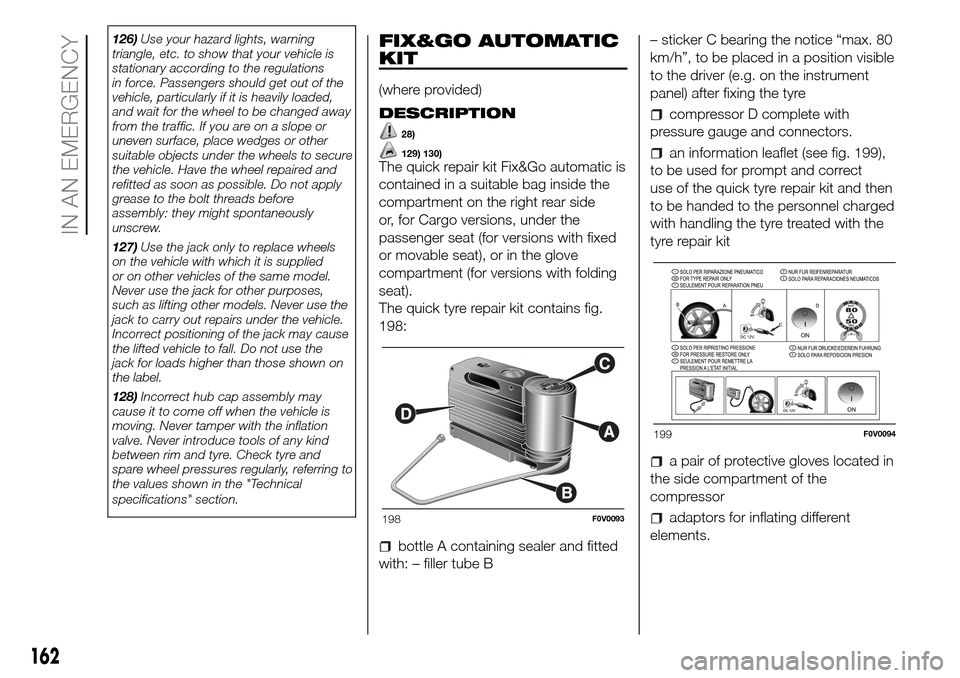
The quick tyre repair kit contains fig.
198:
bottle A containing sealer and fitted
with: – filler tube B– sticker C bearing the notice “max. 80
km/h”, to be placed in a position visible
to the driver (e.g. on the instrument
panel) after fixing the tyre
compressor D complete with
pressure gauge and connectors.
an information leaflet (see fig. 199),
to be used for prompt and correct
use of the quick tyre repair kit and then
to be handed to the personnel charged
with handling the tyre treated with the
tyre repair kit
a pair of protective gloves located in
the side compartment of the
compressor
adaptors for inflating different
elements.198F0V0093
199F0V0094
162
IN AN EMERGENCY
Page 176 of 298
Thousands of kilometres 30 60 90 120 150 180
Months 24 48 72 96 120 144
Check handbrake lever travel and adjust, if necessary●●●●●●
Check exhaust emissions/smokiness●●●●●●
Inspect the conditions of toothed timing drive belt●●
Spark plug replacement (*)●●●●●●
Replace accessory drive belt/s●
Replace the toothed timing drive belt (**)●
Replace air cleaner cartridge●●●●●●
Check and, if necessary, top up fluid levels (brakes/hydraulic
clutch, windscreen washer, battery, engine cooling, etc.)●●●●●●
Check operation of engine management systems (using diagnosis
socket)●●●●●●
Check cleanliness of sliding side door lower guides (or every 6
months)●●●●●●
(*) For 1.4 Turbo Petrol versions, in order to guarantee correct operation and prevent serious damage to the engine, it is essential to observe the following: only use
spark plugs specifically certified for these engines; all spark plugs should be of the same type and brand (see the “Engine” paragraph in the "Technical
Specifications" section); strictly comply with the replacement intervals in the Scheduled Servicing Plan; you are advised to contact a Fiat Dealership to have plugs
replaced.
(**) Irrespective of the mileage, the timing drive belt must be changed every 4 years for heavy-duty use (cold climates, town use, long periods of idling) or at least
every 5 years.
172
SERVICING AND CARE
Page 191 of 298
ENGINE OIL
Check the oil level a few minutes after
stopping the engine (about 5 minutes)
with the vehicle parked on level ground.
Check the level is within the MIN. and
MAX. marks on the dipstick B fig. 208 -
fig. 209 - fig. 210 - fig. 211 - fig. 213 -
fig. 214 - fig. 215.
The range between the MIN. and MAX.
marks corresponds to about 1 litre of
oil.
If the oil level is near or under the MIN
line, add oil through the filler Afig. 208 -
fig. 209 - fig. 210 - fig. 211 - fig. 213
- fig. 214 - fig. 215, until it reaches the
MAX line.
The oil level must never exceed the
MAX reference.
Engine oil consumption
The maximum engine oil consumption
is usually 400 grams every 1000 km.
The engine needs to run in when the
vehicle is new, and therefore the engine
oil consumption can only be considered
stabilised after the first 5,000 - 6,000
km.
IMPORTANT Oil consumption depends
on driving style and conditions of use
of the vehicle.
IMPORTANT After adding or changing
the oil, let the engine turn over for a few
seconds and wait a few minutes after
turning it off before checking oil level.137)
32)
2)
ENGINE COOLANT
The coolant level must be checked
when the engine is cold and must
range between the MIN and MAX
marks on the reservoir. If the level is
low, slowly pour a mixture of 50%
distilled water and 50% PARAFLU
UPby
PETRONAS LUBRICANTSthrough
the filler neck C fig. 208 - fig. 209 - fig.
210 - fig. 211 - fig. 213 - fig. 214 -
fig. 215, until the level approaches
MAX.
The mixture of 50% PARAFLU
UPand
50% distilled water protects against
freezing down to temperatures of
–35°C. For particularly harsh climate
conditions, we recommended using a
mixture of 60% PARAFLU
UPand 40%
distilled water.
33)
138)
WINDSCREEN/REAR
WINDOW WASHING FLUID
Remove the cap D fig. 208 - fig. 209 -
fig. 210 - fig. 211 - fig. 213 - fig. 214
- fig. 215, using the special tab, to add
fluid.
Use a mixture of water and TUTELA
PROFESSIONAL SC35 fluid, in the
following concentrations:
30% TUTELA PROFESSIONAL SC 35
and 70% water in summer.
50% TUTELA PROFESSIONAL SC 35
and 50% water in winter.
At temperatures below -20°C, use
undiluted TUTELA PROFESSIONAL SC
35 fluid.
Check fluid level through the reservoir.
Close cap D by pressing on the central
section.
139)
BRAKE FLUID
Undo cap E fig. 208 - fig. 209 - fig. 210
- fig. 211 - fig. 213 - fig. 214 - fig. 215
and check that the liquid in the reservoir
is at the maximum level.
The fluid level in the reservoir must not
exceed the MAX mark.
Use the brake fluid shown in the "Fluids
and lubricants" table (see "Technical
Specifications").
NB Carefully clean the reservoir cap E
and surrounding surfaces.
187
Page 198 of 298
WARNING
148)Driving with worn windscreen wiper
blades is a serious hazard, because
visibility is reduced in bad weather
conditions.
WHEELS AND TYRES
Check the pressure of each tyre,
including the space-saver wheel,
approximately every two weeks and
before long journeys: the pressure
should be checked with the tyre rested
and cold.
It is normal for the pressure to increase
when the vehicle is used; for the correct
tyre inflation pressure, see “Wheels” in
the “Technical specifications” section.
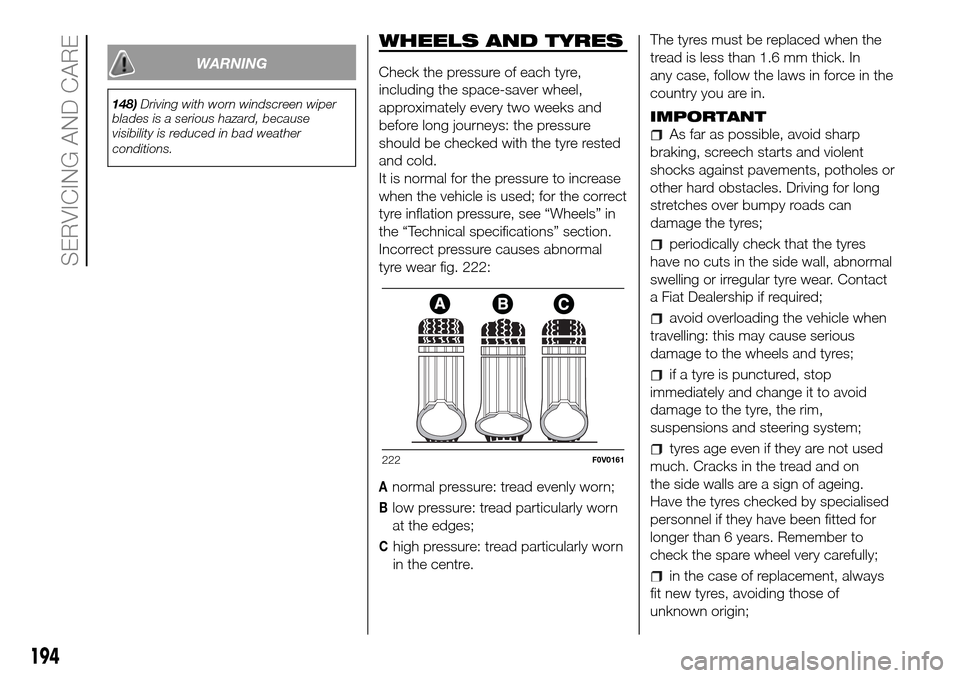
Incorrect pressure causes abnormal
tyre wear fig. 222:
Anormal pressure: tread evenly worn;
Blow pressure: tread particularly worn
at the edges;
Chigh pressure: tread particularly worn
in the centre.The tyres must be replaced when the
tread is less than 1.6 mm thick. In
any case, follow the laws in force in the
country you are in.
IMPORTANT
As far as possible, avoid sharp
braking, screech starts and violent
shocks against pavements, potholes or
other hard obstacles. Driving for long
stretches over bumpy roads can
damage the tyres;
periodically check that the tyres
have no cuts in the side wall, abnormal
swelling or irregular tyre wear. Contact
a Fiat Dealership if required;
avoid overloading the vehicle when
travelling: this may cause serious
damage to the wheels and tyres;
if a tyre is punctured, stop
immediately and change it to avoid
damage to the tyre, the rim,
suspensions and steering system;
tyres age even if they are not used
much. Cracks in the tread and on
the side walls are a sign of ageing.
Have the tyres checked by specialised
personnel if they have been fitted for
longer than 6 years. Remember to
check the spare wheel very carefully;
in the case of replacement, always
fit new tyres, avoiding those of
unknown origin;
222F0V0161
194
SERVICING AND CARE
Page 200 of 298
inflate tyres to +0.5 bar above the
standard specified pressure and check
it at intervals;
do not drain the engine cooling
system.
BODYWORK
PROTECTION AGAINST
ATMOSPHERIC AGENTS
The main causes of corrosion are the
following:
atmospheric pollution;
salty air and humidity (coastal areas,
or hot humid climates);
seasonal environmental conditions.
The abrasive action of wind-borne
atmospheric dust and sand, as well as
mud and gravel raised by other cars
is also not to be underestimated.
On your vehicle, Fiat has implemented
the best manufacturing technologies
to effectively protect the bodywork
against corrosion.
These include:
painting products and systems
which give the vehicle particular
resistance to corrosion and abrasion;
use of galvanised (or pretreated)
sheet metal, with high resistance to
corrosion;
spraying the underbody, engine
compartment, wheelhouse internal
parts and other parts with highly
protective wax products;
spraying of plastic parts, with a
protective function in the more exposed
points: underdoor, inner wing, edges,
etc.;
use of "open" boxed sections to
prevent condensation and pockets of
moisture from triggering rust inside.
VEHICLE EXTERIOR AND
UNDERBODY WARRANTY
Your vehicle is covered by warranty
against perforation due to corrosion of
any original element of the structure
or body.
For the general terms of this warranty,
refer to the Warranty Booklet.
ADVICE FOR
PRESERVING THE
BODYWORK
Paintwork
Paintwork does not only serve an
aesthetic purpose, but also protects the
underlying sheet metal.
Touch up abrasions and scratches
immediately to prevent rust formation.
Use only original paint products for
touch-ups (see “Bodywork paint
identification plate” in the “Technical
specifications” section).
Normal maintenance of paintwork
consists in washing the vehicle: the
frequency depends on the conditions
and environment where the vehicle
is used.
For example, it is advisable to wash the
vehicle more often in areas with high
levels of environmental pollution or on
roads spread with salt.
196
SERVICING AND CARE