weight FIAT DOBLO COMBI 2016 2.G Owners Manual
[x] Cancel search | Manufacturer: FIAT, Model Year: 2016, Model line: DOBLO COMBI, Model: FIAT DOBLO COMBI 2016 2.GPages: 298, PDF Size: 25.92 MB
Page 69 of 298
RADIO
(for versions/markets, where provided)
For the operation of the radio with
CD/MP3 player (for versions/markets
where provided), read the Supplement
attached to this Owner's Handbook.
WIRING FOR
LIGHTWEIGHT SYSTEM
The system consists of:
radio supply leads;
front speaker cables (on door
mirrors trims);
front door panel speaker cables;
rear speaker cables (on the side of
the parcel shelf) (for versions/markets,
where provided);
radio housing;
aerial lead:
aerial.
WIRING FOR
HEAVYWEIGHT SYSTEM
The system consists of:
radio supply leads;
rear speaker cables (on the side of
the parcel shelf) (for versions/markets,
where provided);
no. 2 tweeters on door mirror trims;
no. 2 midwoofers on front door
lower part;
no. 2 rear speakers (on the side of
the parcel shelf) (for versions/markets,
where provided);
radio housing;
aerial lead:
aerial.
SOUND SYSTEM
INSTALLATION
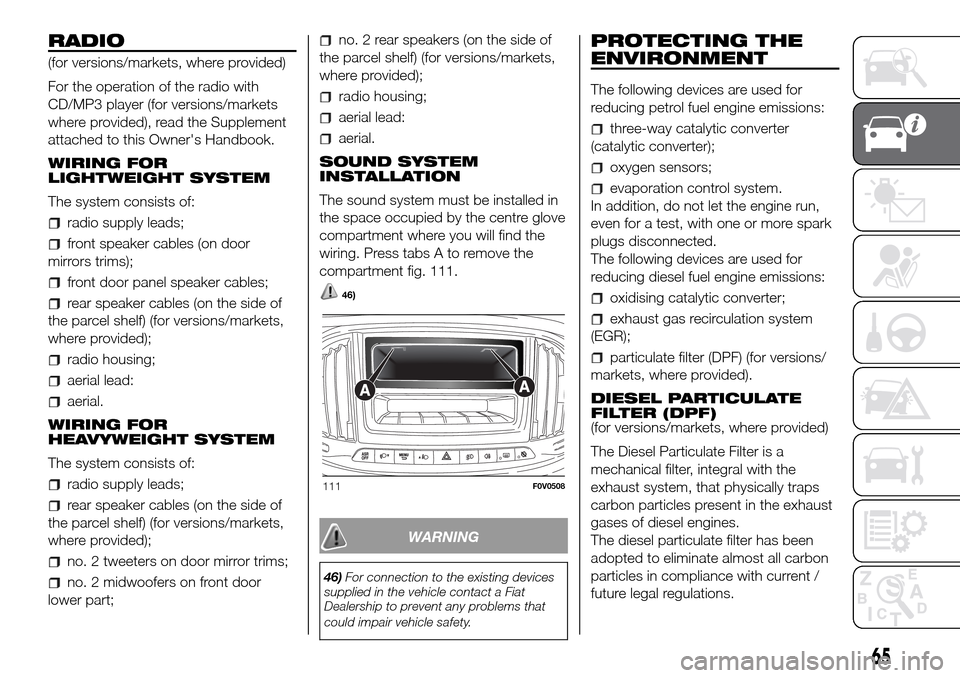
The sound system must be installed in
the space occupied by the centre glove
compartment where you will find the
wiring. Press tabs A to remove the
compartment fig. 111.
46)
WARNING
46)For connection to the existing devices
supplied in the vehicle contact a Fiat
Dealership to prevent any problems that
could impair vehicle safety.
PROTECTING THE
ENVIRONMENT
The following devices are used for
reducing petrol fuel engine emissions:
three-way catalytic converter
(catalytic converter);
oxygen sensors;
evaporation control system.
In addition, do not let the engine run,
even for a test, with one or more spark
plugs disconnected.
The following devices are used for
reducing diesel fuel engine emissions:
oxidising catalytic converter;
exhaust gas recirculation system
(EGR);
particulate filter (DPF) (for versions/
markets, where provided).
DIESEL PARTICULATE
FILTER (DPF)
(for versions/markets, where provided)
The Diesel Particulate Filter is a
mechanical filter, integral with the
exhaust system, that physically traps
carbon particles present in the exhaust
gases of diesel engines.
The diesel particulate filter has been
adopted to eliminate almost all carbon
particles in compliance with current /
future legal regulations.
111F0V0508
65
Page 112 of 298
WARNING
65)The pretensioner may be used only
once. After it is triggered, have it replaced
at a Fiat Dealership.
66)For maximum safety, keep the backrest
upright, lean back into it and make sure
the seat belt fits closely across your chest
and pelvis. Always fasten the seat belts
on both the front and the rear seats!
Travelling without wearing seat belts will
increase the risk of serious injury and even
death in the event of an accident.
67)If the belt has been sharply pulled, for
example as the result of an accident, the
seat belt, together with the anchoring
devices, the anchoring device fixing screws
and the pretensioner must be completely
replaced. Even if the belt does not present
any exterior signs of wear or damage, it
may have lost its restraining properties.
WARNING
16)Operations which lead to knocks,
vibrations or localised heating (over 100°C
for a maximum of 6 hours) in the area
around the pretensioners may cause
damage or trigger them. These devices are
not affected by vibrations caused by
irregularities of the road surface or low
obstacles such as kerbs, etc. Contact a
Fiat Dealership for any assistance.
CARRYING
CHILDREN SAFELY
For optimal protection in the event of an
impact, all passengers must be seated
and wearing adequate restraint
systems.
This is even more important for
children.
This prescription is compulsory in all EU
countries according to EC Directive
2003/20/EC.
Compared with an adult, a child's head
is larger and heavier in proportion to
their body and the child's muscular and
bone structures are not fully developed.
Therefore, correct restraint systems
other than adult seat belts are
necessary to reduce as much as
possible the risk of injuries in the event
of an accident, braking or a sudden
manoeuvre.
Children must be seated safely and
comfortably.
Depending on the characteristics of the
child restraint systems used, you are
advised to keep children in rear-facing
child restraint systems for as long as
possible (at least until 3-4 years old),
since this is the most protected position
in the event of an impact.It is recommended to always choose
the restraint system most suitable
for the child; for this reason always refer
to the Owner Handbook provided with
the child restraint system, to be sure
that it is of the right type for the children
it is intended for.
When over 1.50 m in height, from the
point of view of restraint systems,
children are considered as adults and
wear seat belts normally.
In Europe child restraint systems are
classified, among other criteria, into five
weight groups:
Group Weight groups
Group 0up to 10 kg in
weight
Group 0+up to 13 kg in
weight
Group 1 9 - 18 kg
Group 2 15 - 25 kg
Group 3 22 - 36 kg
All restraint devices must bear the
certification data, together with the
control mark, on a label solidly fixed to
the child restraint system which must
never be removed.
Lineaccessori Fiat offers child restraint
systems for each weight group. These
devices are recommended having been
specifically designed for Fiat vehicles.
108
SAFETY
Page 113 of 298
68)
GROUP 0 and 0+
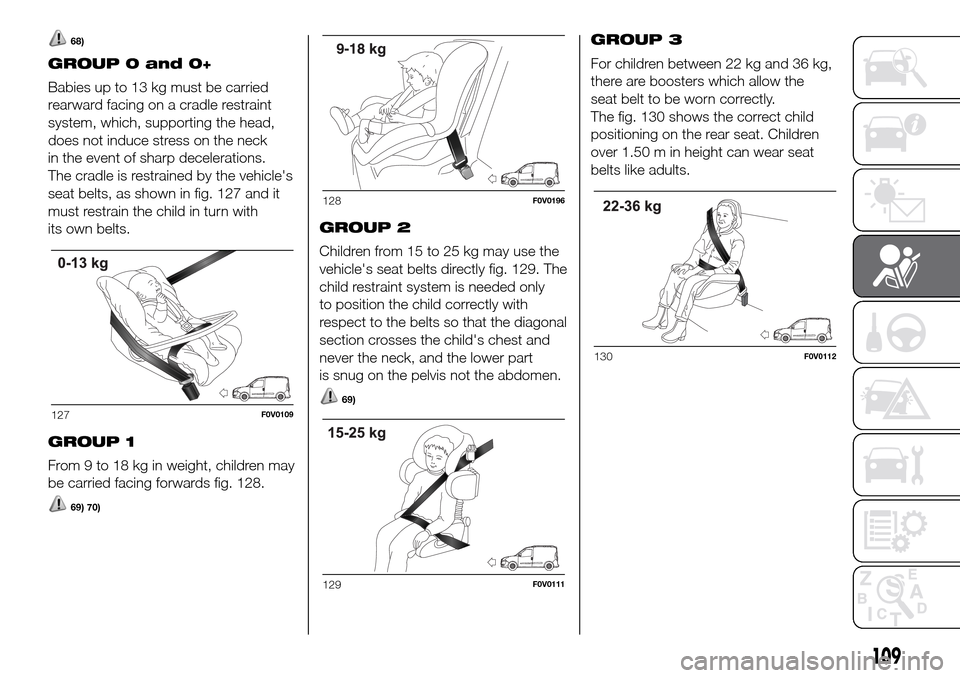
Babies up to 13 kg must be carried
rearward facing on a cradle restraint
system, which, supporting the head,
does not induce stress on the neck
in the event of sharp decelerations.
The cradle is restrained by the vehicle's
seat belts, as shown in fig. 127 and it
must restrain the child in turn with
its own belts.
GROUP 1
From 9 to 18 kg in weight, children may
be carried facing forwards fig. 128.
69) 70)
GROUP 2
Children from 15 to 25 kg may use the
vehicle's seat belts directly fig. 129. The
child restraint system is needed only
to position the child correctly with
respect to the belts so that the diagonal
section crosses the child's chest and
never the neck, and the lower part
is snug on the pelvis not the abdomen.
69)
GROUP 3
For children between 22 kg and 36 kg,
there are boosters which allow the
seat belt to be worn correctly.
The fig. 130 shows the correct child
positioning on the rear seat. Children
over 1.50 m in height can wear seat
belts like adults.
127F0V0109
128F0V0196
129F0V0111
130F0V0112
109
Page 114 of 298
PASSENGER SEAT COMPLIANCE WITH REGULATIONS ON UNIVERSAL CHILD
RESTRAINT SYSTEM USE
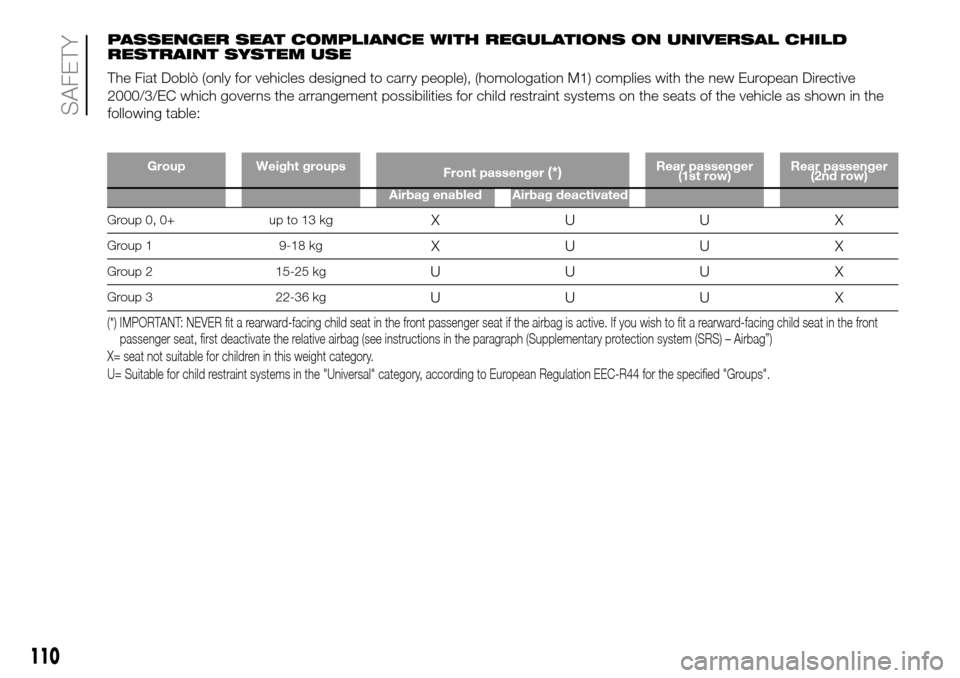
The Fiat Doblò (only for vehicles designed to carry people), (homologation M1) complies with the new European Directive
2000/3/EC which governs the arrangement possibilities for child restraint systems on the seats of the vehicle as shown in the
following table:
110
SAFETY
Group Weight groups
Front passenger(*)Rear passenger
(1st row)Rear passenger
(2nd row)
Airbag enabled Airbag deactivated
Group 0, 0+ up to 13 kgXUUX
Group 1 9-18 kgXUUX
Group 2 15-25 kgUUU X
Group 3 22-36 kgUUU X
(*) IMPORTANT: NEVER fit a rearward-facing child seat in the front passenger seat if the airbag is active. If you wish to fit a rearward-facing child seat in the front
passenger seat, first deactivate the relative airbag (see instructions in the paragraph (Supplementary protection system (SRS) – Airbag”)
X= seat not suitable for children in this weight category.
U= Suitable for child restraint systems in the "Universal" category, according to European Regulation EEC-R44 for the specified "Groups".
Page 116 of 298
ISOFIX CHILD
RESTRAINT SYSTEM
SETUP
(for versions/markets, where provided)
Only for vehicles designed to carry
people, (M1 approval), provision has
been made on some versions to fit
a Universal Isofix child restraint system,
a European standardised system for
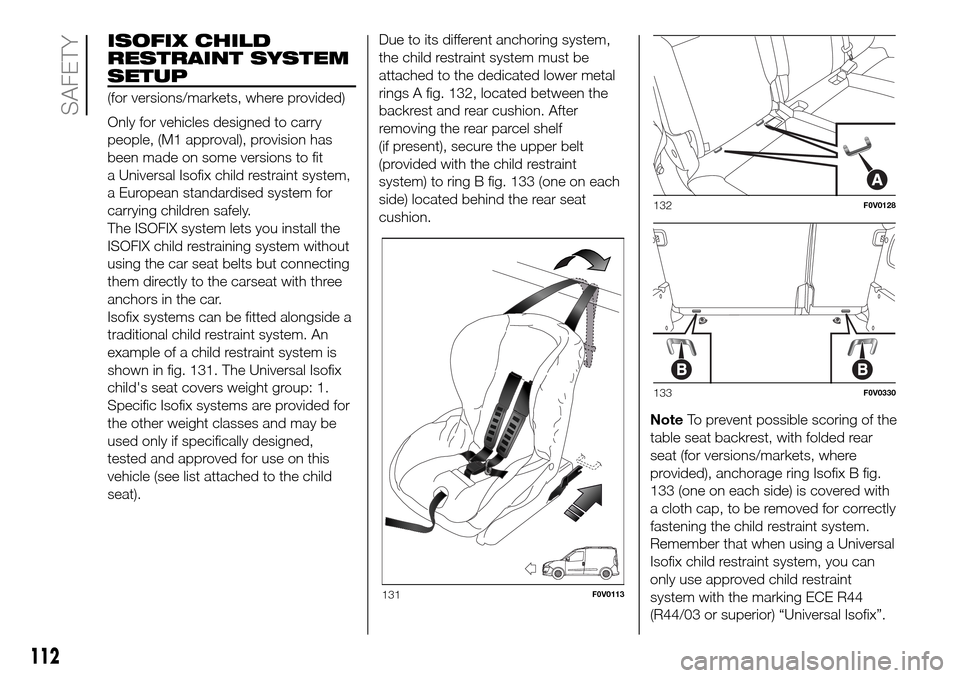
carrying children safely.
The ISOFIX system lets you install the
ISOFIX child restraining system without
using the car seat belts but connecting
them directly to the carseat with three
anchors in the car.
Isofix systems can be fitted alongside a
traditional child restraint system. An
example of a child restraint system is
shown in fig. 131. The Universal Isofix
child's seat covers weight group: 1.
Specific Isofix systems are provided for
the other weight classes and may be
used only if specifically designed,
tested and approved for use on this
vehicle (see list attached to the child
seat).Due to its different anchoring system,
the child restraint system must be
attached to the dedicated lower metal
rings A fig. 132, located between the
backrest and rear cushion. After
removing the rear parcel shelf
(if present), secure the upper belt
(provided with the child restraint
system) to ring B fig. 133 (one on each
side) located behind the rear seat
cushion.
NoteTo prevent possible scoring of the
table seat backrest, with folded rear
seat (for versions/markets, where
provided), anchorage ring Isofix B fig.
133 (one on each side) is covered with
a cloth cap, to be removed for correctly
fastening the child restraint system.
Remember that when using a Universal
Isofix child restraint system, you can
only use approved child restraint
system with the marking ECE R44
(R44/03 or superior) “Universal Isofix”.
131F0V0113
132F0V0128
133F0V0330
112
SAFETY
Page 118 of 298
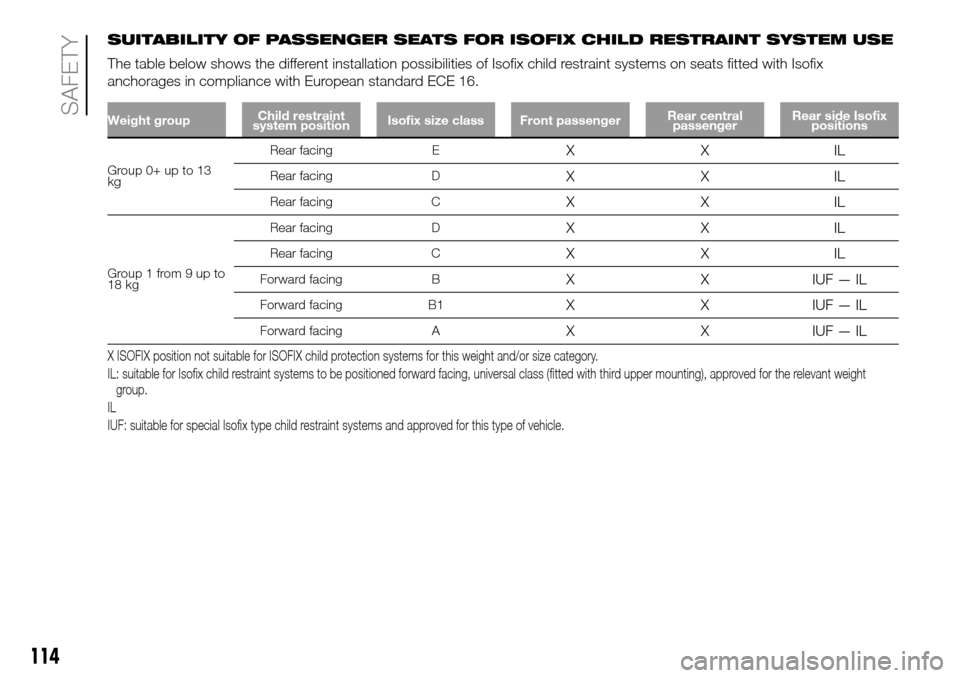
SUITABILITY OF PASSENGER SEATS FOR ISOFIX CHILD RESTRAINT SYSTEM USE
The table below shows the different installation possibilities of Isofix child restraint systems on seats fitted with Isofix
anchorages in compliance with European standard ECE 16.
Weight groupChild restraint
system positionIsofix size class Front passengerRear central
passengerRear side Isofix
positions
Group 0+ up to 13
kgRear facing E
XXIL
Rear facing DXXIL
Rear facing CXXIL
Group1from9upto
18 kgRear facing D
XXIL
Rear facing CXXIL
Forward facing BX X IUF — IL
Forward facing B1X X IUF — IL
Forward facing AX X IUF — IL
X ISOFIX position not suitable for ISOFIX child protection systems for this weight and/or size category.
IL: suitable for Isofix child restraint systems to be positioned forward facing, universal class (fitted with third upper mounting), approved for the relevant weight
group.
IL
IUF: suitable for special Isofix type child restraint systems and approved for this type of vehicle.
114
SAFETY
Page 136 of 298
TPMS operation faults
The system fault is indicated by
warning light
which first flashes for
75 seconds and then stays on steadily.
This can occur in any of the following
situations:
interference caused by electronic
devices or radio frequency emissions
similar to those of the TPM sensors.
Application of tinted films which
interfere with the signals of the radio
waves.
Presence of snow or ice on the
wheels or the wheel arches.
Use of snow chains.
Use of wheels/tyres not equipped
with TPM sensors.
The space-saver wheel is not
equipped with the tyre pressure control
sensor. Therefore, the tyre pressure is
not controlled by the system.
NOTE The vehicle may be equipped
with FiX&Go Automatic tyre repair
kit, space-saver wheel or full size spare
wheel (with or without original TPMS
sensor to measure tyre pressure).
After the punctured tyre has been
repaired with the original tyre sealant
contained in the FiX&Go Automatic tyre
repair kit, the previous condition must
be restored, so that the
warning
light is off during normal driving.Space-saver wheel (for versions/
markets, where provided): the
space-saver wheel is not equipped with
a TPMS sensor. Once fitted, while
driving normally, the warning light
comes on (flashing for about 75
seconds, and then constantly). This
condition lasts until a wheel equipped
with an original TPMS sensor is fitted
on the vehicle.
Normal spare wheel (without TPMS
sensor): once fitted, while driving
normally, the
warning light comes on
(flashing for about 75 seconds, and
then constantly). This condition lasts
until a wheel equipped with an original
TPMS sensor is fitted on the vehicle.
The system is then restored and the
warning light switches off.
Normal spare wheel (with TPMS
sensor): once fitted, while driving
normally, the
warning light switches
off.
IMPORTANT In all the above-mentioned
cases, it is advisable to check the
spare wheel tyre pressure before
starting driving.
NOTE If the tyres are replaced, driving
the vehicle for short stretches, some
time might be needed before the
system is restored.IMPORTANT
WARNING
103)The TPMS is optimised for the
original tyres and wheels provided. TPMS
pressures and alerts have been defined
according to the size of the tyres mounted
on the vehicle. Using equipment with
different size, type or kind may cause
irregular system operation or sensor
damage. Non-original spare wheels can
damage the sensor. Do not use tyre
sealant or balancing weights if the vehicle
is equipped with TPMS as these may
damage the sensors.
104)If the system signals a pressure
decrease on a specific tyre, it is
recommended to check the pressure on all
four tyres.
105)TPMS does not relieve the driver from
the obligation to check the tyre pressure
every month; it is not to be considered
a replacing system for maintenance or a
safety system.
106)Tyre pressure must be checked with
tyres cold. Should it become necessary for
whatever reason to check pressure with
warm tyres, do not reduce pressure even if
it is higher than the prescribed value, but
repeat the check when tyres are cold.
107)The TPMS cannot indicate sudden
tyre pressure drops (for example when
a tyre bursts). In this case, stop the vehicle,
braking with caution and avoiding abrupt
steering.
132
STARTING AND DRIVING
Page 143 of 298
SAVING FUEL
Some useful tips are given below for
fuel saving and reducing harmful
emissions of CO2 and other pollutants
(nitrogen oxides, unburnt
hydrocarbons, Particulate Matter (PM),
etc.).
PRACTICAL ADVICE FOR
REDUCING FUEL
CONSUMPTION AND
HARMFUL EMISSIONS
Vehicle conditions
Have checks and adjustments for
vehicle maintenancecarried out
in accordance with the “Scheduled
servicing plan”.
Checktyrepressure regularly, at
least once every four weeks.
Excessively low pressures will increase
consumption because rolling resistance
will be higher. In addition, this wears
the tyre more quickly and impairs
performance.
Only usesnow tyreswhen the
weather conditions make them
absolutely necessary. They increase
consumption and noise.
Do not travel witha heavy load: the
weight of the vehicle (especially when
driving in town) and its geometry greatly
affect fuel consumption and stability.
Removeroof racks or ski racks
after use. These accessories reduce the
vehicle's aerodynamic penetration and
have a negative effect on fuel
consumption.
When transporting particularly large
objects, use atrailerif possible.
Use the vehicle's air vents if
possible: travelling with the windows
open impairs aerodynamics.
Use electrical devices only for the
amount of time needed. The vehicle’s
heated rear window, additional
headlights, screen wipers and heater
fan require a considerable amount
of energy; this increases fuel
consumption (by up to +25% in an
urban cycle).
Air conditioning leads to higher fuel
consumption (on average up to +30%).
If the temperature outside is not too
extreme, try and use the air vents.
Driving style
Afterstarting the engineyou
should drive away immediately and
slowly, avoiding high revs. Do not warm
up the engine at low or high revs when
the vehicle is stationary; this causes
the engine to warm up more slowly,
thereby increasing fuel consumption,
emissions and mechanical component
wear.
Avoidpointless actionssuch as
revving up when at traffic lights or
before stopping the engine. The latter
action, like double-declutching, is
unnecessary and causes increased fuel
consumption and pollution.
Gear selection:select a high gear
as soon as possible (taking into
account normal engine operation and
traffic conditions) without pushing
the engine to high revs during
the intermediate gears. Using low gears
at high revs to get lively acceleration
increases fuel consumption, harmful
emissions and engine wear.
Vehicle speed:fuel consumption
increases exponentially as the speed of
the vehicle increases. Keep your speed
moderate and as even as possible,
avoiding unnecessary braking and
acceleration, which cause excessive
fuel consumption and increased
emissions. Keeping a safe distance
from the vehicle in front helps to
maintain a steady speed.
Acceleration:accelerating violently
severely affects consumption and
emissions. Acceleration should be
gradual and should not exceed the
maximum engine torque rate.
139
Page 144 of 298
CONDITIONS OF USE
Cold starting
Short journeys and frequent cold starts
do not allow the engine to reach
optimum operating temperature.
This results in a significant increase in
consumption levels (from +15 to +30%
on the urban cycle) and emissions.
Traffic and road conditions
Rather high consumption levels are
linked to situations with heavy traffic, for
instance when travelling in queues
with frequent use of the lower gears or
in cities with many traffic lights. Winding
mountain roads and rough road
surfaces also adversely affect
consumption.
Stops in traffic
During prolonged hold-ups (e.g. level
crossings) the engine should be
switched off.TOWING TRAILERS
IMPORTANT
The vehicle must be equipped with a
type-approved tow hook and adequate
electrical system to tow trailers.
Installation should be carried out by
specialised personnel who will issue the
required papers for travelling on roads.
Install any specific and/or additional
door mirrors as specified by the
Highway Code.
Remember that when towing a trailer,
steep hills are harder to climb, braking
spaces increase and overtaking takes
longer depending on the overall weight.
Engage a low gear when driving
downhill, rather than constantly using
the brake.
The weight of the trailer on the vehicle
tow hook will reduce the loading
capacity of the vehicle by the same
amount.
To make sure that the maximum
towable weight is not exceeded (given
in the vehicle registration document)
account should be taken of the fully
laden trailer, including accessories and
luggage.
Do not exceed the speed limits specific
to each country you are driving in, in
the case of vehicles towing trailers.
In any case, the top speed must not
exceed 80 km/h.
116) 117)
WARNING
116)The ABS device with which the
vehicle is equipped will not control the
braking system of the trailer. Particular
caution is required on slippery roads.
117)Never modify the braking system of
the vehicle to control the trailer brake. The
trailer braking system must be fully
independent from the hydraulic system of
the vehicle.
140
STARTING AND DRIVING
Page 162 of 298
CHANGING A WHEEL
The vehicle is originally equipped with
the Fix&Go automatic quick tyre repair
kit (see instructions in the next section).
As an alternative, the vehicle may
have a normal-sized spare wheel.
Wheel changing and correct use of the
jack and spare wheel call for some
precautions, as listed below.
125) 126) 127) 128)
Note for one-way tyres
One-way tyres have a few arrows on
the side indicating the rotation direction.
If a wheel is changed (when punctured,
for example) the direction of the arrows
on the spare wheel tyre may not
coincide with the rotation direction of
the wheel to be replaced.
In these conditions, too, the tyre still
maintains its safety features.
Anyway, it is recommended to have the
wheel repaired and refitted as soon as
possible, as the best performance is
achieved when the rotation direction of
all tyres coincides with the one
indicated by the arrows.
Please note that:
the jack weight is 4 kg;
the jack requires no adjustment;
the jack cannot be repaired and in
the event of a fault it must be replaced
by another original one;
no tool other than its cranking
device may be fitted on the jack.
To change a wheel, proceed as follows:
stop the vehicle in a position that is
not dangerous for oncoming traffic
where you can change the wheel safely.
The ground should be flat if possible,
and sufficiently firm;
stop the engine and pull the
handbrake;
engage first gear or reverse;
wear the reflective safety jacket
(compulsory by law in certain countries)
before getting out of the vehicle;
indicate that the vehicle has broken
down using the devices required by
the law in the current country (e.g.
warning triangle, hazard lights, etc.);
for Cargo versions fig. 182: move
the left front seat forward and operate
lever A to access the tool bag; take it to
the wheel that needs replacing;
for Doblò/Doblò Combi versions fig.
183: open the rear doors, inside the
compartment on the rear right side,
take the tool bag, unhooking the elastic
band from the buckle, and take it next
to the wheel to be changed;
take wheel spanner B fig. 184 and
the extension with pentagonal fitting C;
inside the load area, fit extension C
on bolt A; use spanner B to lower the
wheel by unwinding the wire;
use the wheel dismantling spanner B
to remove the wheel from the vehicle
fig. 185;
unscrew knob D fig. 186 and release
the rim from bracket E, removing it
from the hole of the rim;
182F0V0149
183F0V0148
158
IN AN EMERGENCY