ESP FIAT DOBLO COMBI 2017 2.G Owners Manual
[x] Cancel search | Manufacturer: FIAT, Model Year: 2017, Model line: DOBLO COMBI, Model: FIAT DOBLO COMBI 2017 2.GPages: 300, PDF Size: 24.91 MB
Page 2 of 300

Noi che abbiamo ideato, progettato e costruito il tuo veicolo,
lo conosciamo davvero in ogni singolo dettaglio e componente. Nelle officine autorizzate Fiat Professional Service
trovi tecnici formati direttamente da noi che ti offrono qualità e pr\
ofessionalità in tutti gli interventi di manutenzione. Le officine Fiat Professional sono sempre al tuo fianco pe\
r la manutenzione periodica, i controlli di stagione e per i consigli pratici dei nostri esperti.
Con i Ricambi Originali Fiat Professional, mantieni nel tempo le caratte\
ristiche di affidabilità, comfort e performance per cui hai scelto il tuo nuovo veicolo.
Chiedi sempre i Ricambi Originali dei componenti che utilizziamo per cos\
truire le nostre auto e che ti raccomandiamo perché sono il risultato del nostro costante impegno ne\
lla ricerca e nello sviluppo di tecnologie sempre più innovative.
Per tutti questi motivi affidati ai Ricambi Originali:
i soli appositamente progettati da Fiat Professional per il tuo veicolo.
SICUREZZA:
SISTEMA FRENANTEECOLOGIA: FILTRI ANTIPARTICOLATO, MANUTENZIONE CLIMATIZZATORECOMFORT:
SOSPENSIONI E TERGICRISTALLIPERFORMANCE:
CANDELE, INIETTORI E BATTERIELINEA ACCESSORI:
BARRE PORTA TUTTO, CERCHI
PERCHÈ SCEGLIERE
RICAMBI ORIGINALI
COP FULL BACK LUM IT.qxp_500 UM ITA 23/02/16 09:51 Pagina 2
Page 6 of 300
VERY IMPORTANT
REFUELLING
Petrol engines: only refuel with unleaded petrol with octane rating (RON) not less than 95 in compliance with the European specification
EN228.Diesel engines: only refuel with diesel fuel conforming to the European specification EN590. The use of other products or mixtures
may damage the engine beyond repair and consequently invalidate the warranty, due to the damage caused.
STARTING THE ENGINE
Petrol engines: make sure that the handbrake is engaged; set the gear lever to neutral; fully depress the clutch pedal without pressing the
accelerator, then turn the ignition key to AVV and release it as soon as the engine has started.Diesel engines: turn the ignition key to MAR
and wait for the
andwarning lights to switch off. Then turn the ignition key to AVV and release it as soon as the engine has started.
PARKING ON FLAMMABLE MATERIAL
The catalytic converter develops high temperatures during operation. Do not park on grass, dry leaves, pine needles or other flammable
material: fire hazard.
RESPECTING THE ENVIRONMENT
The vehicle is fitted with a system that allows continuous diagnosis of the emission-related components in order to help protect the
environment.
ELECTRICAL ACCESSORIES
If, after buying the vehicle, you decide to add electrical accessories (with the risk of gradually draining the battery), visit a Fiat Dealership. They
can calculate the overall electrical requirement and check that the vehicle's electrical system can support the required load.
SCHEDULED SERVICING
Correct maintenance enables the vehicle to perfectly maintain performance and safety characteristics, its environmental friendliness and low
running costs over time.
Page 7 of 300
USE OF THE OWNER HANDBOOK
OPERATING INSTRUCTIONS
Each time direction instructions (left/right or forwards/backwards) about the vehicle are given, these must be intended as
regarding an occupant in the driver's seat. Special cases not complying with this rule will be specified as appropriate in the text.
The figures in the Owner Handbook are provided by way of example only: this might imply that some details of the image do
not correspond to the actual arrangement of your vehicle. In addition, the Handbook has been conceived considering vehicles
with steering wheel on the left side; it is therefore possible that on vehicles with steering wheel on the right side, the position
or construction of some controls is not exactly mirror-like with respect to the figure.
To identify the chapter with the information needed you can consult the index at the end of this Owner Handbook.
Chapters can be rapidly identified with dedicated graphic tabs, at the side of each odd page. A few pages further there is a key
for getting to know the chapter order and the relevant symbols in the tabs. There is in any case a textual indication of the
current chapter at the side of each even page.
WARNINGS AND PRECAUTIONS
While reading this Owner Handbook you will find a series ofWARNINGSto prevent procedures that could damage your
vehicle.
There are alsoPRECAUTIONSthat must be carefully followed to prevent incorrect use of the components of the vehicle,
which could cause accidents or injuries.
Therefore allWARNINGSandPRECAUTIONSmust always be carefully followed.
WARNINGSandPRECAUTIONSare recalled in the text with the following symbols:
personal safety;
vehicle integrity;
environmental protection.
NOTE These symbols, when necessary, are indicated besides the title or at the end of the line and are followed by a number.
That number recalls the corresponding warning at the end of the relevant section.
Page 19 of 300
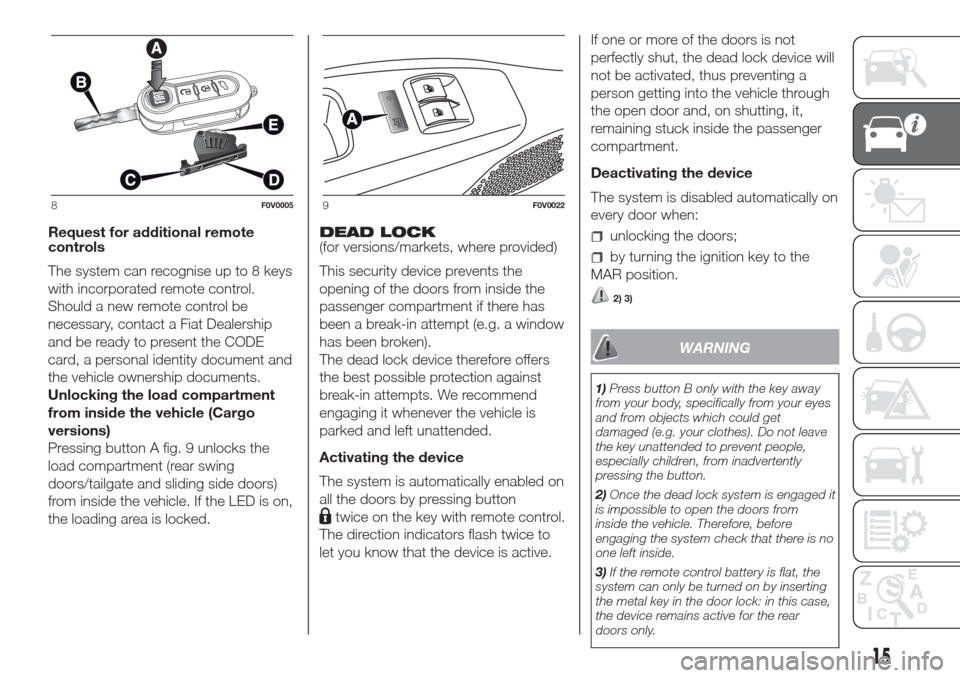
Request for additional remote
controls
The system can recognise up to 8 keys
with incorporated remote control.
Should a new remote control be
necessary, contact a Fiat Dealership
and be ready to present the CODE
card, a personal identity document and
the vehicle ownership documents.
Unlocking the load compartment
from inside the vehicle (Cargo
versions)
Pressing button A fig. 9 unlocks the
load compartment (rear swing
doors/tailgate and sliding side doors)
from inside the vehicle. If the LED is on,
the loading area is locked.DEAD LOCK
(for versions/markets, where provided)
This security device prevents the
opening of the doors from inside the
passenger compartment if there has
been a break-in attempt (e.g. a window
has been broken).
The dead lock device therefore offers
the best possible protection against
break-in attempts. We recommend
engaging it whenever the vehicle is
parked and left unattended.
Activating the device
The system is automatically enabled on
all the doors by pressing button
twice on the key with remote control.
The direction indicators flash twice to
let you know that the device is active.If one or more of the doors is not
perfectly shut, the dead lock device will
not be activated, thus preventing a
person getting into the vehicle through
the open door and, on shutting, it,
remaining stuck inside the passenger
compartment.
Deactivating the device
The system is disabled automatically on
every door when:
unlocking the doors;
by turning the ignition key to the
MAR position.
2) 3)
WARNING
1)Press button B only with the key away
from your body, specifically from your eyes
and from objects which could get
damaged (e.g. your clothes). Do not leave
the key unattended to prevent people,
especially children, from inadvertently
pressing the button.
2)Once the dead lock system is engaged it
is impossible to open the doors from
inside the vehicle. Therefore, before
engaging the system check that there is no
one left inside.
3)If the remote control battery is flat, the
system can only be turned on by inserting
the metal key in the door lock: in this case,
the device remains active for the rear
doors only.
8F0V00059F0V0022
15
Page 37 of 300
WARNING
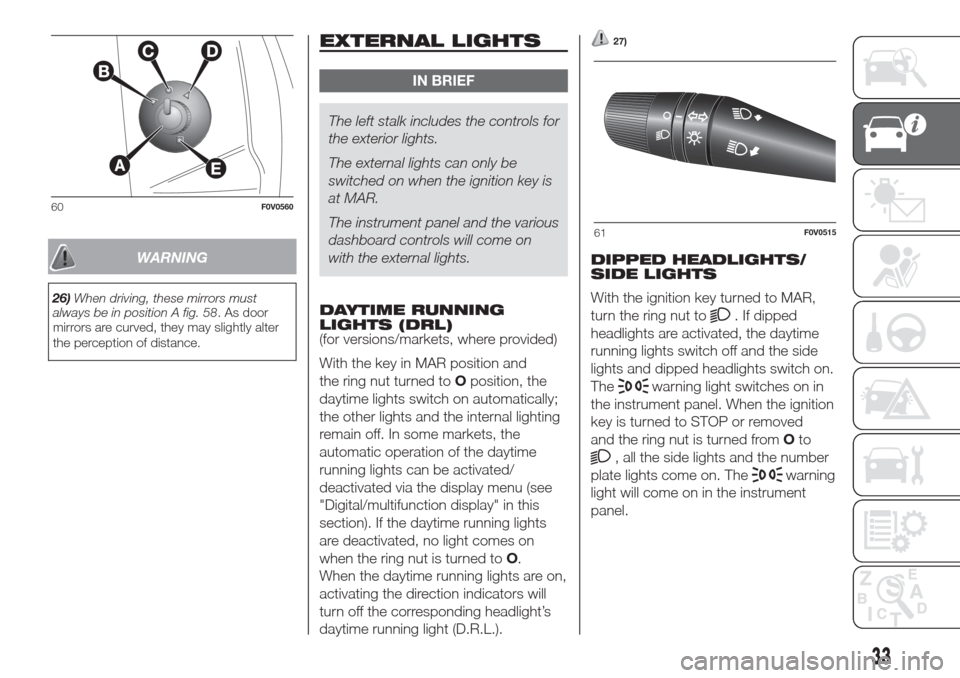
26)When driving, these mirrors must
always be in position A fig. 58. As door
mirrors are curved, they may slightly alter
the perception of distance.
EXTERNAL LIGHTS
IN BRIEF
The left stalk includes the controls for
the exterior lights.
The external lights can only be
switched on when the ignition key is
at MAR.
The instrument panel and the various
dashboard controls will come on
with the external lights.
DAYTIME RUNNING
LIGHTS (DRL)
(for versions/markets, where provided)
With the key in MAR position and
the ring nut turned toOposition, the
daytime lights switch on automatically;
the other lights and the internal lighting
remain off. In some markets, the
automatic operation of the daytime
running lights can be activated/
deactivated via the display menu (see
"Digital/multifunction display" in this
section). If the daytime running lights
are deactivated, no light comes on
when the ring nut is turned toO.
When the daytime running lights are on,
activating the direction indicators will
turn off the corresponding headlight’s
daytime running light (D.R.L.).
27)
DIPPED HEADLIGHTS/
SIDE LIGHTS
With the ignition key turned to MAR,
turn the ring nut to
. If dipped
headlights are activated, the daytime
running lights switch off and the side
lights and dipped headlights switch on.
The
warning light switches on in
the instrument panel. When the ignition
key is turned to STOP or removed
and the ring nut is turned fromOto
, all the side lights and the number
plate lights come on. The
warning
light will come on in the instrument
panel.
60F0V0560
61F0V0515
33
Page 38 of 300
MAIN BEAM HEADLIGHTS
With ring nut in position
, push the
stalk forward toward the dashboard
(stable position). The
warning light
switches on in the instrument panel.
Pulling the stalk towards the steering
wheel, the main beams are turned
off and the dipped headlights on.
FLASHING
You can flash the beams pulling the
stalk toward the steering wheel
(unstable position). The
warning
light switches on in the instrument
panel.
DIRECTION INDICATORS
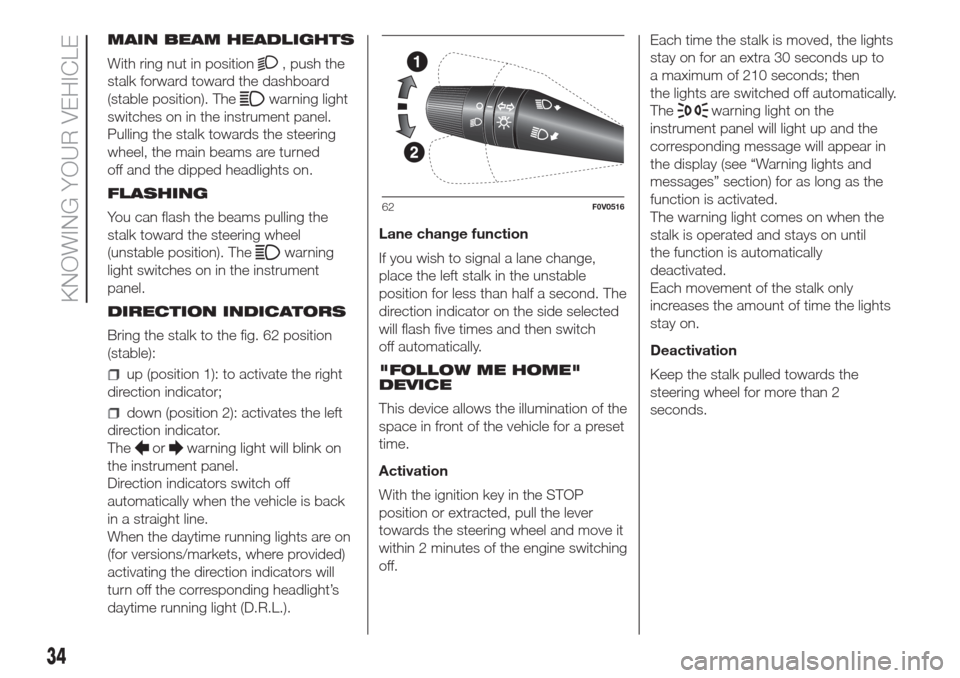
Bring the stalk to the fig. 62 position
(stable):
up (position 1): to activate the right
direction indicator;
down (position 2): activates the left
direction indicator.
The
orwarning light will blink on
the instrument panel.
Direction indicators switch off
automatically when the vehicle is back
in a straight line.
When the daytime running lights are on
(for versions/markets, where provided)
activating the direction indicators will
turn off the corresponding headlight’s
daytime running light (D.R.L.).Lane change function
If you wish to signal a lane change,
place the left stalk in the unstable
position for less than half a second. The
direction indicator on the side selected
will flash five times and then switch
off automatically.
"FOLLOW ME HOME"
DEVICE
This device allows the illumination of the
space in front of the vehicle for a preset
time.
Activation
With the ignition key in the STOP
position or extracted, pull the lever
towards the steering wheel and move it
within 2 minutes of the engine switching
off.Each time the stalk is moved, the lights
stay on for an extra 30 seconds up to
a maximum of 210 seconds; then
the lights are switched off automatically.
The
warning light on the
instrument panel will light up and the
corresponding message will appear in
the display (see “Warning lights and
messages” section) for as long as the
function is activated.
The warning light comes on when the
stalk is operated and stays on until
the function is automatically
deactivated.
Each movement of the stalk only
increases the amount of time the lights
stay on.
Deactivation
Keep the stalk pulled towards the
steering wheel for more than 2
seconds.
62F0V0516
34
KNOWING YOUR VEHICLE
Page 51 of 300
IMPORTANT The air recirculation
system makes it possible to reach the
required heating or cooling conditions
faster, depending on the selected
mode. It is not advisable to switch the
internal air recirculation on when it is
rainy/cold or the windows might steam
up, especially if the climate control
system is not turned on.
CLIMATE CONTROL
SYSTEM (cooling)
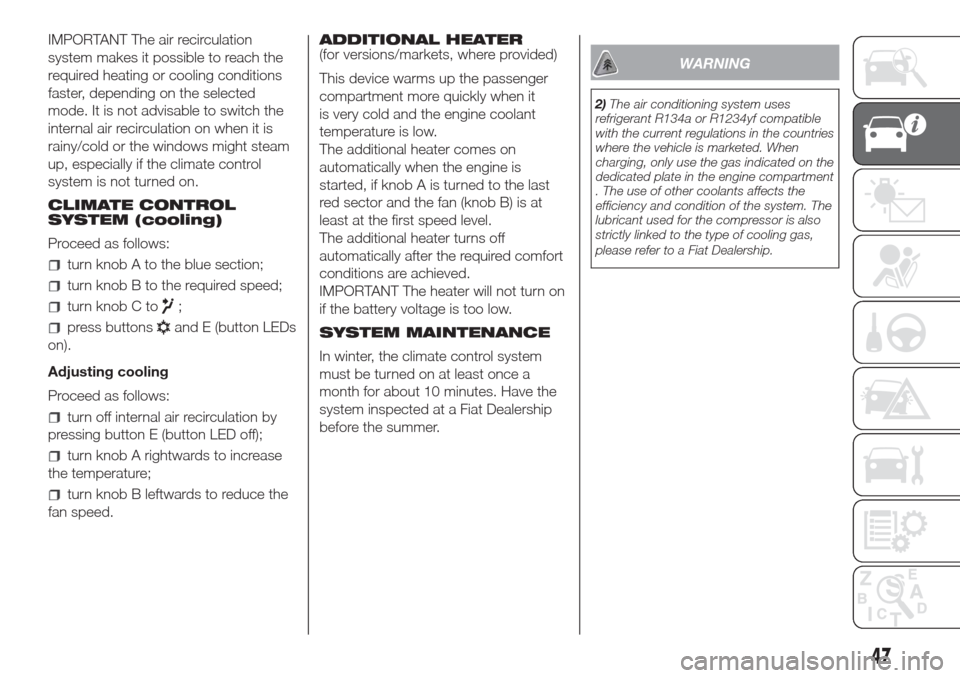
Proceed as follows:
turn knob A to the blue section;
turn knob B to the required speed;
turn knob C to;
press buttonsand E (button LEDs
on).
Adjusting cooling
Proceed as follows:
turn off internal air recirculation by
pressing button E (button LED off);
turn knob A rightwards to increase
the temperature;
turn knob B leftwards to reduce the
fan speed.ADDITIONAL HEATER
(for versions/markets, where provided)
This device warms up the passenger
compartment more quickly when it
is very cold and the engine coolant
temperature is low.
The additional heater comes on
automatically when the engine is
started, if knob A is turned to the last
red sector and the fan (knob B) is at
least at the first speed level.
The additional heater turns off
automatically after the required comfort
conditions are achieved.
IMPORTANT The heater will not turn on
if the battery voltage is too low.
SYSTEM MAINTENANCE
In winter, the climate control system
must be turned on at least once a
month for about 10 minutes. Have the
system inspected at a Fiat Dealership
before the summer.
WARNING
2)The air conditioning system uses
refrigerant R134a or R1234yf compatible
with the current regulations in the countries
where the vehicle is marketed. When
charging, only use the gas indicated on the
dedicated plate in the engine compartment
. The use of other coolants affects the
efficiency and condition of the system. The
lubricant used for the compressor is also
strictly linked to the type of cooling gas,
please refer to a Fiat Dealership.
47
Page 55 of 300
Air flow distributed between
footwell diffusers (hotter air)
and central and side
dashboard vents (cooler air).
This distribution mode is
particularly useful in spring and
autumn on sunny days.
Air flow distributed between
the footwell vents and the
windscreen and front
side window defrosting/
demisting vents. This allows an
adequate warming of the
passenger compartment and
prevents the windows from
misting up.
The distribution set is shown by the
corresponding LEDs in the selected
buttons coming on.
To restore automatic control of the air
distribution after a manual selection,
press the AUTO button.
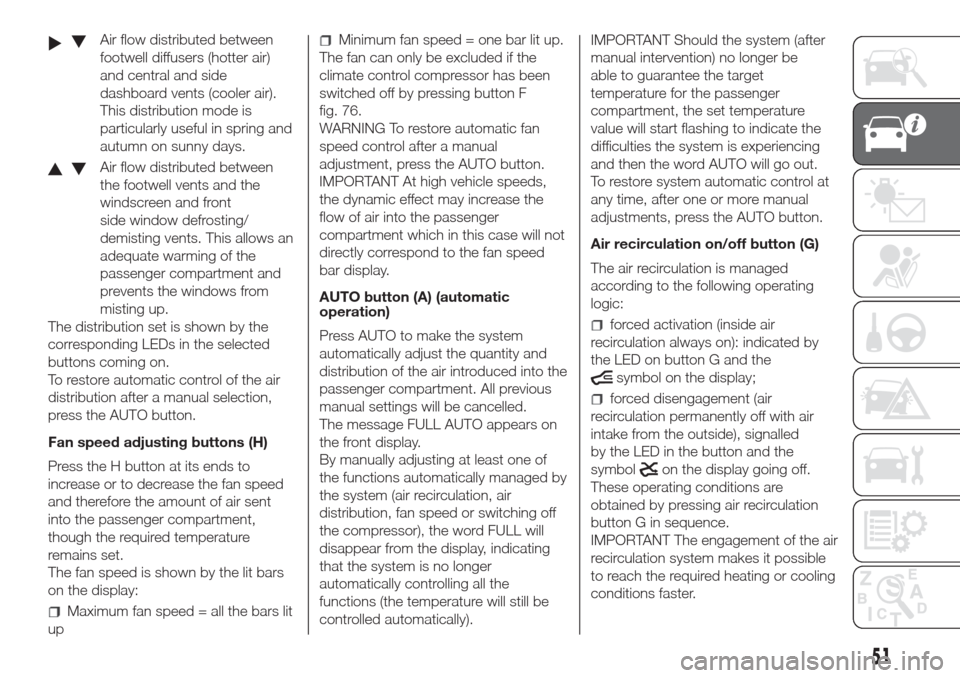
Fan speed adjusting buttons (H)
Press the H button at its ends to
increase or to decrease the fan speed
and therefore the amount of air sent
into the passenger compartment,
though the required temperature
remains set.
The fan speed is shown by the lit bars
on the display:
Maximum fan speed = all the bars lit
up
Minimum fan speed = one bar lit up.
The fan can only be excluded if the
climate control compressor has been
switched off by pressing button F
fig. 76.
WARNING To restore automatic fan
speed control after a manual
adjustment, press the AUTO button.
IMPORTANT At high vehicle speeds,
the dynamic effect may increase the
flow of air into the passenger
compartment which in this case will not
directly correspond to the fan speed
bar display.
AUTO button (A) (automatic
operation)
Press AUTO to make the system
automatically adjust the quantity and
distribution of the air introduced into the
passenger compartment. All previous
manual settings will be cancelled.
The message FULL AUTO appears on
the front display.
By manually adjusting at least one of
the functions automatically managed by
the system (air recirculation, air
distribution, fan speed or switching off
the compressor), the word FULL will
disappear from the display, indicating
that the system is no longer
automatically controlling all the
functions (the temperature will still be
controlled automatically).IMPORTANT Should the system (after
manual intervention) no longer be
able to guarantee the target
temperature for the passenger
compartment, the set temperature
value will start flashing to indicate the
difficulties the system is experiencing
and then the word AUTO will go out.
To restore system automatic control at
any time, after one or more manual
adjustments, press the AUTO button.
Air recirculation on/off button (G)
The air recirculation is managed
according to the following operating
logic:
forced activation (inside air
recirculation always on): indicated by
the LED on button G and the
symbol on the display;
forced disengagement (air
recirculation permanently off with air
intake from the outside), signalled
by the LED in the button and the
symbol
on the display going off.
These operating conditions are
obtained by pressing air recirculation
button G in sequence.
IMPORTANT The engagement of the air
recirculation system makes it possible
to reach the required heating or cooling
conditions faster.
51
Page 56 of 300
It is however inadvisable to use it on
rainy/cold days as it would considerably
increase the possibility of the windows
misting inside, especially if the climate
control compressor is off.
To prevent the windows from misting
up, the recirculation is forced off (i.e. air
is drawn in from the outside) when
the outside temperature is cold.
It is advisable not to use the internal air
recirculation function when the outside
temperature is low, because the
windows could mist rapidly.
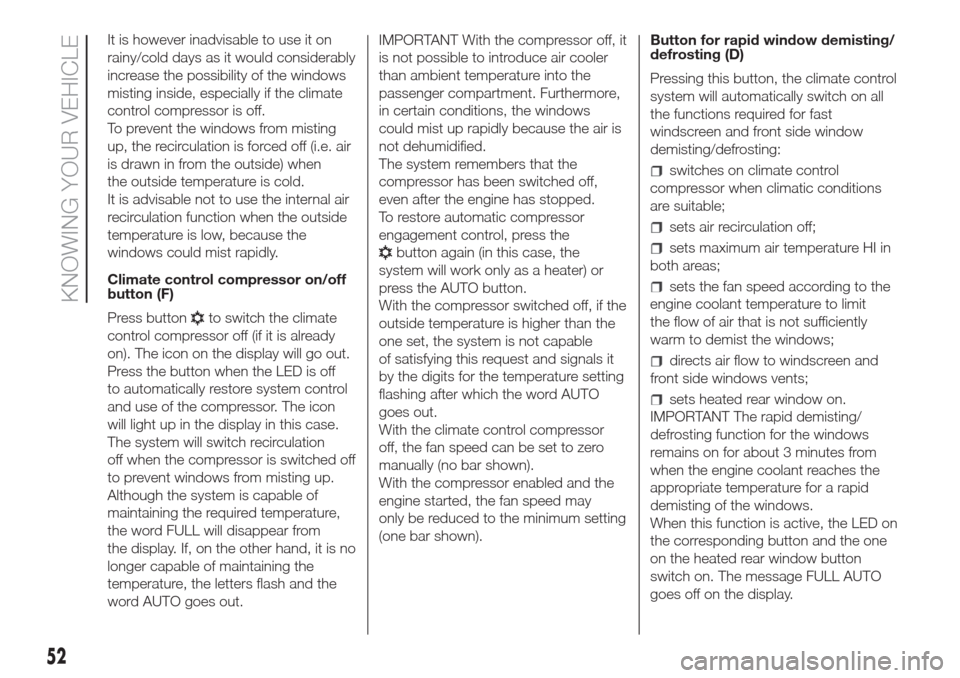
Climate control compressor on/off
button (F)
Press button
to switch the climate
control compressor off (if it is already
on). The icon on the display will go out.
Press the button when the LED is off
to automatically restore system control
and use of the compressor. The icon
will light up in the display in this case.
The system will switch recirculation
off when the compressor is switched off
to prevent windows from misting up.
Although the system is capable of
maintaining the required temperature,
the word FULL will disappear from
the display. If, on the other hand, it is no
longer capable of maintaining the
temperature, the letters flash and the
word AUTO goes out.IMPORTANT With the compressor off, it
is not possible to introduce air cooler
than ambient temperature into the
passenger compartment. Furthermore,
in certain conditions, the windows
could mist up rapidly because the air is
not dehumidified.
The system remembers that the
compressor has been switched off,
even after the engine has stopped.
To restore automatic compressor
engagement control, press the
button again (in this case, the
system will work only as a heater) or
press the AUTO button.
With the compressor switched off, if the
outside temperature is higher than the
one set, the system is not capable
of satisfying this request and signals it
by the digits for the temperature setting
flashing after which the word AUTO
goes out.
With the climate control compressor
off, the fan speed can be set to zero
manually (no bar shown).
With the compressor enabled and the
engine started, the fan speed may
only be reduced to the minimum setting
(one bar shown).Button for rapid window demisting/
defrosting (D)
Pressing this button, the climate control
system will automatically switch on all
the functions required for fast
windscreen and front side window
demisting/defrosting:
switches on climate control
compressor when climatic conditions
are suitable;
sets air recirculation off;
sets maximum air temperature HI in
both areas;
sets the fan speed according to the
engine coolant temperature to limit
the flow of air that is not sufficiently
warm to demist the windows;
directs air flow to windscreen and
front side windows vents;
sets heated rear window on.
IMPORTANT The rapid demisting/
defrosting function for the windows
remains on for about 3 minutes from
when the engine coolant reaches the
appropriate temperature for a rapid
demisting of the windows.
When this function is active, the LED on
the corresponding button and the one
on the heated rear window button
switch on. The message FULL AUTO
goes off on the display.
52
KNOWING YOUR VEHICLE
Page 58 of 300
The electric windows are fitted with a
security system (where provided) that
can detect the presence of an obstacle
whilst the window is closing; when
this happens, the system kicks in and
the movement of the glass is
immediately reversed.
IMPORTANT In the event that the
anti-crushing function is activated 5
times in only 1 minute, the system will
automatically enter the "recovery" mode
(self-protection). This condition is
apparent from the window closing in
stages.
If this occurs, restore the system as
follows:
open the windows.
If no malfunction is present, the window
returns to its normal operation
automatically.
IMPORTANT With the ignition key at
STOP or removed, the electric windows
remain activated for about two minutes
and are deactivated as soon as a
door is opened.
28) 29)
FRONT AND REAR
ELECTRIC WINDOWS
(for versions/markets, where provided)
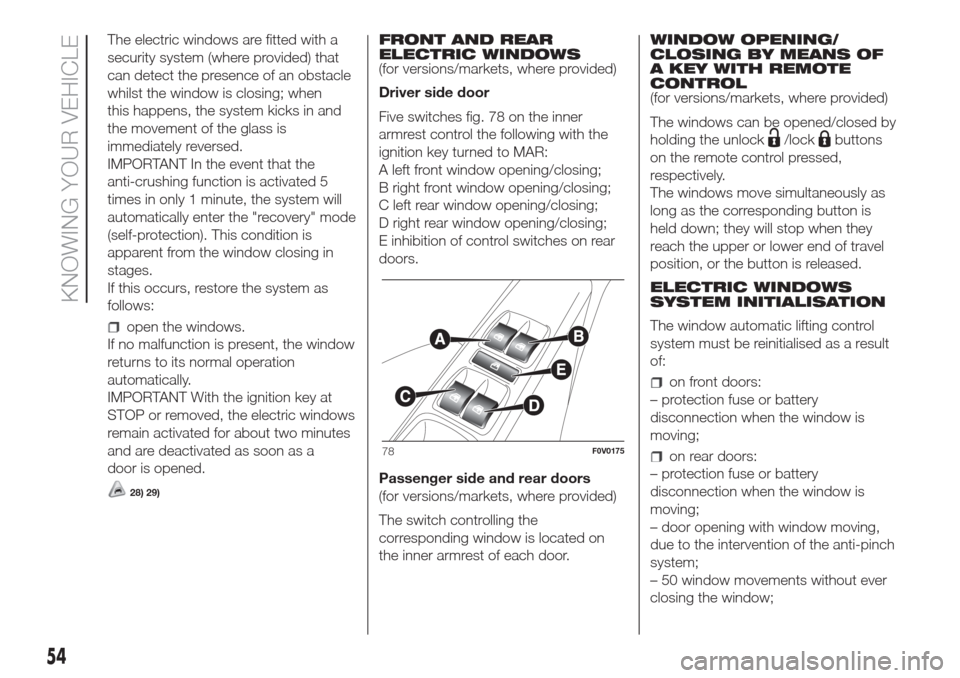
Driver side door
Five switches fig. 78 on the inner
armrest control the following with the
ignition key turned to MAR:
A left front window opening/closing;
B right front window opening/closing;
C left rear window opening/closing;
D right rear window opening/closing;
E inhibition of control switches on rear
doors.
Passenger side and rear doors
(for versions/markets, where provided)
The switch controlling the
corresponding window is located on
the inner armrest of each door.WINDOW OPENING/
CLOSING BY MEANS OF
A KEY WITH REMOTE
CONTROL
(for versions/markets, where provided)
The windows can be opened/closed by
holding the unlock
/lockbuttons
on the remote control pressed,
respectively.
The windows move simultaneously as
long as the corresponding button is
held down; they will stop when they
reach the upper or lower end of travel
position, or the button is released.
ELECTRIC WINDOWS
SYSTEM INITIALISATION
The window automatic lifting control
system must be reinitialised as a result
of:
on front doors:
– protection fuse or battery
disconnection when the window is
moving;
on rear doors:
– protection fuse or battery
disconnection when the window is
moving;
– door opening with window moving,
due to the intervention of the anti-pinch
system;
– 50 window movements without ever
closing the window;78F0V0175
54
KNOWING YOUR VEHICLE