warning lights FIAT DOBLO COMBI 2018 Owner handbook (in English)
[x] Cancel search | Manufacturer: FIAT, Model Year: 2018, Model line: DOBLO COMBI, Model: FIAT DOBLO COMBI 2018Pages: 272, PDF Size: 23.75 MB
Page 82 of 272
MSR system (engine drive
regulation)
The system prevents the drive wheels
from possibly locking, which could
happen, for example, if the accelerator
pedal is released suddenly or in the
case of a sudden downshifting in
conditions of poor grip.
In these conditions, the engine braking
effect could cause the drive wheels
to slip, resulting in a loss of vehicle
stability. In these situations, the MSR
system intervenes, restoring torque to
the engine in order to conserve vehicle
stability and increase safety.
Engagement/disengagement of the
ASR system
The ASR system switches on
automatically each time the engine is
started.
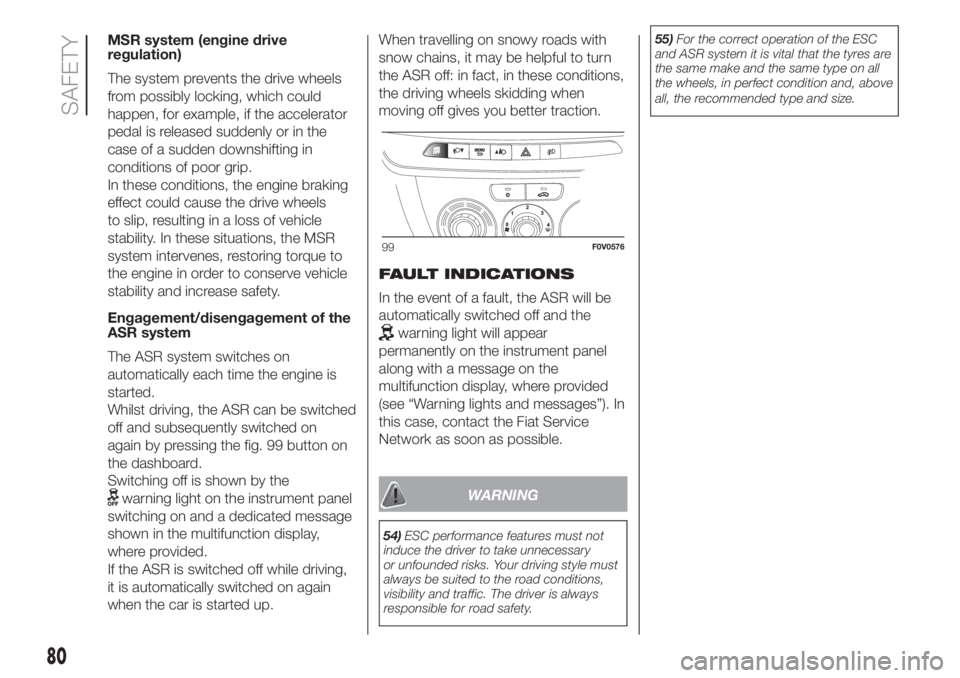
Whilst driving, the ASR can be switched
off and subsequently switched on
again by pressing the fig. 99 button on
the dashboard.
Switching off is shown by the
warning light on the instrument panel
switching on and a dedicated message
shown in the multifunction display,
where provided.
If the ASR is switched off while driving,
it is automatically switched on again
when the car is started up.When travelling on snowy roads with
snow chains, it may be helpful to turn
the ASR off: in fact, in these conditions,
the driving wheels skidding when
moving off gives you better traction.
FAULT INDICATIONS
In the event of a fault, the ASR will be
automatically switched off and the
warning light will appear
permanently on the instrument panel
along with a message on the
multifunction display, where provided
(see “Warning lights and messages”). In
this case, contact the Fiat Service
Network as soon as possible.
WARNING
54)ESC performance features must not
induce the driver to take unnecessary
or unfounded risks. Your driving style must
always be suited to the road conditions,
visibility and traffic. The driver is always
responsible for road safety.55)For the correct operation of the ESC
and ASR system it is vital that the tyres are
the same make and the same type on all
the wheels, in perfect condition and, above
all, the recommended type and size.
99F0V0576
80
SAFETY
Page 85 of 272
SBR SYSTEM
This system comprises an acoustic
warning which, in conjunction with the
warning lights
flashing on the
instrument panel, warns the front seat
passengers if their seat belt has not
been fastened.
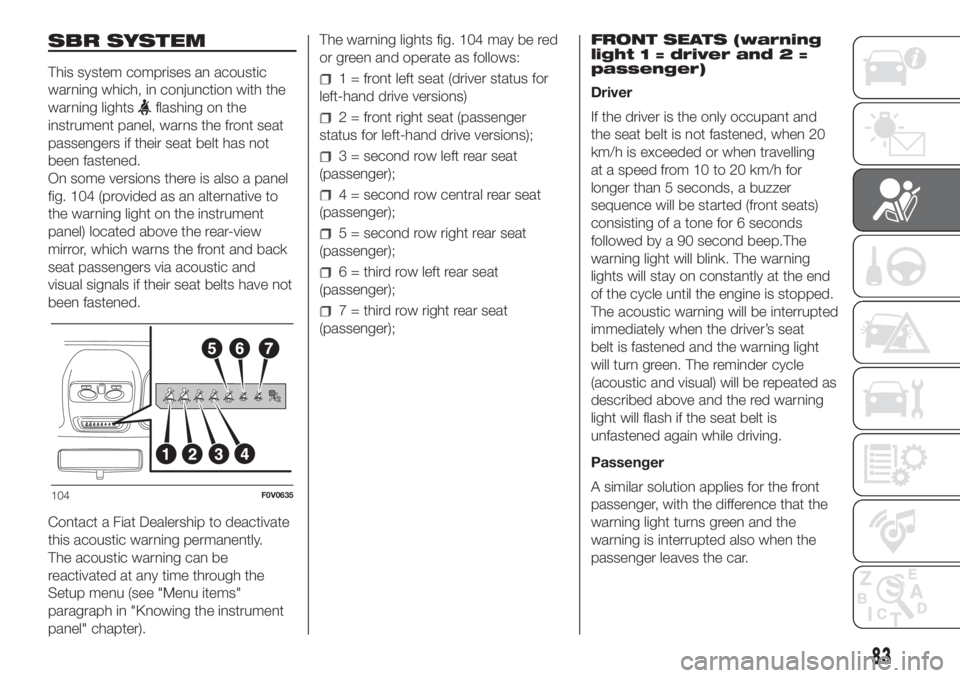
On some versions there is also a panel
fig. 104 (provided as an alternative to
the warning light on the instrument
panel) located above the rear-view
mirror, which warns the front and back
seat passengers via acoustic and
visual signals if their seat belts have not
been fastened.
Contact a Fiat Dealership to deactivate
this acoustic warning permanently.
The acoustic warning can be
reactivated at any time through the
Setup menu (see "Menu items"
paragraph in "Knowing the instrument
panel" chapter).The warning lights fig. 104 may be red
or green and operate as follows:
1 = front left seat (driver status for
left-hand drive versions)
2 = front right seat (passenger
status for left-hand drive versions);
3 = second row left rear seat
(passenger);
4 = second row central rear seat
(passenger);
5 = second row right rear seat
(passenger);
6 = third row left rear seat
(passenger);
7 = third row right rear seat
(passenger);FRONT SEATS (warning
light 1 = driver and 2 =
passenger)
Driver
If the driver is the only occupant and
the seat belt is not fastened, when 20
km/h is exceeded or when travelling
at a speed from 10 to 20 km/h for
longer than 5 seconds, a buzzer
sequence will be started (front seats)
consisting of a tone for 6 seconds
followed by a 90 second beep.The
warning light will blink. The warning
lights will stay on constantly at the end
of the cycle until the engine is stopped.
The acoustic warning will be interrupted
immediately when the driver’s seat
belt is fastened and the warning light
will turn green. The reminder cycle
(acoustic and visual) will be repeated as
described above and the red warning
light will flash if the seat belt is
unfastened again while driving.
Passenger
A similar solution applies for the front
passenger, with the difference that the
warning light turns green and the
warning is interrupted also when the
passenger leaves the car.
104F0V0635
83
Page 86 of 272
It both front seat belts are unfastened
while the vehicle is travelling a few
seconds apart, the acoustic indication
will refer to the most recent event
and the two warning lights will proceed
with the visual indication independently.
REAR SEATS (warning
lights3—4—5—6—7)
The reminder cycle is run only when
any seat belt is unfastened (red
blinking). In this condition, the warning
light for the seat belt which has been
unfastened will start flashing red for
approximately 30 seconds. An acoustic
signal is also emitted.The visual
indication (blinking red) will start and
end independently for each warning
light if several seat belts are unfastened.
The warning light will become green
when the relevant seat belt is fastened
again. The rear seat warning lights
will go out, if the front seat belts are
fastened, regardless of the state of the
belt (red or green) approximately 30
seconds after the last signal.
All the warning lights will come on when
at least one belt changes from
fastened to unfastened status or vice
versa.
84
SAFETY
PRE-TENSIONERS
To increase the protective efficiency of
the front seat belts, the vehicle is fitted
with pretensioners. These devices, in
the event of a violent head-on crash or
side impact, rewind the seat belts a
few centimetres. In this way, they
ensure that the belts fit tightly to the
wearer before the restraining action
begins.
It is evident that the pretensioners have
been activated when the belt withdraws
toward the retractor.
A slight discharge of smoke may be
produced during the activation of the
pretensioner which is not harmful and
does not involve any fire hazard.
The pretensioner does not require any
maintenance or lubrication. Any
changes to its original conditions will
invalidate its efficiency. If, due to
unusual natural events (floods, sea
storms, etc.), the device has been
affected by water and/or mud, contact
a Fiat Dealership to have it replaced.
IMPORTANT To obtain the highest
degree of protection from the action of
the pretensioner, wear the seat belt
tight to the chest and pelvis.
61)
17)
LOAD LIMITERS
(for versions/markets, where provided)
To increase passenger safety, the
front and rear seat belt retractors (for
versions/markets where provided)
contain a load limiter which controls the
force acting on the chest and
shoulders during the belt restraining
action in the event of a frontal collision.
GENERAL WARNINGS
FOR USING THE SEAT
BELTS
Seat belts must also be worn by
pregnant mothers: the risk of injury in
the event of an accident is greatly
reduced for them and the unborn child
if they are wearing a seat belt. Pregnant
women must position the lower part
of the belt very low down so that it
passes over the pelvis and under the
abdomen (see fig. 105).
While pregnancy progresses, the driver
must adjust both seat and steering
wheel to have full control over the
vehicle (pedals and steering wheel must
be easy to access). The maximum
clearance should be kept between the
abdomen and the steering wheel.
Page 106 of 272
STARTING THE
ENGINE
The vehicle is fitted with an electronic
engine lock device: if the engine fails to
start, see the paragraph “The Fiat
CODE system” in section “Know your
vehicle”.
18) 19)
91)
PROCEDURE FOR
PETROL VERSIONS
Proceed as follows:
engage the handbrake;
put the gear lever into neutral;
fully depress the clutch pedal,
without touching the accelerator;
turn the ignition key to AVV and
release it as soon as the engine starts.
PROCEDURE FOR DIESEL
VERSIONS
Proceed as follows:
engage the handbrake;
put the gear lever into neutral;
turn the ignition key to MAR: the
warning lights
eon the
instrument panel will turn on;
wait for the warning lightsand
to turn off, which will happen faster
the warmer the engine is;
fully depress the clutch pedal,
without touching the accelerator;
turn the ignition key to the AVV
position as soon as the warning light
turns off. Waiting too long will waste
the heating work carried out by the
plugs.
Release the key as soon as the engine
starts.
20)
PROCEDURE FOR
NATURAL POWER
VERSIONS
The engine always starts up on petrol
independently of the previously
selected mode.
PROCEDURE FOR
VERSIONS WITH
DUALOGIC™
TRANSMISSION
The system allows the engine to be
started both with a gear engaged and
with the transmission in neutral (N).
Always press the brake pedal with the
gear engaged.
It is advisable to place the gear lever in
neutral (N) before starting the engine.IMPORTANT With cold engine, the
accelerator must be entirely released
when turning the ignition key to position
AVV. If the engine does not start at the
first attempt, return the ignition key
to STOP before repeating the starting
procedure. With the key in the MAR
position, if the warning light
on the
instrument panel remains on, it is
advisable to turn the key to the STOP
position and to MAR again; if the
warning light continues to remain on,
try again with the other keys provided. If
you still cannot start the engine,
contact a Fiat Dealership.
21)
WARMING UP THE
ENGINE JUST AFTER IT
HAS STARTED
Proceed as follows:
drive off slowly, letting the engine
turn at medium revs. Do not accelerate
abruptly;
do not demand full performance at
first. Wait until the engine coolant
temperature gauge starts moving.
104
STARTING AND DRIVING
Page 123 of 272
IN AN EMERGENCY
A punctured tyre or a burnt-out bulb?
At times, a problem may interfere
with our journey.
The pages on emergencies can help
you to deal with critical situations
independently and with calm.
In an emergency we recommend that
you call the freephone number found in
the Warranty Booklet.
It is also possible to call the 00 800
3428 0000 freephone number to
search the nearest Fiat Dealership.HAZARD WARNING LIGHTS...........122
REPLACING A BULB ......................122
REPLACING AN EXTERIOR BULB ..125
REPLACING INTERIOR BULBS ......128
REPLACING FUSES........................129
REPLACING A WHEEL ...................134
FIX&GO AUTOMATIC KIT ................138
EMERGENCY STARTING ................141
FUEL CUT-OFF SYSTEM ................142
LIFTING THE VEHICLE....................142
TOWING THE VEHICLE ..................143
121
Page 124 of 272
HAZARD WARNING
LIGHTS
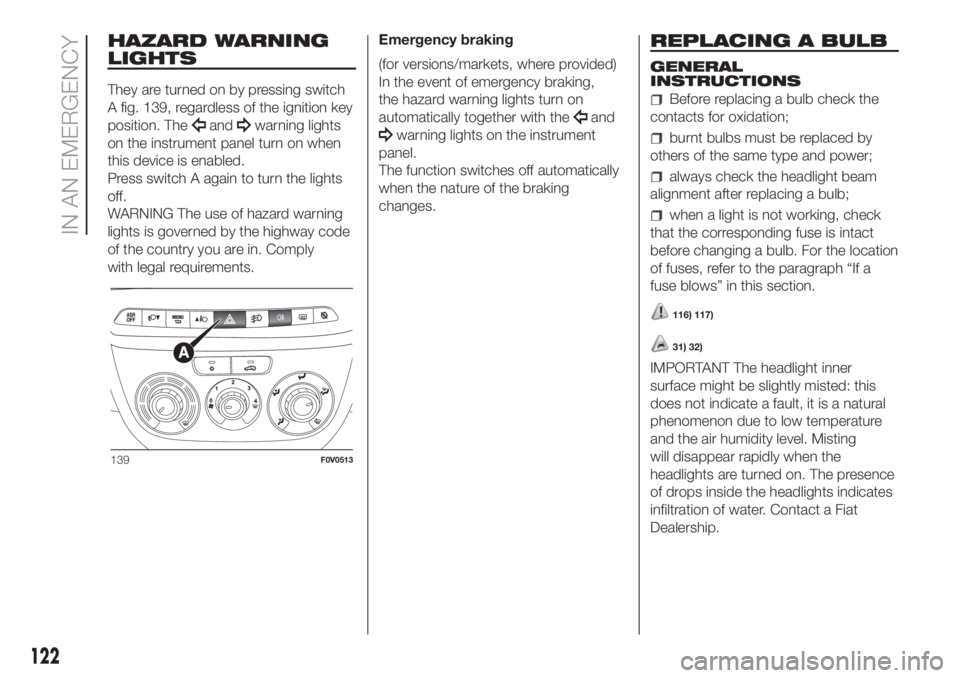
They are turned on by pressing switch
A fig. 139, regardless of the ignition key
position. The
andwarning lights
on the instrument panel turn on when
this device is enabled.
Press switch A again to turn the lights
off.
WARNING The use of hazard warning
lights is governed by the highway code
of the country you are in. Comply
with legal requirements.Emergency braking
(for versions/markets, where provided)
In the event of emergency braking,
the hazard warning lights turn on
automatically together with theand
warning lights on the instrument
panel.
The function switches off automatically
when the nature of the braking
changes.
REPLACING A BULB
GENERAL
INSTRUCTIONS
Before replacing a bulb check the
contacts for oxidation;
burnt bulbs must be replaced by
others of the same type and power;
always check the headlight beam
alignment after replacing a bulb;
when a light is not working, check
that the corresponding fuse is intact
before changing a bulb. For the location
of fuses, refer to the paragraph “If a
fuse blows” in this section.
116) 117)
31) 32)
IMPORTANT The headlight inner
surface might be slightly misted: this
does not indicate a fault, it is a natural
phenomenon due to low temperature
and the air humidity level. Misting
will disappear rapidly when the
headlights are turned on. The presence
of drops inside the headlights indicates
infiltration of water. Contact a Fiat
Dealership.
139F0V0513
122
IN AN EMERGENCY
Page 125 of 272
TYPES OF BULBS
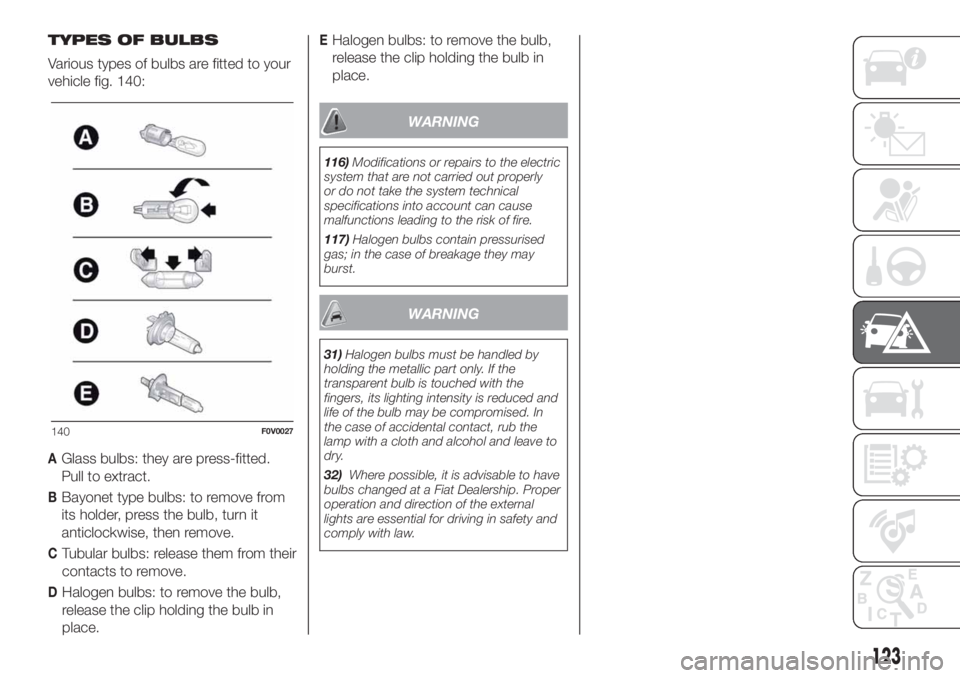
Various types of bulbs are fitted to your
vehicle fig. 140:
AGlass bulbs: they are press-fitted.
Pull to extract.
BBayonet type bulbs: to remove from
its holder, press the bulb, turn it
anticlockwise, then remove.
CTubular bulbs: release them from their
contacts to remove.
DHalogen bulbs: to remove the bulb,
release the clip holding the bulb in
place.
EHalogen bulbs: to remove the bulb,
release the clip holding the bulb in
place.
WARNING
116)Modifications or repairs to the electric
system that are not carried out properly
or do not take the system technical
specifications into account can cause
malfunctions leading to the risk of fire.
117)Halogen bulbs contain pressurised
gas; in the case of breakage they may
burst.
WARNING
31)Halogen bulbs must be handled by
holding the metallic part only. If the
transparent bulb is touched with the
fingers, its lighting intensity is reduced and
life of the bulb may be compromised. In
the case of accidental contact, rub the
lamp with a cloth and alcohol and leave to
dry.
32)Where possible, it is advisable to have
bulbs changed at a Fiat Dealership. Proper
operation and direction of the external
lights are essential for driving in safety and
comply with law.
140F0V0027
123
Page 136 of 272
REPLACING A
WHEEL
The vehicle is originally equipped with
the Fix&Go automatic quick tyre repair
kit (see instructions in the next section).
As an alternative, the vehicle may
have a normal-sized spare wheel.
Wheel changing and correct use of the
jack and spare wheel call for some
precautions, as listed below.
121) 122) 123) 124)
Note for one-way tyres
One-way tyres have a few arrows on
the side indicating the rotation direction.
If a wheel is changed (when punctured,
for example) the direction of the arrows
on the spare wheel tyre may not
coincide with the rotation direction of
the wheel to be replaced.
In these conditions, too, the tyre still
maintains its safety features.
Anyway, it is recommended to have the
wheel repaired and refitted as soon as
possible, as the best performance is
achieved when the rotation direction of
all tyres coincides with the one
indicated by the arrows.JACK
Please note that:
the jack weight is 4 kg;
the jack requires no adjustment;
the jack cannot be repaired and in
the event of a fault it must be replaced
by another genuine one;
no tool other than its cranking
device may be fitted on the jack.
WHEEL REPLACEMENT
PROCEDURE
To change a wheel, proceed as follows:
stop the vehicle in a position that is
not dangerous for oncoming traffic
where you can change the wheel safely.
The ground must be flat and sufficiently
compact;
switch off the engine and pull the
handbrake;
engage first gear or reverse;
wear the reflective safety jacket
(compulsory by law in certain countries)
before getting out of the vehicle;
indicate that the vehicle has broken
down using the devices required by
the law in the current country (e.g.
warning triangle, hazard lights, etc.);
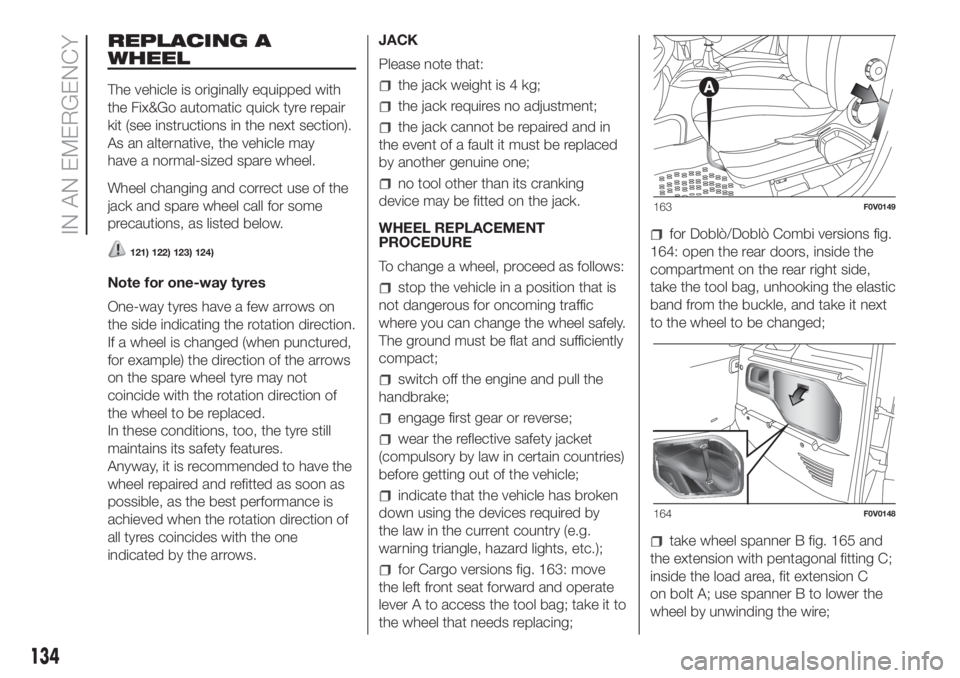
for Cargo versions fig. 163: move
the left front seat forward and operate
lever A to access the tool bag; take it to
the wheel that needs replacing;
for Doblò/Doblò Combi versions fig.
164: open the rear doors, inside the
compartment on the rear right side,
take the tool bag, unhooking the elastic
band from the buckle, and take it next
to the wheel to be changed;
take wheel spanner B fig. 165 and
the extension with pentagonal fitting C;
inside the load area, fit extension C
on bolt A; use spanner B to lower the
wheel by unwinding the wire;
163F0V0149
164F0V0148
134
IN AN EMERGENCY
Page 140 of 272
check that the position of the
replaced wheel under the platform is
correct (the lifting system is equipped
with a clutch to limit the end of the
stroke, incorrect positioning may
jeopardise safety;)
put the jack and the tools back in
the dedicated tool bag;
reposition the tool bag behind the
left side seat (Cargo versions) or, resting
the bottom of the bag against the side
panel, in the compartment inside the
rear right side (Doblò/Doblò Combi
versions).
WARNING
121)The spare wheel (where provided) is
specifically for your vehicle. Therefore, it
must not be used on other models. Do not
use spare wheels of other models on
your vehicle. The spare wheel must be
used only in an emergency. Use of the
spare wheel must kept to the minimum
necessary.122)Use your hazard lights, warning
triangle, etc to show that your vehicle is
stationary. Passengers should get out
of the vehicle, particularly if it is heavily
loaded, and wait for the wheel to be
changed away from the traffic. If you are on
a slope or uneven surface, place wedges
or other suitable objects under the wheels
to secure the vehicle. Have the wheel
repaired and refitted as soon as possible.
Do not apply grease to the bolt threads
before fitting: they could come unscrewed.
123)Use the jack only to replace wheels
on the vehicle with which it is supplied
or on other vehicles of the same model.
Never use the jack for other purposes,
such as lifting other models. Never use the
jack to carry out repairs under the vehicle.
Incorrect positioning of the jack may cause
the lifted vehicle to fall. Do not use the
jack for loads higher than the one shown
on its label.
124)Incorrect hub cap assembly may
cause it to come off when the vehicle is
moving. Never tamper with the inflation
valve. Never introduce tools of any kind
between rim and tyre. Check tyre and
space-saver wheel pressures regularly,
complying with the values given in the
"Technical specifications" chapter.
FIX&GO AUTOMATIC
KIT
125) 126)
37)
DESCRIPTION
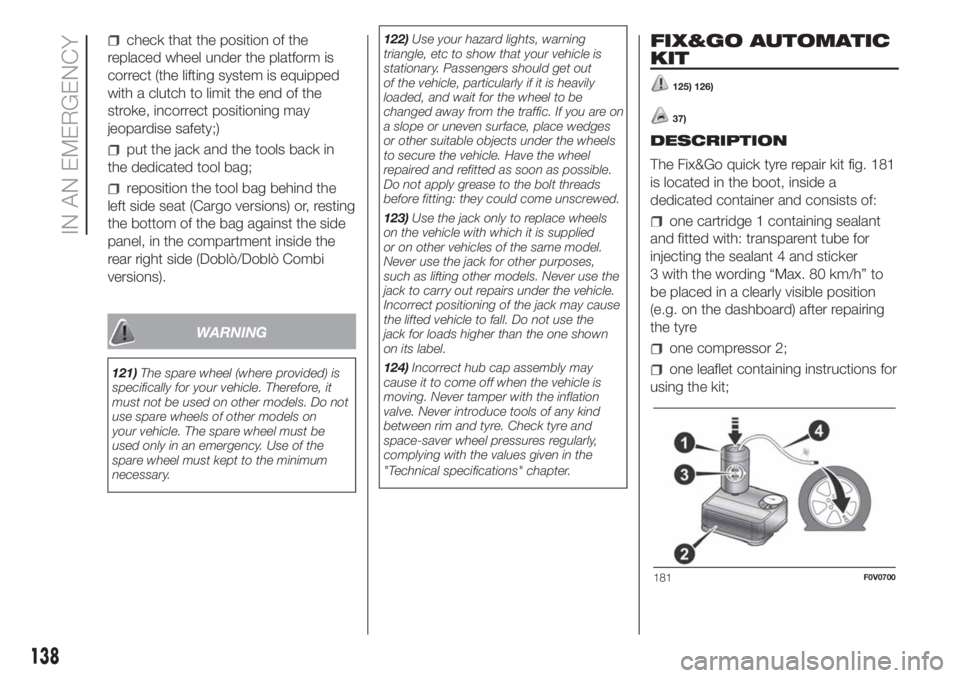
The Fix&Go quick tyre repair kit fig. 181
is located in the boot, inside a
dedicated container and consists of:
one cartridge 1 containing sealant
and fitted with: transparent tube for
injecting the sealant 4 and sticker
3 with the wording “Max. 80 km/h” to
be placed in a clearly visible position
(e.g. on the dashboard) after repairing
the tyre
one compressor 2;
one leaflet containing instructions for
using the kit;
181F0V0700
138
IN AN EMERGENCY
Page 141 of 272
TYRE REPAIRING AND
PRESSURE RESTORING
PROCEDURE
Proceed as follows:
stop the car in a position that is not
dangerous for oncoming traffic where
you can carry out the procedure safely.
The ground must be flat and sufficiently
compact;
stop the engine, engage the hazard
warning lights and the parking brake;
wear the reflective safety jacket
before getting out of the car (anyway
comply with the laws in force in the
country you are driving in);
Insert the cartridge 1 containing the
sealant in the proper compartment of
the compressor 2, pressing it down
hard fig. 181. Remove the speed limit
sticker 3 and apply it in a clearly visible
position fig. 185;
wear the gloves;
remove the cap from the tyre valve
and connect and firmly tighten the
transparent tube of the sealing fluid 4
fig. 181. If a 250 ml cartridge is present
the housing of the transparent tube is
provided with removable ring to
facilitate extraction. Make sure that the
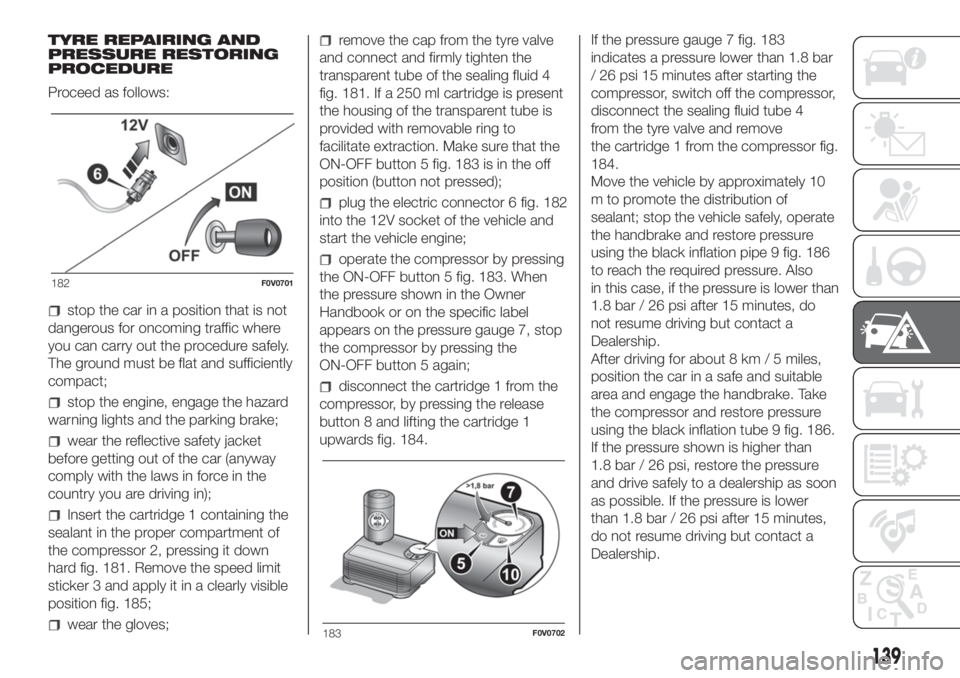
ON-OFF button 5 fig. 183 is in the off
position (button not pressed);
plug the electric connector 6 fig. 182
into the 12V socket of the vehicle and
start the vehicle engine;
operate the compressor by pressing
the ON-OFF button 5 fig. 183. When
the pressure shown in the Owner
Handbook or on the specific label
appears on the pressure gauge 7, stop
the compressor by pressing the
ON-OFF button 5 again;
disconnect the cartridge 1 from the
compressor, by pressing the release
button 8 and lifting the cartridge 1
upwards fig. 184.If the pressure gauge 7 fig. 183
indicates a pressure lower than 1.8 bar
/ 26 psi 15 minutes after starting the
compressor, switch off the compressor,
disconnect the sealing fluid tube 4
from the tyre valve and remove
the cartridge 1 from the compressor fig.
184.
Move the vehicle by approximately 10
m to promote the distribution of
sealant; stop the vehicle safely, operate
the handbrake and restore pressure
using the black inflation pipe 9 fig. 186
to reach the required pressure. Also
in this case, if the pressure is lower than
1.8 bar / 26 psi after 15 minutes, do
not resume driving but contact a
Dealership.
After driving for about 8 km / 5 miles,
position the car in a safe and suitable
area and engage the handbrake. Take
the compressor and restore pressure
using the black inflation tube 9 fig. 186.
If the pressure shown is higher than
1.8 bar / 26 psi, restore the pressure
and drive safely to a dealership as soon
as possible. If the pressure is lower
than 1.8 bar / 26 psi after 15 minutes,
do not resume driving but contact a
Dealership.
182F0V0701
183F0V0702
139