display FIAT DOBLO PANORAMA 2018 Owner handbook (in English)
[x] Cancel search | Manufacturer: FIAT, Model Year: 2018, Model line: DOBLO PANORAMA, Model: FIAT DOBLO PANORAMA 2018Pages: 272, PDF Size: 23.75 MB
Page 242 of 272
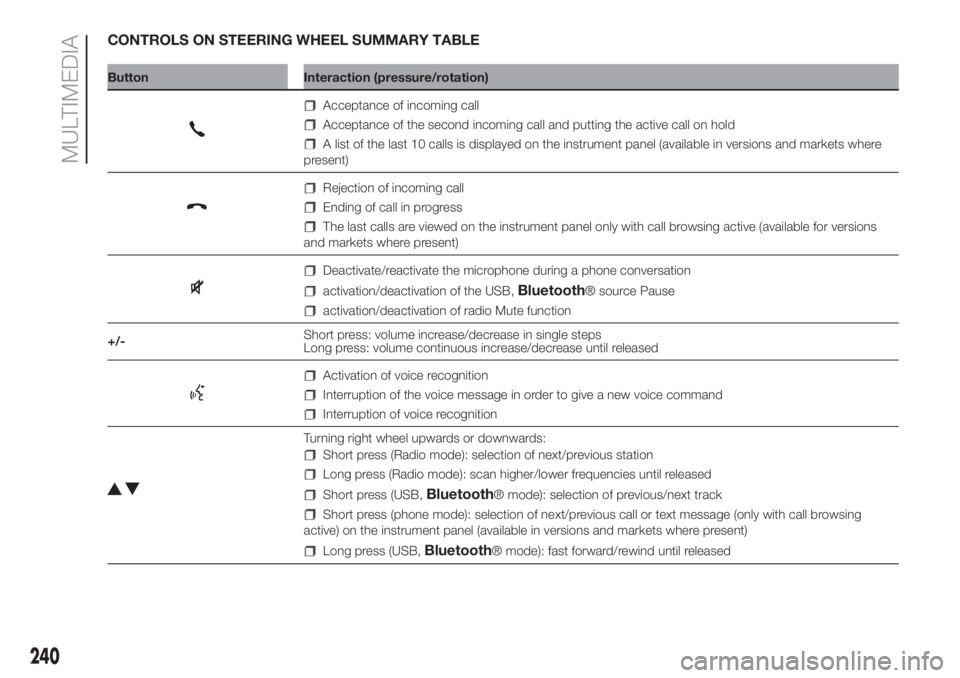
CONTROLS ON STEERING WHEEL SUMMARY TABLE
Button Interaction (pressure/rotation)
Acceptance of incoming call
Acceptance of the second incoming call and putting the active call on hold
A list of the last 10 calls is displayed on the instrument panel (available in versions and markets where
present)
Rejection of incoming call
Ending of call in progress
The last calls are viewed on the instrument panel only with call browsing active (available for versions
and markets where present)
Deactivate/reactivate the microphone during a phone conversation
activation/deactivation of the USB,Bluetooth® source Pause
activation/deactivation of radio Mute function
+/-Short press: volume increase/decrease in single steps
Long press: volume continuous increase/decrease until released
Activation of voice recognition
Interruption of the voice message in order to give a new voice command
Interruption of voice recognition
Turning right wheel upwards or downwards:
Short press (Radio mode): selection of next/previous station
Long press (Radio mode): scan higher/lower frequencies until released
Short press (USB,Bluetooth® mode): selection of previous/next track
Short press (phone mode): selection of next/previous call or text message (only with call browsing
active) on the instrument panel (available in versions and markets where present)
Long press (USB,Bluetooth® mode): fast forward/rewind until released
240
MULTIMEDIA
Page 243 of 272
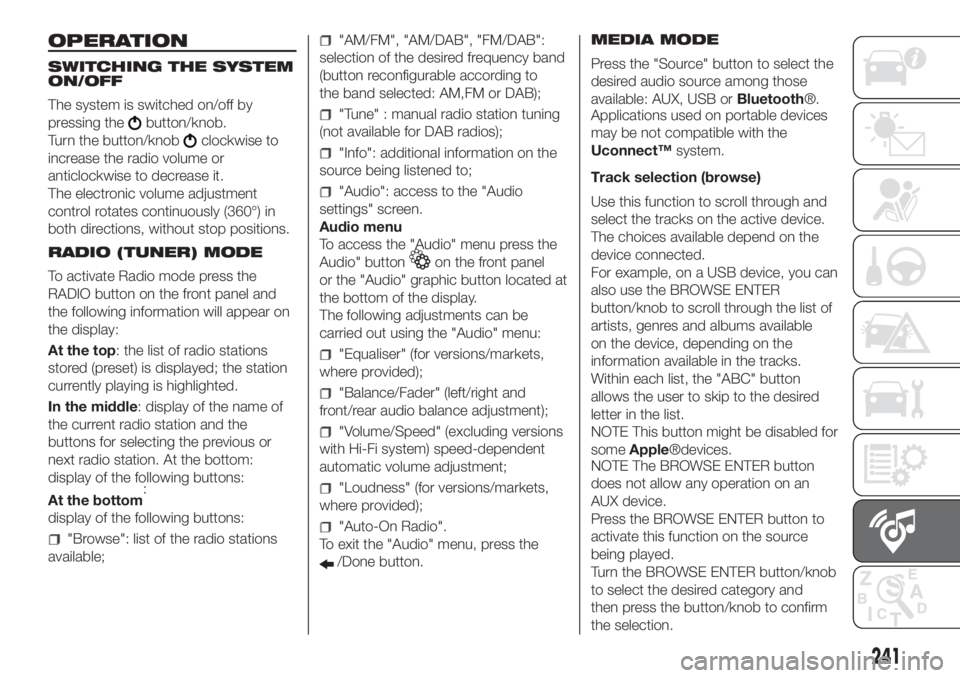
OPERATION
SWITCHING THE SYSTEM
ON/OFF
The system is switched on/off by
pressing the
button/knob.
Turn the button/knob
clockwise to
increase the radio volume or
anticlockwise to decrease it.
The electronic volume adjustment
control rotates continuously (360°) in
both directions, without stop positions.
RADIO (TUNER) MODE
To activate Radio mode press the
RADIO button on the front panel and
the following information will appear on
the display:
At the top: the list of radio stations
stored (preset) is displayed; the station
currently playing is highlighted.
In the middle: display of the name of
the current radio station and the
buttons for selecting the previous or
next radio station. At the bottom:
display of the following buttons:
:
display of the following buttons:
"Browse": list of the radio stations
available;
"AM/FM", "AM/DAB", "FM/DAB":
selection of the desired frequency band
(button reconfigurable according to
the band selected: AM,FM or DAB);
"Tune" : manual radio station tuning
(not available for DAB radios);
"Info": additional information on the
source being listened to;
"Audio": access to the "Audio
settings" screen.
Audio menu
To access the "Audio" menu press the
Audio" button
on the front panel
or the "Audio" graphic button located at
the bottom of the display.
The following adjustments can be
carried out using the "Audio" menu:
"Equaliser" (for versions/markets,
where provided);
"Balance/Fader" (left/right and
front/rear audio balance adjustment);
"Volume/Speed" (excluding versions
with Hi-Fi system) speed-dependent
automatic volume adjustment;
"Loudness" (for versions/markets,
where provided);
"Auto-On Radio".
To exit the "Audio" menu, press the
/Done button.MEDIA MODE
Press the "Source" button to select the
desired audio source among those
available: AUX, USB orBluetooth®.
Applications used on portable devices
may be not compatible with the
Uconnect™system.
Track selection (browse)
Use this function to scroll through and
select the tracks on the active device.
The choices available depend on the
device connected.
For example, on a USB device, you can
also use the BROWSE ENTER
button/knob to scroll through the list of
artists, genres and albums available
on the device, depending on the
information available in the tracks.
Within each list, the "ABC" button
allows the user to skip to the desired
letter in the list.
NOTE This button might be disabled for
someApple®devices.
NOTE The BROWSE ENTER button
does not allow any operation on an
AUX device.
Press the BROWSE ENTER button to
activate this function on the source
being played.
Turn the BROWSE ENTER button/knob
to select the desired category and
then press the button/knob to confirm
the selection.
241
At the bottom
Page 244 of 272
Press the
button on the front panel to cancel the
function.
Bluetooth® SOURCE
This mode is activated by pairing aBlu-
etooth® device containing music
tracks with the system.
PAIRING A Bluetooth® AUDIO
DEVICE
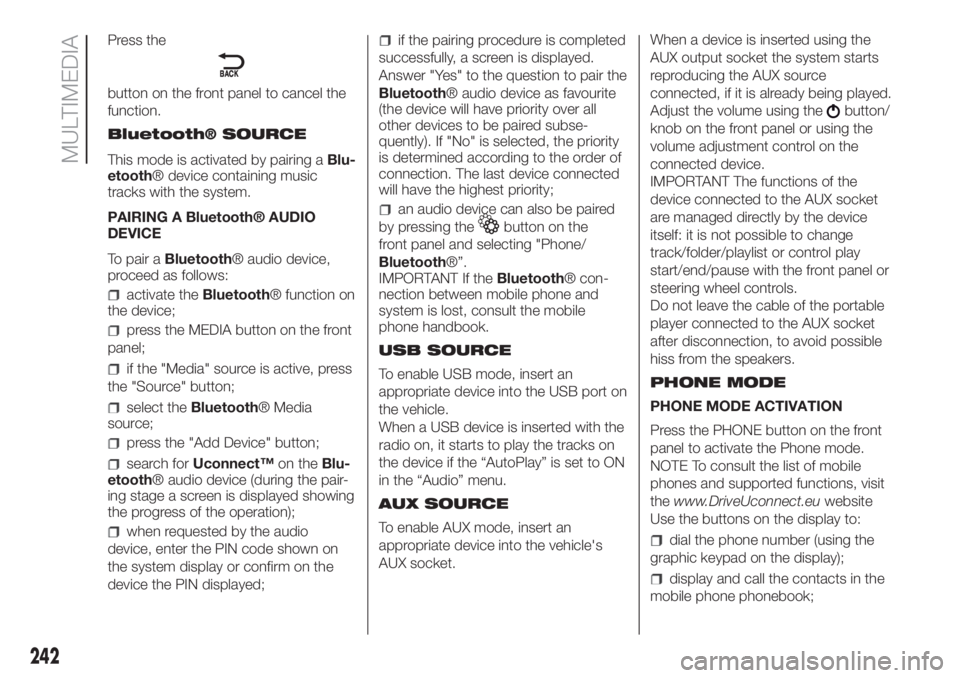
To pair aBluetooth® audio device,
proceed as follows:
activate theBluetooth® function on
the device;
press the MEDIA button on the front
panel;
if the "Media" source is active, press
the "Source" button;
select theBluetooth® Media
source;
press the "Add Device" button;
search forUconnect™on theBlu-
etooth® audio device (during the pair-
ing stage a screen is displayed showing
the progress of the operation);
when requested by the audio
device, enter the PIN code shown on
the system display or confirm on the
device the PIN displayed;
if the pairing procedure is completed
successfully, a screen is displayed.
Answer "Yes" to the question to pair the
Bluetooth® audio device as favourite
(the device will have priority over all
other devices to be paired subse-
quently). If "No" is selected, the priority
is determined according to the order of
connection. The last device connected
will have the highest priority;
an audio device can also be paired
by pressing the
button on the
front panel and selecting "Phone/
Bluetooth®”.
IMPORTANT If theBluetooth® con-
nection between mobile phone and
system is lost, consult the mobile
phone handbook.
USB SOURCE
To enable USB mode, insert an
appropriate device into the USB port on
the vehicle.
When a USB device is inserted with the
radio on, it starts to play the tracks on
the device if the “AutoPlay” is set to ON
in the “Audio” menu.
AUX SOURCE
To enable AUX mode, insert an
appropriate device into the vehicle's
AUX socket.When a device is inserted using the
AUX output socket the system starts
reproducing the AUX source
connected, if it is already being played.
Adjust the volume using the
button/
knob on the front panel or using the
volume adjustment control on the
connected device.
IMPORTANT The functions of the
device connected to the AUX socket
are managed directly by the device
itself: it is not possible to change
track/folder/playlist or control play
start/end/pause with the front panel or
steering wheel controls.
Do not leave the cable of the portable
player connected to the AUX socket
after disconnection, to avoid possible
hiss from the speakers.
PHONE MODE
PHONE MODE ACTIVATION
Press the PHONE button on the front
panel to activate the Phone mode.
NOTE To consult the list of mobile
phones and supported functions, visit
thewww.DriveUconnect.euwebsite
Use the buttons on the display to:
dial the phone number (using the
graphic keypad on the display);
display and call the contacts in the
mobile phone phonebook;
242
MULTIMEDIA
Page 245 of 272
display and call contacts from the
registers of previous calls;
pair up to 10 phones/audio devices
to make access and connection easier
and quicker;
transfer calls from the system to the
mobile phone and vice versa and
deactivate the microphone audio for
private conversations.
The mobile phone audio is transmitted
through the vehicle’s audio system;
the system automatically mutes the
radio when the Phone function is used.
PAIRING A MOBILE PHONE
IMPORTANT Only do this with vehicle
stationary and in safe conditions; this
function is disabled when the vehicle is
moving.
The pairing procedure for a mobile
phone is described below: always
consult the handbook for the mobile
phone in any case.
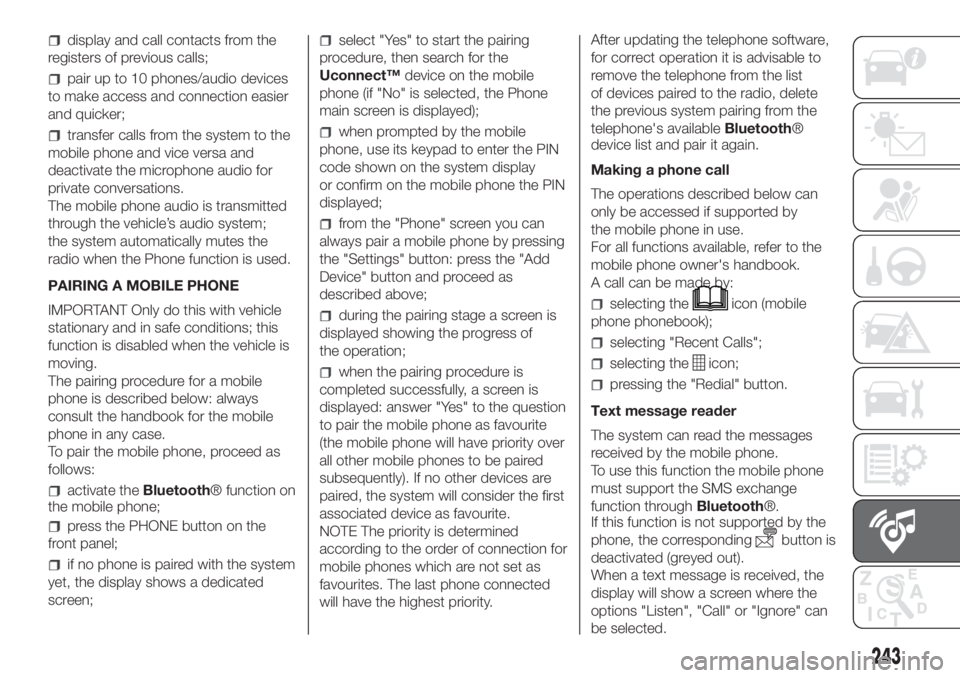
To pair the mobile phone, proceed as
follows:
activate theBluetooth® function on
the mobile phone;
press the PHONE button on the
front panel;
if no phone is paired with the system
yet, the display shows a dedicated
screen;
select "Yes" to start the pairing
procedure, then search for the
Uconnect™device on the mobile
phone (if "No" is selected, the Phone
main screen is displayed);
when prompted by the mobile
phone, use its keypad to enter the PIN
code shown on the system display
or confirm on the mobile phone the PIN
displayed;
from the "Phone" screen you can
always pair a mobile phone by pressing
the "Settings" button: press the "Add
Device" button and proceed as
described above;
during the pairing stage a screen is
displayed showing the progress of
the operation;
when the pairing procedure is
completed successfully, a screen is
displayed: answer "Yes" to the question
to pair the mobile phone as favourite
(the mobile phone will have priority over
all other mobile phones to be paired
subsequently). If no other devices are
paired, the system will consider the first
associated device as favourite.
NOTE The priority is determined
according to the order of connection for
mobile phones which are not set as
favourites. The last phone connected
will have the highest priority.After updating the telephone software,
for correct operation it is advisable to
remove the telephone from the list
of devices paired to the radio, delete
the previous system pairing from the
telephone's availableBluetooth®
device list and pair it again.
Making a phone call
The operations described below can
only be accessed if supported by
the mobile phone in use.
For all functions available, refer to the
mobile phone owner's handbook.
A call can be made by:
selecting theicon (mobile
phone phonebook);
selecting "Recent Calls";
selecting theicon;
pressing the "Redial" button.
Text message reader
The system can read the messages
received by the mobile phone.
To use this function the mobile phone
must support the SMS exchange
function throughBluetooth®.
If this function is not supported by the
phone, the corresponding
button is
deactivated (greyed out).
When a text message is received, the
display will show a screen where the
options "Listen", "Call" or "Ignore" can
be selected.
243
Page 246 of 272
You can access the SMS message list
received by the cell by pressing the
graphic
button (the list shows
a maximum of 60 received messages).
NOTE On some mobile phones, to
make the SMS voice reading function
available, the SMS notification option
on the phone must be enabled; this
option is usually available on the phone,
in theBluetooth® connections menu
for a device registered asUconnect™.
After enabling this function on your
phone, you need to disconnect and
reconnect the phone using the
Uconnect™system to effect enabling.
SMS message options
Default SMS messages are stored in
the system memory and can be sent to
answer a received message or as a
new message.
Ye s
No
Okay
I can't talk right now
Call me
I'll call you later
I'm on my way
Thanks
I'll be late
Stuck in traffic
Start without me
Where are you?
Are you there yet?
I need directions
I'm lost
See you later
I will be 5 (or 10, 15, 20, 25, 30, 45,
60) (*) minutes late
See you in 5 (or 10, 15, 20, 25, 30,
45, 60) (*) minutes
(*) Only use the numbers listed,
otherwise the system will not take the
message.
When receiving an SMS, the systems
also allows the same message to
be forwarded.
NOTE For details on how to send an
SMS using the voice commands, refer
to the dedicated paragraph.
BROWSING SMS
(for versions/markets, where provided)
Using the steering wheel commands,
you can view and manage the last
10 SMS messages received on the
instrument panel. To use this function
the mobile phone must support the
SMS exchange function throughBlu-
etooth®.
Select “Phone” on the instrument panel
menu and then select “SMS reader”
using the arrow keys on the steering
wheel controls.The ‘SMS reader’ submenu allows the
last 10 SMS messages to be displayed.
WARNING Some mobile phones may
not take the SMS delivery confirmation
settings into account when interfacing
withUconnect™LIVE.IfanSMS
message is sent viaUconnect™ LIVE,
the user could face an additional cost,
without any warning, due to the SMS
delivery confirmation request sent
by the phone. For any problems related
to the above, contact your telephone
service provider.
"APPS" MODE
Press the APPS button on the front
panel to display the operating settings:
Outside Temperature
Clock
Compass (Uconnect™5” Nav LIVE
only)
Trip Computer (Uconnect™5” Nav
LIVE only)
Uconnect™ LIVE(where present)
Uconnect™ LIVE
SERVICES
(where provided)
Pressing the APPS button you get to
the menu where all the application
functions of the function.
244
MULTIMEDIA
Page 248 of 272
Connected services that can be
accessed on the car
TheUconnect™ LIVEservices
available in theUconnect™system
menu can change according to the
market.
Theeco:Drive™application was
developed to improve the driving
experience and therefore it can be used
in all markets where theUconnect™
LIVEservices are accessible.
For further information visit the
www.driveuconnect.eu website.
eco:Drive™
Theeco:Drive™application allows you
to display your driving behaviour in
real time, in order to help you reach a
more efficient driving style as far as
consumption and emissions are
concerned.
In addition, the data can be saved on a
USB flash drive, and the data analysis
can be made on your personal
computer thanks to theeco:Drive™
desktop application, available on
www.DriveUconnect.eu.
Driving style is evaluated by means of
four indices which monitor the following
parameters: acceleration, deceleration,
gearchange, speedDisplay of the eco:Drive™
Press theeco:Drive™button to
interact with the function.
A screen will appear on the radio
showing 4 indices: Acceleration,
Deceleration, Speed and Gear. These
indices are grey until the system has
enough data to evaluate the driving
style. Once sufficient data are available,
the indices will have 5 colours
depending on the evaluation: dark
green (very good), light green, yellow,
orange and red (very bad).
In the event of extended inactivity the
display will show the average of the
indices up to that moment (“Average
index”) then the indices will be coloured
again in real time as soon as the car is
restarted.
Recording and transferring trip data
The trip data can be stored in the
system memory and transferred using a
suitably configured USB memory stick
or byUconnect™ LIVEapp. This
allows you to display the history of the
collected data, showing the complete
analysis of the trip data and of your
driving style.
Further information is available at
www.DriveUconnect.eu.my:Car
my:Carallows you to keep the "health"
of your vehicle always under control.
my:Carcan detect malfunction in real
time and inform the user about the
expiry of the servicing interval. Press
the "my:Car" button to interact with the
application.
The display will show a screen with the
"care:Index" section, which provides
all the detailed information about the
status of the vehicle. Press the "Active
warnings" button (if present) to show
the details of the faults of the car which
caused a warning light to switch on.
SETTINGS
Press the
button on the front panel
to view the "Settings" main menu on
the display.
NOTE The menu items displayed vary
according to the versions.
The menu includes the following items:
Language
Display;
Units;
Voice controls;
Clock & Date;
Safety/Assistance (for versions/
markets, where provided);
Lights (for versions/markets where
provided);
246
MULTIMEDIA
Page 249 of 272
Doors & Locks;
Vehicle Off Options;
Audio;
Phone/Bluetooth;
Radio;
Restore Settings;
Clear personal data.
NAVIGATION
151)
(Uconnect™5” Nav LIVE only)
Planning a route
IMPORTANT In the interest of safety
and to reduce distractions while you are
driving, you should always plan a route
before you start driving.
Using the destination search function, it
is possible to find and reach your
destinations in different ways: searching
for a specific address, a partial
address, a specific type of location (for
example a service station or a
restaurant), a postal code, a POI (Point
Of Interest) near your current position
(for example, a restaurant with the
search type set to "nearby"), a pair of
latitude and longitude coordinates,
or by selecting a point on the map.Select “Search” in the Main menu and
set the search for a destination. While
entering the information, the list
displays the corresponding addresses
and POIs in two separate lists.
The corresponding address and city are
displayed in the Address list and the
POI, the type of POIs and the locations
are displayed in the Point of Interest
lists.
To plan a route towards the destination,
select the “Guide” button.
A route is planned and you are guided
to your destination, using spoken
instructions and on-screen directions.
Map update
To ensure optimal performance, the
navigation system must be updated
periodically. For this, the Mopar Map
Care service offers a new map update
every three months.
The updates can be downloaded from
the maps.mopar.eu website and
installed directly on the navigator in
your vehicle. All updates are free of
charge for 3 years from the start of the
warranty on the vehicle.
The navigation system can also be
updated at the Fiat Dealership.
NOTE The dealer may charge for
updating the navigation system.VOICE COMMANDS
NoteFor languages not supported by
the system, voice commands are
not available.
To use the voice commands, press the
button on the steering wheel (”Voice”
button) or
and say out loud the
command you want to activate.
Global
The following voice commands can be
given after pressing the
button on
the steering wheel:
Help
Cancel
Repeat
Voice Prompts
Phone
The following voice commands can be
given after pressing the
button on
the steering wheel:
Call
Dial
Re-dial
Call back
Recent calls
Calls made
Missed calls
Calls received
PhoneBook
247
Page 252 of 272
Some automatic systems equipped with old generation blades and/or with a poor maintenance can damage the paint, promoting the
creation of microscoring which give an opaque/coated appearance to the paint, especially on dark colours. In this case, just lightly polish with
specific products.
RADIO
To connect to the existing wiring in the vehicle, contact a Fiat Dealership to prevent any problems that could impair vehicle safety.
EOBD SYSTEM
If, when the ignition key is turned to MAR, thewarning light does not switch on, switches on constantly or flashes when driving (on
certain versions together with the message on the display), contact a Fiat Dealership as soon as possible. The operation of thewarning
light may be checked by the traffic police using specific devices. Comply with the laws and regulations of the country where you are driving.
SNOW CHAINS
Keep the vehicle's speed down when snow chains are fitted; never exceed 50 km/h. Avoid potholes, do not drive over steps or
pavements, and do not drive long distances over roads without snow, to avoid damaging both your vehicle and the road surface.
DIESEL FILTER
The presence of water in the supply circuit may cause severe damage to the injection system and irregular engine operation. If thewarning light comes on, go to a Fiat Dealership as soon as possible to have the system bled. If the above indication occurs immediately
after refuelling, water may have entered the tank: turn the engine off immediately and contact a Fiat Dealership.
BATTERY
Incorrect installation of electric and electronic devices may cause severe damage to your vehicle. After purchasing your vehicle, if you wish
to install any accessories (anti-theft, radio phone, etc.), go to a Fiat Dealership, which will suggest the most suitable devices and advise you
whether a higher capacity battery needs to be installed.
If the vehicle will be unused for an extended period of time in extremely cold weather conditions, remove the battery and store it in a
heated area to prevent it from freezing.
250
WARNING
BODY
Page 267 of 272
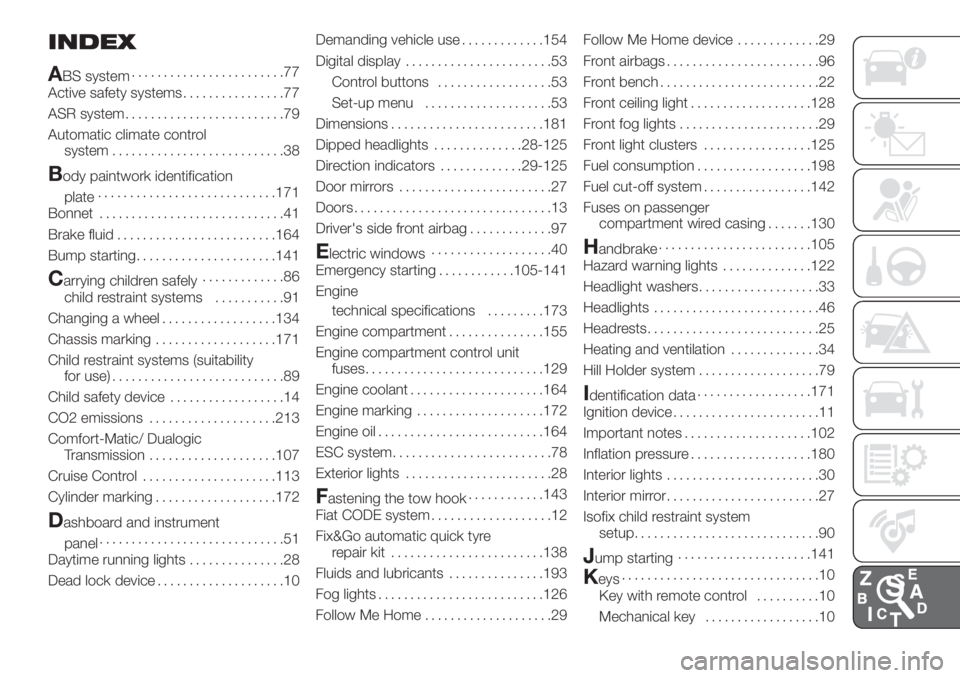
INDEX
A
BS system........................77
Active safety systems................77
ASR system.........................79
Automatic climate control
system...........................38
Body paintwork identification
plate............................171
Bonnet.............................41
Brake fluid.........................164
Bump starting......................141
Carrying children safely.............86
child restraint systems...........91
Changing a wheel..................134
Chassis marking...................171
Child restraint systems (suitability
for use)...........................89
Child safety device..................14
CO2 emissions....................213
Comfort-Matic/ Dualogic
Transmission....................107
Cruise Control.....................113
Cylinder marking...................172
Dashboard and instrument
panel.............................51
Daytime running lights...............28
Dead lock device....................10Demanding vehicle use.............154
Digital display.......................53
Control buttons..................53
Set-up menu....................53
Dimensions........................181
Dipped headlights..............28-125
Direction indicators.............29-125
Door mirrors........................27
Doors...............................13
Driver's side front airbag.............97
Electric windows...................40
Emergency starting............105-141
Engine
technical specifications.........173
Engine compartment...............155
Engine compartment control unit
fuses............................129
Engine coolant.....................164
Engine marking....................172
Engine oil..........................164
ESC system.........................78
Exterior lights.......................28
Fastening the tow hook............143
Fiat CODE system...................12
Fix&Go automatic quick tyre
repair kit........................138
Fluids and lubricants...............193
Fog lights..........................126
Follow Me Home....................29Follow Me Home device.............29
Front airbags........................96
Front bench.........................22
Front ceiling light...................128
Front fog lights......................29
Front light clusters.................125
Fuel consumption..................198
Fuel cut-off system.................142
Fuses on passenger
compartment wired casing.......130
Handbrake........................105
Hazard warning lights..............122
Headlight washers...................33
Headlights..........................46
Headrests...........................25
Heating and ventilation..............34
Hill Holder system...................79
Identification data..................171
Ignition device.......................11
Important notes....................102
Inflation pressure...................180
Interior lights........................30
Interior mirror........................27
Isofix child restraint system
setup.............................90
Jump starting.....................141
Keys...............................10
Key with remote control..........10
Mechanical key..................10
Page 268 of 272
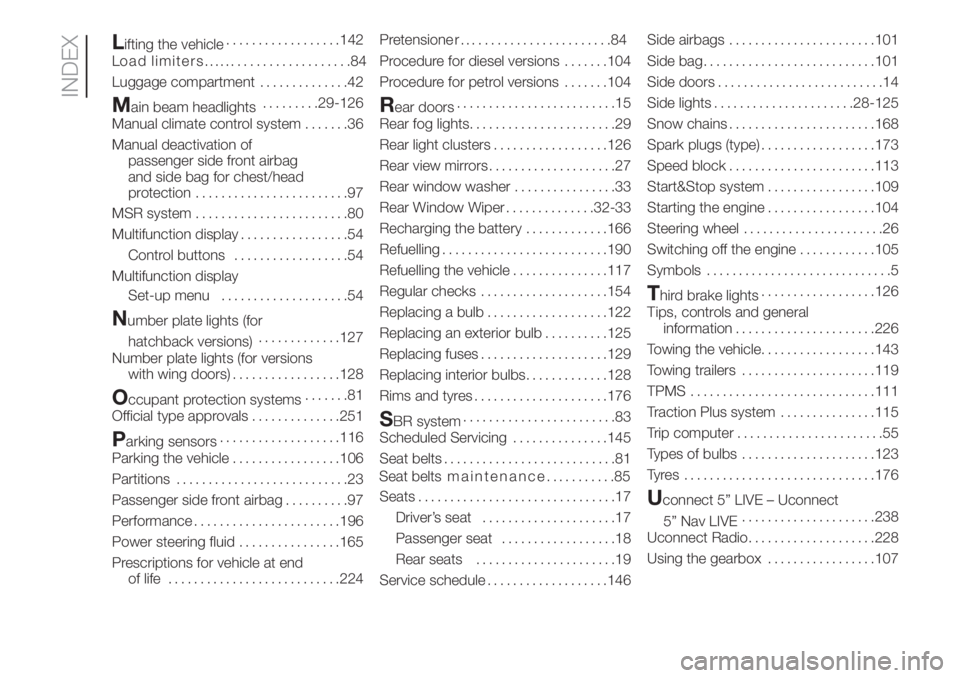
Lifting the vehicle..................142
L
Luggage compartment..............42
Main beam headlights.........29-126
Manual climate control system.......36
Manual deactivation of
passenger side front airbag
and side bag for chest/head
protection........................97
MSR system........................80
Multifunction display.................54
Control buttons..................54
Multifunction display
Set-up menu....................54
Number plate lights (for
hatchback versions).............127
Number plate lights (for versions
with wing doors).................128
Occupant protection systems.......81
Official type approvals..............251
Parking sensors...................116
Parking the vehicle.................106
Partitions...........................23
Passenger side front airbag..........97
Performance.......................196
Power steering fluid................165
Prescriptions for vehicle at end
of life...........................224Pretensione r
Procedure for diesel versions.......104
Procedure for petrol versions.......104
Rear doors.........................15
Rear fog lights.......................29
Rear light clusters..................126
Rear view mirrors....................27
Rear window washer................33
Rear Window Wiper..............32-33
Recharging the battery.............166
Refuelling..........................190
Refuelling the vehicle...............117
Regular checks....................154
Replacing a bulb...................122
Replacing an exterior bulb..........125
Replacing fuses....................129
Replacing interior bulbs.............128
Rims and tyres.....................176
SBR system........................83
Scheduled Servicing...............145
Seat belts...........................81
Seats...............................17
Driver’s seat.....................17
Passenger seat..................18
Rear seats......................19
Service schedule...................146Side airbags.......................101
Side bag...........................101
Side doors..........................14
Side lights......................28-125
Snow chains.......................168
Spark plugs (type)..................173
Speed block.......................113
Start&Stop system.................109
Starting the engine.................104
Steering wheel......................26
Switching off the engine............105
Symbols.............................5
Third brake lights..................126
Tips, controls and general
information......................226
Towing the vehicle..................143
Towing trailers.....................119
TPMS.............................111
Traction Plus system...............115
Trip computer.......................55
Types of bulbs.....................123
Tyres ..............................176
Uconnect 5” LIVE – Uconnect
5” Nav LIVE.....................238
Uconnect Radio....................228
Using the gearbox.................107
INDEX
........................84
oad limiters........................84
Seat belts maintenance...........85