rear lights FIAT DUCATO 2006 3.G User Guide
[x] Cancel search | Manufacturer: FIAT, Model Year: 2006, Model line: DUCATO, Model: FIAT DUCATO 2006 3.GPages: 258, PDF Size: 4.05 MB
Page 143 of 258
142IN AN EMERGENCY
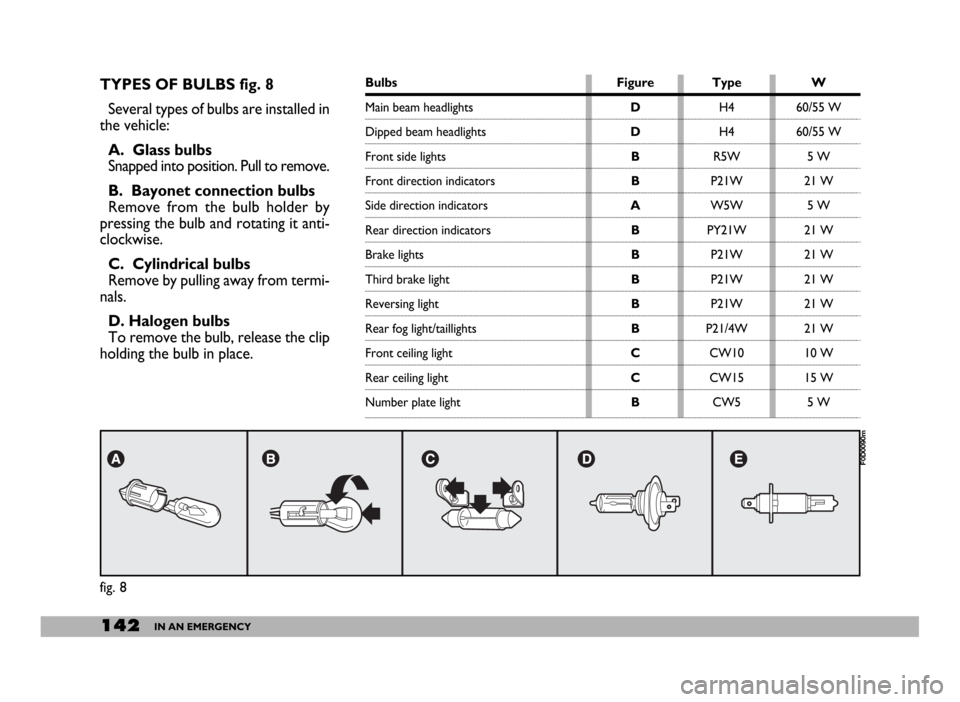
Bulbs
Main beam headlights
Dipped beam headlights
Front side lights
Front direction indicators
Side direction indicators
Rear direction indicators
Brake lights
Third brake light
Reversing light
Rear fog light/taillights
Front ceiling light
Rear ceiling light
Number plate lightW
60/55 W
60/55 W
5 W
21 W
5 W
21 W
21 W
21 W
21 W
21 W
10 W
15 W
5 W Type
H4
H4
R5W
P21W
W5W
PY21W
P21W
P21W
P21W
P21/4W
CW10
CW15
CW5
Figure
D
D
B
B
A
B
B
B
B
B
C
C
B
fig. 8
F0D0090m
TYPES OF BULBS fig. 8
Several types of bulbs are installed in
the vehicle:
A. Glass bulbs
Snapped into position. Pull to remove.
B. Bayonet connection bulbs
Remove from the bulb holder by
pressing the bulb and rotating it anti-
clockwise.
C. Cylindrical bulbs
Remove by pulling away from termi-
nals.
D. Halogen bulbs
To remove the bulb, release the clip
holding the bulb in place.
Page 146 of 258
145IN AN EMERGENCY
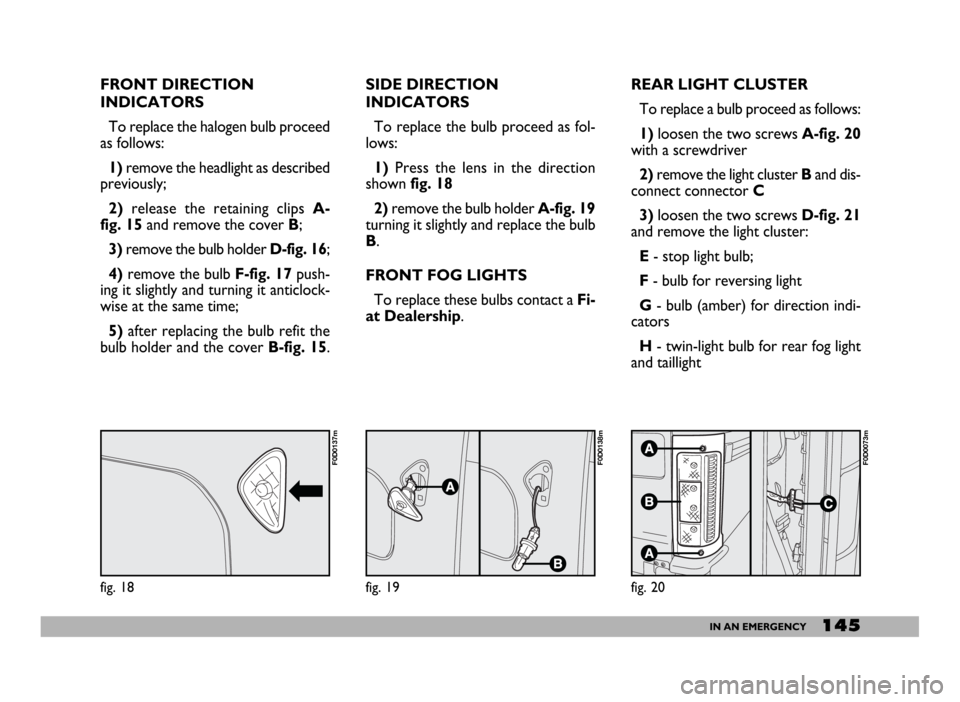
REAR LIGHT CLUSTER
To replace a bulb proceed as follows:
1)loosen the two screws A-fig. 20
with a screwdriver
2)remove the light cluster Band dis-
connect connector C
3)loosen the two screws D-fig. 21
and remove the light cluster:
E- stop light bulb;
F- bulb for reversing light
G - bulb (amber) for direction indi-
cators
H- twin-light bulb for rear fog light
and taillight
fig. 20
F0D0073m
FRONT DIRECTION
INDICATORS
To replace the halogen bulb proceed
as follows:
1) remove the headlight as described
previously;
2)release the retaining clips A-
fig. 15 and remove the cover B;
3)remove the bulb holder D-fig. 16;
4)remove the bulb F-fig. 17push-
ing it slightly and turning it anticlock-
wise at the same time;
5)after replacing the bulb refit the
bulb holder and the cover B-fig. 15.SIDE DIRECTION
INDICATORS
To replace the bulb proceed as fol-
lows:
1)Press the lens in the direction
shown fig. 18
2)remove the bulb holder A-fig. 19
turning it slightly and replace the bulb
B.
FRONT FOG LIGHTS
To replace these bulbs contact a Fi-
at Dealership.
fig. 18
F0D0137m
fig. 19
F0D0138m
Page 149 of 258
148IN AN EMERGENCY
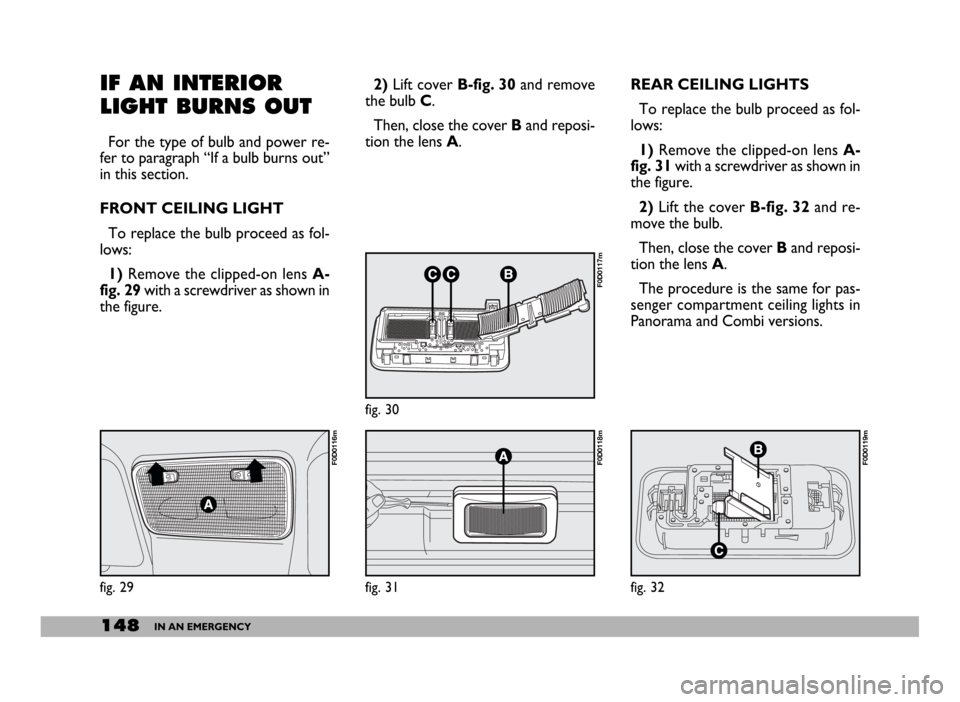
REAR CEILING LIGHTS
To replace the bulb proceed as fol-
lows:
1) Remove the clipped-on lens A-
fig. 31with a screwdriver as shown in
the figure.
2)Lift the cover B-fig. 32 and re-
move the bulb.
Then, close the cover Band reposi-
tion the lens A.
The procedure is the same for pas-
senger compartment ceiling lights in
Panorama and Combi versions.IF AN INTERIOR
LIGHT BURNS OUT
For the type of bulb and power re-
fer to paragraph “If a bulb burns out”
in this section.
FRONT CEILING LIGHT
To replace the bulb proceed as fol-
lows:
1) Remove the clipped-on lens A-
fig. 29with a screwdriver as shown in
the figure.2)Lift cover B-fig. 30and remove
the bulb C.
Then, close the cover Band reposi-
tion the lens A.
fig. 29
F0D0116m
fig. 30
F0D0117m
fig. 31
F0D0118m
fig. 32
F0D0119m
Page 154 of 258
153IN AN EMERGENCY
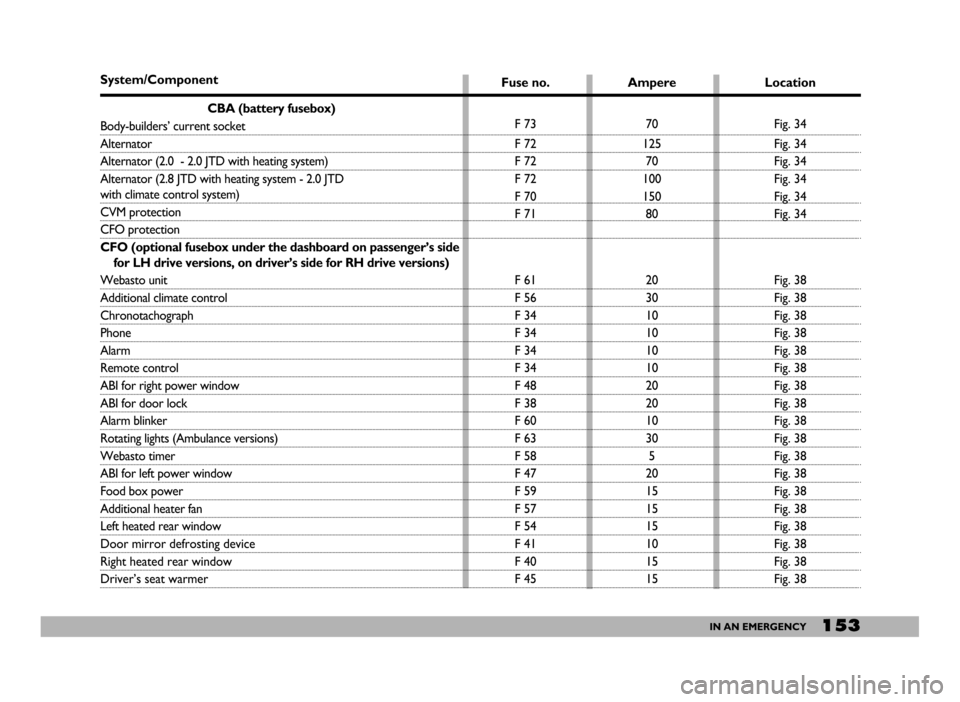
System/Component
CBA (battery fusebox)
Body-builders’ current socket
Alternator
Alternator (2.0 - 2.0 JTD with heating system)
Alternator (2.8 JTD with heating system - 2.0 JTD
with climate control system)
CVM protection
CFO protection
CFO (optional fusebox under the dashboard on passenger’s side
for LH drive versions, on driver’s side for RH drive versions)
Webasto unit
Additional climate control
Chronotachograph
Phone
Alarm
Remote control
ABI for right power window
ABI for door lock
Alarm blinker
Rotating lights (Ambulance versions)
Webasto timer
ABI for left power window
Food box power
Additional heater fan
Left heated rear window
Door mirror defrosting device
Right heated rear window
Driver’s seat warmerFuse no.
F 73
F 72
F 72
F 72
F 70
F 71
F 61
F 56
F 34
F 34
F 34
F 34
F 48
F 38
F 60
F 63
F 58
F 47
F 59
F 57
F 54
F 41
F 40
F 45Ampere
70
125
70
100
150
80
20
30
10
10
10
10
20
20
10
30
5
20
15
15
15
10
15
15Location
Fig. 34
Fig. 34
Fig. 34
Fig. 34
Fig. 34
Fig. 34
Fig. 38
Fig. 38
Fig. 38
Fig. 38
Fig. 38
Fig. 38
Fig. 38
Fig. 38
Fig. 38
Fig. 38
Fig. 38
Fig. 38
Fig. 38
Fig. 38
Fig. 38
Fig. 38
Fig. 38
Fig. 38
Page 155 of 258
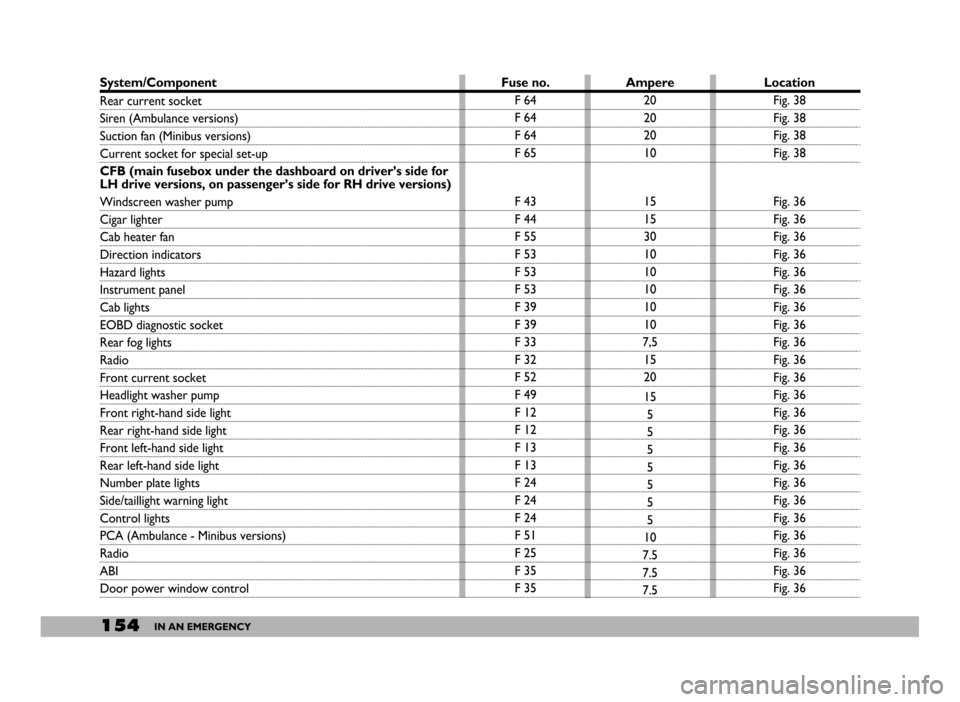
154IN AN EMERGENCY
System/Component
Rear current socket
Siren (Ambulance versions)
Suction fan (Minibus versions)
Current socket for special set-up
CFB (main fusebox under the dashboard on driver’s side for
LH drive versions, on passenger’s side for RH drive versions)
Windscreen washer pump
Cigar lighter
Cab heater fan
Direction indicators
Hazard lights
Instrument panel
Cab lights
EOBD diagnostic socket
Rear fog lights
Radio
Front current socket
Headlight washer pump
Front right-hand side light
Rear right-hand side light
Front left-hand side light
Rear left-hand side light
Number plate lights
Side/taillight warning light
Control lights
PCA (Ambulance - Minibus versions)
Radio
ABI
Door power window controlLocation
Fig. 38
Fig. 38
Fig. 38
Fig. 38
Fig. 36
Fig. 36
Fig. 36
Fig. 36
Fig. 36
Fig. 36
Fig. 36
Fig. 36
Fig. 36
Fig. 36
Fig. 36
Fig. 36
Fig. 36
Fig. 36
Fig. 36
Fig. 36
Fig. 36
Fig. 36
Fig. 36
Fig. 36
Fig. 36
Fig. 36
Fig. 36 Ampere
20
20
20
10
15
15
30
10
10
10
10
10
7,5
15
20
15
5
5
5
5
5
5
5
10
7.5
7.5
7.5 Fuse no.
F 64
F 64
F 64
F 65
F 43
F 44
F 55
F 53
F 53
F 53
F 39
F 39
F 33
F 32
F 52
F 49
F 12
F 12
F 13
F 13
F 24
F 24
F 24
F 51
F 25
F 35
F 35
Page 161 of 258
160IN AN EMERGENCY
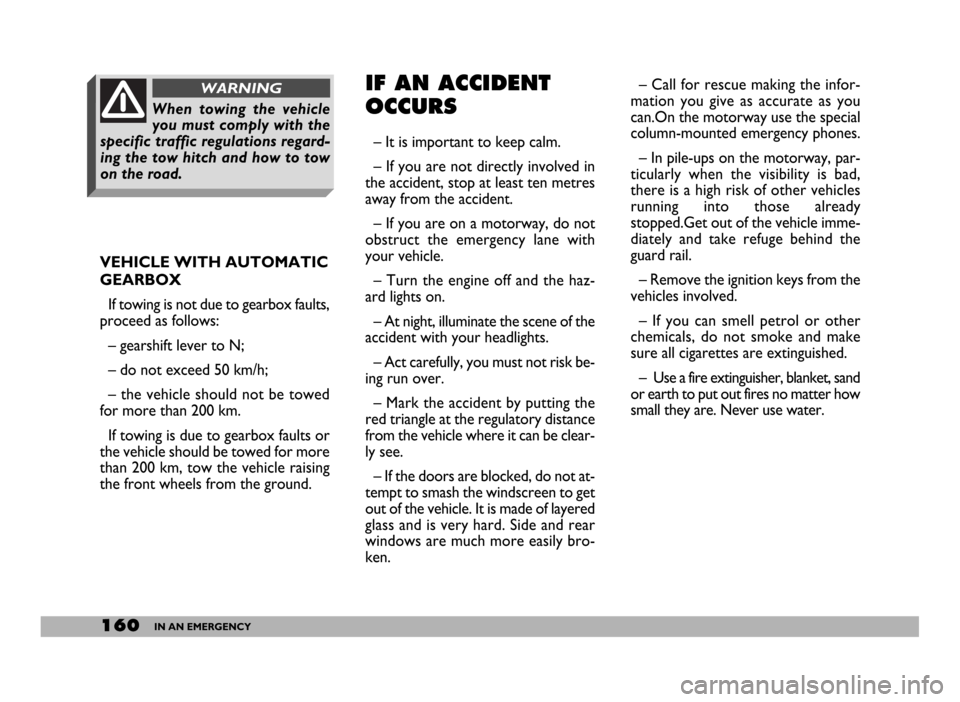
IF AN ACCIDENT
OCCURS
– It is important to keep calm.
– If you are not directly involved in
the accident, stop at least ten metres
away from the accident.
– If you are on a motorway, do not
obstruct the emergency lane with
your vehicle.
– Turn the engine off and the haz-
ard lights on.
– At night, illuminate the scene of the
accident with your headlights.
– Act carefully, you must not risk be-
ing run over.
– Mark the accident by putting the
red triangle at the regulatory distance
from the vehicle where it can be clear-
ly see.
– If the doors are blocked, do not at-
tempt to smash the windscreen to get
out of the vehicle. It is made of layered
glass and is very hard. Side and rear
windows are much more easily bro-
ken. VEHICLE WITH AUTOMATIC
GEARBOX
If towing is not due to gearbox faults,
proceed as follows:
– gearshift lever to N;
– do not exceed 50 km/h;
– the vehicle should not be towed
for more than 200 km.
If towing is due to gearbox faults or
the vehicle should be towed for more
than 200 km, tow the vehicle raising
the front wheels from the ground.– Call for rescue making the infor-
mation you give as accurate as you
can.On the motorway use the special
column-mounted emergency phones.
– In pile-ups on the motorway, par-
ticularly when the visibility is bad,
there is a high risk of other vehicles
running into those already
stopped.Get out of the vehicle imme-
diately and take refuge behind the
guard rail.
– Remove the ignition keys from the
vehicles involved.
– If you can smell petrol or other
chemicals, do not smoke and make
sure all cigarettes are extinguished.
– Use a fire extinguisher, blanket, sand
or earth to put out fires no matter how
small they are. Never use water.
When towing the vehicle
you must comply with the
specific traffic regulations regard-
ing the tow hitch and how to tow
on the road.
WARNING
Page 164 of 258
163VEHICLE MAINTENANCE
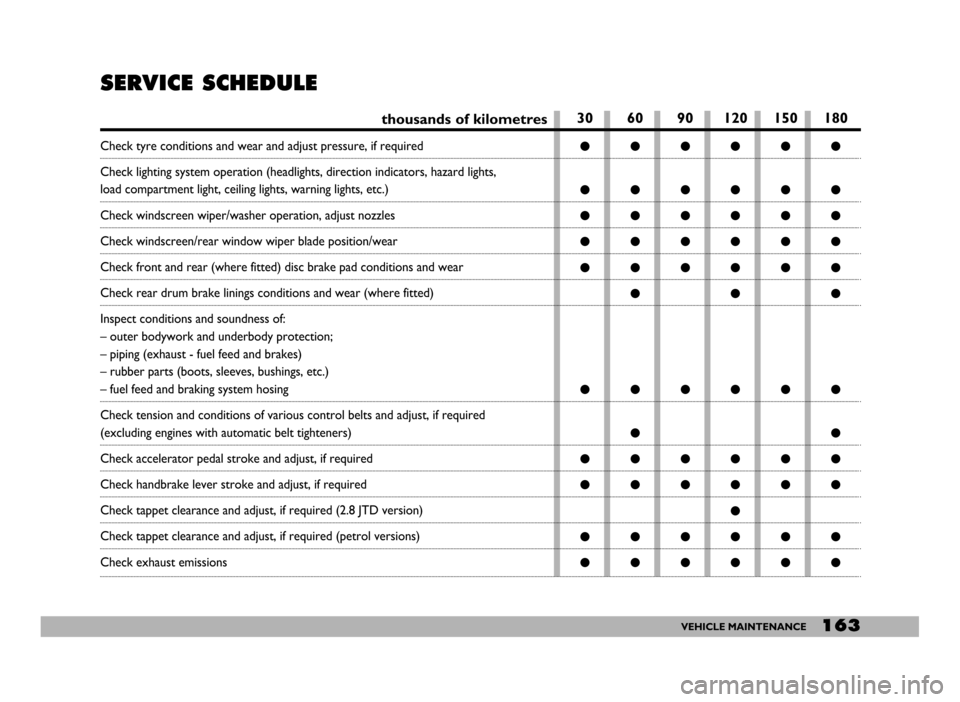
SERVICE SCHEDULE
thousands of kilometres
Check tyre conditions and wear and adjust pressure, if required
Check lighting system operation (headlights, direction indicators, hazard lights,
load compartment light, ceiling lights, warning lights, etc.)
Check windscreen wiper/washer operation, adjust nozzles
Check windscreen/rear window wiper blade position/wear
Check front and rear (where fitted) disc brake pad conditions and wear
Check rear drum brake linings conditions and wear (where fitted)
Inspect conditions and soundness of:
– outer bodywork and underbody protection;
– piping (exhaust - fuel feed and brakes)
– rubber parts (boots, sleeves, bushings, etc.)
– fuel feed and braking system hosing
Check tension and conditions of various control belts and adjust, if required
(excluding engines with automatic belt tighteners)
Check accelerator pedal stroke and adjust, if required
Check handbrake lever stroke and adjust, if required
Check tappet clearance and adjust, if required (2.8 JTD version)
Check tappet clearance and adjust, if required (petrol versions)
Check exhaust emissions
30 60 90 120 150 180
●●●●●●
●●●●●●
●●●●●●
●●●●●●
●●●●●●
●●●
●●●●●●
●●
●●●●●●
●●●●●●
●
●●●●●●
●●●●●●
Page 166 of 258
165VEHICLE MAINTENANCE
ANNUAL
INSPECTION
SCHEDULE
The following annual inspection
schedule is required for vehicles trav-
elling 15,000 Kmapprox. a year. The
schedule includes the following oper-
ations:
– check tyre condition and wear and
adjust pressure, if required (including
spare wheel);
– check operation of lights (head-
lights, direction indicators, hazard
lights, boot light, passenger compart-
ment light, instrument panel lights,
etc.);
– check windscreen wiper/washer
and adjust nozzles;
– check position and wear of wind-
screen/rear window wiper blades;
– check front pad conditions and
wear;
– check for bonnet and boot lock
cleanness, lever cleanness and lubri-
cation;– inspect conditions of: engine, gear-
box, transmission, piping (exhaust, fu-
el feed, brakes), rubber parts (boots,
sleeves, bushings, etc.), brake and fu-
el line hoses;
– check battery charge status;
– check conditions of various control
belts;
– check and top up fluid levels (en-
gine coolant, brakes, windscreen
washer, battery, etc.);
– check and top up engine oil;
– replace pollen filter.
ADDITIONAL
CHECKS
Every 1,000 km or before long
trips, check and top up as necessary:
– engine coolant level
– brake fluid level
– power steering fluid level
– battery electrolyte level
– windscreen washer fluid
– tyre pressure and conditions.
Every 3,000 km or before long
trips, check and top up as necessary:
engine oil
Every 10,000 kmor at cwarning
light coming on (diesel engines only):
bleed water from fuel filter.
You are recommended to use FL
Seleniaproducts designed and pro-
duced for Fiat vehicles (see the “Ca-
pacities” table in the “Technical Spec-
ifications” section).
Page 184 of 258
183VEHICLE MAINTENANCE
Do not wash the vehicle after it has
been parked in the sun or while the
bonnet is hot: it could take the shine
off the paint.
Outside plastic parts must be
cleaned following the usual vehicle
washing procedure.
Where possible avoid parking the
vehicle under trees; the resinous sub-
stances that certain species of tree
shed dull the paintwork and increase
the possibility of rust forming.To better protect the paintwork,
polish with protective wax from time
to time, that leaves a protective layer
on the paintwork.
When the paintwork tends to lose
its shine because of the build-up of
smog, use a wax (polish) which has a
slightly abrasive as well as protective
action.
Front headlights
IMPORTANTNever use aromat-
ic substances (e.g.: petrol) or ketones
(e.g.: acetone) for cleaning front head-
light plastic lens.
Windows
Use specific window cleaners to
clean the windows. Use very clean
cloths to avoid scratching the glass or
damaging its transparency.
IMPORTANTTo prevent damage
to the electric heater element, wipe
the inside of the heated rear window
(where fitted) gently in the same di-
rection as the elements.Engine compartment
At the end of each winter season,
carefully clean the engine compart-
ment. Have this done at a garage.
IMPORTANTThe engine com-
partment should be washed while the
engine is cold and with the ignition key
at STOP. After washing, make sure
that the various protections (e.g. rub-
ber boots and various guards) have
not be removed or damaged.
Detergents pollute wa-
ter. For this reason, the
vehicle must be washed
in an area equipped for the col-
lection and purification of the liq-
uids used while washing.
IMPORTANTBird droppings
must be washed off immediately and
with great care as their acid is partic-
ularly aggressive.
Detergents pollute wa-
ter. The vehicle must
therefore be washed in an
area equipped for the collection
and purification of the liquids
used while washing.
Page 249 of 258
248INDEX
Cruise Control ............................ 68
Current socket ............................ 76
Dashboard ................................. 5
Demisting ...................................... 56
Diesel fuel filter ........................... 173
Differential .................................... 216
Digital clock .................................. 32
Dimensions ........................... 222-224
Dipped beam headlights ............ 65
- bulb replacement ................... 143
Direction indicators ................... 66
- front bulb replacement ......... 145
- rear bulb replacement .......... 146
- side bulb replacement ........... 145
Doors ............................................ 79
- 270° opening ........................... 82
- central door locking .............. 83
- driver’s cab doors .................. 79
- rear door ................................. 81
- remote control ....................... 9- side sliding door ..................... 80
- window regulators ................ 83
Driving style affecting fuel
consumption .............................. 124
Electric windows ....................... 83
Electronic alarm .......................... 11
Electronic automatic gearbox .. 110
Electronic control units ............. 177
- speed limiter ........................... 177
Emergency starting .............. 107-135
Emission control devices ........... 128
Engine ............................................ 214
- starting diesel engines ........... 106
- starting petrol engines .......... 105
- stopping the engine ............... 108
- supply/ignition ......................... 215
- warming up the engine ......... 107
Engine/bodywork codes ............ 187
Engine compartment .................. 183
Engine coolant gauge .................. 30
Engine coolant level .................... 170Engine marking ............................ 185
Engine oil ....................................... 169
- consumption ........................... 170
Engine oil level ............................. 169
Engine oil level gauge ................. 32
EOBD system .............................. 95
Fiat Code (system) ................... 7
First aid kit .................................... 161
Flashing the headlights ............... 66
Fluids and lubricants ................... 241
Front/rear ceiling light
replacement ............................... 148
Front fog light replacement ...... 145
Fuel cut-off switch ...................... 72
Fuel gauge ..................................... 31
Fuses (replacement) ................... 149
Getting to know
your vehicle............................ 5
Getting the best out of
your vehicle............................ 105