warning FIAT DUCATO 2009 3.G Owner's Guide
[x] Cancel search | Manufacturer: FIAT, Model Year: 2009, Model line: DUCATO, Model: FIAT DUCATO 2009 3.GPages: 282, PDF Size: 4.55 MB
Page 32 of 282
31
SAFETY
DEVICES
CORRECT USE
OF THE
VEHICLE
WARNING
LIGHTS AND
MESSAGES
IN AN
EMERGENCY
VEHICLE
MAINTENANCE
TECHNICAL
SPECIFICATIONS
INDEX
DASHBOARD
AND CONTROLS
Automatic door locking with
vehicle running (Autoclose)
When activated (On), this function locks
automatically the doors when the vehicle
speed exceeds 20 km/h.
To activate (On) or to deactivate (Off) this
function proceed as follows:
– briefly press button MODEto display
the submenu;
– briefly press button MODE : (On) or
(Off) will flash on the display (according to
previous setting);
– press button ▲or ▼for setting;
– briefly press button MODEto go back
to the menu screen or press the button
for long to go back to the standard screen
without storing settings;
– press again button MODEfor long to
go back to the standard screen or to the
main menu according to the current menu
level. Audio repetition (See radio)
With this function the display repeats in-
formation relevant to the sound system.
– Radio: selected radio station frequency
or RDS message, automatic tuning acti-
vation or AutoSTore;
– audio CD, MP3 CD: track number;
– CD Changer: CD number and track
number;
To activate (On) or to deactivate (Off)
sound system info displaying proceed as
follows:
– briefly press button MODE: (On) or
(Off)will flash on the display (according to
previous setting);
– press button ▲or ▼for setting;
– briefly press button MODEto go back
to the menu screen or press the button
for long to go back to the standard screen
without storing settings.Set unit (Units)
With this function it is possible to set the
units through three sub-menus: “Distances”,
“Consumption” and “Temperature”.
To set the required unit proceed as follows:
– briefly press button MODE, to display
the three sub-menus;
– press button ▲or ▼to surf the three
sub-menus;
– select the required sub-menu and then
press briefly button MODE;
– if selecting “Distances”: briefly press button
MODEthe display will show “km” or “mi”
(according to previous setting);
– press button ▲or ▼for setting;
– if selecting “Consumption”: briefly press but-
ton MODEthe display will show “km/l”,
“l/100km” or “mpg” (according to previous
setting);
Page 33 of 282
32
SAFETY
DEVICES
CORRECT USE
OF THE
VEHICLE
WARNING
LIGHTS AND
MESSAGES
IN AN
EMERGENCY
VEHICLE
MAINTENANCE
TECHNICAL
SPECIFICATIONS
INDEX
DASHBOARD
AND CONTROLS
Selecting the language (Language)
Display messages can be shown (after set-
ting) in different languages: Italian, German,
English, Spanish, French, Portuguese and
Dutch.
To set the required language proceed as
follows:
– briefly press button MODE: the previ-
ously set “language” will flash on the dis-
play;
– press button ▲or ▼for setting;
– briefly press button MODEto go back
to the menu screen or press the button
for long to go back to the standard screen
without storing settings.Adjusting the failure/warning
buzzer volume
(Buzzer Volume)
With this function the volume of the
buzzer accompanying any failure/warning
indication can be adjusted according to 8
levels.
To adjust the volume proceed as follows:
– briefly press button MODE: the previ-
ously set volume “level” will flash on the
display;
– press button ▲or ▼for setting;
– briefly press button MODEto go back
to the menu screen or press the button
for long to go back to the standard screen
without storing settings. If the distance unit set is “km” the fuel con-
sumption unit will be displayed in km/l or
l/100km.
If the distance unit set is “mi” the fuel con-
sumption unit will be displayed in “mpg”.
– press button ▲or ▼for setting;
– if selecting “Temperature”: briefly press but-
ton MODE, the display will show “°C” or
“°F” (according to previous setting);
– press button ▲or ▼for setting;
After setting, briefly press button MODE
to go back to the submenu screen or
press the button for long to go back to the
main menu screen without storing set-
tings.
– press again button MODEfor long to
go back to the standard screen or to the
main menu according to the current menu
level.
Page 34 of 282
33
SAFETY
DEVICES
CORRECT USE
OF THE
VEHICLE
WARNING
LIGHTS AND
MESSAGES
IN AN
EMERGENCY
VEHICLE
MAINTENANCE
TECHNICAL
SPECIFICATIONS
INDEX
DASHBOARD
AND CONTROLS
Adjusting the button volume
(Button Vol.)
With this function the volume of the
roger-beep accompanying the activation
of buttons MODE, ▲and ▼can be ad-
justed according to 8 levels.
To adjust the volume proceed as follows:
– briefly press button MODE: the previ-
ously set volume “level” will flash on the
display;
– press button ▲or ▼for setting;
– briefly press button MODEto go back
to the menu screen or press the button
for long to go back to the standard screen
without storing settings.S.B.R. buzzer reactivation
(Belt Buzzer)
This function can be only displayed after
Fiat Dealership has deactivated the S.B.R.
system (see paragraph “S.B.R. system” in
section “Safety devices”).
Scheduled Servicing (Service)
Through this function it is possible to dis-
play information connected to proper ve-
hicle servicing.
Proceed as follows:
– briefly press button MODE: service in
km or mi, according to previous setting,
will be displayed (see paragraph “Units”);
– briefly press button MODEto go back
to the menu screen or press the button
for long to go back to the standard screen.NoteThe “Service schedule” plans dif-
ferent service intervals according to en-
gine models; service interval is displayed
automatically, with the ignition key at
MAR, starting from 2,000 km (or 1,240
mi) from this deadline and it is shown again
every 200 km (or 124 mi). Oil change
warning messages are displayed in the
same way. Use buttons ▲and ▼to dis-
play alternately service schedule info and
engine oil change info. Below 200 km ser-
vicing indications are displayed more fre-
quently. Service indications will be dis-
played in km or mi according to previous
unit setting. When a programmed main-
tenance interval (coupon) is near to come,
turning the ignition key to MAR, the dis-
play will show the message “Service” fol-
lowed by the number of km/mi to go be-
fore vehicle servicing. Contact a Fiat Deal-
ership to carry out any service operation
provided by the “Service schedule” and to
reset the display.
Page 35 of 282
34
SAFETY
DEVICES
CORRECT USE
OF THE
VEHICLE
WARNING
LIGHTS AND
MESSAGES
IN AN
EMERGENCY
VEHICLE
MAINTENANCE
TECHNICAL
SPECIFICATIONS
INDEX
DASHBOARD
AND CONTROLS
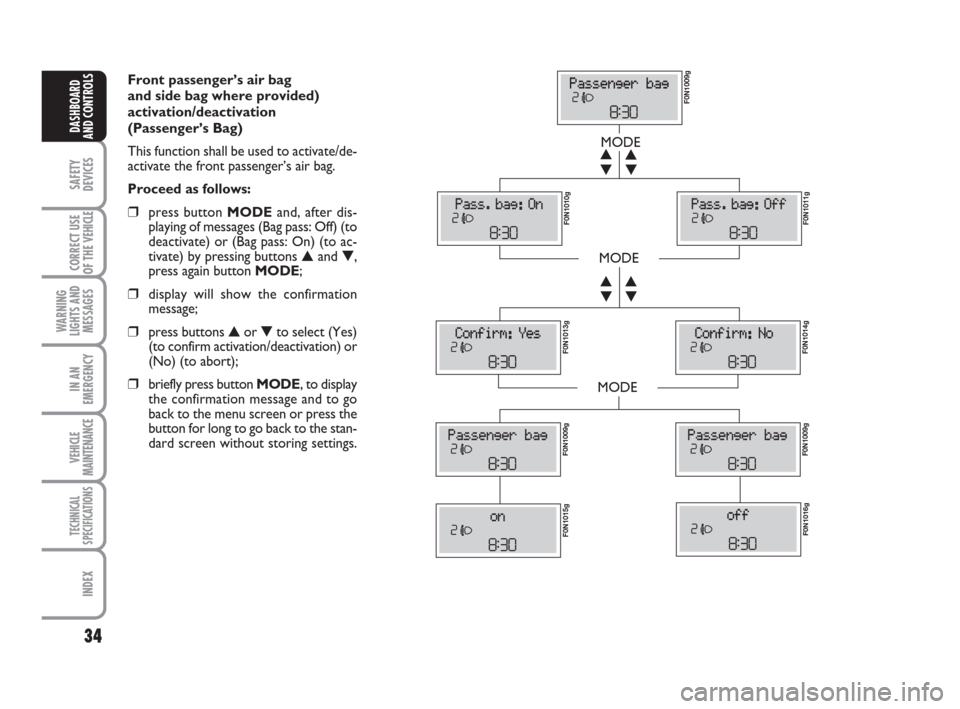
Front passenger’s air bag
and side bag where provided)
activation/deactivation
(Passenger’s Bag)
This function shall be used to activate/de-
activate the front passenger’s air bag.
Proceed as follows:
❒press button MODEand, after dis-
playing of messages (Bag pass: Off) (to
deactivate) or (Bag pass: On) (to ac-
tivate) by pressing buttons ▲and ▼,
press again button MODE;
❒display will show the confirmation
message;
❒press buttons ▲or ▼to select (Yes)
(to confirm activation/deactivation) or
(No) (to abort);
❒briefly press button MODE, to display
the confirmation message and to go
back to the menu screen or press the
button for long to go back to the stan-
dard screen without storing settings.
MODE
MODE
MODE
▼ ▲
▼ ▲
▼ ▲
▼ ▲
F0N1009g F0N1010g
F0N1011g F0N1013g
F0N1014g F0N1009gF0N1009g
F0N1015gF0N1016g
Page 36 of 282
35
SAFETY
DEVICES
CORRECT USE
OF THE
VEHICLE
WARNING
LIGHTS AND
MESSAGES
IN AN
EMERGENCY
VEHICLE
MAINTENANCE
TECHNICAL
SPECIFICATIONS
INDEX
DASHBOARD
AND CONTROLS
TRIP COMPUTER
General features
The “Trip computer” displays information
(with ignition key at MAR), relating to the
operating status of the vehicle. This func-
tion comprises two separate and inde-
pendent trips: “Trip A” and “Trip B” con-
cerning the “complete mission” of the ve-
hicle (journey).
Both functions are resettable (reset - start
of new mission).
“Trip A” shall be used to display the fig-
ures relating to:
– External temperature
– Range
– Trip distance
– Average consumption
– Instant consumption
– Average speed
– Travel time (driving time).“Trip B”, available on multifunction display
only, shall be used to display the figures
relating to:
– Trip distance B
– Average consumption B
– Average speed B
– Travel time B (driving time).
Note“Trip B” function can be excluded
(see paragraph “Trip B On/Off”). “Range”
and “Instant consumption” cannot be re-
set.
Values displayed
External temperature
It indicates the external temperature of
the driver compartment.
Range
This value shows the distance in km (or
mi) that the vehicle can still cover before
needing fuel, assuming that driving condi-
tions are kept unvaried. The display will
show “----” in the following cases:
– value lower than 50 km (or 30 mi)
– vehicle left parked with engine running
for long.
Trip distance
This value shows the distance covered
from the start of the new mission. Exit Menu
This is the last function that closes the cir-
cular setting cycle listed in the initial menu
screen.
Briefly press button MODEto go back to
the standard screen without storing set-
tings.
Press button ▼to return to the first menu
option (Speed Beep).
Page 37 of 282
36
SAFETY
DEVICES
CORRECT USE
OF THE
VEHICLE
WARNING
LIGHTS AND
MESSAGES
IN AN
EMERGENCY
VEHICLE
MAINTENANCE
TECHNICAL
SPECIFICATIONS
INDEX
DASHBOARD
AND CONTROLS
Average consumption
This value shows the average consump-
tion from the start of the new mission.
Instant consumption
This value shows instant fuel consumption
(this value is updated second by second).
If parking the vehicle with engine on,
the display will show “----”.
Average speed
This value shows the vehicle average
speed as a function of the overall time
elapsed since the start of the new mission.
Travel time
This value shows the time elapsed since
the start of the new mission.
IMPORTANT Lacking information, Trip
computer values are displayed with “----”.
When normal operating condition is re-
set, calculation of different units will
restart regularly. Values displayed before
the failure will not be reset.
fig. 22F0N0019m
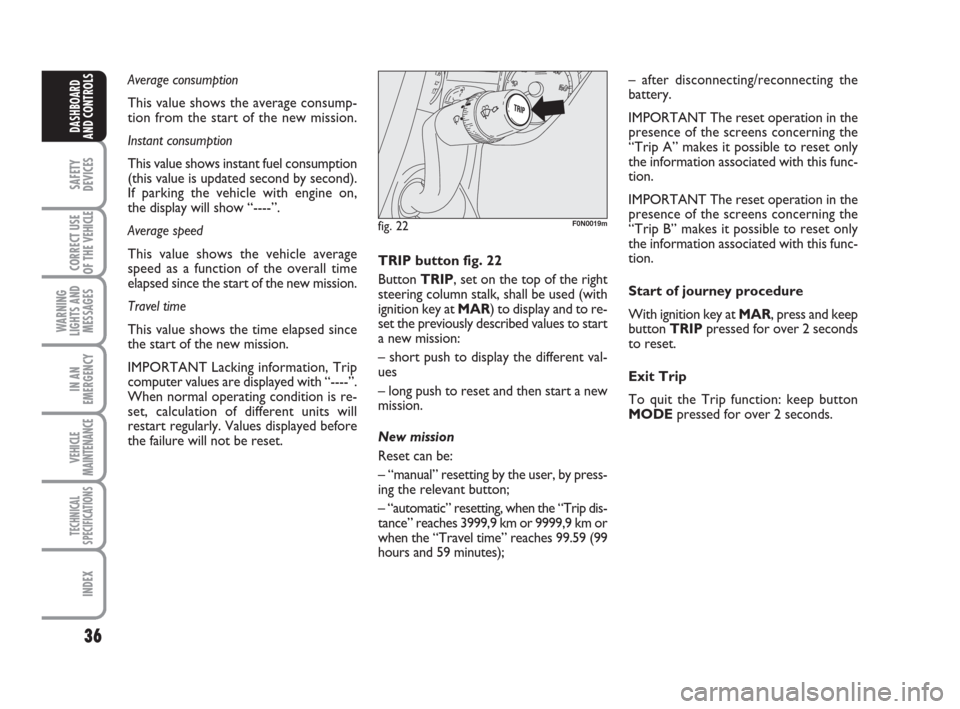
TRIP button fig. 22
Button TRIP, set on the top of the right
steering column stalk, shall be used (with
ignition key at MAR) to display and to re-
set the previously described values to start
a new mission:
– short push to display the different val-
ues
– long push to reset and then start a new
mission.
New mission
Reset can be:
– “manual” resetting by the user, by press-
ing the relevant button;
– “automatic” resetting, when the “Trip dis-
tance” reaches 3999,9 km or 9999,9 km or
when the “Travel time” reaches 99.59 (99
hours and 59 minutes);– after disconnecting/reconnecting the
battery.
IMPORTANT The reset operation in the
presence of the screens concerning the
“Trip A” makes it possible to reset only
the information associated with this func-
tion.
IMPORTANT The reset operation in the
presence of the screens concerning the
“Trip B” makes it possible to reset only
the information associated with this func-
tion.
Start of journey procedure
With ignition key at MAR, press and keep
button TRIPpressed for over 2 seconds
to reset.
Exit Trip
To quit the Trip function: keep button
MODEpressed for over 2 seconds.
Page 38 of 282
37
SAFETY
DEVICES
CORRECT USE
OF THE
VEHICLE
WARNING
LIGHTS AND
MESSAGES
IN AN
EMERGENCY
VEHICLE
MAINTENANCE
TECHNICAL
SPECIFICATIONS
INDEX
DASHBOARD
AND CONTROLS
Fabric upholstery of your Fiat
Ducato is purpose-made to
withstand common wear re-
sulting from normal use of the
vehicle. It is however absolutely neces-
sary to prevent hard and/or prolonged
scratching/scraping caused by clothing
accessories like metallic buckles, studs,
“Velcro” fixings, etc. that stressing lo-
cally the fabric could break yarns and
damage the upholstery as a conse-
quence.
Seat height adjustment
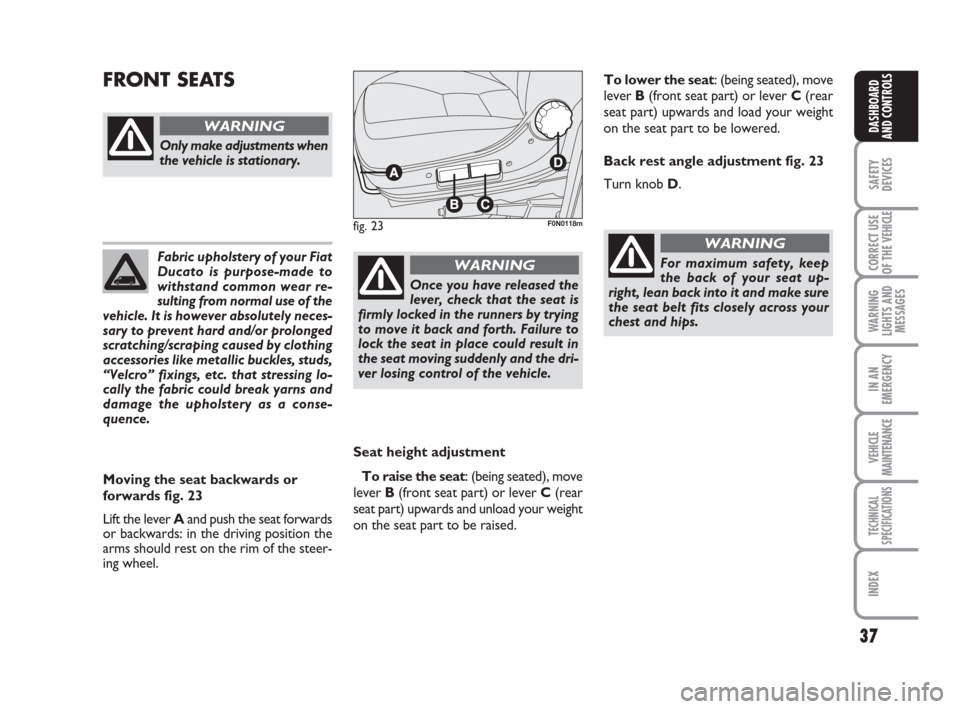
To raise the seat: (being seated), move
lever B (front seat part) or lever C (rear
seat part) upwards and unload your weight
on the seat part to be raised.
FRONT SEATS
fig. 23F0N0118m
Only make adjustments when
the vehicle is stationary.
WARNING
Moving the seat backwards or
forwards fig. 23
Lift the lever Aand push the seat forwards
or backwards: in the driving position the
arms should rest on the rim of the steer-
ing wheel.
Once you have released the
lever, check that the seat is
firmly locked in the runners by trying
to move it back and forth. Failure to
lock the seat in place could result in
the seat moving suddenly and the dri-
ver losing control of the vehicle.
WARNINGFor maximum safety, keep
the back of your seat up-
right, lean back into it and make sure
the seat belt fits closely across your
chest and hips.
WARNING
To lower the seat: (being seated), move
lever B(front seat part) or lever C(rear
seat part) upwards and load your weight
on the seat part to be lowered.
Back rest angle adjustment fig. 23
Turn knob D.
Page 39 of 282
38
SAFETY
DEVICES
CORRECT USE
OF THE
VEHICLE
WARNING
LIGHTS AND
MESSAGES
IN AN
EMERGENCY
VEHICLE
MAINTENANCE
TECHNICAL
SPECIFICATIONS
INDEX
DASHBOARD
AND CONTROLS
fig. 24F0N0147m
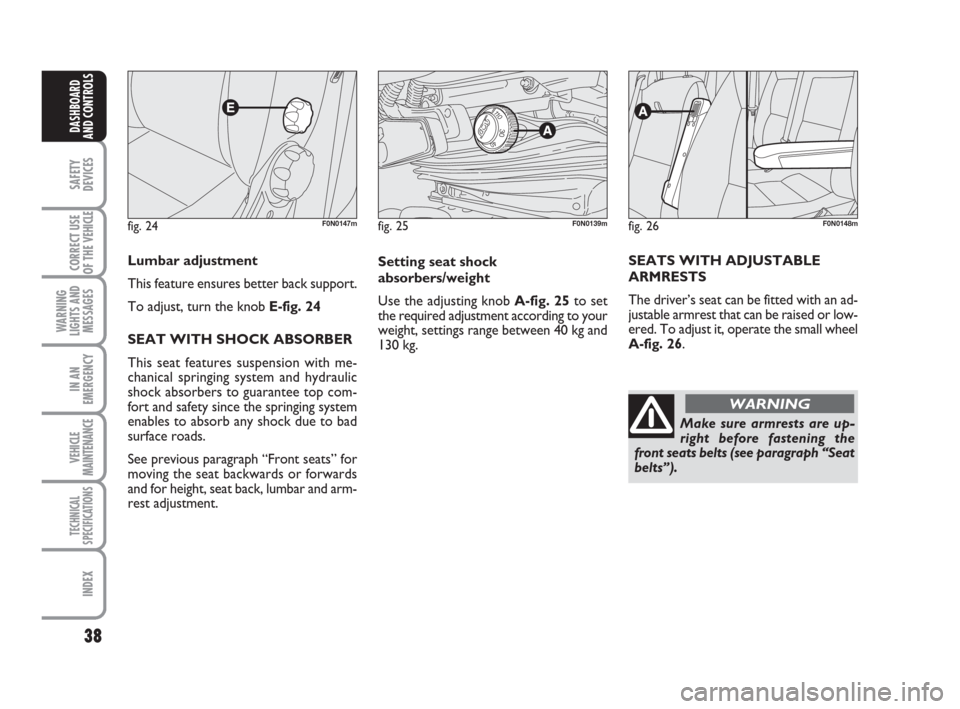
Lumbar adjustment
This feature ensures better back support.
To adjust, turn the knob E-fig. 24
SEAT WITH SHOCK ABSORBER
This seat features suspension with me-
chanical springing system and hydraulic
shock absorbers to guarantee top com-
fort and safety since the springing system
enables to absorb any shock due to bad
surface roads.
See previous paragraph “Front seats” for
moving the seat backwards or forwards
and for height, seat back, lumbar and arm-
rest adjustment.
fig. 25F0N0139m
Setting seat shock
absorbers/weight
Use the adjusting knob A-fig. 25to set
the required adjustment according to your
weight, settings range between 40 kg and
130 kg.
Make sure armrests are up-
right before fastening the
front seats belts (see paragraph “Seat
belts”). SEATS WITH ADJUSTABLE
ARMRESTS
The driver’s seat can be fitted with an ad-
justable armrest that can be raised or low-
ered. To adjust it, operate the small wheel
A-fig. 26.
fig. 26F0N0148m
WARNING
Page 40 of 282
39
SAFETY
DEVICES
CORRECT USE
OF THE
VEHICLE
WARNING
LIGHTS AND
MESSAGES
IN AN
EMERGENCY
VEHICLE
MAINTENANCE
TECHNICAL
SPECIFICATIONS
INDEX
DASHBOARD
AND CONTROLS
Only make adjustments
when the vehicle is station-
ary. Specially when revolving the seat,
make sure it is not interfering with the
handbrake lever.
Make sure the outer armrest
(door side) is completely up-
right before unfastening the seat belts
and getting out of the vehicle.
WARNING
Should it be absolutely nec-
essary to carry a child seat
on the front passenger’s seat, make
sure to deactivate the front passen-
ger’s air bag, to fasten the passenger’s
seat belt and to lower completely the
armrests to prevent their accidental
moving.
WARNING
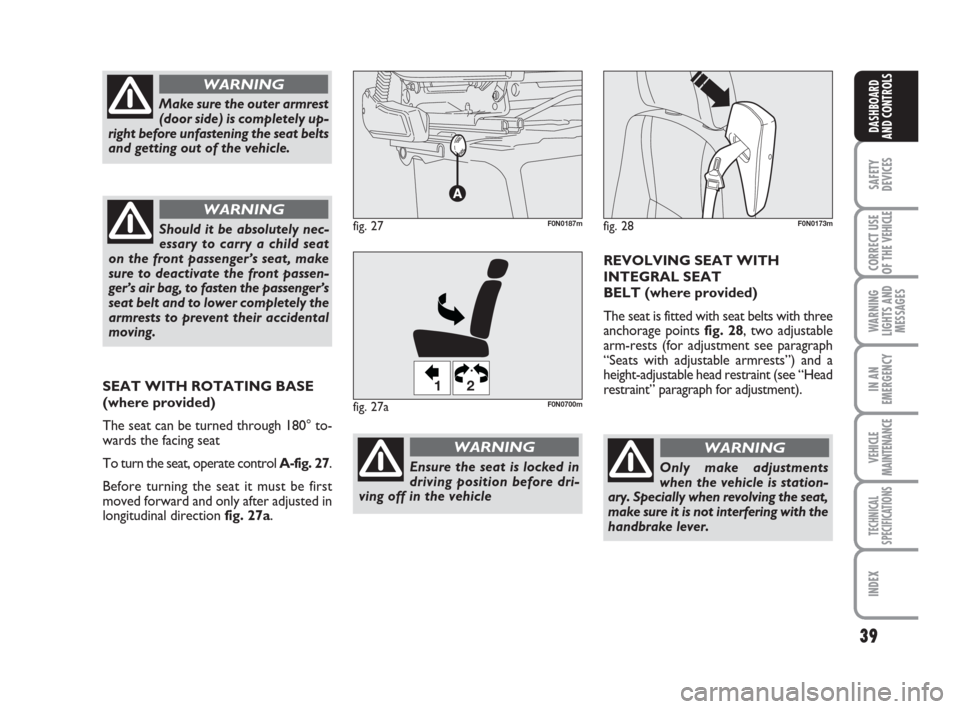
REVOLVING SEAT WITH
INTEGRAL SEAT
BELT (where provided)
The seat is fitted with seat belts with three
anchorage points fig. 28, two adjustable
arm-rests (for adjustment see paragraph
“Seats with adjustable armrests”) and a
height-adjustable head restraint (see “Head
restraint” paragraph for adjustment).
WARNING
fig. 28F0N0173mfig. 27F0N0187m
Ensure the seat is locked in
driving position before dri-
ving off in the vehicle
WARNING
SEAT WITH ROTATING BASE
(where provided)
The seat can be turned through 180° to-
wards the facing seat
To turn the seat, operate control A-fig. 27.
Before turning the seat it must be first
moved forward and only after adjusted in
longitudinal direction fig. 27a.
fig. 27a
12
F0N0700m
Page 41 of 282
40
SAFETY
DEVICES
CORRECT USE
OF THE
VEHICLE
WARNING
LIGHTS AND
MESSAGES
IN AN
EMERGENCY
VEHICLE
MAINTENANCE
TECHNICAL
SPECIFICATIONS
INDEX
DASHBOARD
AND CONTROLS
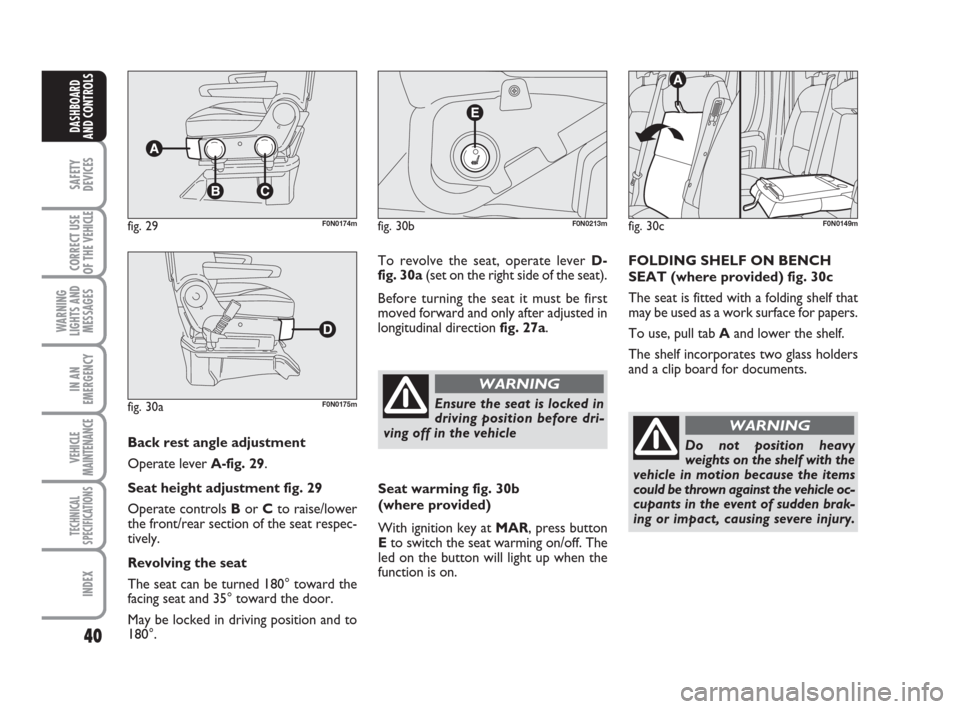
Back rest angle adjustment
Operate lever A-fig. 29.
Seat height adjustment fig. 29
Operate controls Bor Cto raise/lower
the front/rear section of the seat respec-
tively.
Revolving the seat
The seat can be turned 180° toward the
facing seat and 35° toward the door.
May be locked in driving position and to
180°.
fig. 29F0N0174m
fig. 30aF0N0175m
To revolve the seat, operate lever D-
fig. 30a(set on the right side of the seat).
Before turning the seat it must be first
moved forward and only after adjusted in
longitudinal direction fig. 27a.
fig. 30bF0N0213m
Ensure the seat is locked in
driving position before dri-
ving off in the vehicle
WARNING
Seat warming fig. 30b
(where provided)
With ignition key at MAR, press button
Eto switch the seat warming on/off. The
led on the button will light up when the
function is on.
fig. 30cF0N0149m
FOLDING SHELF ON BENCH
SEAT (where provided) fig. 30c
The seat is fitted with a folding shelf that
may be used as a work surface for papers.
To use, pull tab Aand lower the shelf.
The shelf incorporates two glass holders
and a clip board for documents.
Do not position heavy
weights on the shelf with the
vehicle in motion because the items
could be thrown against the vehicle oc-
cupants in the event of sudden brak-
ing or impact, causing severe injury.
WARNING