100 FIAT DUCATO 2009 3.G Owners Manual
[x] Cancel search | Manufacturer: FIAT, Model Year: 2009, Model line: DUCATO, Model: FIAT DUCATO 2009 3.GPages: 282, PDF Size: 4.55 MB
Page 5 of 282
4
SAFETY
DEVICES
CORRECT USE
OF THE
VEHICLE
WARNING
LIGHTS AND
MESSAGES
IN AN
EMERGENCY
VEHICLE
MAINTENANCE
TECHNICAL
SPECIFICATIONS
INDEX
DASHBOARD
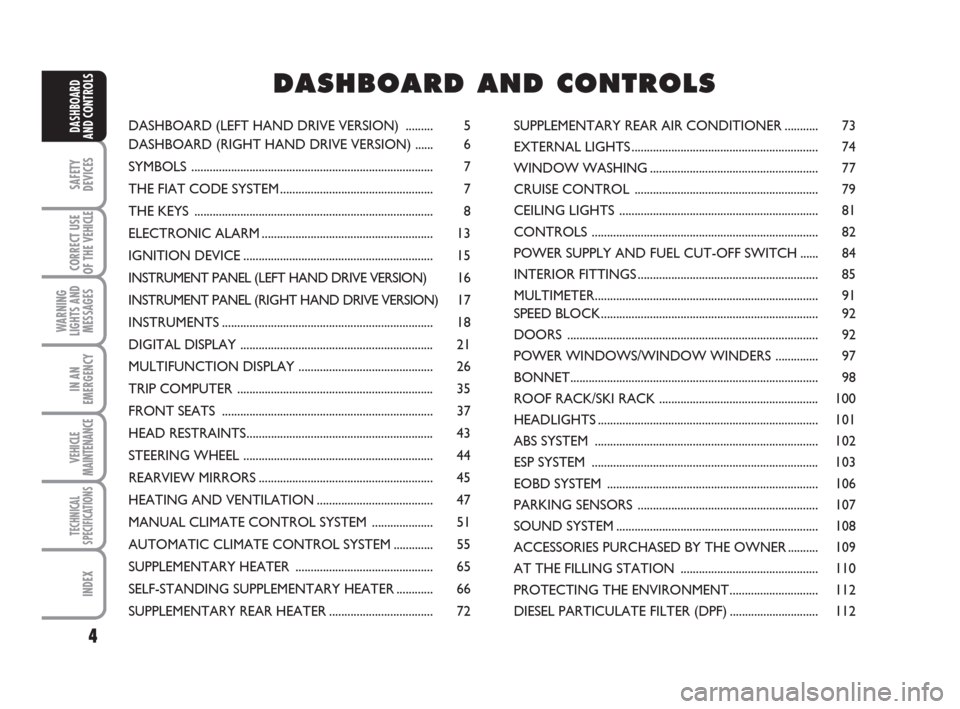
AND CONTROLSDASHBOARD (LEFT HAND DRIVE VERSION) ......... 5
DASHBOARD (RIGHT HAND DRIVE VERSION) ...... 6
SYMBOLS ............................................................................... 7
THE FIAT CODE SYSTEM.................................................. 7
THE KEYS .............................................................................. 8
ELECTRONIC ALARM........................................................ 13
IGNITION DEVICE.............................................................. 15
INSTRUMENT PANEL (LEFT HAND DRIVE VERSION) 16
INSTRUMENT PANEL (RIGHT HAND DRIVE VERSION) 17
INSTRUMENTS..................................................................... 18
DIGITAL DISPLAY ............................................................... 21
MULTIFUNCTION DISPLAY ............................................ 26
TRIP COMPUTER ................................................................ 35
FRONT SEATS ..................................................................... 37
HEAD RESTRAINTS............................................................. 43
STEERING WHEEL .............................................................. 44
REARVIEW MIRRORS......................................................... 45
HEATING AND VENTILATION...................................... 47
MANUAL CLIMATE CONTROL SYSTEM .................... 51
AUTOMATIC CLIMATE CONTROL SYSTEM ............. 55
SUPPLEMENTARY HEATER ............................................. 65
SELF-STANDING SUPPLEMENTARY HEATER............ 66
SUPPLEMENTARY REAR HEATER.................................. 72SUPPLEMENTARY REAR AIR CONDITIONER........... 73
EXTERNAL LIGHTS............................................................. 74
WINDOW WASHING....................................................... 77
CRUISE CONTROL ............................................................ 79
CEILING LIGHTS ................................................................. 81
CONTROLS .......................................................................... 82
POWER SUPPLY AND FUEL CUT-OFF SWITCH ...... 84
INTERIOR FITTINGS........................................................... 85
MULTIMETER......................................................................... 91
SPEED BLOCK....................................................................... 92
DOORS .................................................................................. 92
POWER WINDOWS/WINDOW WINDERS .............. 97
BONNET................................................................................. 98
ROOF RACK/SKI RACK .................................................... 100
HEADLIGHTS........................................................................ 101
ABS SYSTEM ......................................................................... 102
ESP SYSTEM .......................................................................... 103
EOBD SYSTEM ..................................................................... 106
PARKING SENSORS ........................................................... 107
SOUND SYSTEM.................................................................. 108
ACCESSORIES PURCHASED BY THE OWNER .......... 109
AT THE FILLING STATION ............................................. 110
PROTECTING THE ENVIRONMENT............................. 112
DIESEL PARTICULATE FILTER (DPF) ............................. 112
DD D
A A
S S
H H
B B
O O
A A
R R
D D
A A
N N
D D
C C
O O
N N
T T
R R
O O
L L
S S
Page 24 of 282
23
SAFETY
DEVICES
CORRECT USE
OF THE
VEHICLE
WARNING
LIGHTS AND
MESSAGES
IN AN
EMERGENCY
VEHICLE
MAINTENANCE
TECHNICAL
SPECIFICATIONS
INDEX
DASHBOARD
AND CONTROLS
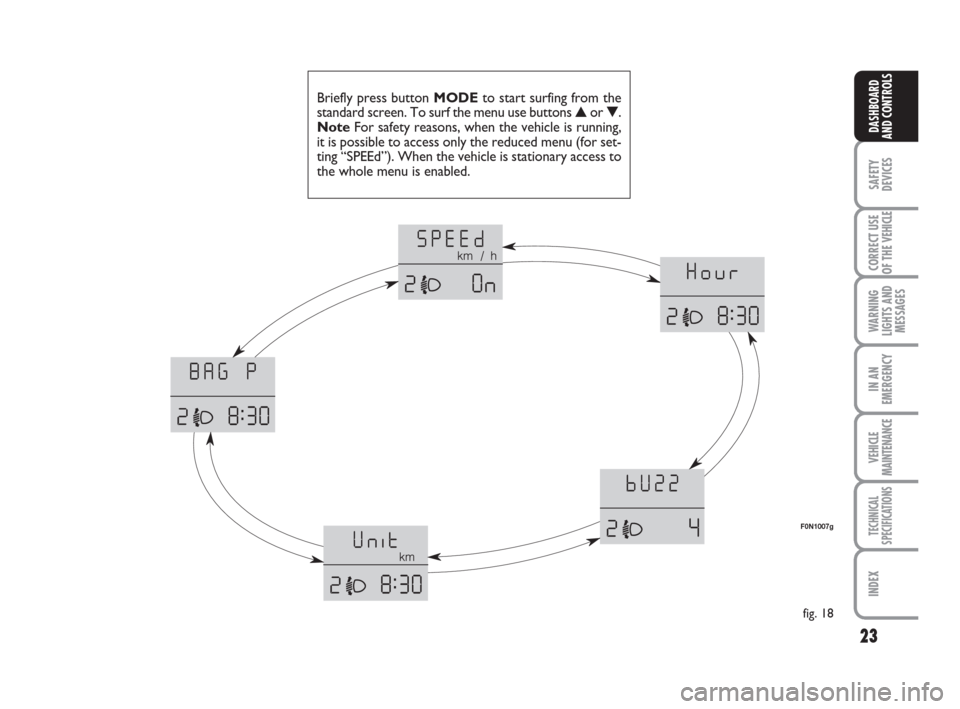
Briefly press button MODEto start surfing from the
standard screen. To surf the menu use buttons ▲or ▼.
NoteFor safety reasons, when the vehicle is running,
it is possible to access only the reduced menu (for set-
ting “SPEEd”). When the vehicle is stationary access to
the whole menu is enabled.
fig. 18
F0N1007g
Page 26 of 282
25
SAFETY
DEVICES
CORRECT USE
OF THE
VEHICLE
WARNING
LIGHTS AND
MESSAGES
IN AN
EMERGENCY
VEHICLE
MAINTENANCE
TECHNICAL
SPECIFICATIONS
INDEX
DASHBOARD
AND CONTROLS
MODE
MODE
MODE
▼ ▲
▼ ▲
▼ ▲
▼ ▲
F0N1001g
F0N1003gF0N1002g F0N1005g
F0N1006g F0N1002g
F0N1003g
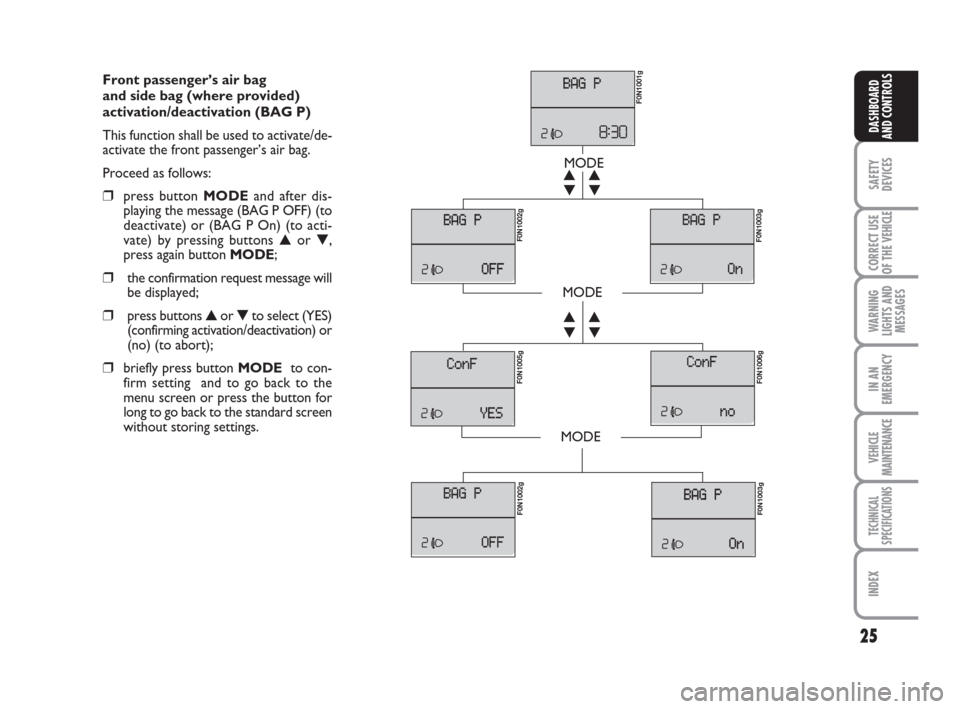
Front passenger’s air bag
and side bag (where provided)
activation/deactivation (BAG P)
This function shall be used to activate/de-
activate the front passenger’s air bag.
Proceed as follows:
❒press button MODEand after dis-
playing the message (BAG P OFF) (to
deactivate) or (BAG P On) (to acti-
vate) by pressing buttons ▲or ▼,
press again button MODE;
❒the confirmation request message will
be displayed;
❒press buttons ▲or ▼to select (YES)
(confirming activation/deactivation) or
(no) (to abort);
❒briefly press button MODE to con-
firm setting and to go back to the
menu screen or press the button for
long to go back to the standard screen
without storing settings.
Page 29 of 282
28
SAFETY
DEVICES
CORRECT USE
OF THE
VEHICLE
WARNING
LIGHTS AND
MESSAGES
IN AN
EMERGENCY
VEHICLE
MAINTENANCE
TECHNICAL
SPECIFICATIONS
INDEX
DASHBOARD
AND CONTROLS
Day
YearMonth
Deutsch
Français
English
Español
Italiano
Nederland
Português Example:
fig. 21 Example:
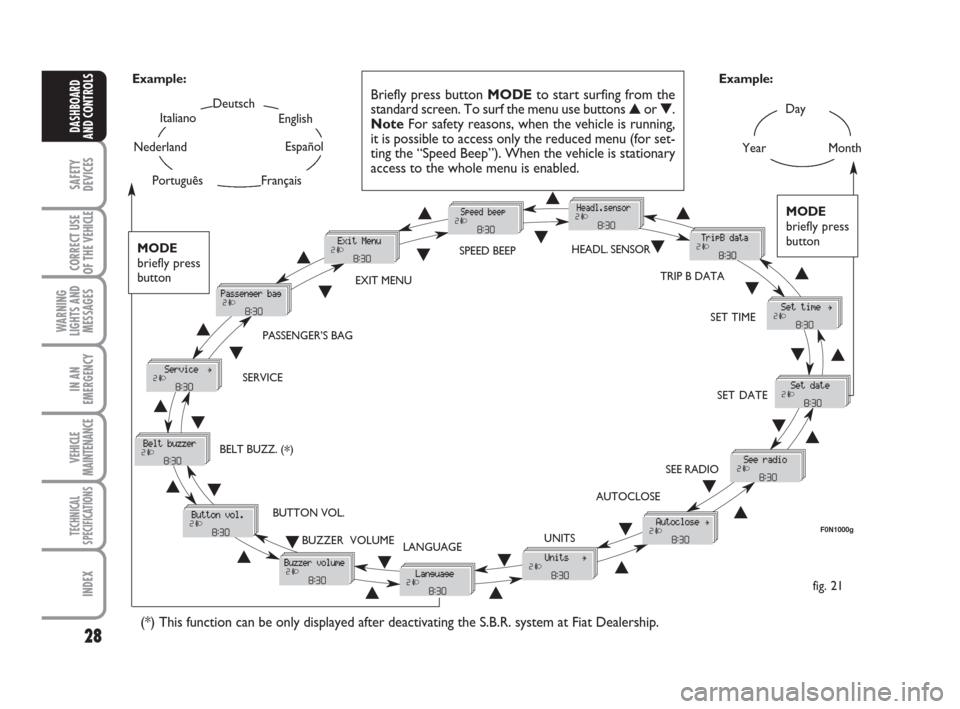
Briefly press button MODEto start surfing from the
standard screen. To surf the menu use buttons ▲or ▼.
NoteFor safety reasons, when the vehicle is running,
it is possible to access only the reduced menu (for set-
ting the “Speed Beep”). When the vehicle is stationary
access to the whole menu is enabled.
F0N1000g
MODE
briefly press
button
▲
▼
EXIT MENUSPEED BEEPHEADL. SENSOR
SET TIME
SET DATE
SEE RADIO
AUTOCLOSE
UNITS
LANGUAGE BUZZER VOLUME BUTTON VOL. SERVICEPASSENGER’S BAG
(*) This function can be only displayed after deactivating the S.B.R. system at Fiat Dealership.
TRIP B DATA
MODE
briefly press
button
▲
▼▲
▼▲
▼
▲
▼
▲ ▼
▲ ▼ ▲
▼
▲
▼
▲
▼
▲▼
▲▼
▲▼
▲▼▲ ▼
BELT BUZZ. (*)
Page 32 of 282
31
SAFETY
DEVICES
CORRECT USE
OF THE
VEHICLE
WARNING
LIGHTS AND
MESSAGES
IN AN
EMERGENCY
VEHICLE
MAINTENANCE
TECHNICAL
SPECIFICATIONS
INDEX
DASHBOARD
AND CONTROLS
Automatic door locking with
vehicle running (Autoclose)
When activated (On), this function locks
automatically the doors when the vehicle
speed exceeds 20 km/h.
To activate (On) or to deactivate (Off) this
function proceed as follows:
– briefly press button MODEto display
the submenu;
– briefly press button MODE : (On) or
(Off) will flash on the display (according to
previous setting);
– press button ▲or ▼for setting;
– briefly press button MODEto go back
to the menu screen or press the button
for long to go back to the standard screen
without storing settings;
– press again button MODEfor long to
go back to the standard screen or to the
main menu according to the current menu
level. Audio repetition (See radio)
With this function the display repeats in-
formation relevant to the sound system.
– Radio: selected radio station frequency
or RDS message, automatic tuning acti-
vation or AutoSTore;
– audio CD, MP3 CD: track number;
– CD Changer: CD number and track
number;
To activate (On) or to deactivate (Off)
sound system info displaying proceed as
follows:
– briefly press button MODE: (On) or
(Off)will flash on the display (according to
previous setting);
– press button ▲or ▼for setting;
– briefly press button MODEto go back
to the menu screen or press the button
for long to go back to the standard screen
without storing settings.Set unit (Units)
With this function it is possible to set the
units through three sub-menus: “Distances”,
“Consumption” and “Temperature”.
To set the required unit proceed as follows:
– briefly press button MODE, to display
the three sub-menus;
– press button ▲or ▼to surf the three
sub-menus;
– select the required sub-menu and then
press briefly button MODE;
– if selecting “Distances”: briefly press button
MODEthe display will show “km” or “mi”
(according to previous setting);
– press button ▲or ▼for setting;
– if selecting “Consumption”: briefly press but-
ton MODEthe display will show “km/l”,
“l/100km” or “mpg” (according to previous
setting);
Page 33 of 282
32
SAFETY
DEVICES
CORRECT USE
OF THE
VEHICLE
WARNING
LIGHTS AND
MESSAGES
IN AN
EMERGENCY
VEHICLE
MAINTENANCE
TECHNICAL
SPECIFICATIONS
INDEX
DASHBOARD
AND CONTROLS
Selecting the language (Language)
Display messages can be shown (after set-
ting) in different languages: Italian, German,
English, Spanish, French, Portuguese and
Dutch.
To set the required language proceed as
follows:
– briefly press button MODE: the previ-
ously set “language” will flash on the dis-
play;
– press button ▲or ▼for setting;
– briefly press button MODEto go back
to the menu screen or press the button
for long to go back to the standard screen
without storing settings.Adjusting the failure/warning
buzzer volume
(Buzzer Volume)
With this function the volume of the
buzzer accompanying any failure/warning
indication can be adjusted according to 8
levels.
To adjust the volume proceed as follows:
– briefly press button MODE: the previ-
ously set volume “level” will flash on the
display;
– press button ▲or ▼for setting;
– briefly press button MODEto go back
to the menu screen or press the button
for long to go back to the standard screen
without storing settings. If the distance unit set is “km” the fuel con-
sumption unit will be displayed in km/l or
l/100km.
If the distance unit set is “mi” the fuel con-
sumption unit will be displayed in “mpg”.
– press button ▲or ▼for setting;
– if selecting “Temperature”: briefly press but-
ton MODE, the display will show “°C” or
“°F” (according to previous setting);
– press button ▲or ▼for setting;
After setting, briefly press button MODE
to go back to the submenu screen or
press the button for long to go back to the
main menu screen without storing set-
tings.
– press again button MODEfor long to
go back to the standard screen or to the
main menu according to the current menu
level.
Page 35 of 282
34
SAFETY
DEVICES
CORRECT USE
OF THE
VEHICLE
WARNING
LIGHTS AND
MESSAGES
IN AN
EMERGENCY
VEHICLE
MAINTENANCE
TECHNICAL
SPECIFICATIONS
INDEX
DASHBOARD
AND CONTROLS
Front passenger’s air bag
and side bag where provided)
activation/deactivation
(Passenger’s Bag)
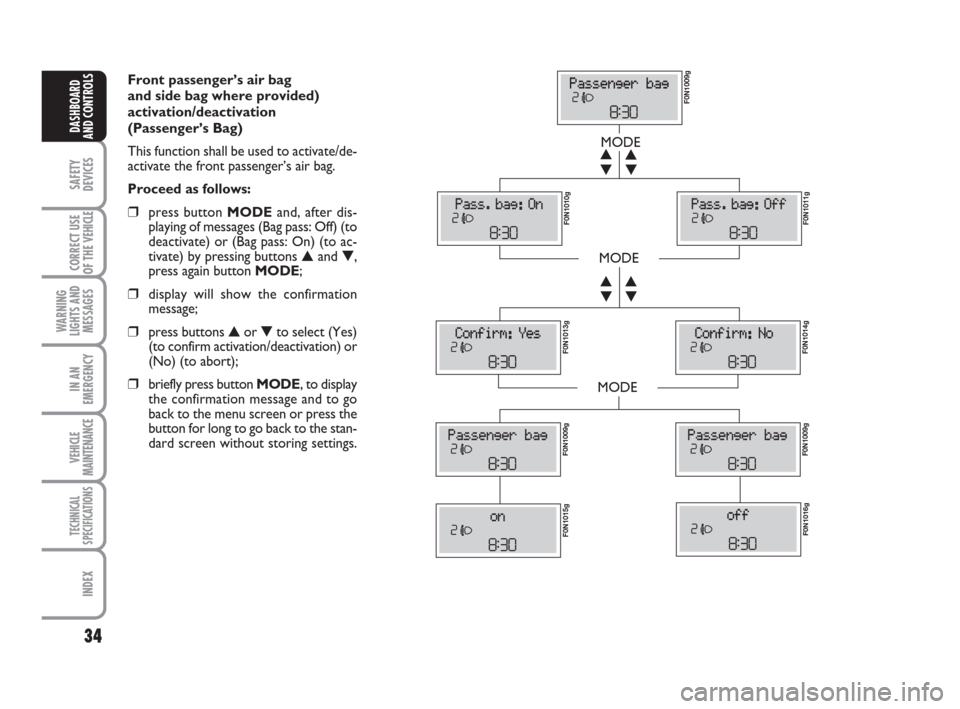
This function shall be used to activate/de-
activate the front passenger’s air bag.
Proceed as follows:
❒press button MODEand, after dis-
playing of messages (Bag pass: Off) (to
deactivate) or (Bag pass: On) (to ac-
tivate) by pressing buttons ▲and ▼,
press again button MODE;
❒display will show the confirmation
message;
❒press buttons ▲or ▼to select (Yes)
(to confirm activation/deactivation) or
(No) (to abort);
❒briefly press button MODE, to display
the confirmation message and to go
back to the menu screen or press the
button for long to go back to the stan-
dard screen without storing settings.
MODE
MODE
MODE
▼ ▲
▼ ▲
▼ ▲
▼ ▲
F0N1009g F0N1010g
F0N1011g F0N1013g
F0N1014g F0N1009gF0N1009g
F0N1015gF0N1016g
Page 89 of 282
88
SAFETY
DEVICES
CORRECT USE
OF THE
VEHICLE
WARNING
LIGHTS AND
MESSAGES
IN AN
EMERGENCY
VEHICLE
MAINTENANCE
TECHNICAL
SPECIFICATIONS
INDEX
DASHBOARD
AND CONTROLS
fig. 97F0N0056m
fig. 98F0N0057m
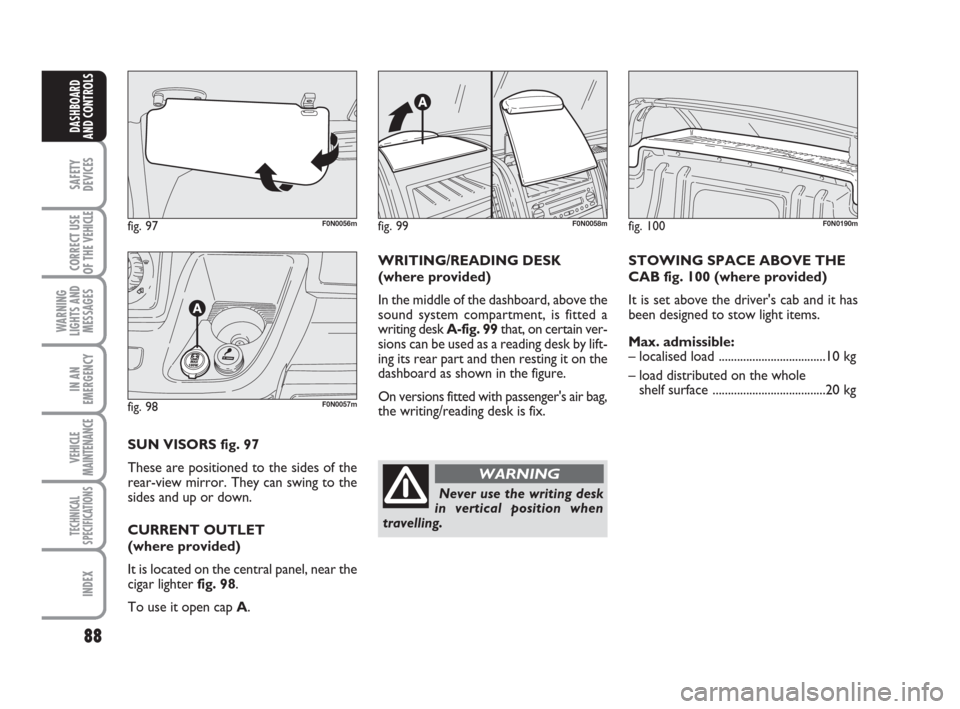
SUN VISORS fig. 97
These are positioned to the sides of the
rear-view mirror. They can swing to the
sides and up or down.
CURRENT OUTLET
(where provided)
It is located on the central panel, near the
cigar lighter fig. 98.
To use it open cap A.WRITING/READING DESK
(where provided)
In the middle of the dashboard, above the
sound system compartment, is fitted a
writing desk A-fig. 99that, on certain ver-
sions can be used as a reading desk by lift-
ing its rear part and then resting it on the
dashboard as shown in the figure.
On versions fitted with passenger's air bag,
the writing/reading desk is fix.STOWING SPACE ABOVE THE
CAB fig. 100 (where provided)
It is set above the driver's cab and it has
been designed to stow light items.
Max. admissible:
– localised load ...................................10 kg
– load distributed on the whole
shelf surface .....................................20 kg
fig. 99F0N0058mfig. 100F0N0190m
Never use the writing desk
in vertical position when
travelling.
WARNING
Page 93 of 282
92
SAFETY
DEVICES
CORRECT USE
OF THE
VEHICLE
WARNING
LIGHTS AND
MESSAGES
IN AN
EMERGENCY
VEHICLE
MAINTENANCE
TECHNICAL
SPECIFICATIONS
INDEX
DASHBOARD
AND CONTROLS
IMPORTANT
Do not use abrasive detergents or sol-
vents to clean the device. To clean its ex-
ternal surface, use a wet cloth or special
products for cleaning synthetic materials.
The multimeter is installed and sealed with
lead by authorised personnel: access to
the device and relevant power and record-
ing cables is forbidden.
The vehicle owner is responsible for gov-
erning the instrument use. The inspection
must be carried out at least every two
years and will include a test to confirm
correct operation.
After the inspection, check that the plate
is updated with specified data.SPEED BLOCK
(where provided)
The vehicle is available with a speed re-
striction function that can be set, by the
user, at one of 4 pre-set levels: 90, 100,
110, 130 km/h. To activate/deactivate this
function, go to a Fiat Dealership. After the
operation a label will be stuck on the
windscreen containing the maximum set
speed.
WARNING The speedometer may show
a top speed that is higher than the actual
one set by the Dealership as provided for
by legislation.
DOORS
CENTRAL DOOR
LOCKING/UNLOCKING SYSTEM
Locking from the outside
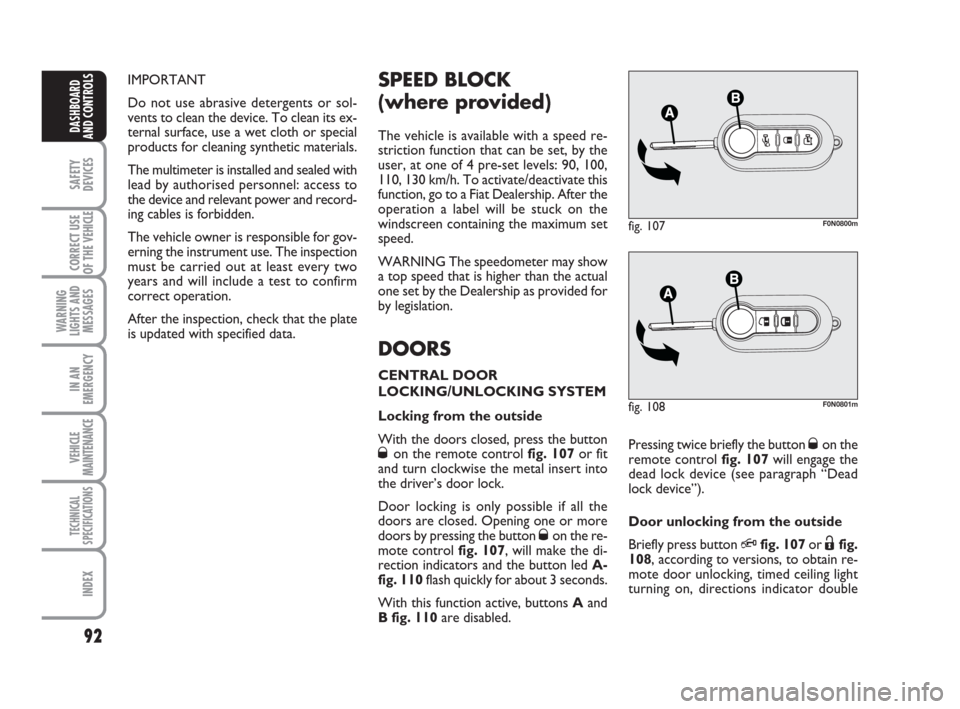
With the doors closed, press the button
Øon the remote control fig. 107or fit
and turn clockwise the metal insert into
the driver’s door lock.
Door locking is only possible if all the
doors are closed. Opening one or more
doors by pressing the button
Øon the re-
mote control fig. 107, will make the di-
rection indicators and the button led A-
fig. 110flash quickly for about 3 seconds.
With this function active, buttons Aand
B fig. 110are disabled.
fig. 107F0N0800m
Pressing twice briefly the button Øon the
remote control fig. 107will engage the
dead lock device (see paragraph “Dead
lock device”).
Door unlocking from the outside
Briefly press button
Qfig. 107or Ëfig.
108, according to versions, to obtain re-
mote door unlocking, timed ceiling light
turning on, directions indicator double
fig. 108F0N0801m
Page 101 of 282
Distribute the load evenly
and when driving, bear in
mind the increased sensitivity of the
vehicle to side wind.
100
SAFETY
DEVICES
CORRECT USE
OF THE
VEHICLE
WARNING
LIGHTS AND
MESSAGES
IN AN
EMERGENCY
VEHICLE
MAINTENANCE
TECHNICAL
SPECIFICATIONS
INDEX
DASHBOARD
AND CONTROLS
ROOF RACK/SKI RACK
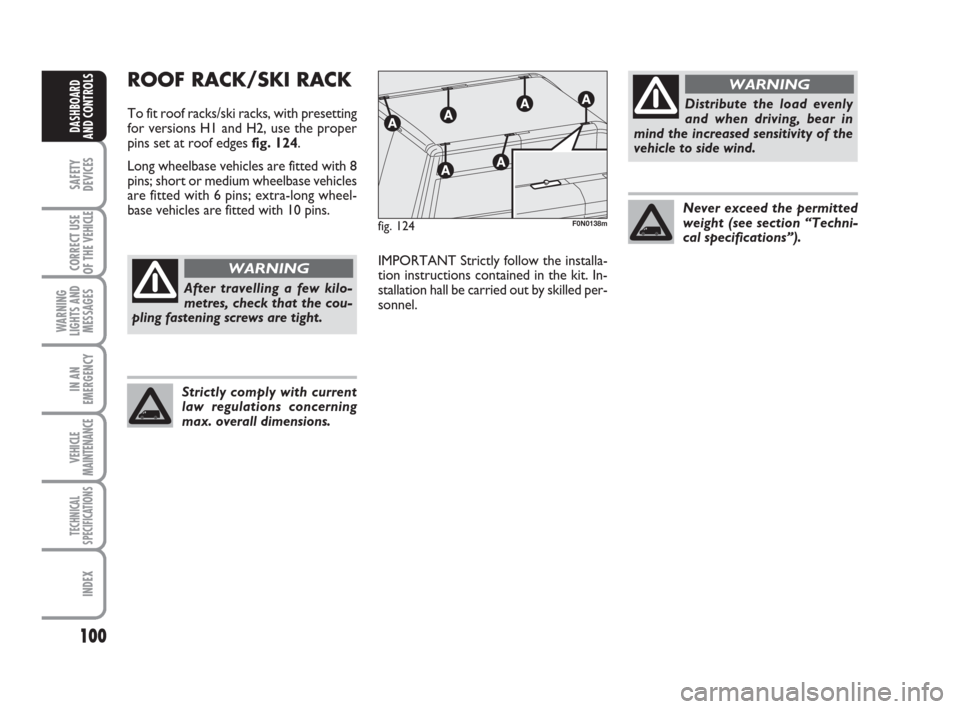
To fit roof racks/ski racks, with presetting
for versions H1 and H2, use the proper
pins set at roof edges fig. 124.
Long wheelbase vehicles are fitted with 8
pins; short or medium wheelbase vehicles
are fitted with 6 pins; extra-long wheel-
base vehicles are fitted with 10 pins.
After travelling a few kilo-
metres, check that the cou-
pling fastening screws are tight.
WARNING
Strictly comply with current
law regulations concerning
max. overall dimensions.
Never exceed the permitted
weight (see section “Techni-
cal specifications”).
IMPORTANT Strictly follow the installa-
tion instructions contained in the kit. In-
stallation hall be carried out by skilled per-
sonnel.
fig. 124F0N0138m
WARNING