Trip FIAT DUCATO 2014 3.G Owners Manual
[x] Cancel search | Manufacturer: FIAT, Model Year: 2014, Model line: DUCATO, Model: FIAT DUCATO 2014 3.GPages: 367, PDF Size: 20.39 MB
Page 17 of 367
IMPORTANT
1) Used batteries are harmful to the
environment. You can dispose of
them either in the correct
containers as specified by law or
by taking them to a Fiat
Dealership, which will deal with
their disposal.
ELECTRONIC ALARM(for versions/markets, where provided)
The alarm, in addition to all the remote
control functions described previously,
is controlled by the receiver located
under the dashboard near the fuse box.
Operation
The alarm intervenes in the following
cases:
❒wrongful opening of a door or the
bonnet (perimeter protection);
❒when the ignition system is started
up (ignition key turned to MAR-ON);
❒cutting of the battery leads.
Depending on the market, the
activation of the alarm causes the
activation of the siren and the direction
indicators (for about 26 seconds).
Alarm tripping and the number of
cycles depend on the sales market.
There is a maximum number of
acoustic/visual cycles. When this is
reached the system returns to normal
operation.
IMPORTANT The engine stop function
is guaranteed by the Fiat CODE, which
is automatically activated when the
ignition key is extracted from the
ignition switch.Activation
With the doors and bonnet closed and
the ignition key either turned to STOP
or removed, point the key with the
remote control towards the vehicle and
press and release the lock button.
Excluding some markets, the system
produces an acoustic warning (beep)
and enables door locking.
The switching on of the alarm is
preceded by an self-diagnosis stage: if
a fault is detected, the system
produces another acoustic signal.
In this case, turn the alarm off by
pressing the "release doors/release
load compartment" button, check that
the doors and bonnet are properly
closed and turn the alarm back on by
pressing the lock button.
If a door or the bonnet is not properly
shut, it will be excluded from the testing
by the alarm system.
If the alarm produces an acoustic signal
even when the doors and bonnet are
correctly closed, a fault has occurred in
the operation of the system. Contact
a Fiat Dealership.
IMPORTANT The alarm does not come
on when the central locking is activated
using the metal insert in the key.
13
Page 107 of 367
KNOWING THE INSTRUMENT PANEL
This section of the booklet gives you all
the information you need to
understand, interpret and use the
instrument panel correctly.CONTROL PANEL AND
INSTRUMENTS ...............................104
DISPLAY ........................................109
TRIP COMPUTER ...........................118
WARNING LIGHTS AND
MESSAGES ....................................121
- LOW BRAKE FLUID/HANDBRAKE
ENGAGED .......................................... 121
- EBD FAILURE .................................. 122
- AIRBAG FAILURE ............................. 122
- SEAT BELTS NOT FASTENED .......... 123
- ENGINE COOLANT TEMPERATURE
TOO HIGH .......................................... 124
- LOW BATTERY CHARGE ................. 124
- LOW ENGINE OIL PRESSURE ......... 125
-ENGINE OIL DETERIORATED ........... 125
-INCOMPLETE DOOR/LOAD
COMPARTMENT CLOSURE ............... 126
- POWER STEERING FAILURE ........... 126
-SELF-LEVELLING SUSPENSION
FAILURE ............................................. 126
- INJECTION/EOBD SYSTEM
FAILURE ............................................. 128
- ABS FAILURE ................................... 129
-FUEL RESERVE ................................ 129
- GLOW PLUG HEATING/GLOW
PLUG HEATING FAILURE ................... 130
- WATER IN DIESEL FILTER ................ 130
-VEHICLE PROTECTION SYSTEM
FAILURE - FIAT CODE ........................ 131
- REAR FOG LIGHTS .......................... 131
-GENERIC FAILURE INDICATION ....... 131
-DPF (PARTICULATE FILTER)
CLEANING UNDERWAY ..................... 133
-WORN BRAKE PADS ........................ 134
-DRIVING ADVISOR ........................... 135
- TPMS ............................................... 136
- DIPPED HEADLIGHTS ..................... 137- FOLLOW ME HOME ........................ 137
- LEFT-HAND DIRECTION INDICATOR
............................................................ 137
- RIGHT-HAND DIRECTION
INDICATOR ........................................ 138
-FOG LIGHTS ..................................... 138
- CRUISE CONTROL .......................... 138
-SPEED LIMITER ................................ 138
- AUTOMATIC MAIN BEAM
HEADLIGHTS ..................................... 139
- MAIN BEAM HEADLIGHTS .............. 139
-EXTERIOR LIGHTS FAULT ................ 140
-BRAKE LIGHT FAILURE .................... 140
-MAIN BEAM AUTOMATISM FAULT ... 141
-POSSIBLE ICE ON ROAD ................. 141
-SPEED LIMIT EXCEEDED ................. 141
-SCHEDULED SERVICING ................. 141
-DRIVING ADVISOR SYSTEM
FAILURE ............................................. 142
-TRAFFIC SIGN RECOGNITION
FAILURE ............................................. 142
-LIMITED RANGE ............................... 142
-START&STOP SYSTEM
ACTIVATION/DEACTIVATION .............. 143
-START&STOP FAILURE .................... 143
103
Page 114 of 367
NoteWhen one of the front doors is
opened, the display is activated,
showing the time and mileage for a few
seconds.
RECONFIGURABLE
MULTIFUNCTION
DISPLAY "STANDARD"
SCREEN
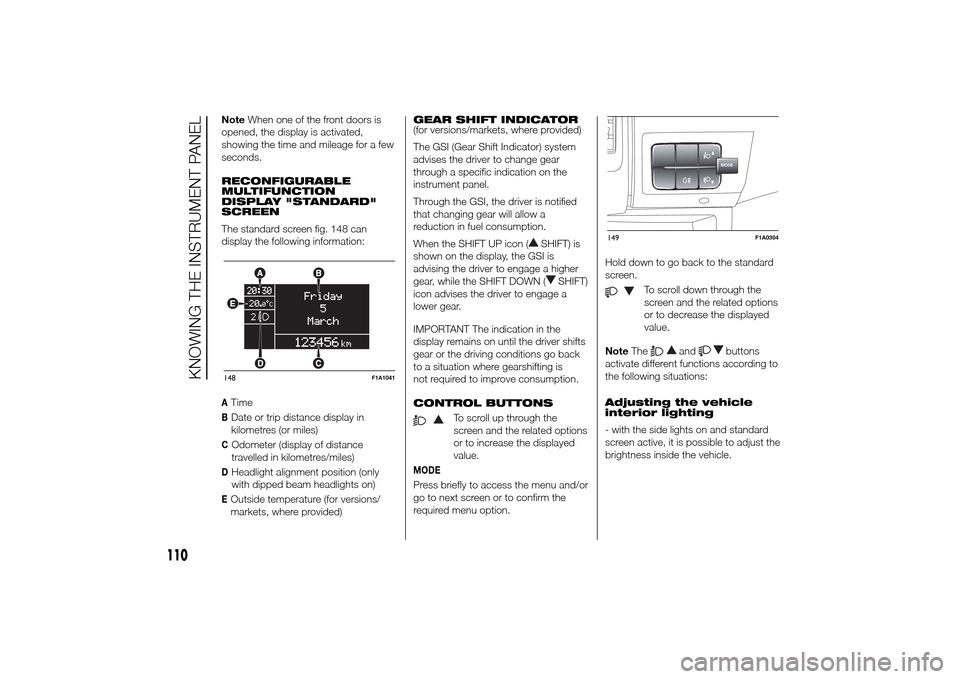
The standard screen fig. 148 can
display the following information:ATimeBDate or trip distance display in
kilometres (or miles)COdometer (display of distance
travelled in kilometres/miles)DHeadlight alignment position (only
with dipped beam headlights on)EOutside temperature (for versions/
markets, where provided)GEAR SHIFT INDICATOR
(for versions/markets, where provided)
The GSI (Gear Shift Indicator) system
advises the driver to change gear
through a specific indication on the
instrument panel.
Through the GSI, the driver is notified
that changing gear will allow a
reduction in fuel consumption.
When the SHIFT UP icon (
SHIFT) is
shown on the display, the GSI is
advising the driver to engage a higher
gear, while the SHIFT DOWN (
SHIFT)
icon advises the driver to engage a
lower gear.
IMPORTANT The indication in the
display remains on until the driver shifts
gear or the driving conditions go back
to a situation where gearshifting is
not required to improve consumption.
CONTROL BUTTONS
To scroll up through the
screen and the related options
or to increase the displayed
value.
MODEPress briefly to access the menu and/or
go to next screen or to confirm the
required menu option.Hold down to go back to the standard
screen.
To scroll down through the
screen and the related options
or to decrease the displayed
value.
NoteThe
and
buttons
activate different functions according to
the following situations:
Adjusting the vehicle
interior lighting
- with the side lights on and standard
screen active, it is possible to adjust the
brightness inside the vehicle.
148
F1A1041
MODE
149
F1A0304
110
KNOWING THE INSTRUMENT PANEL
Page 115 of 367
Setup menu
- within the menu, they allow you to
scroll up and down;
- during setting operations they allow
an increase or decrease.
SETUP MENU
Setup menu functions
The menu comprises a series of
functions arranged in a circular way,
which can be selected through the
and
buttons to access the
different selection operations and
settings (setup) given in the following
paragraphs. A submenu is provided for
some items (Clock and Unit setting).
The setup menu can be activated
by pressing the MODE button briefly.
The menu comprises the following
functions:
❒Menu
❒Lighting
❒Headlight alignment corrector
❒Speed warning
❒Headlight sensor
❒Cornering lights
❒Rain sensor
❒Trip B activation❒Traffic sign
❒Set time
❒Set date
❒Autoclose
❒Units of measurement
❒Language
❒Warning volume
❒Service
❒Passenger airbag
❒Daytime Running Lights
❒Automatic main beam headlights
❒Exit menu
Single presses of the
or
buttons permit navigation
through the setup menu options.
Operating modes are different
according to the characteristics of the
option selected.
Selecting an option from the main
menu without a submenu:
- briefly press the MODE button to
select the main menu option that needs
to be changed;
- press the
or
buttons (with
a single press) to select the new
setting;- briefly press the MODE button to
store the new setting and at the same
time go back to the previously selected
menu option.
Selecting an option from the main
menu with a submenu:
- briefly press the MODE button to
display the first submenu option;
- press the
or
buttons (with
a single press) to scroll through all
submenu options;
- briefly press the MODE button to
select the displayed submenu option
and to open the relevant settings menu;
- press the
or
buttons
(with a single press) to choose the new
setting for this submenu option;
- briefly press the MODE button to
store the setting and return to the
previously selected submenu option.
Selecting “Date” and “Set Clock”:
- briefly press the MODE button to
select the first value to be changed (e.g.
hours / minutes or year / month / day);
- press the
or
buttons (with
a single press) to select the new
setting;
111
Page 118 of 367
❒press
or
to make your
choice;
❒briefly press the MODE button to
return to the menu screen or hold the
button down to return to the
standard screen without storing.
Rain sensor
(Rain sensor setting adjustment)
(for versions/markets, where provided)
This function allows you to adjust the
rain sensor sensitivity to 4 levels.
To set the required sensitivity level,
proceed as follows:
❒briefly press the MODE button. The
sensitivity “level” set previously
flashes on the display;
❒press the
or
button to
make the adjustment;
❒briefly press the MODE button to
return to the menu screen or hold the
button down to return to the
standard screen without storing.
Trip B On/Off (Trip B
data)
This function can be used to activate
(On) or deactivate (Off) the Trip B
display (partial trip).
For more information see the "Trip
computer" paragraph.For activation/deactivation, proceed as
follows:
- briefly press the MODE button: ON or
OFF flashes on the display (depending
the previous setting);
- press the
or
button to
select;
- press the MODE button briefly to
return to the menu screen or hold the
button down to return to the standard
screen without storing.
Traffic sign
This function allows you to activate (On)
or deactivate (Off) the Traffic Sign
function to recognise the traffic signs
(no overtaking or speed limits).
For activation/deactivation, proceed as
follows:
- briefly press the MODE button: ON or
OFF flashes on the display (depending
the previous setting);
- press the
or
button to
select;
- press the MODE button briefly to
return to the menu screen or hold the
button down to return to the standard
screen without storing.Setting the clock (Set
time)
This function allows you to set the clock
through two submenus: “Time” and
“Format”.
To carry out the adjustment, proceed as
follows:
- briefly press the MODE button and
two submenus, "Time" and "Format",
will be displayed;
- press the
or
button to
switch between the two submenus;
- once you have selected the submenu
to be changed, press button MODE
briefly;
- if you enter the "Time" submenu,
pressing the MODE button briefly
makes the "hours" flash on the display;
- press the
or
button to
adjust;
- briefly press the MODE button: the
"minutes" starts to flash on the display;
- press the
or
button to
adjust;
– if you enter the "Format" submenu,
pressing the MODE button briefly
makes the display format flash on the
display;
- press the
or
button to
select "24h" or "12h" mode.
114
KNOWING THE INSTRUMENT PANEL
Page 122 of 367
Automatic main beam
headlights
(for versions/markets, where provided)
This function activates/deactivates
the automatic headlights.
Proceed as follows to activate or
deactivate this function:
❒briefly press the MODE button. The
display shows a submenu;
❒briefly press the MODE button. "On"
or "Off" flash on the display,
according to what has been
previously set;
❒press
or
to make your
choice;
❒briefly press the MODE button to
return to the submenu screen or hold
the button down to return to the
main menu screen without storing;
❒press the MODE button again to
return to the standard screen or
to the main menu according to the
menu items where you are in.
Exit Menu
This is the last function that closes the
cycle of settings listed in the menu
screen.
Pressing the MODE button briefly will
return the display to the standard
screen without storing.Press button
to return to the first
menu item (Speed Beep).
TRIP COMPUTER
IN BRIEF
The Trip computer is used to display
information on vehicle operation
when the ignition key is turned to
MAR-ON. This function allows you to
define two separate trips, called
"Trip A" and "Trip B", for monitoring
the "complete mission" (journey)
of the vehicle in a reciprocally
independent manner. Both functions
can be reset (reset means start of
a new journey).
“Trip A” is used to display the figures
relating to:
❒Outside temperature
❒Range
❒Distance travelled A
❒Average consumption A
❒Instant fuel consumption
❒Average speed A
❒Trip time A (driving time).
❒Reset Trip A
"Trip B", available on multifunction
display only, is used to display
the values relating to:
118
KNOWING THE INSTRUMENT PANEL
Page 123 of 367
❒Distance travelled B
❒Average consumption B
❒Average speed B
❒Trip time B (driving time).
20)
Values displayed
Outside temperature
Indicates the temperature outside the
vehicle passenger compartment.
Range (for versions/markets, where
provided)
This indicates the distance that can still
be travelled with the fuel in the tank,
assuming that driving style remains
unvaried. The display will show the
reading '-----' when the following
events take place:
❒range value lower than 50 km (or 30
mi)
❒vehicle is left parked with the engine
running for a long time.IMPORTANT The range can be affected
by several factors: driving style (see
paragraph “Driving style” in the
“Starting and driving” section), type of
route (motorway, towns and cities,
mountain roads, etc…), usage
conditions (load, tyre pressures, etc…).
Trip planning must therefore take the
above into account.
Distance travelled
This value shows the distance covered
from the start of the new journey.
Average consumption (for versions/
markets, where provided)
This value shows the approximate
average fuel consumption from the start
of the new journey.
Instant consumption (for versions/
markets where provided)
This value shows the fuel consumption.
The value is constantly updated. The
display will show “----”ifthecar
is parked with the engine running.Average speed
This value shows the car's average
speed based on the overall time
elapsed since the start of the new
journey.
Trip time
Time elapsed since the start of the new
journey.
IMPORTANT If there is no information,
the Trip computer displays "----" in
place of the value. When normal
operating conditions are restored, the
counting of the various values is
resumed, without either zeroing the
values displayed prior to the problem,
or starting a new mission.
TRIP control button
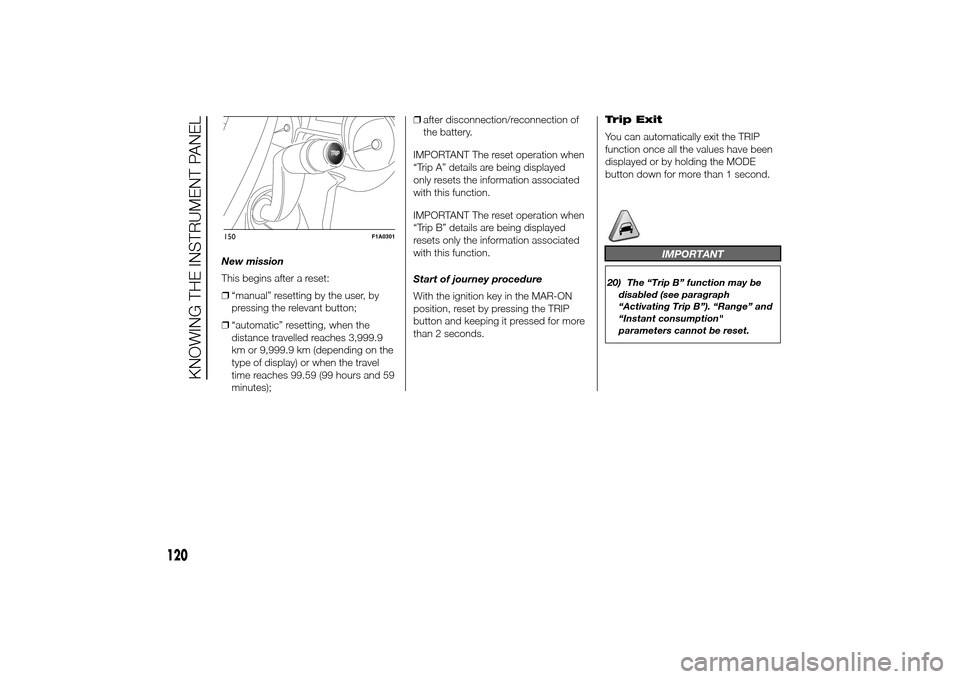
The TRIP button is located on the right
stalk fig. 150. With the ignition key
turned to MAR-ON, this button allows
you to view the previously described
values and also zero them to begin
a new journey:
❒brief press to access the various
values displays;
❒long press to reset and then start a
new mission.
119
Page 124 of 367
New mission
This begins after a reset:
❒“manual” resetting by the user, by
pressing the relevant button;
❒“automatic” resetting, when the
distance travelled reaches 3,999.9
km or 9,999.9 km (depending on the
type of display) or when the travel
time reaches 99.59 (99 hours and 59
minutes);❒after disconnection/reconnection of
the battery.
IMPORTANT The reset operation when
“Trip A” details are being displayed
only resets the information associated
with this function.
IMPORTANT The reset operation when
“Trip B” details are being displayed
resets only the information associated
with this function.
Start of journey procedure
With the ignition key in the MAR-ON
position, reset by pressing the TRIP
button and keeping it pressed for more
than 2 seconds.Trip Exit
You can automatically exit the TRIP
function once all the values have been
displayed or by holding the MODE
button down for more than 1 second.
IMPORTANT
20) The “Trip B” function may be
disabled (see paragraph
“Activating Trip B”). “Range” and
“Instant consumption"
parameters cannot be reset.
TRIP
150
F1A0301
120
KNOWING THE INSTRUMENT PANEL
Page 129 of 367
Warning lights on
displayWhat it means What to do
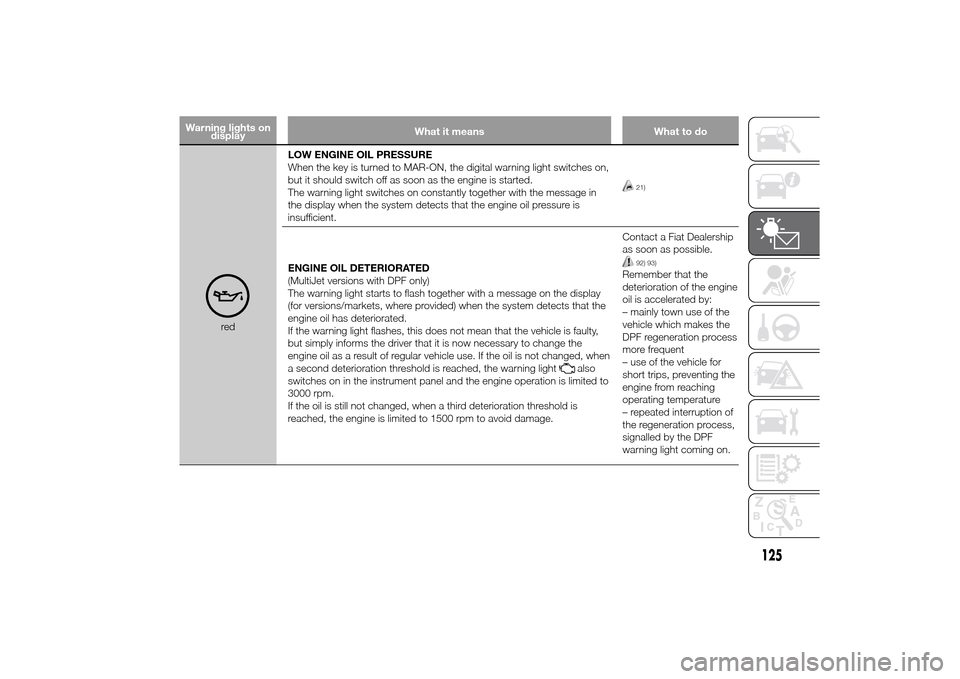
redLOW ENGINE OIL PRESSURE
When the key is turned to MAR-ON, the digital warning light switches on,
but it should switch off as soon as the engine is started.
The warning light switches on constantly together with the message in
the display when the system detects that the engine oil pressure is
insufficient.
21)
ENGINE OIL DETERIORATED
(MultiJet versions with DPF only)
The warning light starts to flash together with a message on the display
(for versions/markets, where provided) when the system detects that the
engine oil has deteriorated.
If the warning light flashes, this does not mean that the vehicle is faulty,
but simply informs the driver that it is now necessary to change the
engine oil as a result of regular vehicle use. If the oil is not changed, when
a second deterioration threshold is reached, the warning light
also
switches on in the instrument panel and the engine operation is limited to
3000 rpm.
If the oil is still not changed, when a third deterioration threshold is
reached, the engine is limited to 1500 rpm to avoid damage.Contact a Fiat Dealership
as soon as possible.
92) 93)
Remember that the
deterioration of the engine
oil is accelerated by:
– mainly town use of the
vehicle which makes the
DPF regeneration process
more frequent
– use of the vehicle for
short trips, preventing the
engine from reaching
operating temperature
– repeated interruption of
the regeneration process,
signalled by the DPF
warning light coming on.
125
Page 146 of 367
What it means What to do
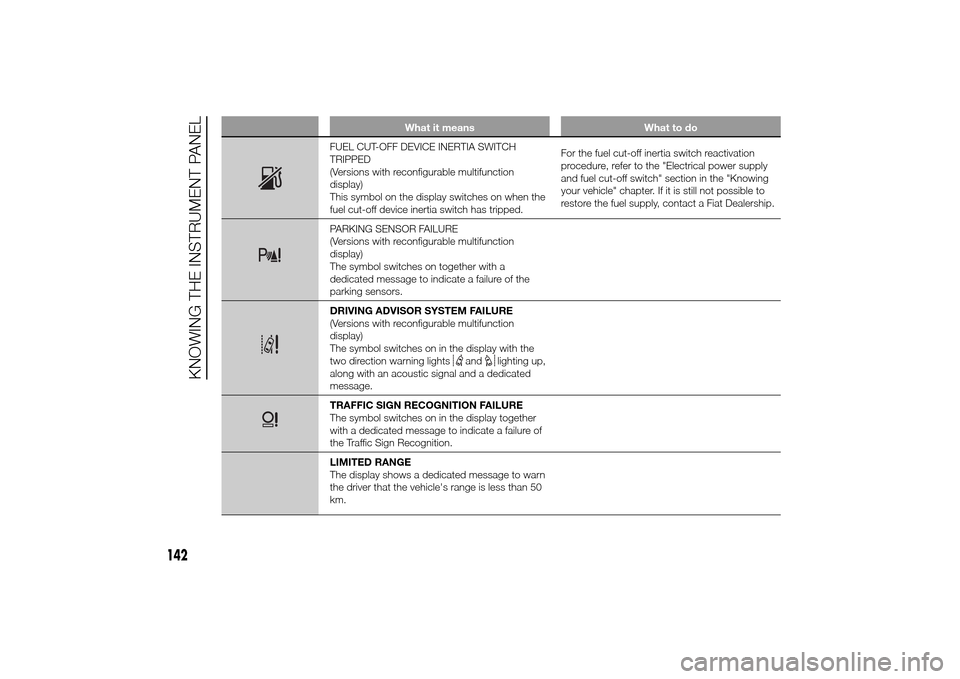
FUEL CUT-OFF DEVICE INERTIA SWITCH
TRIPPED
(Versions with reconfigurable multifunction
display)
This symbol on the display switches on when the
fuel cut-off device inertia switch has tripped.For the fuel cut-off inertia switch reactivation
procedure, refer to the "Electrical power supply
and fuel cut-off switch" section in the "Knowing
your vehicle" chapter. If it is still not possible to
restore the fuel supply, contact a Fiat Dealership.PARKING SENSOR FAILURE
(Versions with reconfigurable multifunction
display)
The symbol switches on together with a
dedicated message to indicate a failure of the
parking sensors.DRIVING ADVISOR SYSTEM FAILURE
(Versions with reconfigurable multifunction
display)
The symbol switches on in the display with the
two direction warning lights
and
lighting up,
along with an acoustic signal and a dedicated
message.
TRAFFIC SIGN RECOGNITION FAILURE
The symbol switches on in the display together
with a dedicated message to indicate a failure of
the Traffic Sign Recognition.
LIMITED RANGE
The display shows a dedicated message to warn
the driver that the vehicle's range is less than 50
km.
142
KNOWING THE INSTRUMENT PANEL