window FIAT DUCATO 2018 Owner handbook (in English)
[x] Cancel search | Manufacturer: FIAT, Model Year: 2018, Model line: DUCATO, Model: FIAT DUCATO 2018Pages: 304, PDF Size: 14.93 MB
Page 113 of 304
SUPPLEMENTARY
RESTRAINT SYSTEM
(SRS) - AIRBAG
The vehicle may be equipped with:
driver front airbag;
passenger front airbag;
front side bags to protect the pelvis
and chest of the driver and passenger;
window bags to protect the heads
of the front seat occupants.
The airbag locations on the vehicle are
marked by the word "AIRBAG" in the
middle of the steering wheel, on the
dashboard, on the side lining or on
a label placed next to the airbag
deployment area.
FRONT AIRBAGS
The front airbags protect the front seat
occupants in the event of a medium-
high severity frontal impact, by placing
the bag between the occupant and
the steering wheel or dashboard.
Therefore, non-activation in other types
of collisions (side collisions, rear shunts,
roll-overs, etc.) is not a system
malfunction.
An electronic control unit will make the
bag inflate in the event of a frontal
impact.The bag will inflate instantaneously
placing itself between the front
occupants body and the structures
which could cause injury. It will deflate
immediately afterwards.
Front airbags are not a replacement of
but complementary to the seat belts,
which you are recommended to always
wear, as specified by law in Europe
and most non-European countries.
In the event of an impact, someone not
wearing a seat belt could move forward
and come into contact with a bag
which is still opening. The protection
offered by the bag is compromised
in these circumstances.
Front airbags may not activate in the
following situations:
frontal impacts against highly
deformable objects not involving the
front surface of the vehicle (e.g. wing
collision against guard rail, etc.);
when the vehicle is wedged under
other vehicles or protective barriers
(e.g. under a lorry or a guardrail); Failure
to deploy in the conditions described
above is due to the fact that the airbags
may not provide any additional
protection compared with seat belts, so
their activation would be inappropriate.
In these cases, non-deployment does
not indicate a system malfunction.
100)
The driver's and passenger's front
airbags have been designed and
calibrated to protect front seat
occupants wearing seat belts. At their
maximum inflation, their volume fills
most of the space between the steering
wheel and the driver and between the
dashboard and the passenger.
The airbags are not deployed in the
event of minor frontal impacts (for
which the restraining action of the seat
belts is sufficient). Seat belts must
always be worn. In the event of a frontal
collision, they ensure the correct
positioning of the occupant.
FRONT AIRBAG DRIVER'S
SIDE
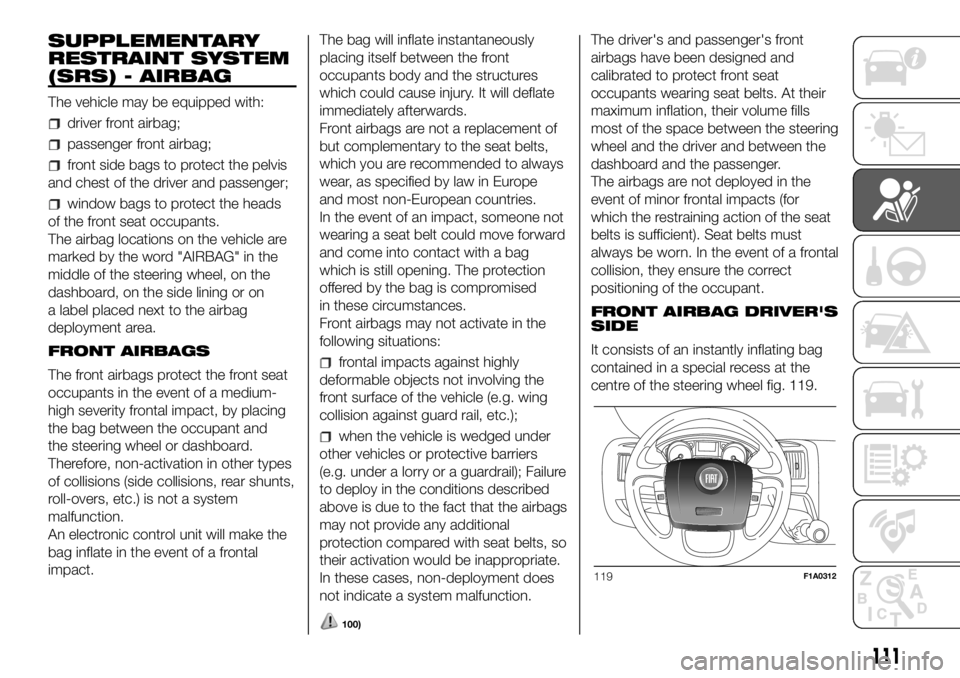
It consists of an instantly inflating bag
contained in a special recess at the
centre of the steering wheel fig. 119.
119F1A0312
111
Page 117 of 304
SIDE BAGS
102) 103) 104) 105) 106) 107) 108) 109) 110) 111)
112) 113) 114) 115)
To help increase occupant protection in
the event of a side impact, for
versions/markets where provided, the
car is equipped with front side bags
and window bags.
Side bags (for versions/markets where
provided) protect occupants from
side impacts of medium-high severity,
by placing the bag between the
occupant and the internal parts of the
side structure of the vehicle. Non-
activation of side bags in other types of
collisions (front collisions, rear shunts,
roll-overs, etc.) is not a system
malfunction.
An electronic control unit causes the
bags to inflate in the event of a side-on
collision. The bags inflate
instantaneously, placing themselves
between the occupant's body and the
structures which could cause injury.
They deflate immediately afterwards.
Side bags (for versions/markets where
provided) are not a replacement of
but complementary to the belts, which
you are recommended to always wear,
as specified by law in Europe and
most non-European countries.FRONT SIDE BAGS FOR
CHEST PROTECTION
(for versions/markets, where provided)
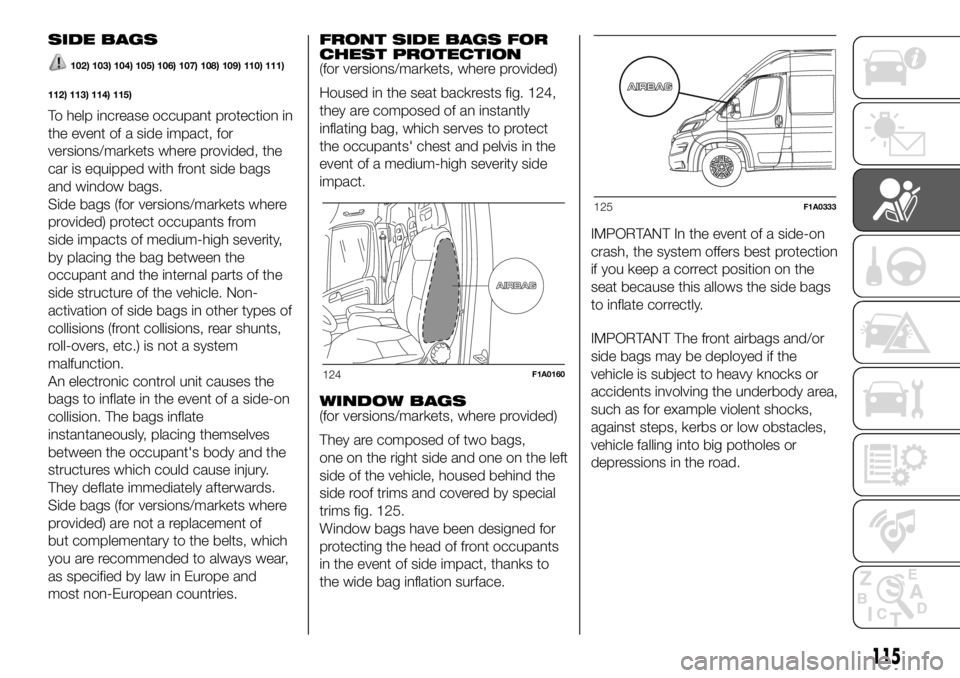
Housed in the seat backrests fig. 124,
they are composed of an instantly
inflating bag, which serves to protect
the occupants' chest and pelvis in the
event of a medium-high severity side
impact.
WINDOW BAGS
(for versions/markets, where provided)
They are composed of two bags,
one on the right side and one on the left
side of the vehicle, housed behind the
side roof trims and covered by special
trims fig. 125.
Window bags have been designed for
protecting the head of front occupants
in the event of side impact, thanks to
the wide bag inflation surface.IMPORTANT In the event of a side-on
crash, the system offers best protection
if you keep a correct position on the
seat because this allows the side bags
to inflate correctly.
IMPORTANT The front airbags and/or
side bags may be deployed if the
vehicle is subject to heavy knocks or
accidents involving the underbody area,
such as for example violent shocks,
against steps, kerbs or low obstacles,
vehicle falling into big potholes or
depressions in the road.
124F1A0160
125F1A0333
115
Page 118 of 304

IMPORTANT A small amount of dust
will be released when the airbags
are deployed. The dust is not harmful
and does not indicate the beginning of
a fire. Furthermore, the surface of the
deployed bag and the interior of the
vehicle may be covered in a dusty
residue: this may irritate your skin and
eyes. Wash with mild soap and water in
the event of exposure.
IMPORTANT Should an accident occur
in which any of the safety devices are
activated, take the vehicle to a Fiat
Dealership to have the activated
devices replaced and to have the whole
system checked.
Every control, repair and replacement
operation concerning the airbags must
be carried out only at Fiat Dealerships.
If you are having the vehicle scrapped,
have the system deactivated at a Fiat
Dealership first. If the vehicle changes
ownership, the new owner must be
informed of how to use the airbags and
the above warnings and also be given
this "Owner Handbook".
IMPORTANT Pretensioners, front
airbags and front side bags are
deployed differently according to the
type of collision. Failure to activate one
or more of the devices does not
indicate a system malfunction.
WARNING
100)Do not apply stickers or other objects
to the steering wheel, the dashboard in
the passenger side airbag area and the
seats. Never put objects (e.g. mobile
phones) on the passenger side of the
dashboard since they could interfere with
correct inflation of the passenger airbag
and also cause serious injury to the
passengers.
101)When there is an active passenger
airbag, DO NOT install rearward facing
child restraint systems on the front seat.
Deployment of the airbag in an accident
could cause fatal injuries to the child
regardless of the severity of the impact.
Therefore, always deactivate the passenger
side airbag when a rearward facing child
restraint system is installed on the front
passenger seat. The front passenger seat
must also be positioned back as far as
possible in order to prevent the child
restraint system from coming into contact
with the dashboard. Immediately reactivate
the passenger airbag as soon as the child
restraint system has been removed.
102)Never rest head, arms and elbows on
the doors, on the windows and in the
side air bag head protection area (Window
Bag) to prevent possible injuries during
inflation phase.
103)Never lean your head, arms or elbows
out of the window.104)If when turning the key to MAR the
warning light
does not turn on or if
it stays on when travelling (together with
the message on the multifunction display,
for versions/markets where provided), there
could be a fault in the safety systems; in
this event, airbags or pretensioners may
not trigger in the case of impact or, in
a lower number of cases, they could be
triggered accidentally. Contact a Fiat
Dealership immediately to have the system
checked.
105)Do not cover the backrest of the front
or rear seats with covers which are not
suitable for use with side bags.
106)Do not travel carrying objects in your
lap, in front of your chest or between
your lips (pipe, pencils, etc.): they could
cause severe injury if the airbag is
deployed.
107)Always drive keeping your hands on
the steering wheel rim so the airbag can
inflate freely if necessary. Do not drive with
your body bent forward. Keep your back
straight against the backrest.
116
SAFETY
Page 149 of 304
PROLONGED
VEHICLE INACTIVITY
If the vehicle needs to be off the road
for longer than one month, the following
precautions must be taken:
park the vehicle indoors in a dry
and, if possible, well-ventilated place;
engage a gear;
check that the handbrake is not
engaged;
disconnect the negative battery
terminal; if the vehicle is equipped with
a battery disconnection function
(disconnector), see the description of
the procedure in the "Controls"
paragraph in the "Dashboard and
controls" section;
clean and protect the painted parts
using protective wax;
clean and protect the shiny metal
parts using special compounds
available commercially;
sprinkle talcum powder on the
windscreen and rear window wiper
rubber blades and lift them off the
glass;
slightly open the windows;
cover the vehicle with a piece of
fabric or perforated plastic sheet. Do
not use compact plastic tarpaulins,
which prevent humidity from
evaporating from the surface of the
vehicle;
inflate tyres to +0.5 bar above the
standard specified pressure and check
it at intervals;
do not drain the engine cooling
system.
IMPORTANT If the vehicle is equipped
with an alarm system, switch off the
vehicle alarm with the remote control.
IMPORTANT After turning the ignition
key to STOP and having closed the
driver side door, wait at least one
minute before disconnecting the
electrical supply from the battery. When
reconnecting the electrical supply to
the battery, make sure that the ignition
key is in the STOP position and the
driver side door is closed.
147
Page 163 of 304
Dashboard fusebox
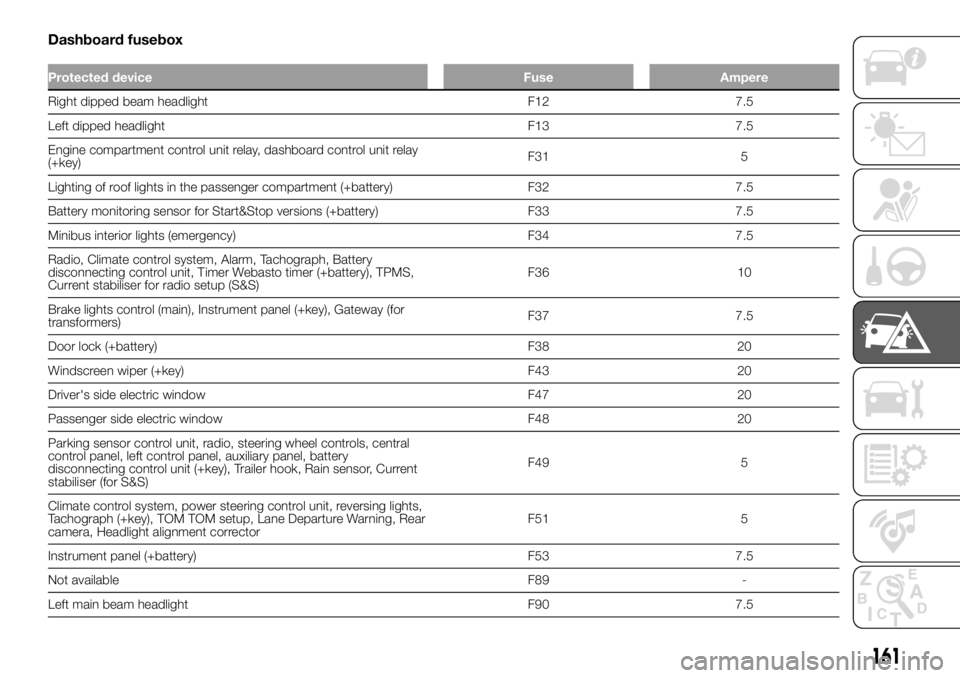
Protected device Fuse Ampere
Right dipped beam headlight F12 7.5
Left dipped headlight F13 7.5
Engine compartment control unit relay, dashboard control unit relay
(+key)F31 5
Lighting of roof lights in the passenger compartment (+battery) F32 7.5
Battery monitoring sensor for Start&Stop versions (+battery) F33 7.5
Minibus interior lights (emergency) F34 7.5
Radio, Climate control system, Alarm, Tachograph, Battery
disconnecting control unit, Timer Webasto timer (+battery), TPMS,
Current stabiliser for radio setup (S&S)F36 10
Brake lights control (main), Instrument panel (+key), Gateway (for
transformers)F37 7.5
Door lock (+battery) F38 20
Windscreen wiper (+key) F43 20
Driver's side electric window F47 20
Passenger side electric window F48 20
Parking sensor control unit, radio, steering wheel controls, central
control panel, left control panel, auxiliary panel, battery
disconnecting control unit (+key), Trailer hook, Rain sensor, Current
stabiliser (for S&S)F49 5
Climate control system, power steering control unit, reversing lights,
Tachograph (+key), TOM TOM setup, Lane Departure Warning, Rear
camera, Headlight alignment correctorF51 5
Instrument panel (+battery) F53 7.5
Not available F89 -
Left main beam headlight F90 7.5
161
Page 171 of 304
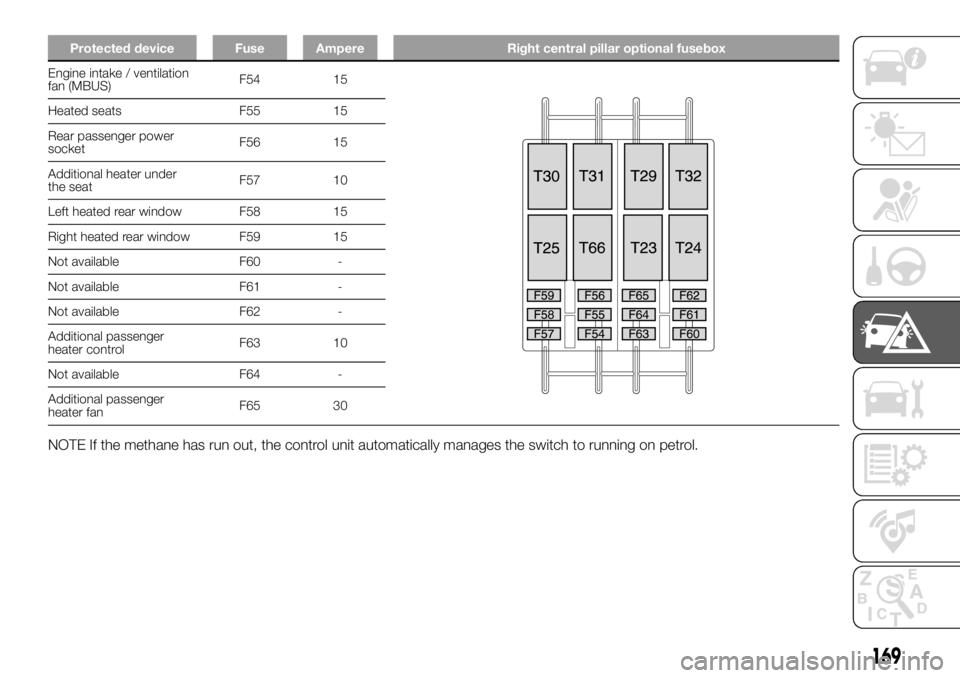
Protected device Fuse Ampere Right central pillar optional fusebox
Engine intake / ventilation
fan (MBUS)F54 15
Heated seats F55 15
Rear passenger power
socketF56 15
Additional heater under
the seatF57 10
Left heated rear window F58 15
Right heated rear window F59 15
Not available F60 -
Not available F61 -
Not available F62 -
Additional passenger
heater controlF63 10
Not available F64 -
Additional passenger
heater fanF65 30
NOTE If the methane has run out, the control unit automatically manages the switch to running on petrol.
169
Page 180 of 304
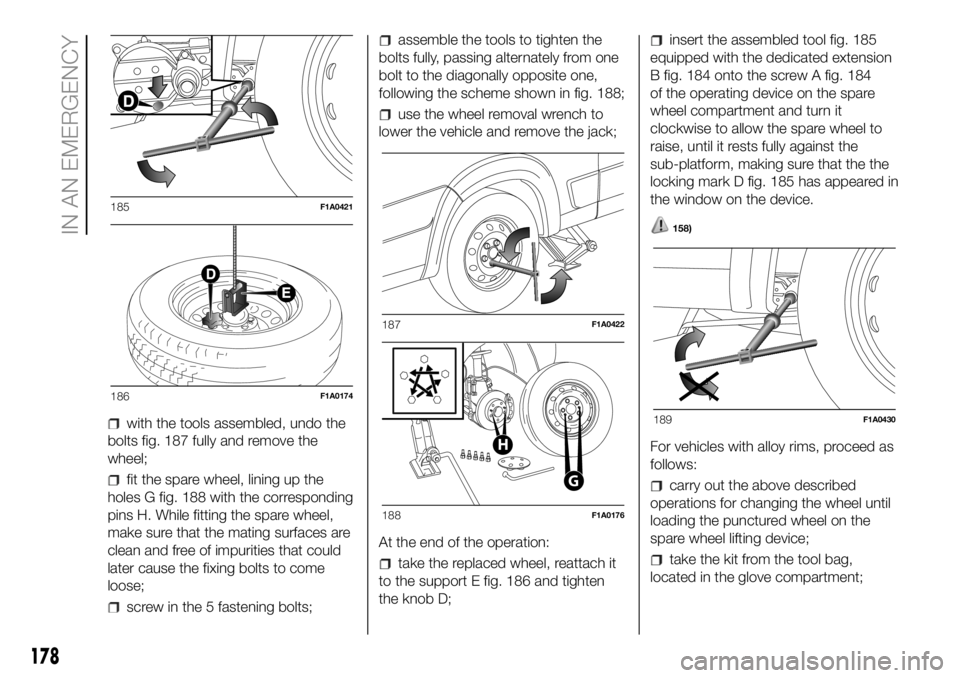
with the tools assembled, undo the
bolts fig. 187 fully and remove the
wheel;
fit the spare wheel, lining up the
holes G fig. 188 with the corresponding
pins H. While fitting the spare wheel,
make sure that the mating surfaces are
clean and free of impurities that could
later cause the fixing bolts to come
loose;
screw in the 5 fastening bolts;
assemble the tools to tighten the
bolts fully, passing alternately from one
bolt to the diagonally opposite one,
following the scheme shown in fig. 188;
use the wheel removal wrench to
lower the vehicle and remove the jack;
At the end of the operation:
take the replaced wheel, reattach it
to the support E fig. 186 and tighten
the knob D;
insert the assembled tool fig. 185
equipped with the dedicated extension
B fig. 184 onto the screw A fig. 184
of the operating device on the spare
wheel compartment and turn it
clockwise to allow the spare wheel to
raise, until it rests fully against the
sub-platform, making sure that the the
locking mark D fig. 185 has appeared in
the window on the device.
158)
For vehicles with alloy rims, proceed as
follows:
carry out the above described
operations for changing the wheel until
loading the punctured wheel on the
spare wheel lifting device;
take the kit from the tool bag,
located in the glove compartment;
185F1A0421
186F1A0174
187F1A0422
G
H
188F1A0176
189F1A0430
178
IN AN EMERGENCY
Page 181 of 304
the kit includes one bracket, three
special screws and one Allen spanner,
10 size;
go to the rear side of the vehicle
where the spare wheel is located;
make sure that all of the cable for
the spare wheel lifting device has been
unrolled, grip the bell and position it
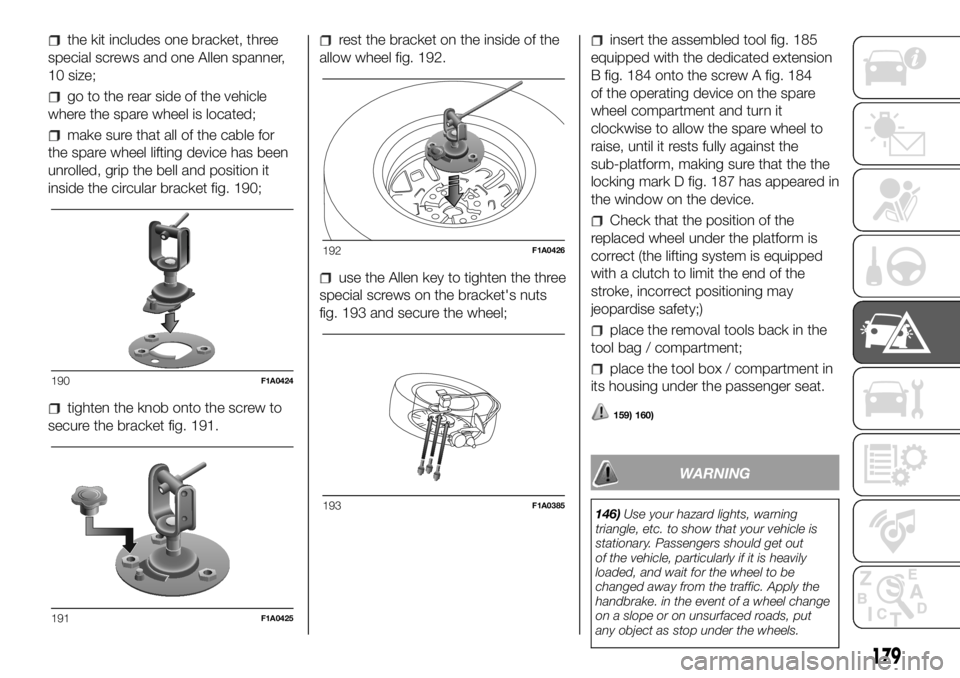
inside the circular bracket fig. 190;
tighten the knob onto the screw to
secure the bracket fig. 191.
rest the bracket on the inside of the
allow wheel fig. 192.
use the Allen key to tighten the three
special screws on the bracket's nuts
fig. 193 and secure the wheel;
insert the assembled tool fig. 185
equipped with the dedicated extension
B fig. 184 onto the screw A fig. 184
of the operating device on the spare
wheel compartment and turn it
clockwise to allow the spare wheel to
raise, until it rests fully against the
sub-platform, making sure that the the
locking mark D fig. 187 has appeared in
the window on the device.
Check that the position of the
replaced wheel under the platform is
correct (the lifting system is equipped
with a clutch to limit the end of the
stroke, incorrect positioning may
jeopardise safety;)
place the removal tools back in the
tool bag / compartment;
place the tool box / compartment in
its housing under the passenger seat.
159) 160)
WARNING
146)Use your hazard lights, warning
triangle, etc. to show that your vehicle is
stationary. Passengers should get out
of the vehicle, particularly if it is heavily
loaded, and wait for the wheel to be
changed away from the traffic. Apply the
handbrake. in the event of a wheel change
on a slope or on unsurfaced roads, put
any object as stop under the wheels.
190F1A0424
191F1A0425
192F1A0426
193F1A0385
179
Page 182 of 304
147)The spare wheel supplied (for
versions/markets, where provided) is
specific for your vehicle. Therefore, it must
not be used on other models. Do not
use spare wheels of other models on your
vehicle. The wheel bolts are specific for
your vehicle: do not use them on different
models and do not use bolts from other
models on your car.
148)Repair and refit the standard wheel as
soon as possible. Do not apply grease to
the bolt threads before fitting: they could
come unscrewed.
149)Use the jack only to replace wheels
on the vehicle with which it is supplied
or on other vehicles of the same model.
Never use the jack for other purposes,
such as lifting other vehicle models. Never
use the jack to carry out repairs under
the vehicle. Incorrect positioning of the jack
may cause the lifted vehicle to fall. Do not
use the jack for loads higher than the
one shown on its label.
150)Never tamper with the inflation valve.
Never introduce tools of any kind between
rim and tyre. Check tyre and spare wheel
pressure regularly, referring to the values
shown in the "Technical specifications"
section.
151)No tools other than the crank
provided should be used with the spare
wheel lifting device; it should be operated
by hand only.
152)On versions equipped with self-
levelling air suspension, never introduce the
head or hands in the wheel arch: the
vehicle could raise or lower automatically
depending on possible load or temperature
changes.153)The device should only be operated
by hand, without using any type of tool
other than the crank provided like
pneumatic or electrical screwers.
154)The moving components of the jack
(screws and joints) can also cause injuries:
avoid touching them. If you come into
contact with lubricating grease, clean
yourself thoroughly.
155)The jack should be used on level firm
ground wherever possible.
156)It is recommended that the wheels of
the vehicle be chocked, and that no person
should remain in a vehicle that is being
jacked.
157)No person should place any portion of
their body under a vehicle that is
supported by a jack.
158)At the end of the operation of
raising/locking the spare wheel, after
checking that the wheel is positioned
correctly under the platform (yellow notch
inside the window on the device), extract
the operating wrench. Take care not to turn
the wrench in the wrong direction (as in
fig. 189) to facilitate extracting it, to prevent
the attachment device from being
released and to ensure that the wheel
assembly remains safely fastened.
159)Each time the spare wheel is moved,
check that it is correctly positioned in its
housing under the platform. If it is not
correctly positioned, this could adversely
affect safety.
160)The spare wheel lifting device is
equipped with a clutch safety system for its
own protection; this could activated if an
excessive load is applied on the
maneuvering screw.FIX&GO
AUTOMATIC QUICK
TYRE REPAIR KIT
(for versions/markets, where provided)
The Fix & Go automatic quick tyre
repair kit is located at the front of the
vehicle passenger compartment and
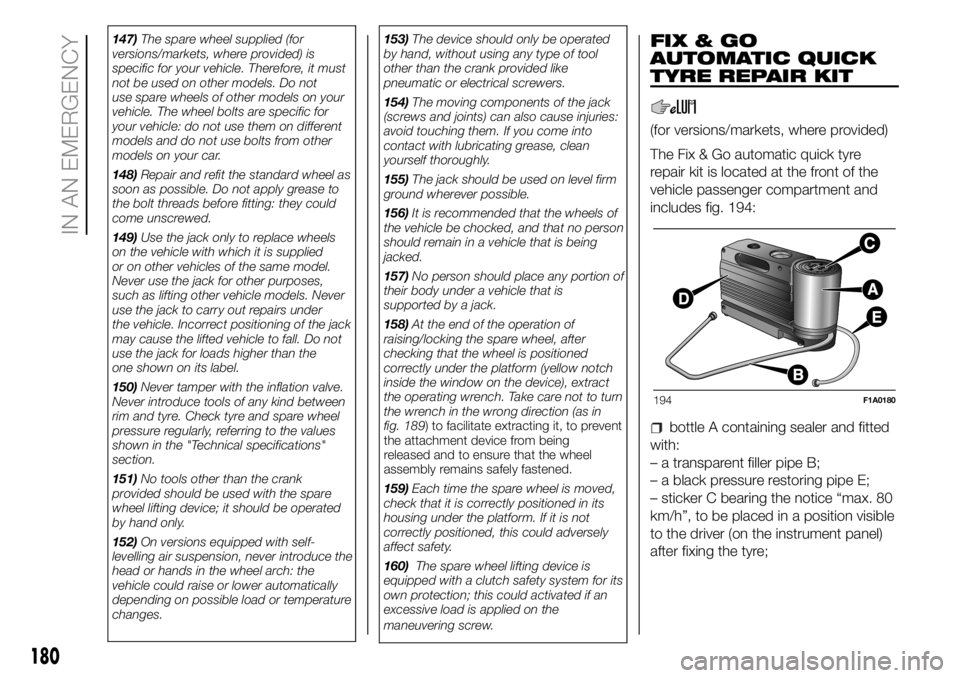
includes fig. 194:
bottle A containing sealer and fitted
with:
– a transparent filler pipe B;
– a black pressure restoring pipe E;
– sticker C bearing the notice “max. 80
km/h”, to be placed in a position visible
to the driver (on the instrument panel)
after fixing the tyre;
194F1A0180
180
IN AN EMERGENCY
Page 192 of 304

SCHEDULED
SERVICING
Correct servicing is crucial for
guaranteeing a long life for the vehicle
under the best conditions.
This is why Fiat has planned a series of
checks and maintenance operations
every 48,000 km depending on the
engine version.
It is, however, important to remember
that scheduled servicing does not
completely cover all the requirements of
the car: even in the initial period before
48,000 km, and then subsequently
between one service and another,
ordinary care is always required such as
routine checks involving topping up
fluid level, checking tyre pressures etc.
IMPORTANT Scheduled Servicing
interventions are set out by the
Manufacturer. Failure to have them
carried out may invalidate the warranty.
Scheduled Servicing can be carried
out by any Fiat Dealership, at
pre-established times.
If during each operation, in addition to
the ones scheduled, the need arises for
further replacements or repairs, these
may only be carried out with the
express agreement of the Customer.IMPORTANT It is advisable to inform a
Fiat Dealership of any small operating
irregularities without waiting for the next
service.
If your vehicle is used frequently for
towing, the interval between service
coupons must be reduced.
PERIODIC CHECKS
Before long journeys, check and, if
necessary, restore:
engine coolant level;
brake fluid level;
control and recovery of additive level
for AdBlue Diesel emissions (UREA)
(for versions/markets, where provided);
windscreen washer fluid level;
tyre inflation pressure and condition;
operation of lighting system
(headlamps, direction indicators, hazard
warning lights, etc.);
operation of screen washer/wiper
system and positioning/wear of
windscreen/rear window wiper blades.
To ensure that the vehicle is always
efficient and well maintained, it is
advisable to make sure that you carry
out the above operations regularly
(approximately every 1000 km and
every 3000 km for checking and
topping up engine oil is advisable).
190
SERVICING AND CARE