ESP FIAT DUCATO 244 2002 3.G Connect NavPlus Manual
[x] Cancel search | Manufacturer: FIAT, Model Year: 2002, Model line: DUCATO 244, Model: FIAT DUCATO 244 2002 3.GPages: 246, PDF Size: 3.39 MB
Page 154 of 246
CONNECT Nav+
153
ing the roads, advising the best route.
However it cannot take account of the
traffic, sudden interruptions or any
other inconvenience.In carrying out any manoeuvre it is
always necessary to follow the rules of
the road, regardless of the advice giv-
en by the navigation system. If you
leave the suggested route, the naviga-
tion system will calculate a new one
and suggest it to you.
GENERAL INFORMATION
The CONNECT Nav+ controls and
provides information for the following
systems and functions:
– Radio with CD-ROM or Audio CD
player
– GSM Dual Band cell phone with
voice commands
– Navigation system
– On-board computer
– Information and assistance services.
The interface is the multifunction in-
formation display for all the integrat-
ed components.MULTIFUNCTION
INFORMATION DISPLAY
The colour display comprises a 5”
TFT (approx. 7.5 x 10.3 cm) and 320H
x 234V pixel screen.
The display brightness can be
changed depending on the environ-
ment conditions and the driver’s re-
quirements, storing two settings, day
and night, according to the settings
performed in the “Setup / Setup-
CONNECT / Day brightness – Night
brightness”.
Brightness can be switched from day
to night and vice versa if external lights
are on and if light conditions in the
passenger compartment are compat-
ible.
The navigation system
helps the driver while dri-
ving by suggesting, vocally and
graphically, the best route to be fol-
lowed to reach the preset destina-
tion. The suggestions given by the
navigation system do not exempt
the driver from full responsibility
due to driving behaviour and com-
pliance with road and other traffic
regulations. The responsibility for
road safety always and anyway lies
with the vehicle’s driver.
WARNING
Page 155 of 246

CONNECT Nav+
154
SYSTEM SWITCHING ON/OFF
AND STAND-BY
The system may be in one of the fol-
lowing conditions:
– off, with all functions disabled;
– normal status, with all functions ac-
tive or activatable;
– stand-by, with functions partially
active and screen darkened.
Switching the system on
The system is turned on automati-
cally turning the ignition key to MAR.
When the ignition key is at STOP
or removed, the system is turned on
pressing the knob 16-fig. 1or key
•
25-fig. 1for the “Emergency call” (to
use the phone it is necessary to en-
ter the PIN code).Switching the system off
The system is turned off automati-
cally when the ignition key is moved
to STOP. The conditions and func-
tions active before turning off are
memorised and brought back the next
time the engine is started.
Turning off is delayed if a phone call,
an “Emergency call” or a voice com-
mand language change is in progress,
and it will take place after about 20
minutes if the call is over or, if not at
the end of it.
If the system was turned on with the
knob 16-fig. 1or key
•25-fig. 1,
with the ignition key at STOPor re-
moved, it is turned off pressing the
knob again 16-fig. 1or automatically
after 20 minutes, to preserve the bat-
tery.Stand-by (Dark)
During operation with the ignition
key engaged, the system may be set to
stand-by with a prolonged press on
the “MAIN” key 17-fig. 1. This oper-
ating condition (Dark) corresponds to
a dark screen with the volume off, but
the system continues working invisi-
bly, therefore the phone is ready to
receive.
If during stand-by the limit of an ac-
tive function is exceeded, the corre-
sponding warning will be shown.
To bring the system back to the nor-
mal operating condition, briefly press
the “MAIN” key 17-fig. 1or key
•
25-fig. 1for the “Emergency call” (to
use the phone it is necessary to en-
ter the PIN code).
Page 156 of 246

CONNECT Nav+
155
CHOOSING THE
OPERATING MODE
The operating mode is selected
pressing one of the following keys
fig. 1:
– MAIN key 17= MAIN SCREEN
– AUDIO key 18= RADIO WITH
CD PLAYER
– TEL key 19= TELEPHONE
– NAV key 20= NAVIGATOR
– key 14= VOICE RECOGNITION
– TRIP key 21= ON-BOARD
COMPUTER
– key •25= CALL FOR INFOR-
MATION AND ASSISTANCE.
For each operating mode the corre-
sponding menu is shown on the dis-
play.CHOOSING THE MENU
FUNCTIONS
The different operating modes of the
CONNECT Nav+ allow access to dif-
ferent menus, with functions that in
turn show other submenus on the dis-
play and so on.
The procedures for choosing and
confirming the functions of the differ-
ent menus and submenus are howev-
er the same and they are described be-
low.
To go back to the previous screen
from a submenu or to exit the various
operating modes, press “ESC” 23-
fig. 1.Choosing a function
To select a function of the menu on
the display, simply turn the knob 22-
fig. 1in one of the two directions un-
til showing the function required.
Confirming the function chosen
To confirm the function selected,
press the knob 22-fig. 1.
IMPORTANTOn the menu or
submenu pages showing “OK”, to
store the functions chosen it is nec-
essary to exit the corresponding
screen confirming the “OK” function.
Leaving the page of the menu or sub-
menu with the “ESC” key 23-fig. 1,
the previous functions are restored in-
stead of the new settings.
Page 157 of 246
CONNECT Nav+
156
VOLUME ADJUSTMENT
To increase the volume: turn the
knob 16-fig. 1clockwise.
To lower the volume: turn the knob
16-fig. 1counter-clockwise.
During adjustment, the volume lev-
el is shown graphically on the display
(only in the main menu of audio
sources).
IMPORTANTThe volume of
PTY31 Alarm/Traffic Announcement
(TA), telephone, telephone ringer and
voice recognition can be adjusted sep-
arately.
Automatic volume lowering
during phone calls
During phone calls, the radio volume
is turned down automatically and the
screen shows the telephone symbol.MUTE function (turning down
the audio volume)
To turn off the volume of the audio
system (Radio, CD), with any operat-
ing mode on (MAIN, NAV, TRIP),
keep the button 18-fig. 1pressed; this
way the radio turns off and the display
shows the wording “Audio OFF”. To
turn the radio on again, briefly press
the button 18-fig. 1, thereby turning
the audio function on again with the
corresponding screen.
NAV MUTE function (excluding
navigator voice messages)
To turn off the navigator voice in-
structions keep the “NAV” key
pressed 20-fig. 1. The volume will
lower gradually (Soft Mute function)
and the display will show the word-
ing “NAV MUTE”.
Too high a volume may be
a danger for the driver and
for other persons in the traffic. The
volume should therefore always be
adjusted in such a way as to still be
able to hear the noises in the sur-
rounding environment (for example
horns, ambulances, police cars,
etc.).
WARNING
Page 170 of 246
CONNECT Nav+
169
Once the modem has been proper-
ly installed, the portable computer can
use all the applications provided for
telematic connections to data base -
external servers, etc.; more particu-
larly the following can be used:
– Hiper Terminal;
– Microsoft Explorer or Netscape
for Internet and its applications (pro-
vided the user has an “Internet
provider”);
– Microsoft Mail or Groupwise (for
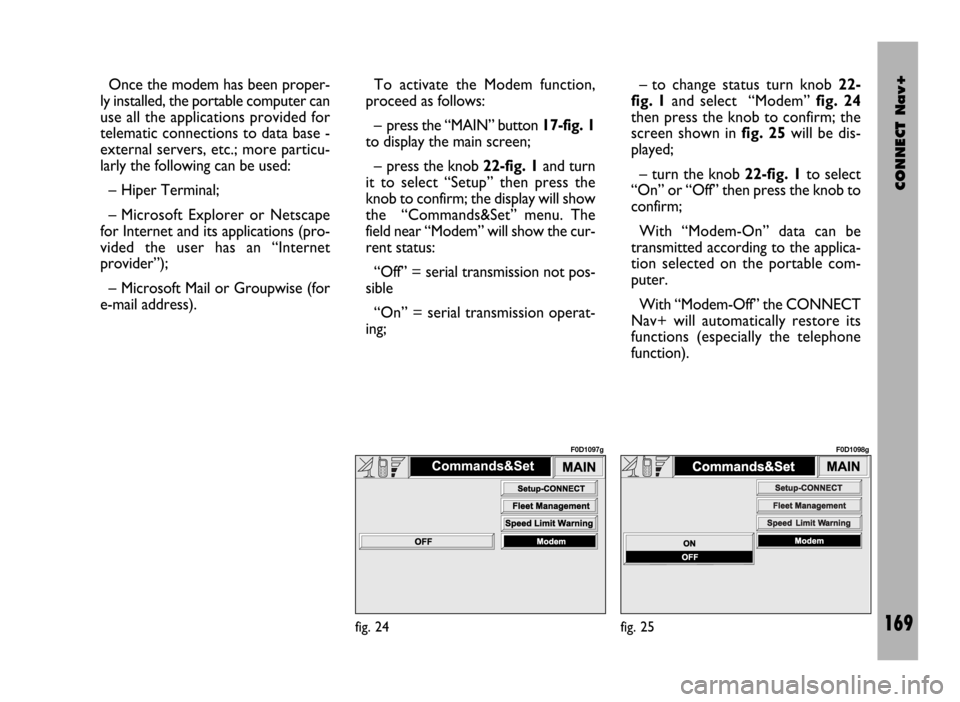
e-mail address).To activate the Modem function,
proceed as follows:
– press the “MAIN” button17-fig. 1
to display the main screen;
– press the knob 22-fig. 1and turn
it to select “Setup” then press the
knob to confirm; the display will show
the “Commands&Set” menu. The
field near “Modem” will show the cur-
rent status:
“Off” = serial transmission not pos-
sible
“On” = serial transmission operat-
ing;– to change status turn knob 22-
fig. 1and select “Modem” fig. 24
then press the knob to confirm; the
screen shown in fig. 25will be dis-
played;
– turn the knob 22-fig. 1to select
“On” or “Off” then press the knob to
confirm;
With “Modem-On” data can be
transmitted according to the applica-
tion selected on the portable com-
puter.
With “Modem-Off” the CONNECT
Nav+ will automatically restore its
functions (especially the telephone
function).
fig. 24
F0D1097g
fig. 25
F0D1098g
Page 171 of 246
CONNECT Nav+
170
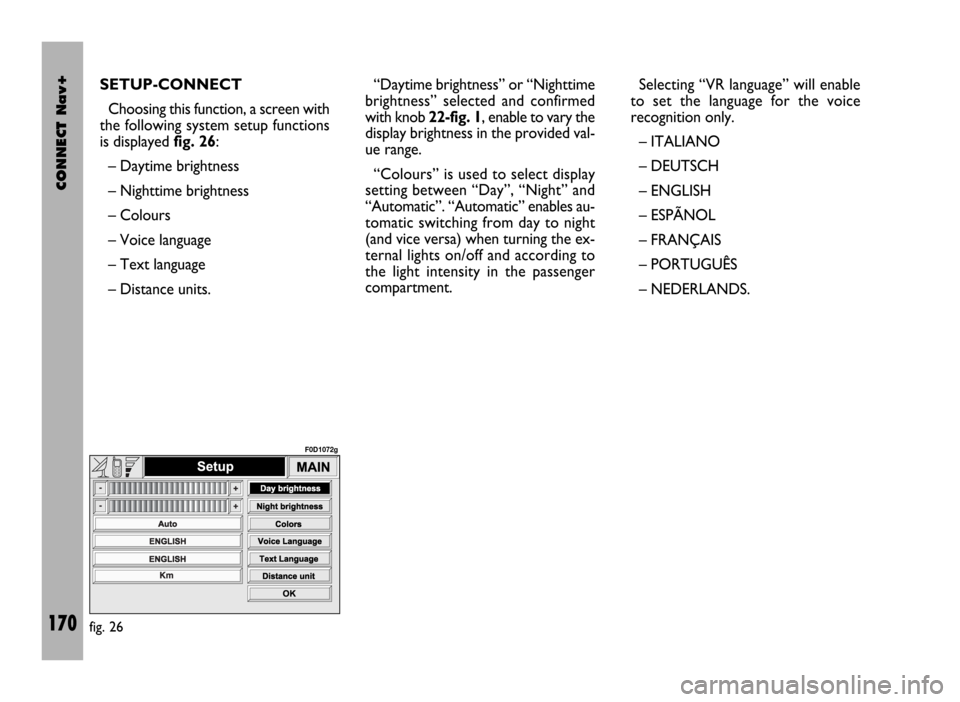
SETUP-CONNECT
Choosing this function, a screen with
the following system setup functions
is displayed fig. 26:
– Daytime brightness
– Nighttime brightness
– Colours
– Voice language
– Text language
– Distance units.“Daytime brightness” or “Nighttime
brightness” selected and confirmed
with knob 22-fig. 1, enable to vary the
display brightness in the provided val-
ue range.
“Colours” is used to select display
setting between “Day”, “Night” and
“Automatic”. “Automatic” enables au-
tomatic switching from day to night
(and vice versa) when turning the ex-
ternal lights on/off and according to
the light intensity in the passenger
compartment.Selecting “VR language” will enable
to set the language for the voice
recognition only.
– ITALIANO
– DEUTSCH
– ENGLISH
– ESPÃNOL
– FRANÇAIS
– PORTUGUÊS
– NEDERLANDS.
fig. 26
F0D1072g
Page 178 of 246

CONNECT Nav+
177
Automatic tuning
This function seeks automatically sta-
tions in the chosen band.
Proceed as follows:
– select the frequency band (FM1,
FM2, FM3, LW or MW) pressing re-
peatedly the SRC key 15-fig. 1;
– Press key 11-fig. 1o 12-fig. 1to
start the automatic search for tuning
the next station that can be received
in the direction chosen, respectively
lowering or highering the frequency;
the display will show “SEEK”.
If the “TA” function is on (traffic in-
formation), the tuner only seeks sta-
tions that broadcast traffic bulletins.
If the “PTY” function is on, the tuner
only seeks PTY stations. Manual station
storage
The station being heard can be
stored in the range chosen with keys
1 ÷ 6-fig. 1.
Keep one of these keys pressed un-
til the display shows the number of the
key with which the station has been
stored.
Listening to stored stations
Proceed as follows:
– choose the required frequency
band
(FM1, FM2, FM3, LW or MW) press-
ing repeatedly the “SRC” key 15-
fig. 1;
– press briefly one of the keys 1÷6-
fig. 1.
In the FM1, FM2 and FM3 bands, if
reception is poor and the AF alterna-
tive frequency seek function is on, a
station with the strongest signal that
is broadcasting the same programme
is automatically sought. “AUDIO SETUP” FUNCTION
(AUDIO ADJUSTMENTS)
The audio parameters can be acti-
vated and adjusted in the same way
with all the audio sources (Radio, CD).
The adjustment procedures are de-
scribed in the related paragraph of the
previous chapter.
“TA” FUNCTION (TRAFFIC
INFORMATION)
Certain stations in the FM band
(FM1, FM2 and FM3) are also enabled
to broadcast information about the
conditions of the traffic. In this case
the displays shows the abbreviation
“TP”.
To turn the TA function (Traffic An-
nouncement) on/off for traffic bul-
letins, repeatedly press the knob 22-
fig. 1after selecting the TA/AF func-
tion.
The cyclic activation of the TA/AF
functions, which is obtained by brief
presses on the knob 22-fig. 1, is the
following: AF – TA – TA and AF –
both functions off – AF …etc.
Page 183 of 246

CONNECT Nav+
182
To turn the Autostore function on
(automatic station storage) press the
knob 22-fig. 1after selecting it.
When this function is on, the radio
automatically stores the stations with
the strongest signal, in decreasing or-
der of intensity of the signal in the fre-
quency band tuned:
– 6 stations in the FM1, FM2 or FM3
band or
– 6 stations in the MW band or
– 6 stations in the LW band.
If the TA function is on (traffic infor-
mation), only stations that broadcast
traffic information will be stored. This
function can be turned on also when
playing a CD.
During automatic storage the display
shows the wording “Autostore”. To
interrupt the automatic storage
process, turn off the “Autostore”
function pressing the “ESC” key 23-
fig. 1; the radio will tune the station
heard before the function was acti-
vated. On the preset keys 1 ÷ 6-fig. 1the
stations that have a strong signal in
that moment will be stored, in the pre-
set band. After storage the radio tunes
automatically to the first station of the
FM1 band, corresponding to the fre-
quency stored on preset key 1-fig. 1.
Every station is stored only once, ex-
cept in the case of regional pro-
grammes which in certain cases might
be stored twice.
The behaviour of the set during Au-
tostore is as follows:
– at the beginning of the Autostore
function all the other functions are dis-
abled
– any change in volume is not shown
on the display– pressing one of the preset keys 1÷
6-fig. 1the automatic storage process
is interrupted and the station stored
with that key is tuned
– selecting and activating a radio
function (e.g. PTY) the automatic stor-
age process is interrupted, the last sta-
tion heard before tuning on Autostore
is tuned and the function associated
with the key pressed is run
– selecting and activating one or both
TA/AF functions during the automat-
ic storage process, automatic storage
will be interrupted, the TA (traffic in-
formation) and AF (alternative fre-
quencies) functions will be turned
on/off and a new automatic storage
process will be started
– changing the audio source (Radio,
CD) during the automatic storage
process, the Autostore function is not
interrupted.
IMPORTANTIt may occur that
the Autostore function is unable to
find 6 stations with a strong signal; in
this case only the stations found are
stored. “AUTOSTORE” FUNCTION (AUTOMATIC STATION STORAGE)
Page 184 of 246
CONNECT Nav+
183
“ST/MONO” FUNCTION
To turn on/off the Stereo function
(stereo station reception) press the
knob 22-fig. 1after selecting the
St/Mono function.
When stereo reception is on the dis-
play shows “STEREO”, when it is off
the display shows “MONO”.
When the signal of the station tuned
is weak, to improve the sound quality,
it is advisable to switch to “MONO”.CD MODE
To guarantee optimum playing, use
original CDs. If using R/RW CDs, use
top quality CDs duplicated at as low
as possible speed.
IMPORTANTNever use 8 mm
audio CDs, even with the specific
adapter, since this format will damage
the system.
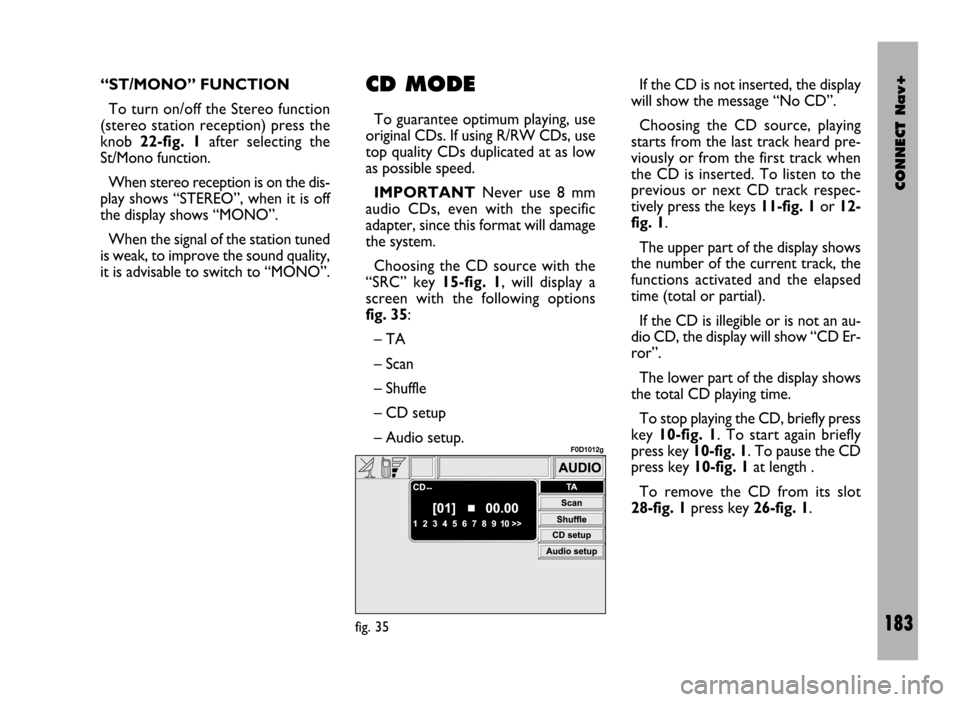
Choosing the CD source with the
“SRC” key 15-fig. 1, will display a
screen with the following options
fig. 35:
– TA
– Scan
– Shuffle
– CD setup
– Audio setup.If the CD is not inserted, the display
will show the message “No CD”.
Choosing the CD source, playing
starts from the last track heard pre-
viously or from the first track when
the CD is inserted. To listen to the
previous or next CD track respec-
tively press the keys 11-fig. 1or 12-
fig. 1.
The upper part of the display shows
the number of the current track, the
functions activated and the elapsed
time (total or partial).
If the CD is illegible or is not an au-
dio CD, the display will show “CD Er-
ror”.
The lower part of the display shows
the total CD playing time.
To stop playing the CD, briefly press
key 10-fig. 1. To start again briefly
press key 10-fig. 1. To pause the CD
press key 10-fig. 1at length .
To remove the CD from its slot
28-fig. 1press key 26-fig. 1.
fig. 35
F0D1012g
Page 185 of 246
CONNECT Nav+
184
“TA” FUNCTION
(TRAFFIC INFORMATION)
To turn the TA function (Traffic An-
nouncement) on/off while listening to
a CD, press the knob 22-fig. 1after
selecting the function.
For the description of the function,
refer to the corresponding paragraph
in the “RADIO MODE” chapter.
“SCAN” FUNCTION
(BRIEF PLAYBACK)
The “Scan” function is turned on/off
pressing the knob 22-fig. 1after se-
lecting the function.
When this function is on, all the CD
tracks are played for about 10 seconds
in the actual sequence on the CD.
Press the knob again to turn the
function off 22-fig. 1.
The “Scan” function is turned off au-
tomatically when “Shuffle” is turned on.“SHUFFLE” FUNCTION
(RANDOM PLAYBACK)
The “Shuffle” function is turned on/off
pressing the knob 22-fig. 1after se-
lecting the function.
With this function on, the CD tracks
are played in random sequence. To
turn the function off press the knob
again 22-fig. 1. The “Shuffle” function
is turned off automatically when the
“Scan” function is turned on.
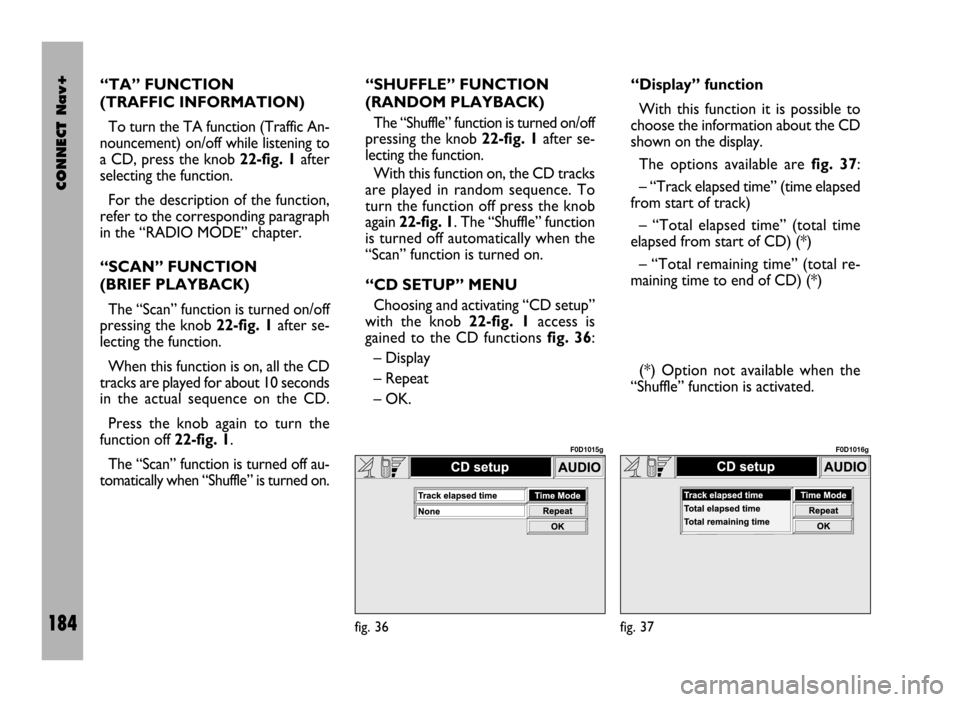
“CD SETUP” MENU
Choosing and activating “CD setup”
with the knob 22-fig. 1access is
gained to the CD functions fig. 36:
– Display
– Repeat
– OK.“Display” function
With this function it is possible to
choose the information about the CD
shown on the display.
The options available are fig. 37:
– “Track elapsed time” (time elapsed
from start of track)
– “Total elapsed time” (total time
elapsed from start of CD) (*)
– “Total remaining time” (total re-
maining time to end of CD) (*)
(*) Option not available when the
“Shuffle” function is activated.
fig. 36
F0D1015g
fig. 37
F0D1016g