jack FIAT DUCATO 244 2005 3.G Owners Manual
[x] Cancel search | Manufacturer: FIAT, Model Year: 2005, Model line: DUCATO 244, Model: FIAT DUCATO 244 2005 3.GPages: 258, PDF Size: 4.05 MB
Page 138 of 258
137IN AN EMERGENCY
BUMP STARTING IF A TYRE IS
PUNCTURED
General instructions
Observe the instruc-
tions on this and the fol-
lowing pages to use the
jack and spare wheel correctly.Catalysed vehicles must
not be bump started
(pushed, towed or
coasted downhill) as this could
cause fuel to flow into the cat-
alytic exhaust system and dam-
age it beyond repair.
Never start the engine
when the vehicle is jacked
up.
WARNING
Remember that until the
engine has started the
brake booster and power steering
systems will not work and a greater
effort will therefore be required to
depress the brake pedal or turn the
steering wheel.
WARNING
If you are towing a trailer,
remove the trailer before
jacking up the vehicle.
WARNING
The jack should only be
used to changed a wheel on
the vehicle for which it was de-
signed. It should not be put to oth-
er uses or employed to raise other
models. Under no circumstances
should it be used when carrying out
repairs under the vehicle. An incor-
rectly positioned jack may cause
the vehicle to fall. Do not use the
jack to lift loads exceeding that in-
dicated on the label attached to the
to the jack itself.
WARNING
Page 139 of 258
138IN AN EMERGENCY
1. STOP THE VEHICLE
– Stop the vehicle in a position that
is not dangerous for oncoming traffic
where you can change the wheel safe-
ly. The ground should be flat and ad-
equately firm. If you have to change
the wheel at night, choose a lit area if
possible.
– Turn the engine off and pull up the
handbrake.
– Engage first or reverse gear.
– Alert other drivers that the vehicle
is stationary in compliance with local
regulations: hazard warning lights,
warning triangle, etc.
Any passengers should get out and
wait as far away as possible from the
danger of traffic.
If the road is sloping or bumpy, place
wedges or other suitable material to
prevent the vehicle from moving, un-
der the wheels.2. TAKE OUT THE TOOLS,
JACK AND SPARE WHEEL
The tools are in the cab near the
seats.
Please note:
– the jack weights 4.2 kg;
– the jack requires no adjustments;
– the jack cannot be repaired. If it
breaks it must be replaced with a new
jack;
– no other tool, apart from the ex-
tension and the ratchet wrench shown
in this chapter can be fitted to the jack.
The spare wheel is located under the
rear part of the load bed.
Do not lubricate the bolt
threads before fitting
them back: they could come
loose.
WARNING
Check tyre pressure and
spare wheel pressure regu-
larly. Refer to section “Technical
Specifications”.
WARNING
Page 140 of 258
139IN AN EMERGENCY
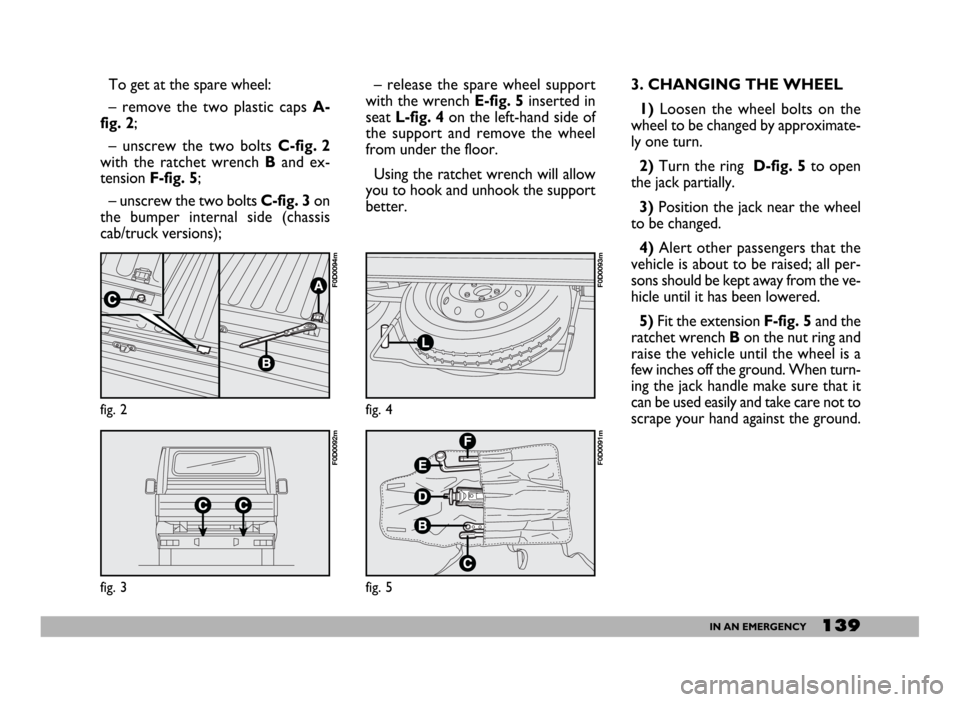
To get at the spare wheel:
– remove the two plastic caps A-
fig. 2;
– unscrew the two bolts C-fig. 2
with the ratchet wrench B and ex-
tension F-fig. 5;
– unscrew the two bolts C-fig. 3on
the bumper internal side (chassis
cab/truck versions);– release the spare wheel support
with the wrench E-fig. 5inserted in
seatL-fig. 4 on the left-hand side of
the support and remove the wheel
from under the floor.
Using the ratchet wrench will allow
you to hook and unhook the support
better.3. CHANGING THE WHEEL
1) Loosen the wheel bolts on the
wheel to be changed by approximate-
ly one turn.
2) Turn the ring D-fig. 5 to open
the jack partially.
3)Position the jack near the wheel
to be changed.
4) Alert other passengers that the
vehicle is about to be raised; all per-
sons should be kept away from the ve-
hicle until it has been lowered.
5)Fit the extension F-fig. 5and the
ratchet wrench Bon the nut ring and
raise the vehicle until the wheel is a
few inches off the ground. When turn-
ing the jack handle make sure that it
can be used easily and take care not to
scrape your hand against the ground.
fig. 2
F0D0094m
fig. 3
F0D0092m
fig. 4
F0D0093m
fig. 5
F0D0091m
Page 141 of 258
140IN AN EMERGENCY
The moving parts of the jack (screw
and joints) may also cause injury if
touched. Clean off any grease.
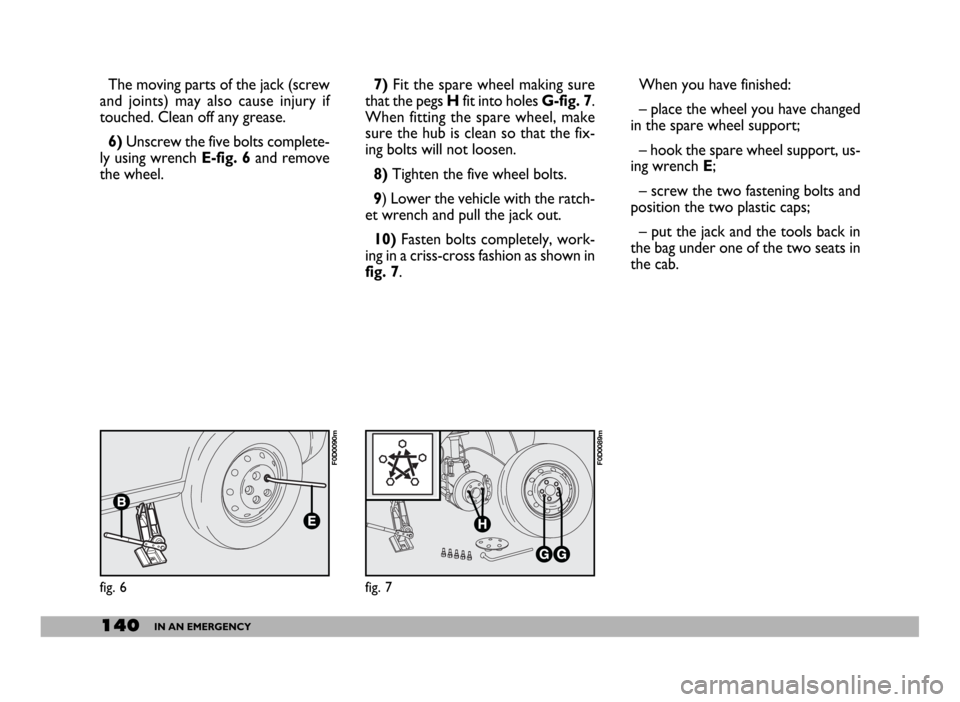
6)Unscrew the five bolts complete-
ly using wrench E-fig. 6and remove
the wheel.7) Fit the spare wheel making sure
that the pegs Hfit into holes G-fig. 7.
When fitting the spare wheel, make
sure the hub is clean so that the fix-
ing bolts will not loosen.
8)Tighten the five wheel bolts.
9) Lower the vehicle with the ratch-
et wrench and pull the jack out.
10)Fasten bolts completely, work-
ing in a criss-cross fashion as shown in
fig. 7.
fig. 6
F0D0090m
fig. 7
F0D0089m
When you have finished:
– place the wheel you have changed
in the spare wheel support;
– hook the spare wheel support, us-
ing wrench E;
– screw the two fastening bolts and
position the two plastic caps;
– put the jack and the tools back in
the bag under one of the two seats in
the cab.
Page 159 of 258
158IN AN EMERGENCY
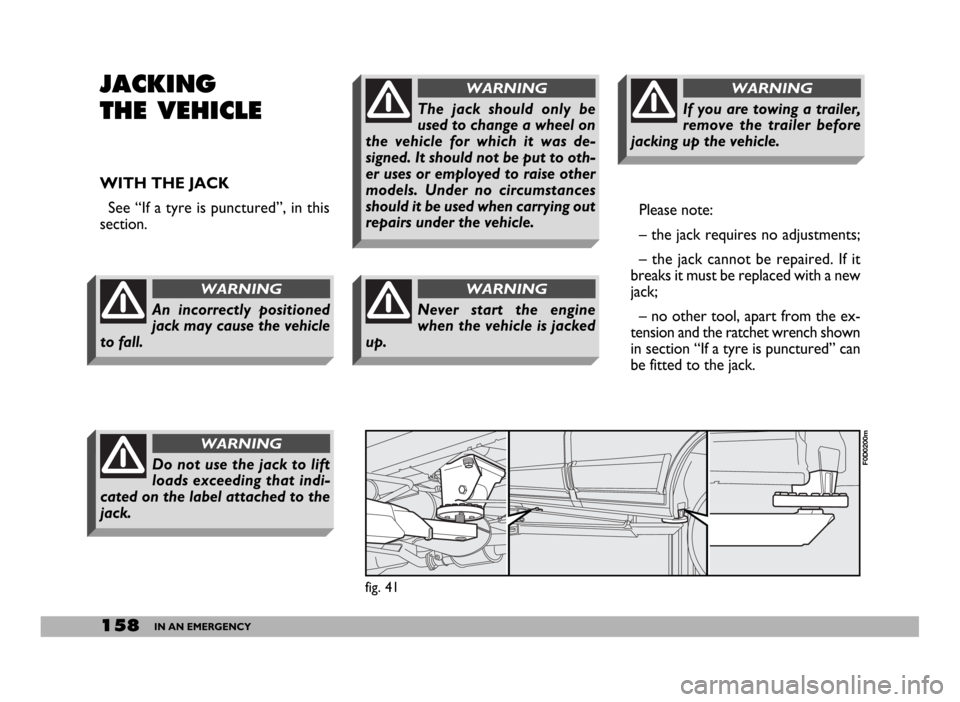
JACKING
THE VEHICLE
WITH THE JACK
See “If a tyre is punctured”, in this
section.Please note:
– the jack requires no adjustments;
– the jack cannot be repaired. If it
breaks it must be replaced with a new
jack;
– no other tool, apart from the ex-
tension and the ratchet wrench shown
in section “If a tyre is punctured” can
be fitted to the jack.
fig. 41
F0D0200mDo not use the jack to lift
loads exceeding that indi-
cated on the label attached to the
jack.
WARNING
The jack should only be
used to change a wheel on
the vehicle for which it was de-
signed. It should not be put to oth-
er uses or employed to raise other
models. Under no circumstances
should it be used when carrying out
repairs under the vehicle.
WARNING
Never start the engine
when the vehicle is jacked
up.
WARNING
An incorrectly positioned
jack may cause the vehicle
to fall.
WARNING
If you are towing a trailer,
remove the trailer before
jacking up the vehicle.
WARNING
Page 160 of 258
159IN AN EMERGENCY
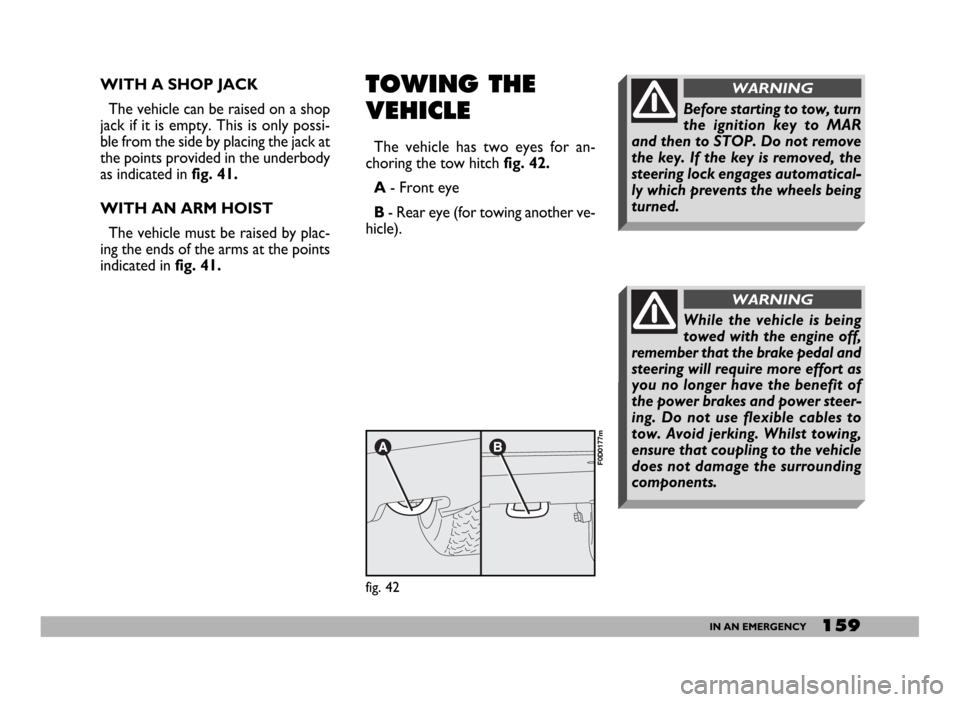
WITH A SHOP JACK
The vehicle can be raised on a shop
jack if it is empty. This is only possi-
ble from the side by placing the jack at
the points provided in the underbody
as indicated infig. 41.
WITH AN ARM HOIST
The vehicle must be raised by plac-
ing the ends of the arms at the points
indicated in fig. 41.TOWING THE
VEHICLE
The vehicle has two eyes for an-
choring the tow hitch fig. 42.
A- Front eye
B- Rear eye (for towing another ve-
hicle).
fig. 42
F0D0177m
Before starting to tow, turn
the ignition key to MAR
and then to STOP. Do not remove
the key. If the key is removed, the
steering lock engages automatical-
ly which prevents the wheels being
turned.
WARNING
While the vehicle is being
towed with the engine off,
remember that the brake pedal and
steering will require more effort as
you no longer have the benefit of
the power brakes and power steer-
ing. Do not use flexible cables to
tow. Avoid jerking. Whilst towing,
ensure that coupling to the vehicle
does not damage the surrounding
components.
WARNING
Page 250 of 258
249INDEX
Glove compartment/oddment
compartment ............................. 73
Headlight washer ...................... 181
Headlights
- beam adjustment .................... 86
Head restraints ............................ 50
Heat flange .................................... 106
Heating .......................................... 56
Heating and ventilation .............. 54
Identification data ...................... 185
If a bulb burns out ...................... 141
If an accident occurs .................. 160
If anyone is injured
(during accidents) ..................... 161
If an exterior light burns out ... 143
If an interior light burns out .... 148
Ignition switch ............................. 28
In an emergency..................... 135
Individual settings ........................ 42
Instrument panel ......................... 29Instruments .................................. 30
Interior equipment ..................... 73
Interiors ........................................ 184
Jacking the vehicle .................... 158
Jump starting ........................... 136-157
Keys ............................................ 7
Load recommendations .......... 126
Main beam headlights ............ 65
- bulb replacement ................... 143
Manual gearbox ........................... 109
Mobile foot board ....................... 80
Model plate ................................... 185
Multimeter .................................... 78
Number plate light
replacement ............................... 147
Object holder/
food box ..................................... 75
Oddment compartments............ 73
Odometer ...................................... 31
Paintwork .................................... 182
Parking ............................................ 108
Parking sensors ............................. 67
Performance .................................. 226
Pollen filter .................................... 173
Power steering fluid level ........... 171
Pretensioners ................................ 18
Protecting the environment ...... 104
Radio transmitters
and cellular phones .................. 101
Reading/writing desk .................. 74
Rear fog light replacement ....... 145
Rearview camera ........................ 67
Rearview mirrors ................ 51-52
Recharging the battery .............. 157
Remote control ........................... 9