taillight FIAT DUCATO 244 2005 3.G Owners Manual
[x] Cancel search | Manufacturer: FIAT, Model Year: 2005, Model line: DUCATO 244, Model: FIAT DUCATO 244 2005 3.GPages: 258, PDF Size: 4.05 MB
Page 42 of 258
41GETTING TO KNOW YOUR VEHICLE
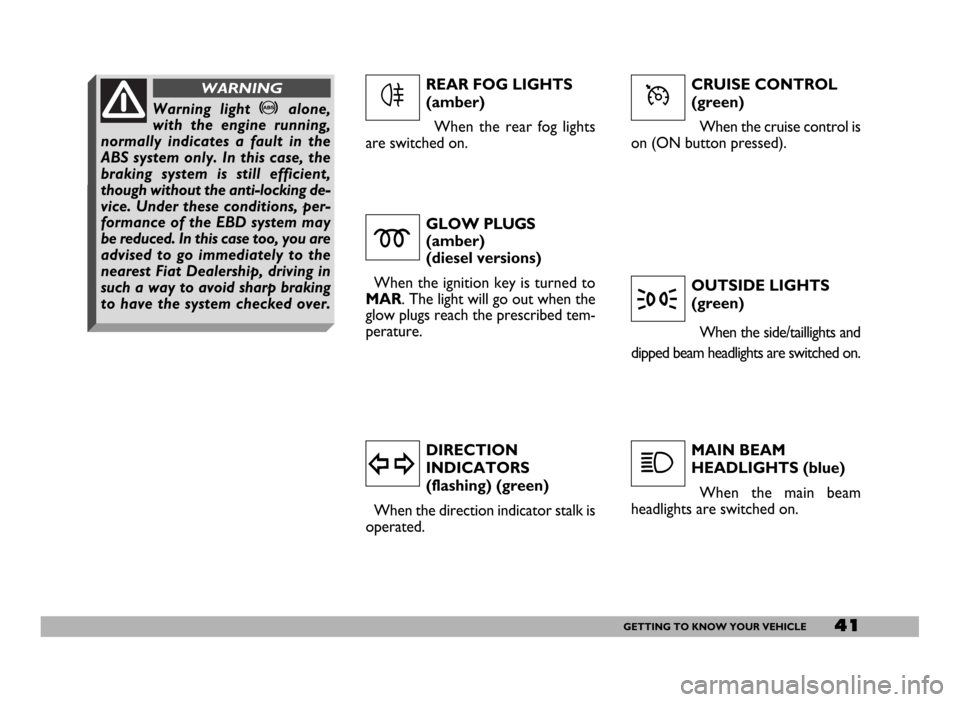
CRUISE CONTROL
(green)
When the cruise control is
on (ON button pressed).
GLOW PLUGS
(amber)
(diesel versions)
When the ignition key is turned to
MAR. The light will go out when the
glow plugs reach the prescribed tem-
perature.
DIRECTION
INDICATORS
(flashing) (green)
When the direction indicator stalk is
operated.OUTSIDE LIGHTS
(green)
When the side/taillights and
dipped beam headlights are switched on.
MAIN BEAM
HEADLIGHTS (blue)
When the main beam
headlights are switched on.
m
y
3
1
REAR FOG LIGHTS
(amber)
When the rear fog lights
are switched on.
4ÜWarning light >alone,
with the engine running,
normally indicates a fault in the
ABS system only. In this case, the
braking system is still efficient,
though without the anti-locking de-
vice. Under these conditions, per-
formance of the EBD system may
be reduced. In this case too, you are
advised to go immediately to the
nearest Fiat Dealership, driving in
such a way to avoid sharp braking
to have the system checked over.
WARNING
Page 66 of 258
65GETTING TO KNOW YOUR VEHICLE
STEERING COLUMN
STALKS
LEFT-HAND STALK
The left-hand stalk operates most of
the external lights.
The external lights can only be
switched on when the ignition key is
at MAR. The instrument panel and
the heating/ventilation (or climate con-
trol system) controls and the cigar
lighter ring will come on with the ex-
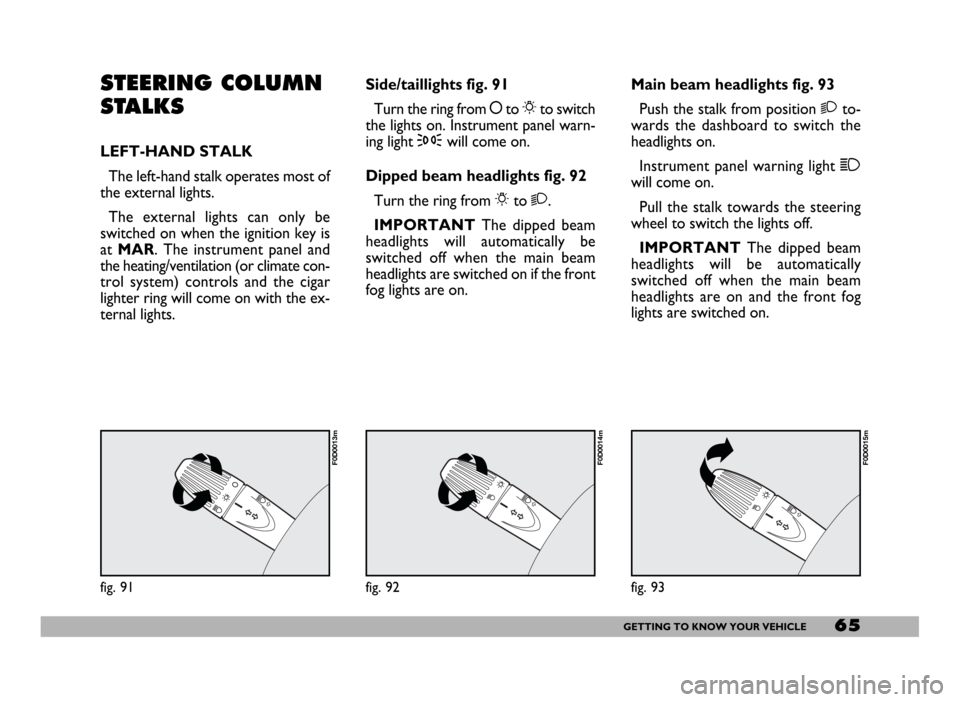
ternal lights.Side/taillights fig. 91
Turn the ring from åto 6to switch
the lights on. Instrument panel warn-
ing light 3will come on.
Dipped beam headlights fig. 92
Turn the ring from 6to 2.
IMPORTANTThe dipped beam
headlights will automatically be
switched off when the main beam
headlights are switched on if the front
fog lights are on.Main beam headlights fig. 93
Push the stalk from position 2to-
wards the dashboard to switch the
headlights on.
Instrument panel warning light 1
will come on.
Pull the stalk towards the steering
wheel to switch the lights off.
IMPORTANTThe dipped beam
headlights will be automatically
switched off when the main beam
headlights are on and the front fog
lights are switched on.
fig. 91
F0D0013m
fig. 92
F0D0014m
fig. 93
F0D0015m
Page 143 of 258
142IN AN EMERGENCY
Bulbs
Main beam headlights
Dipped beam headlights
Front side lights
Front direction indicators
Side direction indicators
Rear direction indicators
Brake lights
Third brake light
Reversing light
Rear fog light/taillights
Front ceiling light
Rear ceiling light
Number plate lightW
60/55 W
60/55 W
5 W
21 W
5 W
21 W
21 W
21 W
21 W
21 W
10 W
15 W
5 W Type
H4
H4
R5W
P21W
W5W
PY21W
P21W
P21W
P21W
P21/4W
CW10
CW15
CW5
Figure
D
D
B
B
A
B
B
B
B
B
C
C
B
fig. 8
F0D0090m
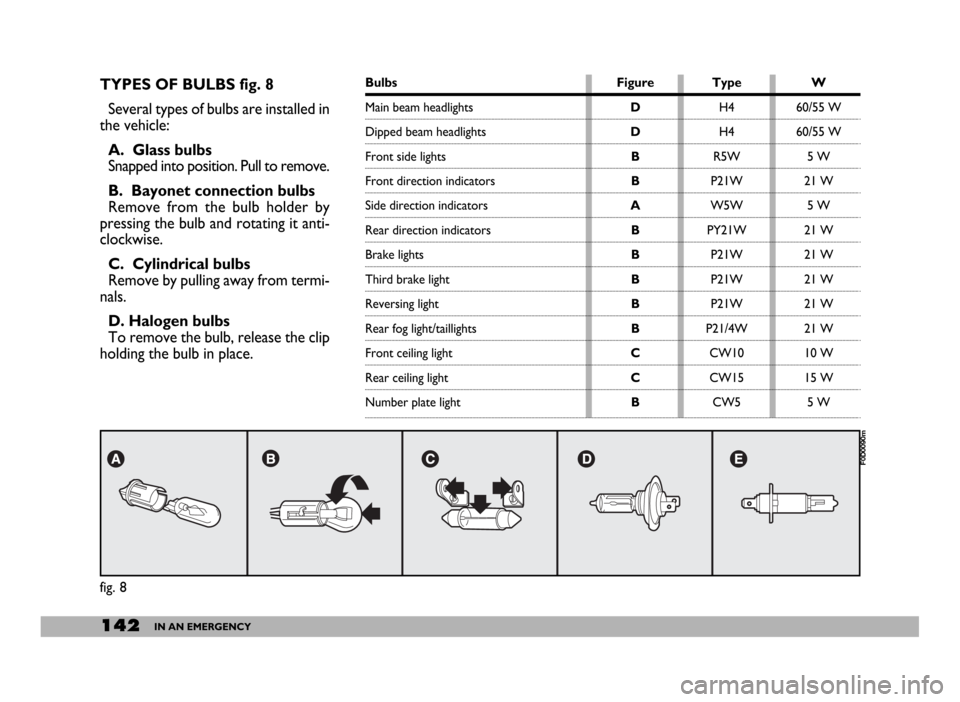
TYPES OF BULBS fig. 8
Several types of bulbs are installed in
the vehicle:
A. Glass bulbs
Snapped into position. Pull to remove.
B. Bayonet connection bulbs
Remove from the bulb holder by
pressing the bulb and rotating it anti-
clockwise.
C. Cylindrical bulbs
Remove by pulling away from termi-
nals.
D. Halogen bulbs
To remove the bulb, release the clip
holding the bulb in place.
Page 146 of 258
145IN AN EMERGENCY
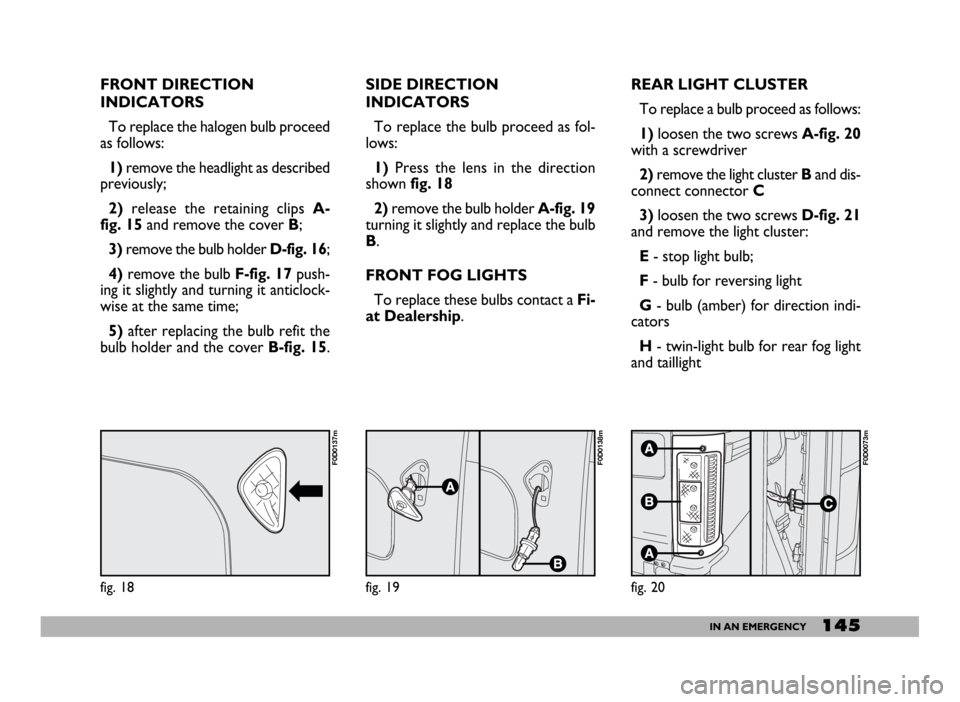
REAR LIGHT CLUSTER
To replace a bulb proceed as follows:
1)loosen the two screws A-fig. 20
with a screwdriver
2)remove the light cluster Band dis-
connect connector C
3)loosen the two screws D-fig. 21
and remove the light cluster:
E- stop light bulb;
F- bulb for reversing light
G - bulb (amber) for direction indi-
cators
H- twin-light bulb for rear fog light
and taillight
fig. 20
F0D0073m
FRONT DIRECTION
INDICATORS
To replace the halogen bulb proceed
as follows:
1) remove the headlight as described
previously;
2)release the retaining clips A-
fig. 15 and remove the cover B;
3)remove the bulb holder D-fig. 16;
4)remove the bulb F-fig. 17push-
ing it slightly and turning it anticlock-
wise at the same time;
5)after replacing the bulb refit the
bulb holder and the cover B-fig. 15.SIDE DIRECTION
INDICATORS
To replace the bulb proceed as fol-
lows:
1)Press the lens in the direction
shown fig. 18
2)remove the bulb holder A-fig. 19
turning it slightly and replace the bulb
B.
FRONT FOG LIGHTS
To replace these bulbs contact a Fi-
at Dealership.
fig. 18
F0D0137m
fig. 19
F0D0138m
Page 147 of 258
146IN AN EMERGENCY
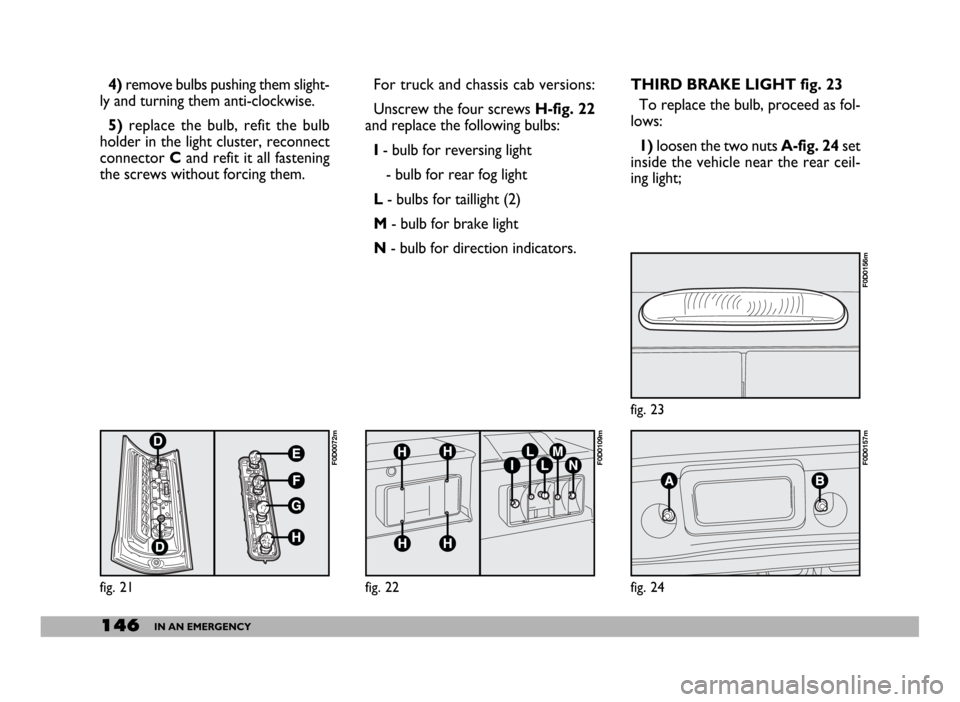
THIRD BRAKE LIGHT fig. 23
To replace the bulb, proceed as fol-
lows:
1)loosen the two nuts A-fig. 24set
inside the vehicle near the rear ceil-
ing light; 4)remove bulbs pushing them slight-
ly and turning them anti-clockwise.
5) replace the bulb, refit the bulb
holder in the light cluster, reconnect
connector Cand refit it all fastening
the screws without forcing them.For truck and chassis cab versions:
Unscrew the four screws H-fig. 22
and replace the following bulbs:
I- bulb for reversing light
- bulb for rear fog light
L- bulbs for taillight (2)
M- bulb for brake light
N- bulb for direction indicators.
fig. 21
F0D0072m
fig. 22
F0D0109m
fig. 23
F0D0156m
fig. 24
F0D0157m
Page 155 of 258
154IN AN EMERGENCY
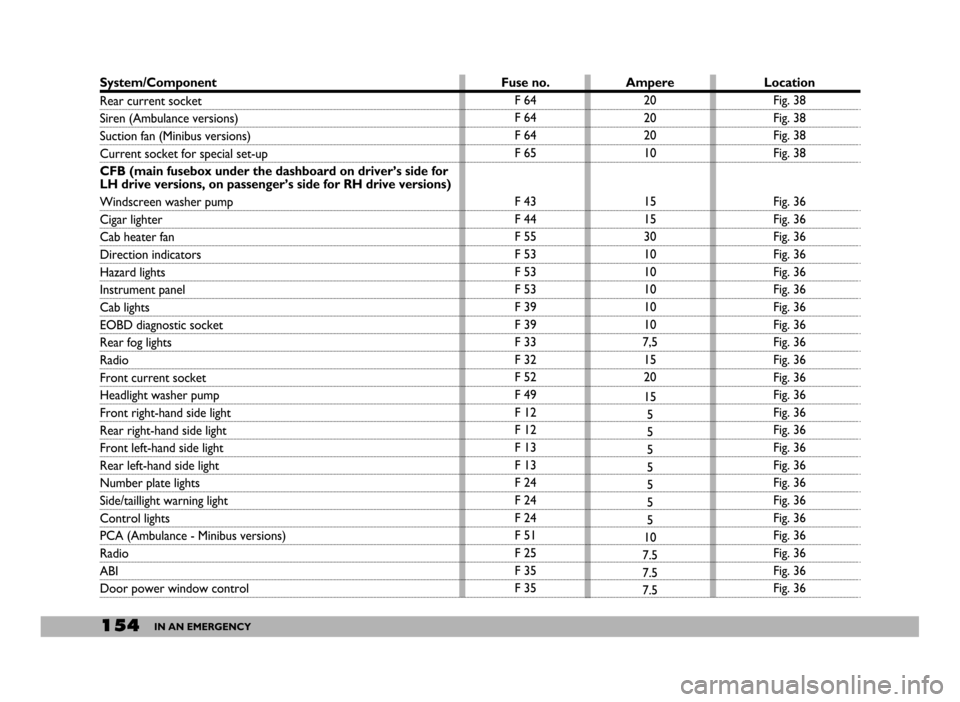
System/Component
Rear current socket
Siren (Ambulance versions)
Suction fan (Minibus versions)
Current socket for special set-up
CFB (main fusebox under the dashboard on driver’s side for
LH drive versions, on passenger’s side for RH drive versions)
Windscreen washer pump
Cigar lighter
Cab heater fan
Direction indicators
Hazard lights
Instrument panel
Cab lights
EOBD diagnostic socket
Rear fog lights
Radio
Front current socket
Headlight washer pump
Front right-hand side light
Rear right-hand side light
Front left-hand side light
Rear left-hand side light
Number plate lights
Side/taillight warning light
Control lights
PCA (Ambulance - Minibus versions)
Radio
ABI
Door power window controlLocation
Fig. 38
Fig. 38
Fig. 38
Fig. 38
Fig. 36
Fig. 36
Fig. 36
Fig. 36
Fig. 36
Fig. 36
Fig. 36
Fig. 36
Fig. 36
Fig. 36
Fig. 36
Fig. 36
Fig. 36
Fig. 36
Fig. 36
Fig. 36
Fig. 36
Fig. 36
Fig. 36
Fig. 36
Fig. 36
Fig. 36
Fig. 36 Ampere
20
20
20
10
15
15
30
10
10
10
10
10
7,5
15
20
15
5
5
5
5
5
5
5
10
7.5
7.5
7.5 Fuse no.
F 64
F 64
F 64
F 65
F 43
F 44
F 55
F 53
F 53
F 53
F 39
F 39
F 33
F 32
F 52
F 49
F 12
F 12
F 13
F 13
F 24
F 24
F 24
F 51
F 25
F 35
F 35
Page 251 of 258
250INDEX
Rev counter ................................. 30
Reversing light replacement ..... 146
Rims
- understanding rim markings .. 219
Roof rack/ski rack (presetting) .. 101
Rubber tubing .............................. 179
Safe driving.................................. 119
Scheduled Service ....................... 162
Seat belts ....................................... 15
Seats ............................................... 42
Self-standing supplementary
heater .......................................... 59
Service indicator .......................... 33
Service Schedule .......................... 163
Side central windows (opening) 78
Side/taillights ................................. 65
- front bulb replacement ......... 146
Smart wash ................................... 67
Snow chains .......................... 133-218
Snow tyres ............................ 132-221Sound system ............................... 98
- aerial ......................................... 100
- heavy set-up ............................ 98
- light set-up ............................... 98
Spare wheel .................................. 218
Spark plugs .................................... 215
Speed limiter ................................ 177
Speedometer ................................ 30
Spray nozzles ............................... 181
Starting the engine ...................... 105
- bump starting .......................... 137
- Diesel engine procedure ...... 106
- emergency starting ......... 107-135
- ignition switch ......................... 28
- jump starting .................... 136-157
- petrol engine procedure ...... 105
- stopping the engine ................ 108
- warming up the engine after
it has just started ................... 107
Steering ......................................... 218
Steering column lock .................. 28Steering column stalks ............... 65
Steering wheel ............................. 51
Sun visors ...................................... 78
Suspensions .................................. 217
Symbols ......................................... 7
Tank cap ................................ 99-103
Technical specifications........ 185
Third brake light
replacement ................................. 146
Tools ................................................ 138
Top speeds ..................................... 226
Tow hitch
(fitting diagrams)................... 130-131
Tow hitch installation .................. 129
Towing a trailer ............................. 129
Towing the vehicle ....................... 159
Transmission .................................. 216
Transporting children in safety .. 22
Tyre pressure ................................. 220
Tyres ......................................... 178-220