brake fluid FIAT DUCATO BASE CAMPER 2014 Owner handbook (in English)
[x] Cancel search | Manufacturer: FIAT, Model Year: 2014, Model line: DUCATO BASE CAMPER, Model: FIAT DUCATO BASE CAMPER 2014Pages: 367, PDF Size: 20.39 MB
Page 107 of 367
KNOWING THE INSTRUMENT PANEL
This section of the booklet gives you all
the information you need to
understand, interpret and use the
instrument panel correctly.CONTROL PANEL AND
INSTRUMENTS ...............................104
DISPLAY ........................................109
TRIP COMPUTER ...........................118
WARNING LIGHTS AND
MESSAGES ....................................121
- LOW BRAKE FLUID/HANDBRAKE
ENGAGED .......................................... 121
- EBD FAILURE .................................. 122
- AIRBAG FAILURE ............................. 122
- SEAT BELTS NOT FASTENED .......... 123
- ENGINE COOLANT TEMPERATURE
TOO HIGH .......................................... 124
- LOW BATTERY CHARGE ................. 124
- LOW ENGINE OIL PRESSURE ......... 125
-ENGINE OIL DETERIORATED ........... 125
-INCOMPLETE DOOR/LOAD
COMPARTMENT CLOSURE ............... 126
- POWER STEERING FAILURE ........... 126
-SELF-LEVELLING SUSPENSION
FAILURE ............................................. 126
- INJECTION/EOBD SYSTEM
FAILURE ............................................. 128
- ABS FAILURE ................................... 129
-FUEL RESERVE ................................ 129
- GLOW PLUG HEATING/GLOW
PLUG HEATING FAILURE ................... 130
- WATER IN DIESEL FILTER ................ 130
-VEHICLE PROTECTION SYSTEM
FAILURE - FIAT CODE ........................ 131
- REAR FOG LIGHTS .......................... 131
-GENERIC FAILURE INDICATION ....... 131
-DPF (PARTICULATE FILTER)
CLEANING UNDERWAY ..................... 133
-WORN BRAKE PADS ........................ 134
-DRIVING ADVISOR ........................... 135
- TPMS ............................................... 136
- DIPPED HEADLIGHTS ..................... 137- FOLLOW ME HOME ........................ 137
- LEFT-HAND DIRECTION INDICATOR
............................................................ 137
- RIGHT-HAND DIRECTION
INDICATOR ........................................ 138
-FOG LIGHTS ..................................... 138
- CRUISE CONTROL .......................... 138
-SPEED LIMITER ................................ 138
- AUTOMATIC MAIN BEAM
HEADLIGHTS ..................................... 139
- MAIN BEAM HEADLIGHTS .............. 139
-EXTERIOR LIGHTS FAULT ................ 140
-BRAKE LIGHT FAILURE .................... 140
-MAIN BEAM AUTOMATISM FAULT ... 141
-POSSIBLE ICE ON ROAD ................. 141
-SPEED LIMIT EXCEEDED ................. 141
-SCHEDULED SERVICING ................. 141
-DRIVING ADVISOR SYSTEM
FAILURE ............................................. 142
-TRAFFIC SIGN RECOGNITION
FAILURE ............................................. 142
-LIMITED RANGE ............................... 142
-START&STOP SYSTEM
ACTIVATION/DEACTIVATION .............. 143
-START&STOP FAILURE .................... 143
103
Page 125 of 367
WARNING LIGHTS AND MESSAGESThe warning light switches on together with (where the instrument panel permits) a specific message and/or acoustic signal.
These indications are indicative and precautionary and as such must not be considered as exhaustive and/or alternative to the
information contained in the Owner Handbook, which you are advised to read carefully in all cases. Always refer to the
information in this chapter in the event of a failure indication.
IMPORTANT Failure indications displayed are divided into two categories: very serious and less serious failures. Serious faults
are indicated by a repeated and prolonged warning "cycle". Less serious faults are indicated by a warning "cycle" with a shorter
duration. The display cycle of both categories can be interrupted. The instrument panel warning light will stay on until the
cause of the malfunction is eliminated.Warning lights on
panelWhat it means What to do
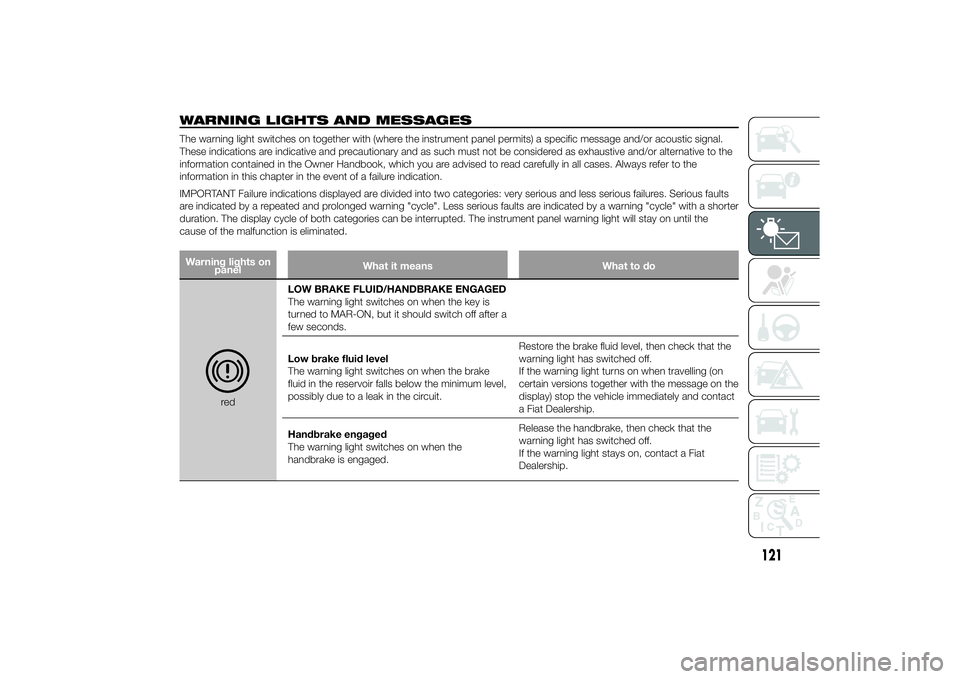
redLOW BRAKE FLUID/HANDBRAKE ENGAGED
The warning light switches on when the key is
turned to MAR-ON, but it should switch off after a
few seconds.
Low brake fluid level
The warning light switches on when the brake
fluid in the reservoir falls below the minimum level,
possibly due to a leak in the circuit.Restore the brake fluid level, then check that the
warning light has switched off.
If the warning light turns on when travelling (on
certain versions together with the message on the
display) stop the vehicle immediately and contact
a Fiat Dealership.
Handbrake engaged
The warning light switches on when the
handbrake is engaged.Release the handbrake, then check that the
warning light has switched off.
If the warning light stays on, contact a Fiat
Dealership.
121
Page 195 of 367
BUMP STARTING
Never bump start the engine by
pushing, towing or driving downhill.
This could cause fuel to flow into the
catalytic converter and damage it
beyond repair.
WARNING
136) This procedure must be
performed by qualified personnel
as incorrect actions may cause
high-intensity electrical discharge.
Furthermore, battery fluid is
poisonous and corrosive: avoid
contact with skin and eyes. Keep
naked flames and lighted
cigarettes away from the battery
and do not cause sparks.
REPLACING A
WHEELGENERAL
INSTRUCTIONS
Wheel replacement and correct use of
the jack and spare wheel (for
versions/markets, where provided) call
for some precautions, which are listed
below.
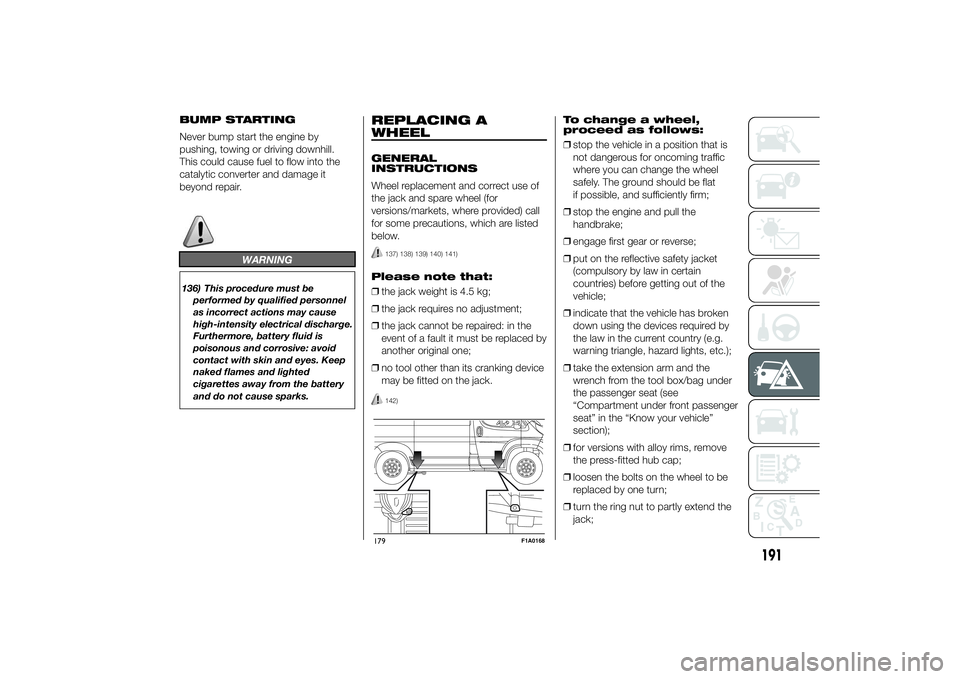
137) 138) 139) 140) 141)
Please note that:
❒the jack weight is 4.5 kg;
❒the jack requires no adjustment;
❒the jack cannot be repaired: in the
event of a fault it must be replaced by
another original one;
❒no tool other than its cranking device
may be fitted on the jack.
142)
To change a wheel,
proceed as follows:
❒stop the vehicle in a position that is
not dangerous for oncoming traffic
where you can change the wheel
safely. The ground should be flat
if possible, and sufficiently firm;
❒stop the engine and pull the
handbrake;
❒engage first gear or reverse;
❒put on the reflective safety jacket
(compulsory by law in certain
countries) before getting out of the
vehicle;
❒indicate that the vehicle has broken
down using the devices required by
the law in the current country (e.g.
warning triangle, hazard lights, etc.);
❒take the extension arm and the
wrench from the tool box/bag under
the passenger seat (see
“Compartment under front passenger
seat” in the “Know your vehicle”
section);
❒for versions with alloy rims, remove
the press-fitted hub cap;
❒loosen the bolts on the wheel to be
replaced by one turn;
❒turn the ring nut to partly extend the
jack;
179
F1A0168
191
Page 200 of 367
FIX&GO
AUTOMATIC QUICK
TYRE REPAIR KIT(for versions/markets, where provided)
The Fix & Go automatic quick tyre
repair kit is positioned at the front of the
vehicle passenger compartment and
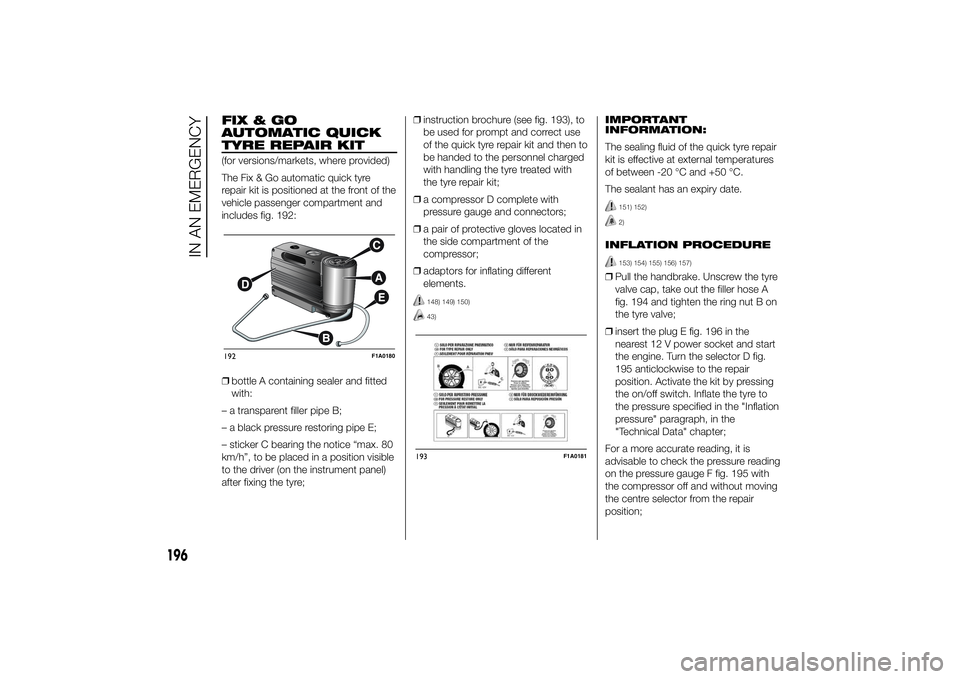
includes fig. 192:
❒bottle A containing sealer and fitted
with:
– a transparent filler pipe B;
– a black pressure restoring pipe E;
– sticker C bearing the notice “max. 80
km/h”, to be placed in a position visible
to the driver (on the instrument panel)
after fixing the tyre;❒instruction brochure (see fig. 193), to
be used for prompt and correct use
of the quick tyre repair kit and then to
be handed to the personnel charged
with handling the tyre treated with
the tyre repair kit;
❒a compressor D complete with
pressure gauge and connectors;
❒a pair of protective gloves located in
the side compartment of the
compressor;
❒adaptors for inflating different
elements.
148) 149) 150)43)
IMPORTANT
INFORMATION:
The sealing fluid of the quick tyre repair
kit is effective at external temperatures
of between -20 °C and +50 °C.
The sealant has an expiry date.
151) 152)2)
INFLATION PROCEDURE
153) 154) 155) 156) 157)
❒Pull the handbrake. Unscrew the tyre
valve cap, take out the filler hose A
fig. 194 and tighten the ring nut B on
the tyre valve;
❒insert the plug E fig. 196 in the
nearest 12 V power socket and start
the engine. Turn the selector D fig.
195 anticlockwise to the repair
position. Activate the kit by pressing
the on/off switch. Inflate the tyre to
the pressure specified in the "Inflation
pressure" paragraph, in the
"Technical Data" chapter;
For a more accurate reading, it is
advisable to check the pressure reading
on the pressure gauge F fig. 195 with
the compressor off and without moving
the centre selector from the repair
position;
192
F1A0180
193
F1A0181
196
IN AN EMERGENCY
Page 201 of 367
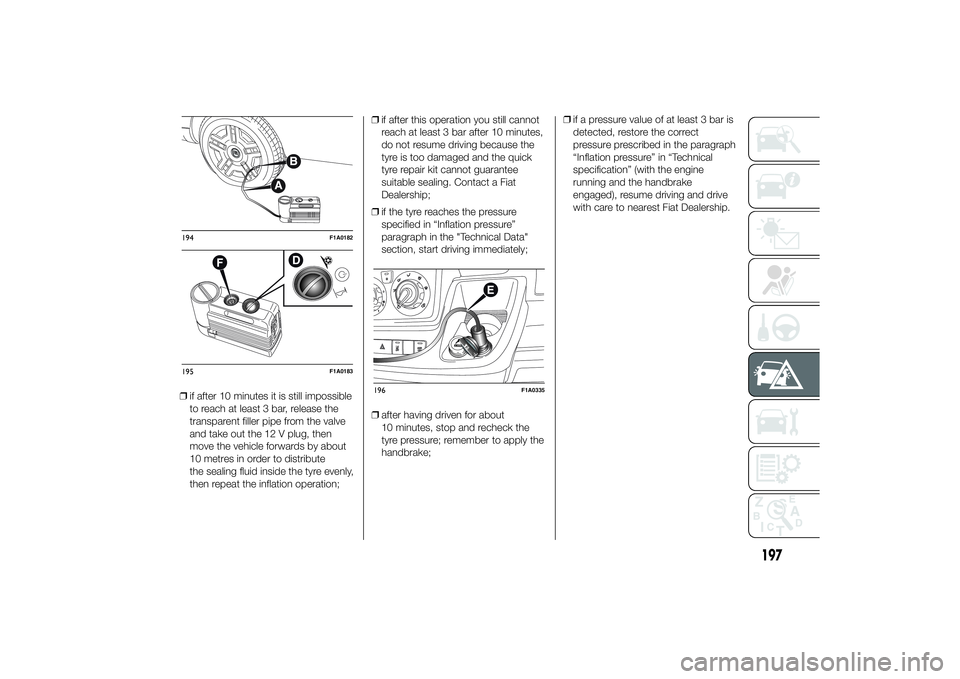
❒if after 10 minutes it is still impossible
to reach at least 3 bar, release the
transparent filler pipe from the valve
and take out the 12 V plug, then
move the vehicle forwards by about
10 metres in order to distribute
the sealing fluid inside the tyre evenly,
then repeat the inflation operation;❒if after this operation you still cannot
reach at least 3 bar after 10 minutes,
do not resume driving because the
tyre is too damaged and the quick
tyre repair kit cannot guarantee
suitable sealing. Contact a Fiat
Dealership;
❒if the tyre reaches the pressure
specified in “Inflation pressure”
paragraph in the "Technical Data"
section, start driving immediately;
❒after having driven for about
10 minutes, stop and recheck the
tyre pressure; remember to apply the
handbrake;❒if a pressure value of at least 3 bar is
detected, restore the correct
pressure prescribed in the paragraph
“Inflation pressure” in “Technical
specification” (with the engine
running and the handbrake
engaged), resume driving and drive
with care to nearest Fiat Dealership.194
F1A0182
195
F1A0183
196
F1A0335
197
Page 229 of 367
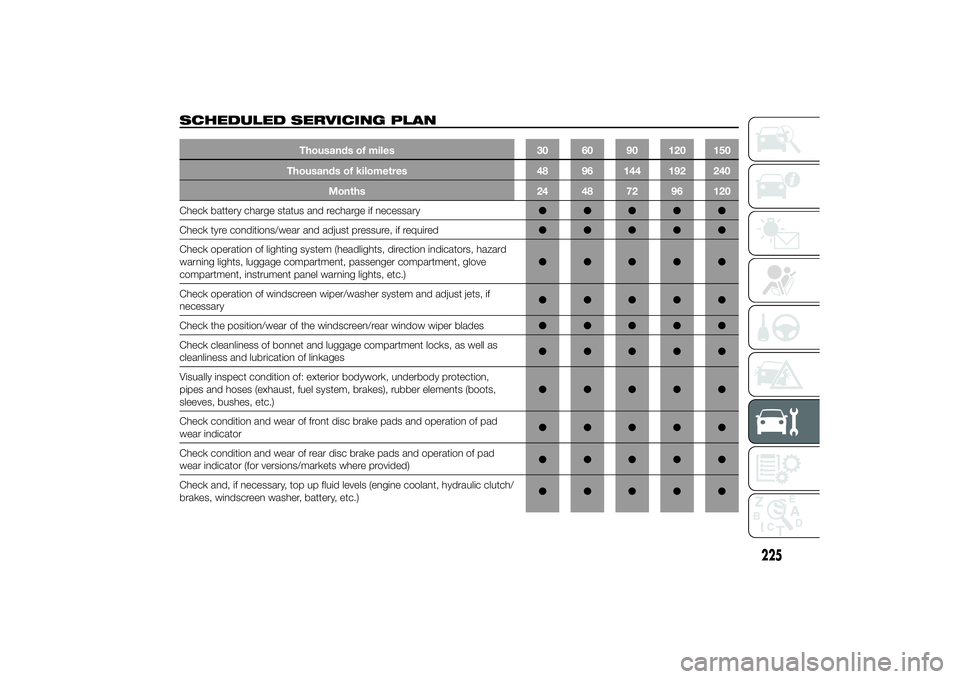
SCHEDULED SERVICING PLAN
Thousands of miles 30 60 90 120 150
Thousands of kilometres 48 96 144 192 240
Months 24 48 72 96 120
Check battery charge status and recharge if necessary●●●●●
Check tyre conditions/wear and adjust pressure, if required●●●●●
Check operation of lighting system (headlights, direction indicators, hazard
warning lights, luggage compartment, passenger compartment, glove
compartment, instrument panel warning lights, etc.)●●●●●
Check operation of windscreen wiper/washer system and adjust jets, if
necessary●●●●●
Check the position/wear of the windscreen/rear window wiper blades●●●●●
Check cleanliness of bonnet and luggage compartment locks, as well as
cleanliness and lubrication of linkages●●●●●
Visually inspect condition of: exterior bodywork, underbody protection,
pipes and hoses (exhaust, fuel system, brakes), rubber elements (boots,
sleeves, bushes, etc.)●●●●●
Check condition and wear of front disc brake pads and operation of pad
wear indicator●●●●●
Check condition and wear of rear disc brake pads and operation of pad
wear indicator (for versions/markets where provided)●●●●●
Check and, if necessary, top up fluid levels (engine coolant, hydraulic clutch/
brakes, windscreen washer, battery, etc.)●●●●●
225
Page 231 of 367
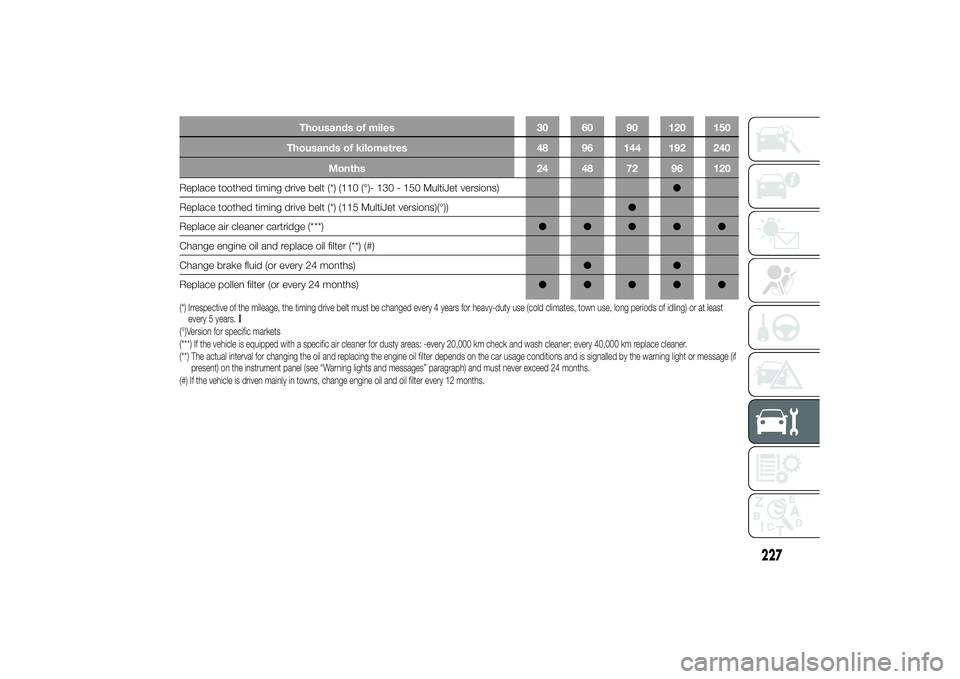
Thousands of miles 30 60 90 120 150
Thousands of kilometres 48 96 144 192 240
Months 24 48 72 96 120
Replace toothed timing drive belt (*) (110 (°)- 130 - 150 MultiJet versions)●
Replace toothed timing drive belt (*) (115 MultiJet versions)(°))●
Replace air cleaner cartridge (***)●●●●●
Change engine oil and replace oil filter (**) (#)
Change brake fluid (or every 24 months)●●
Replace pollen filter (or every 24 months)●●●●●(*) Irrespective of the mileage, the timing drive belt must be changed every 4 years for heavy-duty use (cold climates, town use, long periods of idling) or at least
every 5 years.
I
(°)Version for specific markets
(***) If the vehicle is equipped with a specific air cleaner for dusty areas: -every 20,000 km check and wash cleaner; every 40,000 km replace cleaner.
(**) The actual interval for changing the oil and replacing the engine oil filter depends on the car usage conditions and is signalled by the warning light or message (if
present) on the instrument panel (see “Warning lights and messages” paragraph) and must never exceed 24 months.
(#) If the vehicle is driven mainly in towns, change engine oil and oil filter every 12 months.
227
Page 232 of 367
PERIODIC CHECKSBefore long journeys, check and, if
necessary, restore:
❒engine coolant level;
❒brake fluid level;
❒windscreen washer fluid level;
❒tyre inflation pressure and condition;
❒operation of lighting system
(headlamps, direction indicators,
hazard warning lights, etc.);
❒operation of screen washer/wiper
system and positioning/wear of
windscreen/rear window wiper
blades.
To ensure that the vehicle is always
efficient and well maintained, it is
advisable to make sure that you carry
out the above operations regularly
(approximately every 1000 km and
every 3000 km for checking and
topping up engine oil is advisable).
DEMANDING
VEHICLE USEIf the vehicle is mostly used in one of
the following conditions:
❒towing a trailer or caravan;
❒dusty roads;
❒short, repeated journeys (less than
7-8 km) at sub-zero outside
temperatures;
❒engine often idling or driving long
distances at low speeds or long
periods of inactivity;
the following checks must be carried
out more often than indicated in the
Scheduled Servicing Plan:
❒check front disc brake pad
conditions and wear;
❒check cleanliness of bonnet and boot
locks, cleanliness and lubrication of
linkage;
❒visually inspect conditions of: engine,
gearbox, transmission, pipes and
hoses (exhaust - fuel system -
brakes) and rubber elements (boots -
sleeves - bushes - etc.);
❒check battery charge and battery
fluid level (electrolyte);
❒visually inspect condition of the
accessory drive belts;❒check and, if necessary, change
engine oil and replace oil filter.
❒check and, if necessary, replace
pollen filter.
228
SERVICING AND MAINTENANCE
Page 233 of 367
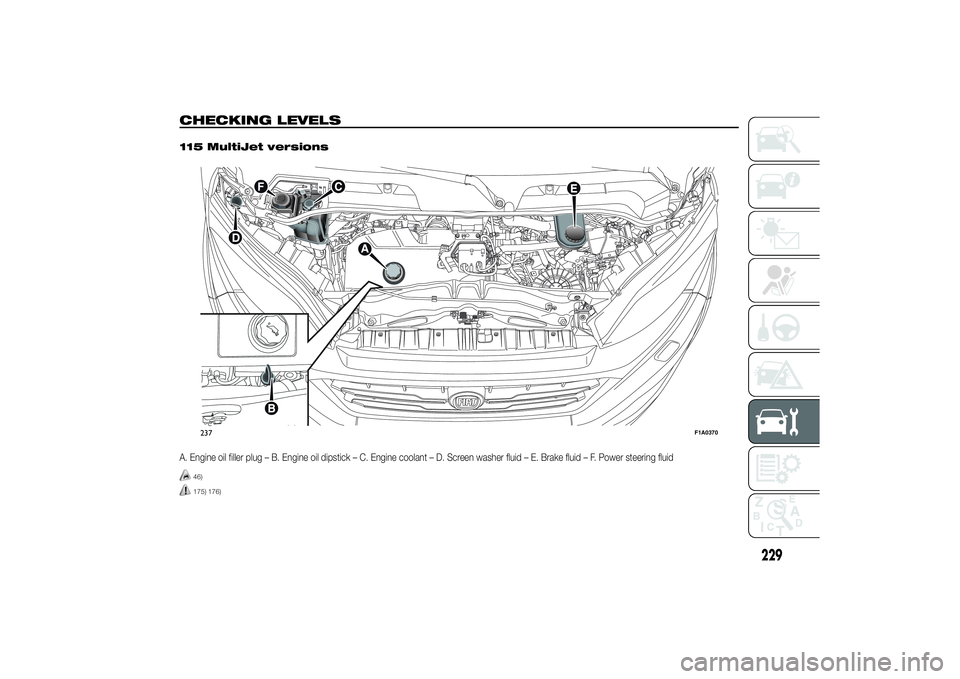
CHECKING LEVELS
.
115 MultiJet versionsA. Engine oil filler plug – B. Engine oil dipstick – C. Engine coolant – D. Screen washer fluid – E. Brake fluid – F. Power steering fluid
46)175) 176)237
F1A0370
229
Page 234 of 367
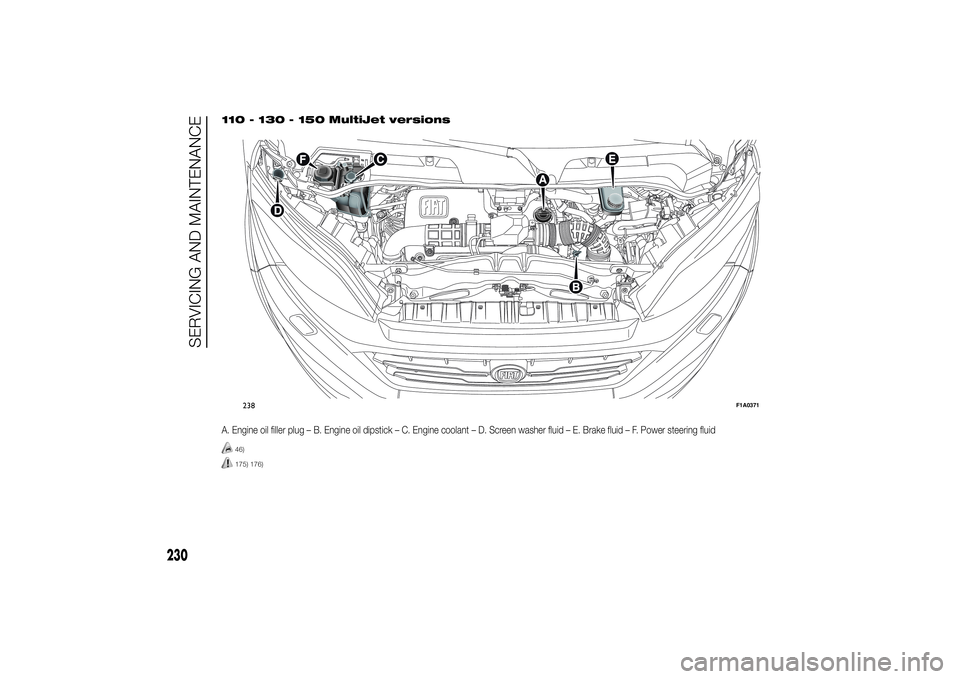
110 - 130 - 150 MultiJet versionsA. Engine oil filler plug – B. Engine oil dipstick – C. Engine coolant – D. Screen washer fluid – E. Brake fluid – F. Power steering fluid
46)175) 176)238
F1A0371
230
SERVICING AND MAINTENANCE