change time FIAT DUCATO BASE CAMPER 2015 Owner handbook (in English)
[x] Cancel search | Manufacturer: FIAT, Model Year: 2015, Model line: DUCATO BASE CAMPER, Model: FIAT DUCATO BASE CAMPER 2015Pages: 367, PDF Size: 19.73 MB
Page 129 of 367

- press the MODE button briefly to
return to the menu screen or hold
the button down to return to the
standard screen without storing.
Traffic sign
This function allows you to activate
(On) or deactivate (Off) the Traffic
Sign function to recognise the traffic
signs (no overtaking or speed
limits).
For activation/deactivation, proceed
as follows:
- briefly press the MODE button:
ON or OFF flashes on the display
(depending the previous setting);
- press the
orbutton to
select;
- press the MODE button briefly to
return to the menu screen or hold
the button down to return to the
standard screen without storing.
Setting the clock (Set
time)
This function allows you to set the
clock through two submenus:
“Time” and “Format”.To carry out the adjustment,
proceed as follows:
- briefly press the MODE button
and two submenus, "Time" and
"Format", will be displayed;
- press the
orbutton to
switch between the two submenus;
- once you have selected the
submenu to be changed, press
button MODE briefly;
- if you enter the "Time" submenu,
pressing the MODE button briefly
makes the "hours" flash on the
display;
- press the
orbutton to
adjust;
- briefly press the MODE button:
the "minutes" starts to flash on the
display;
- press the
orbutton to
adjust;
– if you enter the "Format"
submenu, pressing the MODE
button briefly makes the display
format flash on the display;
- press the
orbutton to
select "24h" or "12h" mode.When you have made the
adjustment, briefly press the MODE
button to go back to the submenu
screen or hold the button down
to go back to the main menu
screen without storing.
- press the MODE button again to
return to the standard screen or
to the main menu according to
where you are in the menu.
Setting the date (Set
Date)
This function allows updating of the
date (day - month - year).
Proceed as follows to update:
- briefly press the MODE button:
the day starts flashing on the
display (dd);
- press the
orbutton to
adjust;
- briefly press the MODE button:
the month starts flashing on the
display (mm);
- press the
orbutton to
adjust;
125
Page 130 of 367

- briefly press the MODE button:
the year starts flashing on the
display (yyyy);
- press the button
orfor
setting.
NoteThe setting will increase or
decrease by one unit each time the
orbutton is pressed.
Keeping the button pressed causes an
automatic rapid value increase/
decrease. Complete the adjustment
with single presses of the button when
you approach the desired value.
- press the MODE button briefly to
return to the menu screen or hold
the button down to return to the
standard screen without storing.
Automatic central
locking with vehicle
moving (Autoclose)
After activation (On), this function
allows the automatic locking of the
doors when the speed exceeds
20 km/h.
Proceed as follows to activate (On)
or deactivate (Off) this function:
- briefly press the MODE button to
display a submenu;- briefly press the MODE button:
ON or OFF flashes on the display
(depending the previous setting);
- press the
orbutton to
select;
- press the MODE button briefly to
return to the submenu screen or
hold the button down to return
to the main menu screen without
storing;
- press the MODE button again to
return to the standard screen or
to the main menu according to
where you are in the menu.
Set units
(Measurement units)
With this function it is possible
to set the unit of measurement
using three submenus: "Distance",
"Consumption" and "Temperature".
To set the desired unit of
measurement, proceed as follows:
- briefly press the MODE button
to display the three submenus;
- press button
orto
navigate through the three
submenus;- once you have selected the
submenu to be changed, press
button MODE briefly;
- if you enter the "Distances"
submenu, pressing the MODE
button briefly makes the display
show "km" or "mi" (depending on
the previous setting);
- press the
orbutton to
select;
- if you enter the "Consumption"
submenu, pressing the MODE
button briefly makes "km/l",
"l/100km" or "mpg" appear on the
display (depending on the previous
setting);
If the set distance unit is "km", the
display enables setting of the
fuel consumption unit (km/l or
l/100km).
If the set distance unit is "mi", the
display shows the amount of fuel
consumed in "mpg".
- press the
orbutton to
select;
126
KNOWING THE INSTRUMENT PANEL
Page 132 of 367

– briefly press button MODE to go
back to the menu screen or press
the button for longer to go back
to the standard screen.
NoteThe "Scheduled Servicing Plan"
requires the vehicle to be serviced every
48,000 km (or 30,000 mi). This
indication will appear automatically, with
the key at MAR-ON, starting from
2,000 km (or 1,240 mi) and will be
displayed every 200 km (or 124 mi). Oil
change notification messages are
displayed in the same way. Use the
andbuttons to alternate
between displaying scheduled servicing
and engine oil change information.
Below 200 km servicing indications are
more frequent. The display will be in
km or mi depending on the
measurement unit settings. When the
next scheduled service is approaching,
the word “Service” will appear on the
display, followed by the number of
kilometres or miles left, when the key is
turned to MAR-ON. Contact a Fiat
Dealership to carry out any service
operation in the "Scheduled servicing
plan" and to reset the display.NoteWhen an oil change is nearly due
and the ignition key is turned to
MAR-ON, the display will show a
dedicated message. Engine
performance will decrease still driving in
these conditions. When the change is
due, the dedicated message will
reappear on the display together with
the activation of both the
and
warning lights. Contact a
Fiat Dealership.
Activating/
deactivating front
passenger side
airbags and side
bags for chest
protection
(Passenger airbag)
(for versions/markets, where
provided)
This function allows the passenger
side airbag to be activated/
deactivated.
Proceed as follows:
❒press the MODE button and, after
the message "Bag pass: Off" (to
deactivate) or "Bag pass: On" (to
activate) is displayed by pressing the
andbuttons, press the
MODE button again;
❒the confirmation request message
will appear on the display;❒by pressing the
or
buttons, select (Yes) (to confirm
activation/deactivation) or (No) (to
cancel);
❒press the MODE button briefly and a
message confirming the selection will
be displayed, then you will return to
the menu screen, or hold the button
down to return to the standard
screen without storing.
Daytime running lights
(DRL)
(for versions/markets, where
provided)
With this function is possible to turn
the daytime running lights on and
off.
Proceed as follows to activate or
deactivate this function:
❒briefly press the MODE button. The
display shows a submenu;
❒briefly press the MODE button. "On"
or "Off" flash on the display,
according to what has been
previously set;
❒press
orto make your
choice;
128
KNOWING THE INSTRUMENT PANEL
Page 187 of 367

USING THE
GEARBOX
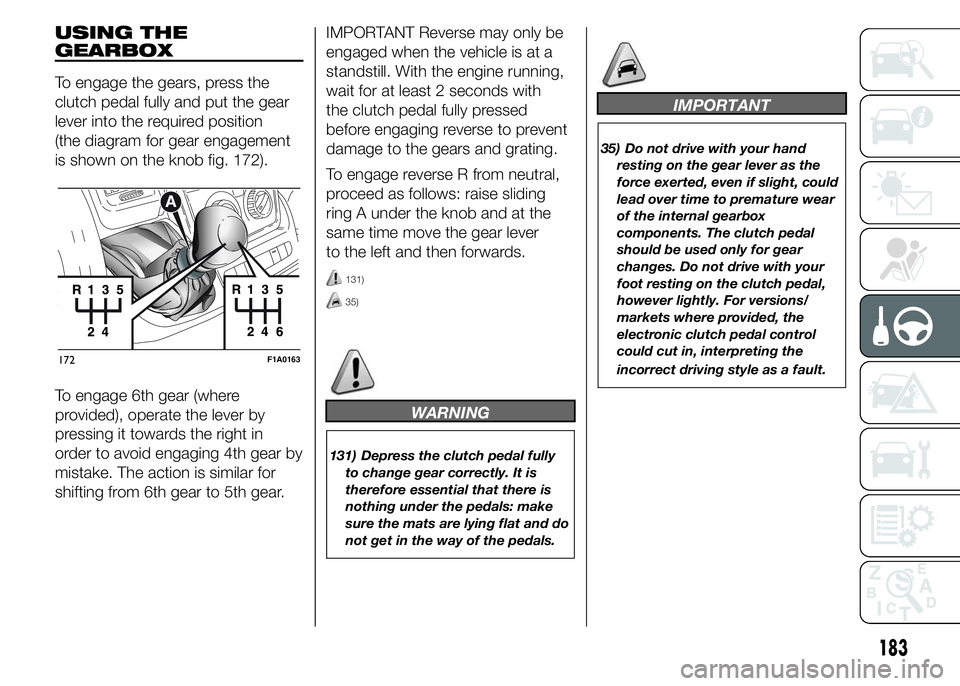
To engage the gears, press the
clutch pedal fully and put the gear
lever into the required position
(the diagram for gear engagement
is shown on the knob fig. 172).
To engage 6th gear (where
provided), operate the lever by
pressing it towards the right in
order to avoid engaging 4th gear by
mistake. The action is similar for
shifting from 6th gear to 5th gear.IMPORTANT Reverse may only be
engaged when the vehicle is at a
standstill. With the engine running,
wait for at least 2 seconds with
the clutch pedal fully pressed
before engaging reverse to prevent
damage to the gears and grating.
To engage reverse R from neutral,
proceed as follows: raise sliding
ring A under the knob and at the
same time move the gear lever
to the left and then forwards.
131)
35)
WARNING
131) Depress the clutch pedal fully
to change gear correctly. It is
therefore essential that there is
nothing under the pedals: make
sure the mats are lying flat and do
not get in the way of the pedals.
IMPORTANT
35) Do not drive with your hand
resting on the gear lever as the
force exerted, even if slight, could
lead over time to premature wear
of the internal gearbox
components. The clutch pedal
should be used only for gear
changes. Do not drive with your
foot resting on the clutch pedal,
however lightly. For versions/
markets where provided, the
electronic clutch pedal control
could cut in, interpreting the
incorrect driving style as a fault.
172F1A0163
183
Page 236 of 367

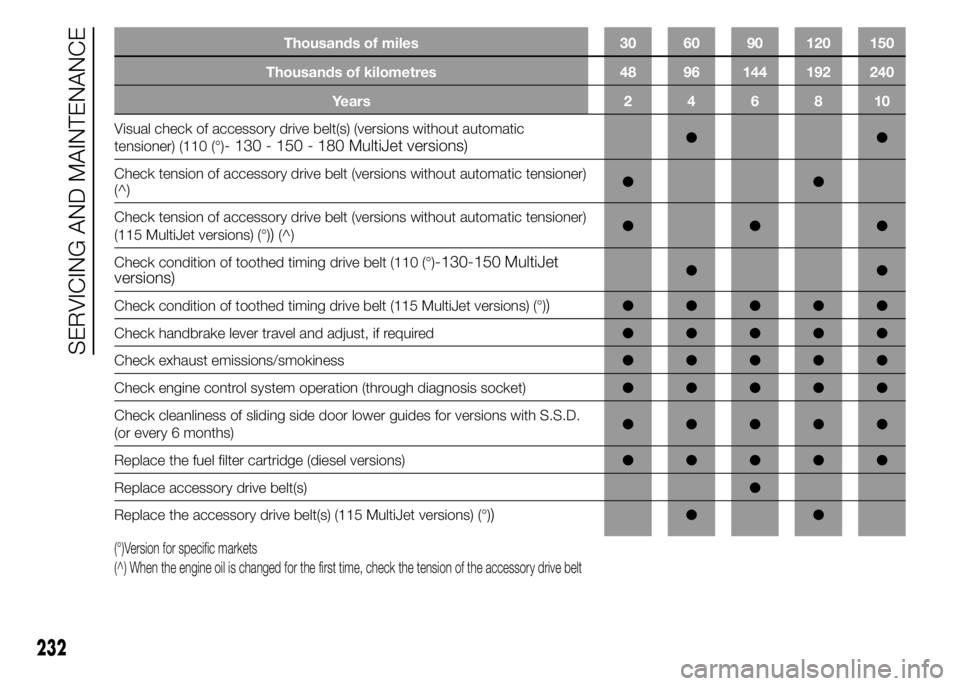
Thousands of miles 30 60 90 120 150
Thousands of kilometres 48 96 144 192 240
Years246810
Visual check of accessory drive belt(s) (versions without automatic
tensioner) (110 (°)
- 130 - 150 - 180 MultiJet versions)●●
Check tension of accessory drive belt (versions without automatic tensioner)
(^)●●
Check tension of accessory drive belt (versions without automatic tensioner)
(115 MultiJet versions) (°)
)(^)●●●
Check condition of toothed timing drive belt (110 (°)
-130-150 MultiJet
versions)●●
Check condition of toothed timing drive belt (115 MultiJet versions) (°)
)●●●●●
Check handbrake lever travel and adjust, if required●●●●●
Check exhaust emissions/smokiness●●●●●
Check engine control system operation (through diagnosis socket)●●●●●
Check cleanliness of sliding side door lower guides for versions with S.S.D.
(or every 6 months)●●●●●
Replace the fuel filter cartridge (diesel versions)●●●●●
Replace accessory drive belt(s)●
Replace the accessory drive belt(s) (115 MultiJet versions) (°)
)●●
(°)Version for specific markets
(^) When the engine oil is changed for the first time, check the tension of the accessory drive belt
232
SERVICING AND MAINTENANCE