climate control FIAT DUCATO BASE CAMPER 2015 Owner handbook (in English)
[x] Cancel search | Manufacturer: FIAT, Model Year: 2015, Model line: DUCATO BASE CAMPER, Model: FIAT DUCATO BASE CAMPER 2015Pages: 367, PDF Size: 19.73 MB
Page 45 of 367
Button for rapid
window demisting/
defrosting (D)
Press this button and the climate
control system will automatically
switch on all the functions required
for fast windscreen and side
window demisting/defrosting:
❒switches on climate control
compressor when climatic conditions
are suitable;
❒switches air recirculation off;
❒maximum air temperature HI in both
areas;
❒sets the fan speed according to the
engine coolant temperature to limit
the flow of air that is not sufficiently
warm to demist the windows;
❒directs air flow to windscreen and
front side windows vents;
❒heated rear window on.
IMPORTANT The rapid demisting/
defrosting function for the windows
remains on for about 3 minutes
from when the engine coolant
reaches the appropriate
temperature for a rapid demisting of
the windows.When this function is active, the
LED on the corresponding button
and the one on the heated rear
window button switch on. The
message FULL AUTO goes off on
the display.
You can only adjust the fan speed
and switch off the heated rear
window manually when this
function is active.
To restore the previous operating
conditions, simply press button B,
air recirculation button G,
compressor button F or AUTO
button A.
NoteTo guarantee rapid demisting/
defrosting, if an additional heater/air
conditioner is present (under the front
or rear seat on Panorama and Combi
versions), if activated, deactivate it
using button F (LED off) located
in control panel F fig. 55.
Switching the system
OFF (E)
Press button E to switch the
climate control system off. The
display will go out.
The following climate control
conditions will be present when the
system is off:
❒display off;
❒temperature setting not displayed;
❒air recirculation on, thereby insulating
the passenger compartment from the
outside (recirculation LED on);
❒climate control compressor off;
❒fan off.
Press the AUTO button to switch
the climate control system back on
in full automatic mode.
41
Page 47 of 367
❒a digital timer fig. 54 for turning the
heater on manually or for
programming the time that it comes
on.
The additional heater (during winter)
heats, maintains the temperature
of and circulates engine coolant for
a set time period in order to ensure
optimum engine and passenger
compartment conditions at engine
start-up.
The heater can operate
automatically when programmed
with a digital timer or manually
by pressing the 'immediate heating'
button on the timer.
After heater activation, whether
programmed or manually, the
electronic control unit operates the
coolant pump and turns on the
burner in accordance with pre-set,
controlled procedures.
The circulation pump output is also
controlled by the electronic control
unit in order to minimise the initial
heating time.
When the system operates, the
control unit turns on the passenger
compartment heater unit fan at
the second speed.The thermal power of the boiler is
regulated automatically by the
electronic control unit depending on
the temperature of the engine
coolant.
IMPORTANT The heater is
equipped with a thermal limiter that
cuts off combustion in the case of
overheating due to insufficient
coolant/coolant leaks. In this case,
after repairing the fault in the
cooling system and/or topping up
the fluid, press the program
selection button before turning the
heater back on.
The heater can turn off
spontaneously due to misfiring after
start-up or because the flame
goes out during operation. In this
case, carry out the turning off
procedure and try to turn the heater
back on. If it still does not work,
consult a Fiat Dealership.Activation of the
heating system
When an automatic climate control
system is present, the control
unit sets the air temperature and
distribution when the heater is
turned on from the park position.
When a manual heater/climate
control is present, to obtain
maximum heater efficiency, check
that the passenger compartment
heating/ventilation temperature
adjustment knob is in the 'hot air'
position.
To prioritise passenger
compartment pre-heating, set the
air distribution knob to the
position.
To prioritise windscreen demisting,
set the air distribution knob to
position.
To obtain both functions, set the air
distribution knob to
position.
43
Page 51 of 367
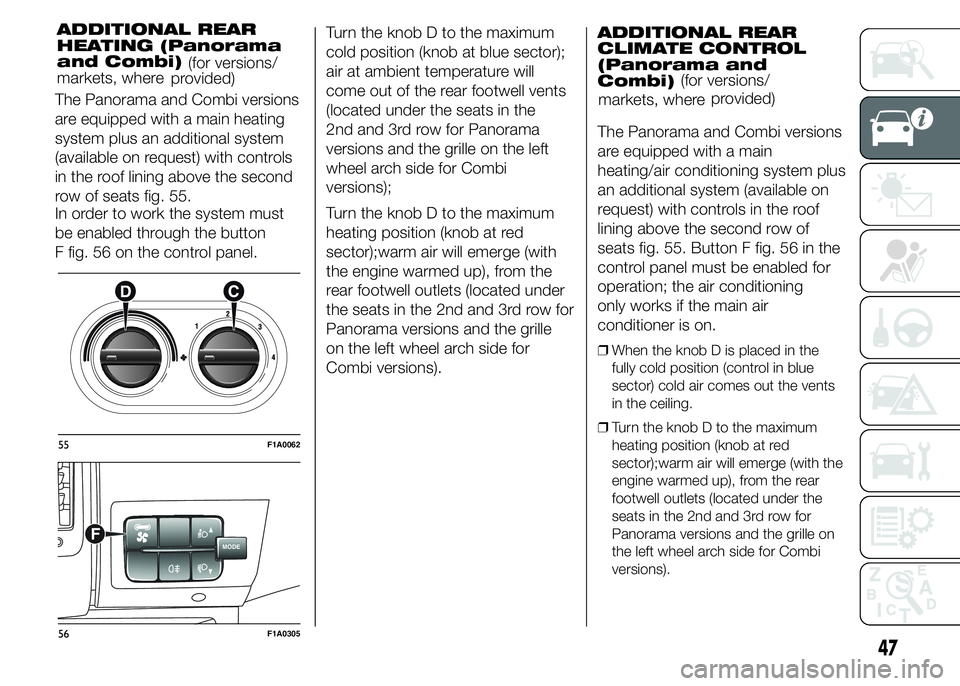
The Panorama and Combi versions
are equipped with a main heating
system plus an additional system
(available on request) with controls
in the roof lining above the second
row of seats fig. 55.
In order to work the system must
be enabled through the button
F fig. 56 on the control panel.Turn the knob D to the maximum
cold position (knob at blue sector);
air at ambient temperature will
come out of the rear footwell vents
(located under the seats in the
2nd and 3rd row for Panorama
versions and the grille on the left
wheel arch side for Combi
versions);
Turn the knob D to the maximum
heating position (knob at red
sector);warm air will emerge (with
the engine warmed up), from the
rear footwell outlets (located under
the seats in the 2nd and 3rd row for
Panorama versions and the grille
on the left wheel arch side for
Combi versions).ADDITIONAL REAR
CLIMATE CONTROL
(Panorama and
Combi)
The Panorama and Combi versions
are equipped with a main
heating/air conditioning system plus
an additional system (available on
request) with controls in the roof
lining above the second row of
seats fig. 55. Button F fig. 56 in the
control panel must be enabled for
operation; the air conditioning
only works if the main air
conditioner is on.
❒When the knob D is placed in the
fully cold position (control in blue
sector) cold air comes out the vents
in the ceiling.
❒Turn the knob D to the maximum
heating position (knob at red
sector);warm air will emerge (with the
engine warmed up), from the rear
footwell outlets (located under the
seats in the 2nd and 3rd row for
Panorama versions and the grille on
the left wheel arch side for Combi
versions).
55F1A0062
MODEF
56F1A0305
47
ADDITIONAL REAR
HEATING (Panorama
and Combi)
markets, where
provided)(for versions/
markets, whereprovided) (for versions/
Page 68 of 367
INTERIOR FITTINGS
UPPER STORAGE
COMPARTMENT -
REFRIGERATED
COMPARTMENT
(for versions/markets, where
provided)
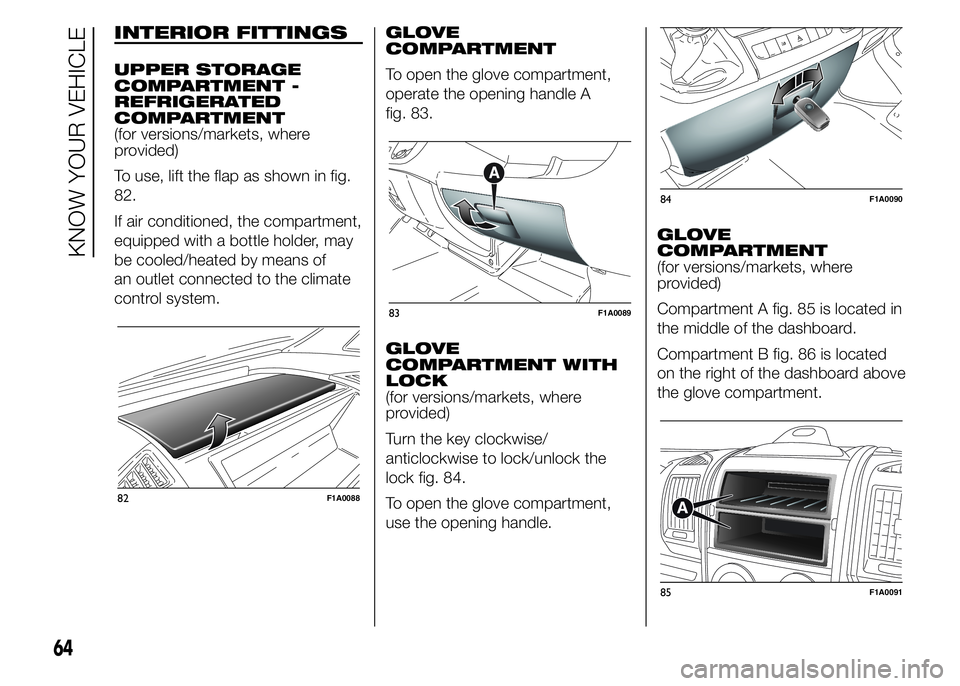
To use, lift the flap as shown in fig.
82.
If air conditioned, the compartment,
equipped with a bottle holder, may
be cooled/heated by means of
an outlet connected to the climate
control system.GLOVE
COMPARTMENT
To open the glove compartment,
operate the opening handle A
fig. 83.
GLOVE
COMPARTMENT WITH
LOCK
(for versions/markets, where
provided)
Turn the key clockwise/
anticlockwise to lock/unlock the
lock fig. 84.
To open the glove compartment,
use the opening handle.GLOVE
COMPARTMENT
(for versions/markets, where
provided)
Compartment A fig. 85 is located in
the middle of the dashboard.
Compartment B fig. 86 is located
on the right of the dashboard above
the glove compartment.
82F1A0088
83F1A0089
84F1A0090
85F1A0091
64
KNOW YOUR VEHICLE
Page 108 of 367
Engine restarting
mode
WITH MANUAL GEARBOX
Depress the clutch pedal to restart
the engine.
MANUAL ACTIVATION
AND DEACTIVATION
OF THE SYSTEM
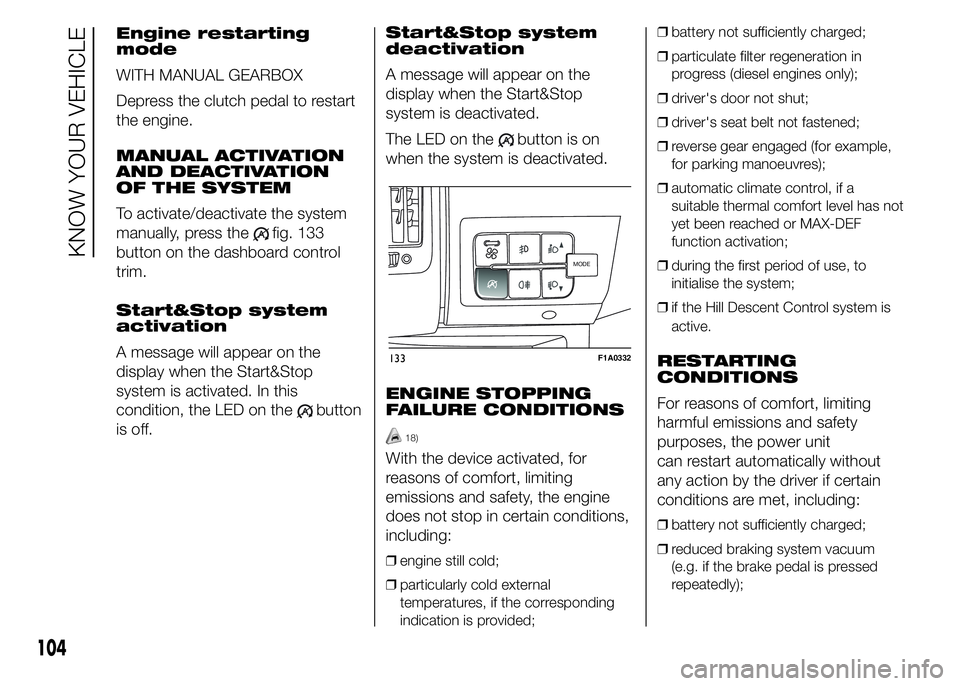
To activate/deactivate the system
manually, press the
fig. 133
button on the dashboard control
trim.
Start&Stop system
activation
A message will appear on the
display when the Start&Stop
system is activated. In this
condition, the LED on the
button
is off.Start&Stop system
deactivation
A message will appear on the
display when the Start&Stop
system is deactivated.
The LED on the
button is on
when the system is deactivated.
ENGINE STOPPING
FAILURE CONDITIONS
18)
With the device activated, for
reasons of comfort, limiting
emissions and safety, the engine
does not stop in certain conditions,
including:
❒engine still cold;
❒particularly cold external
temperatures, if the corresponding
indication is provided;❒battery not sufficiently charged;
❒particulate filter regeneration in
progress (diesel engines only);
❒driver's door not shut;
❒driver's seat belt not fastened;
❒reverse gear engaged (for example,
for parking manoeuvres);
❒automatic climate control, if a
suitable thermal comfort level has not
yet been reached or MAX-DEF
function activation;
❒during the first period of use, to
initialise the system;
❒if the Hill Descent Control system is
active.
RESTARTING
CONDITIONS
For reasons of comfort, limiting
harmful emissions and safety
purposes, the power unit
can restart automatically without
any action by the driver if certain
conditions are met, including:
❒battery not sufficiently charged;
❒reduced braking system vacuum
(e.g. if the brake pedal is pressed
repeatedly);
MODEMODE
133F1A0332
104
KNOW YOUR VEHICLE
Page 109 of 367
❒vehicle in motion (e.g. when driving
on roads with a gradient);
❒stopping the engine through the
Start&Stop system for more than
about three minutes.
❒automatic climate control system for
adjusting the thermal comfort level or
to enable MAX-DEF function.
With a gear engaged, the engine
can be automatically restarted only
by fully depressing the clutch pedal.
NoteIf the engine stops and this is
not desired, due for example to the
clutch pedal being released sharply
with a gear engaged, if the Start&Stop
system is active, the engine can be
restarted by fully depressing the clutch
pedal or by placing the gear lever in
neutral.
NoteIf the clutch is not pressed, when
approx. three minutes have elapsed
since the engine was stopped, the
engine can only be restarted using the
key.
SAFETY FUNCTIONS
In engine cut-out conditions
through the Start&Stop system, if
the driver unfastens his/her seat
belt and opens the driver's door or
the passenger door, the engine
can be restarted only by using the
key. The driver is notified of this
condition by a buzzer, through the
warning light flashing in the
instrument panel and, where
provided, by a message in the
display.
"ENERGY SAVING"
FUNCTION
(for versions/markets, where
provided)
If, after the engine has been
automatically restarted, the driver
does not take any action for a
period of about 3 minutes,
the Start&Stop system will
definitively stop the engine to avoid
fuel consumption. The engine
can only be started using the key in
such cases.
NoteIn any case, it is possible to keep
the engine running by deactivating
the Start&Stop system.
IRREGULAR
OPERATION
In the event of malfunction, the
Start&Stop system is deactivated.
The driver is informed about the
fault through the switching on of the
icon together with a message
on the display. In this case, contact
a Fiat Dealership.
VEHICLE INACTIVITY
In the event of vehicle inactivity,
special attention must be paid to
the disconnection of the battery
power supply. Proceed as follows:
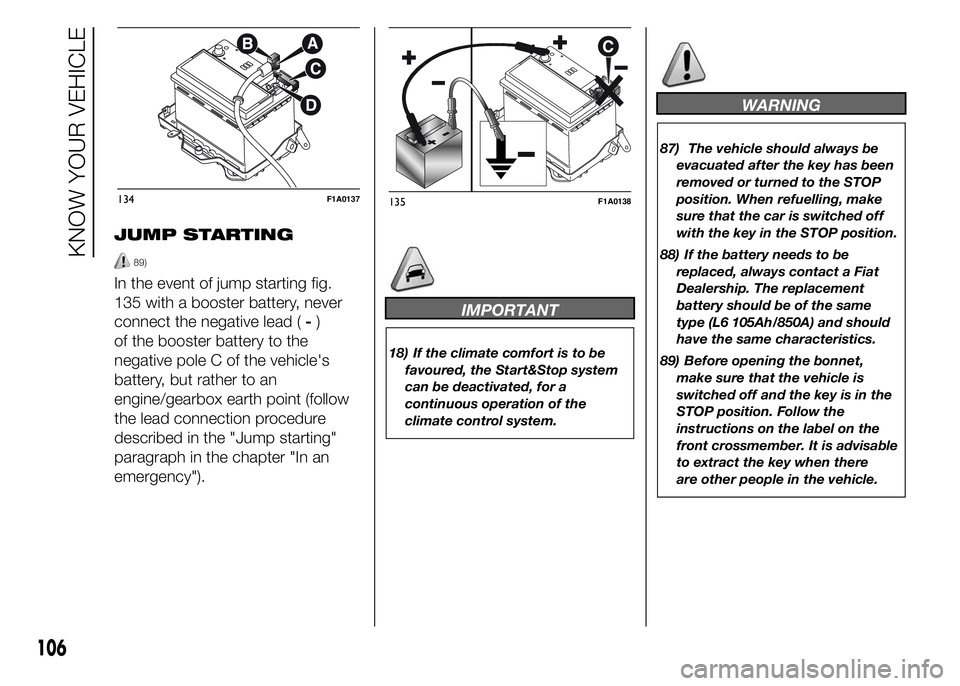
detach connector A fig. 134 (by
pressing button B) from sensor C
for monitoring the status of the
battery installed on the negative
battery pole D. This sensor should
never be disconnected from the
pole except if the battery is
replaced.
87) 88)
IMPORTANT After turning the
ignition key to STOP, wait at least 1
minute before disconnecting the
electrical supply to the battery.
105
Page 110 of 367
JUMP STARTING
89)
In the event of jump starting fig.
135 with a booster battery, never
connect the negative lead (-)
of the booster battery to the
negative pole C of the vehicle's
battery, but rather to an
engine/gearbox earth point (follow
the lead connection procedure
described in the "Jump starting"
paragraph in the chapter "In an
emergency").
IMPORTANT
18) If the climate comfort is to be
favoured, the Start&Stop system
can be deactivated, for a
continuous operation of the
climate control system.
WARNING
87) The vehicle should always be
evacuated after the key has been
removed or turned to the STOP
position. When refuelling, make
sure that the car is switched off
with the key in the STOP position.
88) If the battery needs to be
replaced, always contact a Fiat
Dealership. The replacement
battery should be of the same
type (L6 105Ah/850A) and should
have the same characteristics.
89) Before opening the bonnet,
make sure that the vehicle is
switched off and the key is in the
STOP position. Follow the
instructions on the label on the
front crossmember. It is advisable
to extract the key when there
are other people in the vehicle.
134F1A0137135F1A0138
106
KNOW YOUR VEHICLE
Page 122 of 367
SPEEDOMETER
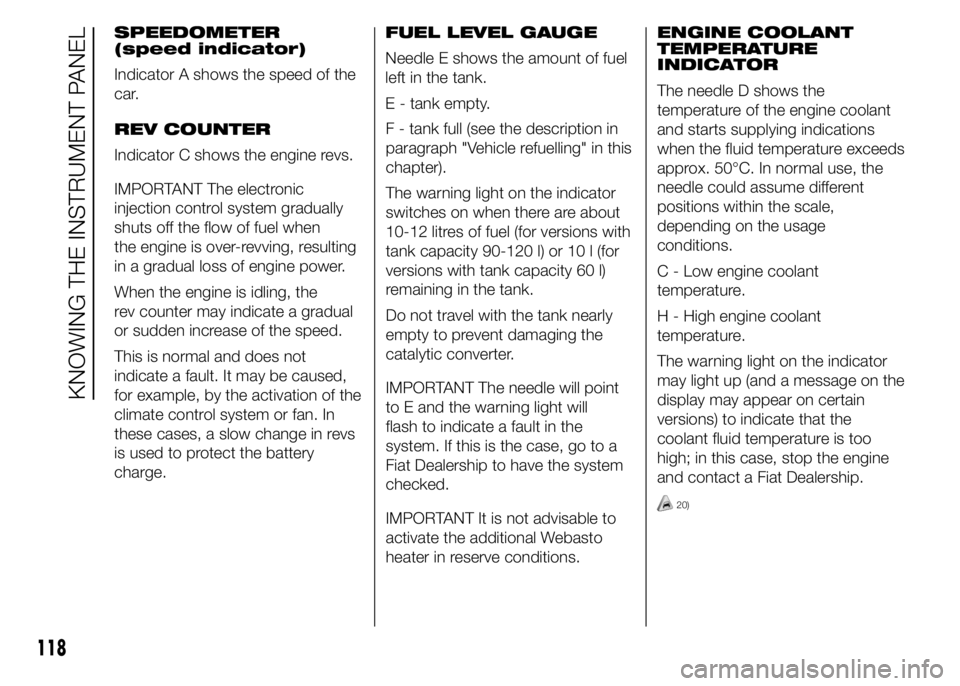
(speed indicator)
Indicator A shows the speed of the
car.
REV COUNTER
Indicator C shows the engine revs.
IMPORTANT The electronic
injection control system gradually
shuts off the flow of fuel when
the engine is over-revving, resulting
in a gradual loss of engine power.
When the engine is idling, the
rev counter may indicate a gradual
or sudden increase of the speed.
This is normal and does not
indicate a fault. It may be caused,
for example, by the activation of the
climate control system or fan. In
these cases, a slow change in revs
is used to protect the battery
charge.FUEL LEVEL GAUGE
Needle E shows the amount of fuel
left in the tank.
E - tank empty.
F - tank full (see the description in
paragraph "Vehicle refuelling" in this
chapter).
The warning light on the indicator
switches on when there are about
10-12 litres of fuel (for versions with
tank capacity 90-120 l) or 10 l (for
versions with tank capacity 60 l)
remaining in the tank.
Do not travel with the tank nearly
empty to prevent damaging the
catalytic converter.
IMPORTANT The needle will point
to E and the warning light will
flash to indicate a fault in the
system. If this is the case, go to a
Fiat Dealership to have the system
checked.
IMPORTANT It is not advisable to
activate the additional Webasto
heater in reserve conditions.ENGINE COOLANT
TEMPERATURE
INDICATOR
The needle D shows the
temperature of the engine coolant
and starts supplying indications
when the fluid temperature exceeds
approx. 50°C. In normal use, the
needle could assume different
positions within the scale,
depending on the usage
conditions.
C - Low engine coolant
temperature.
H - High engine coolant
temperature.
The warning light on the indicator
may light up (and a message on the
display may appear on certain
versions) to indicate that the
coolant fluid temperature is too
high; in this case, stop the engine
and contact a Fiat Dealership.
20)
118
KNOWING THE INSTRUMENT PANEL
Page 127 of 367
Lighting
(Passenger compartment light
adjustment)
(only with side lights on)
This function is used to set the
brightness of the instrument panel,
uconnect™system controls (for
versions/markets where provided)
and automatic climate control
system controls (for versions/
markets where provided) to
8 levels.
Proceed as follows to adjust the
light intensity:
❒briefly press the MODE button. The
level set previously flashes on the
display;
❒press button
orto set
the required brightness level;
❒briefly press the MODE button to
return to the menu screen or hold the
button down to return to the
standard screen without storing.
NoteOn versions with reconfigurable
multifunction display adjustment can be
made both with lights off ("daytime"
mode brightness level) and with lights
on ("nighttime" mode brightness level).
Headlight alignment
(Headlight alignment
corrector position
adjustment)
(for versions/markets, where
provided)
This function permits the
adjustment (to 4 levels) of the
headlight alignment corrector
position.
To carry out the adjustment,
proceed as follows:
❒briefly press the MODE button. The
level set previously flashes on the
display;
❒press button
orto adjust
the position;
❒briefly press the MODE button to
return to the menu screen or hold the
button down to return to the
standard screen without storing.
Speed limit (Speed
Beep)
This function makes it possible to
set the vehicle speed limit (km/h or
mph). When this limit is exceeded
the driver is immediately alerted
(see “Warning lights and messages”
section).To set the desired speed limit,
proceed as follows:
- briefly press the MODE button:
the display will show the wording
(Speed Beep);
press button
orto select
speed limit activation (On) or
deactivation (Off);
- if the function has been activated
(On), press the
orbutton
to select the desired speed limit
and then press MODE to confirm.
NoteSetting is possible between
30 and 200 km/h, or 20 and 125 mph,
according to the previously set unit.
See the "Setting the unit of
measurement (Measurement unit)"
paragraph described below. The setting
will increase/decrease by 5 units each
time button
/is pressed.
Hold down the
/button to
automatically increase/decrease the
setting rapidly. Complete the
adjustment with single presses of the
button when you approach the desired
value.
- press the MODE button briefly to
return to the menu screen or hold
the button down to return to the
standard screen without storing.
123
Page 189 of 367
SAVING FUEL
Some useful tips are given below
for fuel saving and reducing harmful
emissions of CO2 and other
pollutants (nitrogen oxides, unburnt
hydrocarbons, Particulate Matter
(PM), etc.).
GENERAL
CONSIDERATIONS
The general factors that affect fuel
consumption are listed below.
Vehicle maintenance
Have checks and adjustments
carried out in accordance with the
“Scheduled Servicing Plan”.
Tyres
Check the tyre pressures at least
once every four weeks: if the
pressure is too low, consumption
levels increase as resistance to
rolling is higher.Unnecessary loads
Do not travel with an overloaded
luggage compartment. The weight
of the vehicle (especially when
driving in town) and its geometry
greatly affect fuel consumption and
stability.
Roof rack/ski rack
Remove the roof rack or the ski
rack from the roof after use. These
accessories decrease aerodynamic
penetration of the vehicle and
have a negative effect on fuel
consumption. When transporting
particularly large objects, use a
trailer if possible.
Electric devices
Use electrical devices only for the
amount of time needed. The heated
rear window, additional headlights,
windscreen/rear window wipers
and heater fan need a considerable
amount of energy, therefore
increasing fuel consumption (by up
to 25% in the urban cycle).Climate control
system
Air conditioning leads to higher fuel
consumption (on average up to
+20%). If the temperature outside
permits, try and use the ventilation
only.
Devices for
aerodynamic control
The use of non-certified spoilers
may adversely affect air drag and
fuel consumption.
DRIVING STYLE
The main driving styles that affect
fuel consumption are listed below.
Cranking
Do not warm up the engine at low
or high revs when the vehicle is
stationary; this causes the engine
to warm up more slowly, thereby
increasing fuel consumption and
emissions. It is therefore advisable
to move off immediately, slowly,
avoiding high speeds: in this way
the engine will warm up more
quickly.
185