fuse FIAT DUCATO BASE CAMPER 2015 Owner handbook (in English)
[x] Cancel search | Manufacturer: FIAT, Model Year: 2015, Model line: DUCATO BASE CAMPER, Model: FIAT DUCATO BASE CAMPER 2015Pages: 367, PDF Size: 19.73 MB
Page 212 of 367
IMPORTANT
2) Replace the bottle containing the
sealant after the expiry date.
Dispose of the bottle and
the sealant properly. Have the
sealing fluid and the bottle
disposed of in compliance with
national and local regulations.
CHANGING A BULB
GENERAL
INSTRUCTIONS
45)
163) 164)
❒When a light is not working, check
that the corresponding fuse is intact
before changing a bulb. For the
location of fuses, refer to the
paragraph "Replacing fuses" in this
chapter.
❒before changing a bulb check the
contacts for oxidation;
❒burnt bulbs must be replaced by
others of the same type and power;
❒always check the headlight beam
direction after changing a bulb;
IMPORTANT A slight misting may
appear on the internal surface
of the headlight: this does
not indicate a fault and is caused
by low temperature and the degree
of humidity in the air. Misting will
rapidly disappear when the
headlights are switched on. The
presence of drops inside the
headlights indicates infiltration of
water. Contact a Fiat Dealership.
IMPORTANT
45) Halogen bulbs must be handled
by holding the metallic part only.
Touching the transparent part
of the bulb with your fingers may
reduce the intensity of the
emitted light and even reduce the
lifespan of the bulb. In the event
of accidental contact, wipe the
bulb with a cloth moistened with
alcohol and let the bulb dry.
WARNING
163) Modifications or repairs to the
electric system that are not
carried out properly or do not take
the system technical
specifications into account can
cause malfunctions leading to the
risk of fire.
164) Halogen bulbs contain
pressurised gas; in the case of
breakage they may burst.
208
IN AN EMERGENCY
Page 221 of 367
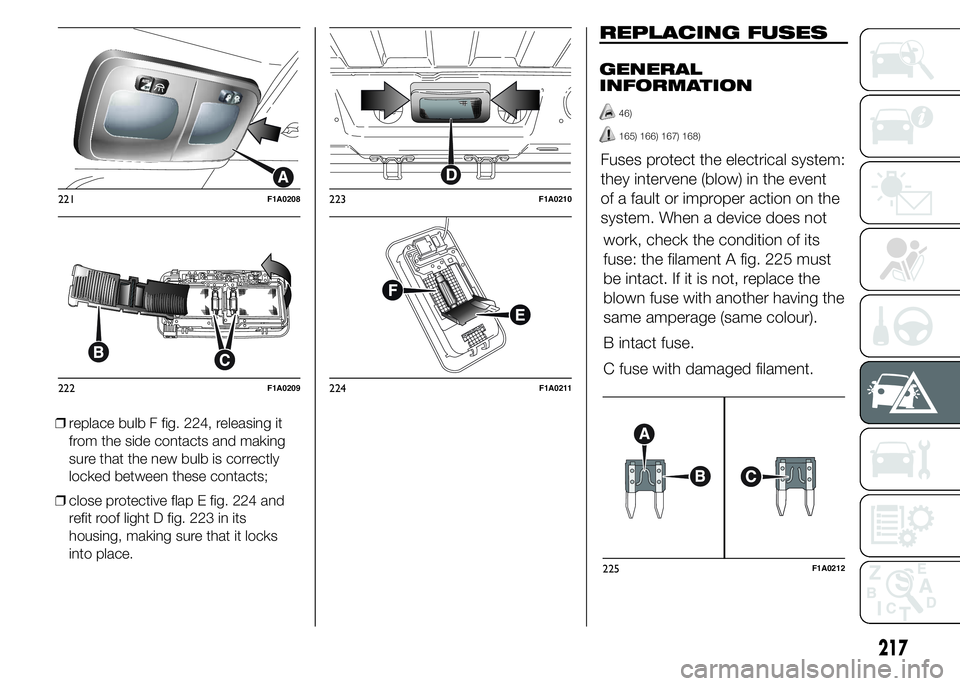
❒replace bulb F fig. 224, releasing it
from the side contacts and making
sure that the new bulb is correctly
locked between these contacts;
❒close protective flap E fig. 224 and
refit roof light D fig. 223 in its
housing, making sure that it locks
into place.
REPLACING FUSES
GENERAL
INFORMATION
46)
165) 166) 167) 168)
Fuses protect the electrical system:
they intervene (blow) in the event
of a fault or improper action on the
system. When a device does not
work, check the condition of its
fuse: the filament A fig. 225 must
be intact. If it is not, replace the
blown fuse with another having the
same amperage (same colour).
B intact fuse.
C fuse with damaged filament.
221F1A0208
222F1A0209
223F1A0210
224F1A0211
225F1A0212
217
Page 222 of 367
Fuse box on the
dashboard
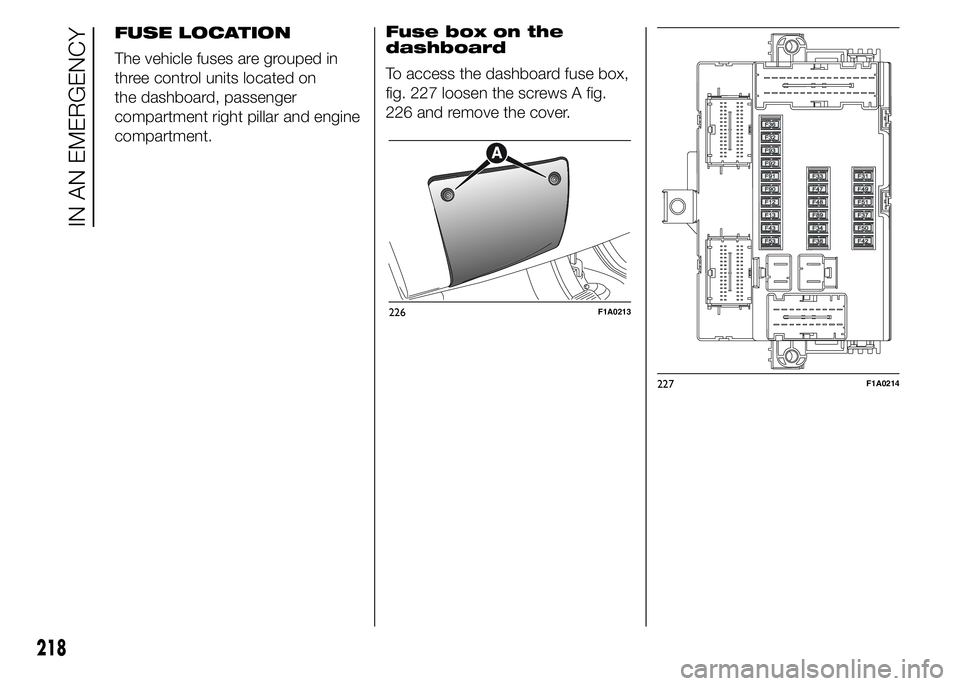
To access the dashboard fuse box,
fig. 227 loosen the screws A fig.
226 and remove the cover.
226F1A0213
227F1A0214
218
IN AN EMERGENCY
FUSE LOCATION
The vehicle fuses are grouped in
three control units located on
the dashboard, passenger
compartment right pillar and engine
compartment.
Page 223 of 367
Engine compartment
fuse box
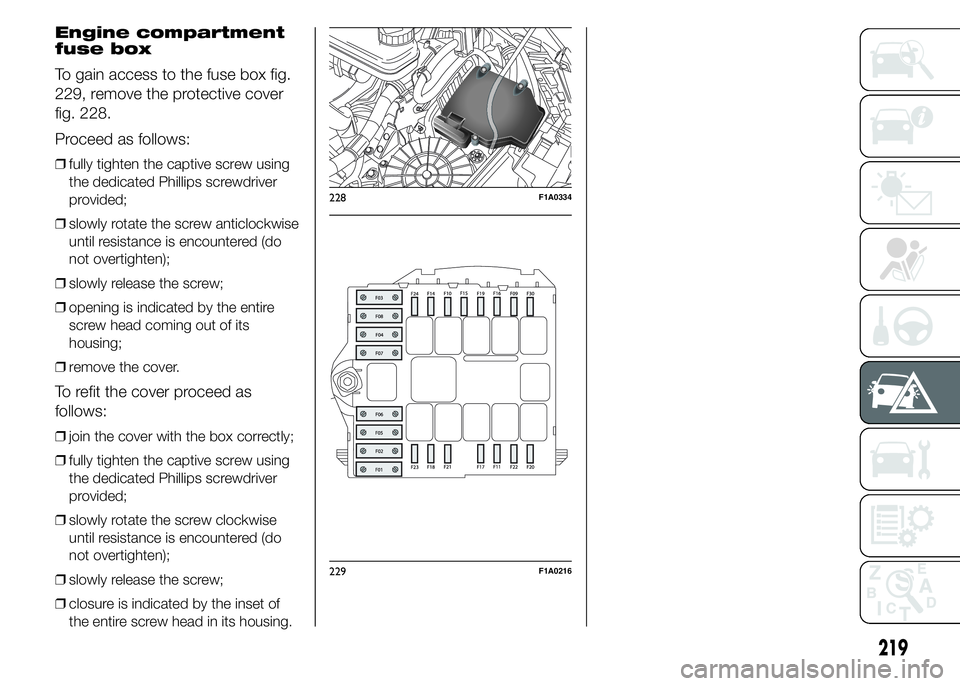
To gain access to the fuse box fig.
229, remove the protective cover
fig. 228.
Proceed as follows:
❒fully tighten the captive screw using
the dedicated Phillips screwdriver
provided;
❒slowly rotate the screw anticlockwise
until resistance is encountered (do
not overtighten);
❒slowly release the screw;
❒opening is indicated by the entire
screw head coming out of its
housing;
❒remove the cover.
To refit the cover proceed as
follows:
❒join the cover with the box correctly;
❒fully tighten the captive screw using
the dedicated Phillips screwdriver
provided;
❒slowly rotate the screw clockwise
until resistance is encountered (do
not overtighten);
❒slowly release the screw;
❒closure is indicated by the inset of
the entire screw head in its housing.
228F1A0334
229F1A0216
219
Page 224 of 367
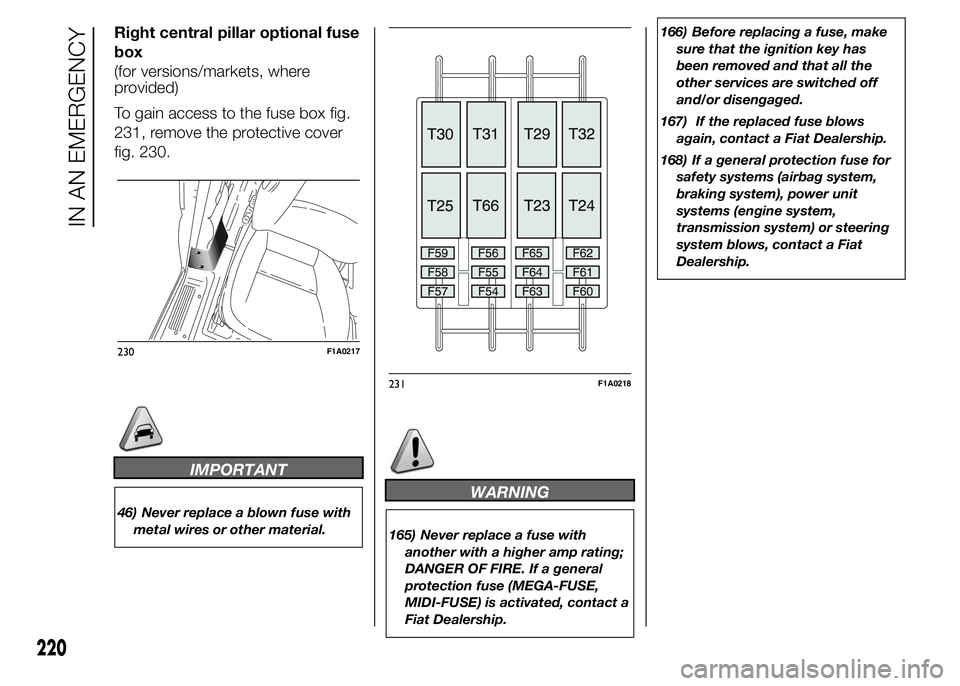
Right central pillar optional fuse
box
(for versions/markets, where
provided)
To gain access to the fuse box fig.
231, remove the protective cover
fig. 230.
IMPORTANT
46) Never replace a blown fuse with
metal wires or other material.
WARNING
165) Never replace a fuse with
another with a higher amp rating;
DANGER OF FIRE. If a general
protection fuse (MEGA-FUSE,
MIDI-FUSE) is activated, contact a
Fiat Dealership.166) Before replacing a fuse, make
sure that the ignition key has
been removed and that all the
other services are switched off
and/or disengaged.
167) If the replaced fuse blows
again, contact a Fiat Dealership.
168) If a general protection fuse for
safety systems (airbag system,
braking system), power unit
systems (engine system,
transmission system) or steering
system blows, contact a Fiat
Dealership.
230F1A0217
231F1A0218
220
IN AN EMERGENCY
Page 225 of 367
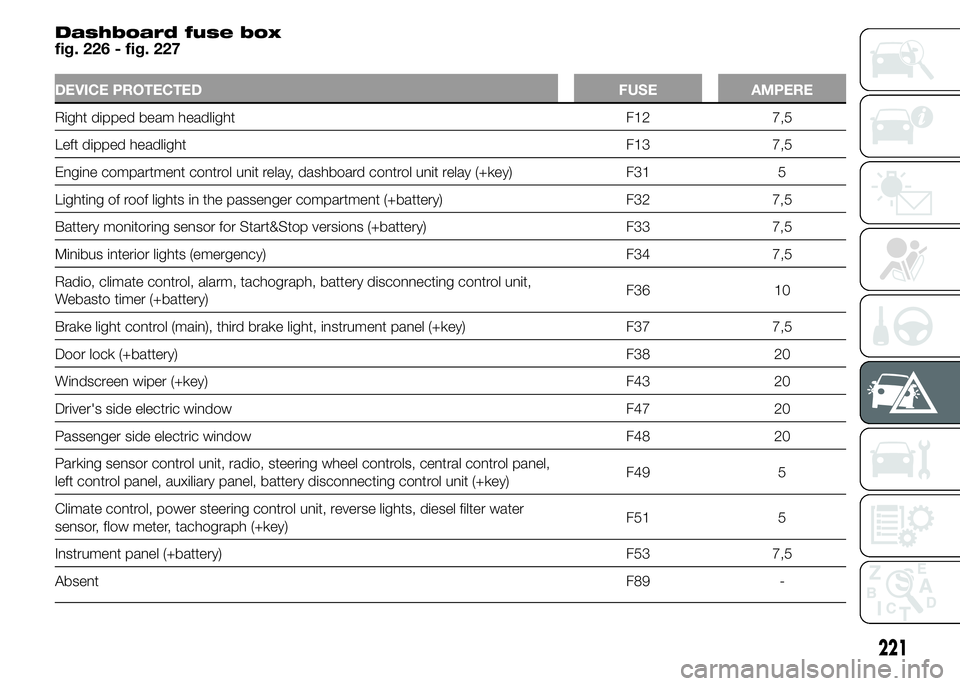
Dashboard fuse box
fig. 226 - fig. 227
DEVICE PROTECTED FUSE AMPERE
Right dipped beam headlight F12 7,5
Left dipped headlight F13 7,5
Engine compartment control unit relay, dashboard control unit relay (+key) F31 5
Lighting of roof lights in the passenger compartment (+battery) F32 7,5
Battery monitoring sensor for Start&Stop versions (+battery) F33 7,5
Minibus interior lights (emergency) F34 7,5
Radio, climate control, alarm, tachograph, battery disconnecting control unit,
Webasto timer (+battery)F36 10
Brake light control (main), third brake light, instrument panel (+key) F37 7,5
Door lock (+battery) F38 20
Windscreen wiper (+key) F43 20
Driver's side electric window F47 20
Passenger side electric window F48 20
Parking sensor control unit, radio, steering wheel controls, central control panel,
left control panel, auxiliary panel, battery disconnecting control unit (+key)F49 5
Climate control, power steering control unit, reverse lights, diesel filter water
sensor, flow meter, tachograph (+key)F51 5
Instrument panel (+battery) F53 7,5
AbsentF89 -
221
Page 226 of 367
DEVICE PROTECTED FUSE AMPERE
Left main beam headlight F90 7,5
Right main beam headlight F91 7,5
Left fog lightF92 7,5
Right fog lightF93 7,5
222
IN AN EMERGENCY
Page 227 of 367
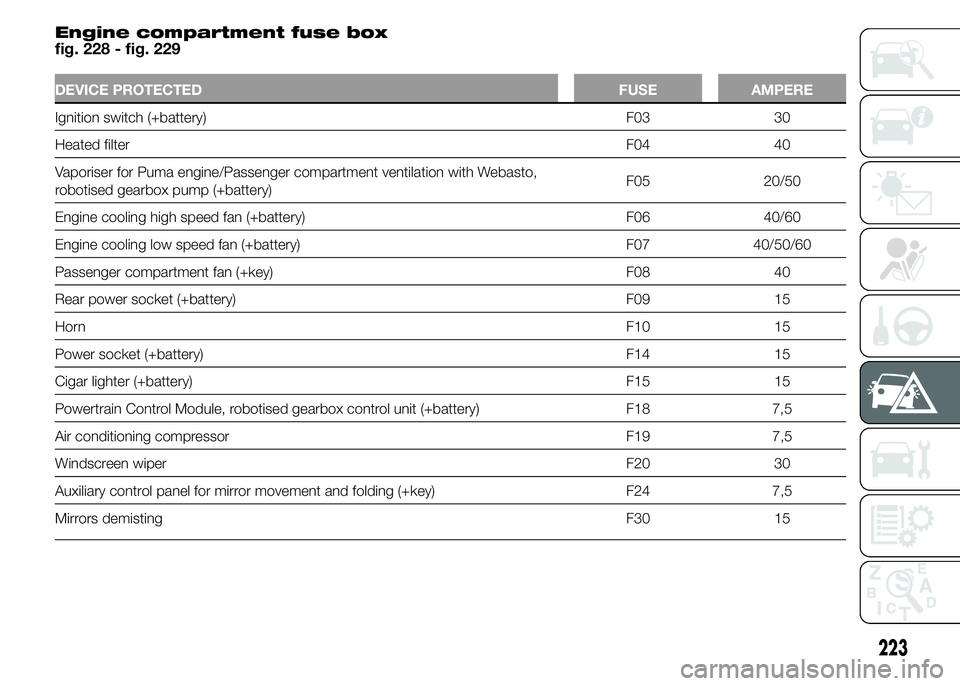
Engine compartment fuse box
fig. 228 - fig. 229
DEVICE PROTECTED FUSE AMPERE
Ignition switch (+battery) F03 30
Heated filterF04 40
Vaporiser for Puma engine/Passenger compartment ventilation with Webasto,
robotised gearbox pump (+battery)F05 20/50
Engine cooling high speed fan (+battery) F06 40/60
Engine cooling low speed fan (+battery) F07 40/50/60
Passenger compartment fan (+key) F08 40
Rear power socket (+battery) F09 15
HornF10 15
Power socket (+battery) F14 15
Cigar lighter (+battery) F15 15
Powertrain Control Module, robotised gearbox control unit (+battery) F18 7,5
Air conditioning compressor F19 7,5
Windscreen wiper F20 30
Auxiliary control panel for mirror movement and folding (+key) F24 7,5
Mirrors demisting F30 15
223
Page 228 of 367
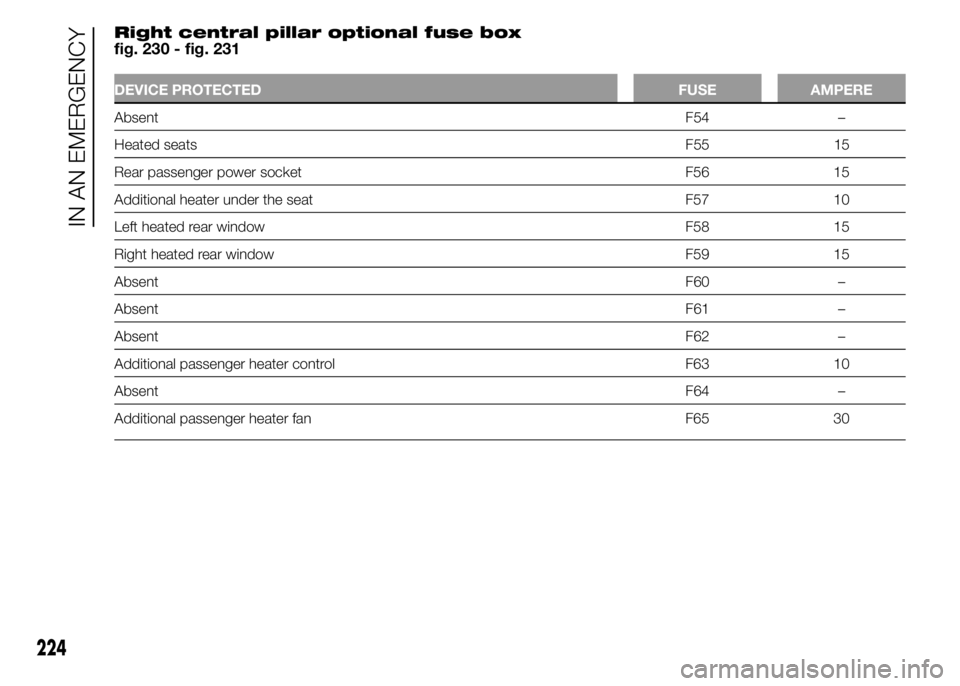
Right central pillar optional fuse box
fig. 230 - fig. 231
DEVICE PROTECTED FUSE AMPERE
AbsentF54 –
Heated seatsF55 15
Rear passenger power socket F56 15
Additional heater under the seat F57 10
Left heated rear window F58 15
Right heated rear window F59 15
AbsentF60 –
AbsentF61 –
AbsentF62 –
Additional passenger heater control F63 10
AbsentF64 –
Additional passenger heater fan F65 30
224
IN AN EMERGENCY
Page 253 of 367
If you put the car through a car
wash, follow these
recommendations:
❒remove the aerial from the roof so it
does not get damaged;
❒the vehicle should be washed with
water added to a soapy solution;
❒rinse thoroughly to avoid soap marks
remaining on the bodywork or less
visible parts.
55)
Dry the less visible parts, such as
the door frames, bonnet and the
headlight frames with special care,
as in these areas water may
stagnate more easily. It is a good
idea to leave the vehicle outdoors
for a while after washing it to give
the water time to evaporate.
Do not wash the vehicle after it has
been left in the sun or with the
bonnet hot: this may alter the shine
of the paintwork.Exterior plastic parts should be
cleaned in the same way as the rest
of the vehicle. Where possible, do
not park the vehicle under trees;
the resinous substances released
by many species give the paint
a dull appearance and increase the
possibility of corrosion.
IMPORTANT Bird droppings must
be washed off immediately and
thoroughly as the acid they contain
is particularly aggressive.5)
Windows
To clean glasses, use specific
cleaning products. Use clean cloths
to avoid scratching the glass or
damaging the transparency.
IMPORTANT Wipe the rear window
inside gently with a cloth following
the direction of the filaments to
avoid damaging the heating device.Engine compartment
At the end of each winter,
thoroughly wash the engine
compartment, taking care to avoid
spraying the water jet directly
onto the electronic control units and
the relay/fuse box on the left side
of the engine compartment (driving
direction). Have this operation
performed at a specialised
workshop.
IMPORTANT The washing should
take place with the engine cold and
the ignition key in the STOP
position. After the washing
operation, make sure that the
various protections (e.g. rubber
caps and guards) have not been
removed or damaged.
Front headlights
IMPORTANT Never use aromatic
substances (e.g. petrol) or ketones
(e.g. acetone) for cleaning the
plastic lenses of the front
headlights.
249