headlights FIAT DUCATO BASE CAMPER 2015 Owner handbook (in English)
[x] Cancel search | Manufacturer: FIAT, Model Year: 2015, Model line: DUCATO BASE CAMPER, Model: FIAT DUCATO BASE CAMPER 2015Pages: 367, PDF Size: 19.73 MB
Page 124 of 367
DISPLAY
(for versions/markets, where
provided)
The vehicle may be equipped with
a multifunction display or with a
reconfigurable multifunction display,
able to display information that is
useful and necessary when driving.
MULTIFUNCTION
DISPLAY "STANDARD"
SCREEN
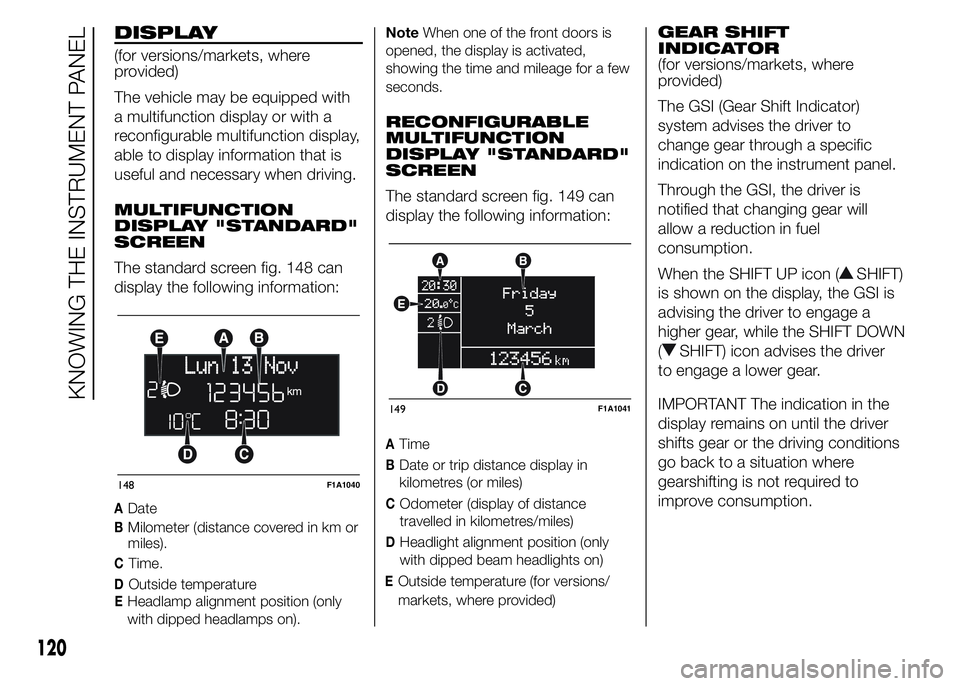
The standard screen fig. 148 can
display the following information:
ADate
BMilometer (distance covered in km or
miles).
CTime.
DOutside temperature
EHeadlamp alignment position (only
with dipped headlamps on).NoteWhen one of the front doors is
opened, the display is activated,
showing the time and mileage for a few
seconds.
RECONFIGURABLE
MULTIFUNCTION
DISPLAY "STANDARD"
SCREEN
The standard screen fig. 149 can
display the following information:
ATime
BDate or trip distance display in
kilometres (or miles)
COdometer (display of distance
travelled in kilometres/miles)
DHeadlight alignment position (only
with dipped beam headlights on)
EOutside temperature (for versions/
markets, where provided)
GEAR SHIFT
INDICATOR
(for versions/markets, where
provided)
The GSI (Gear Shift Indicator)
system advises the driver to
change gear through a specific
indication on the instrument panel.
Through the GSI, the driver is
notified that changing gear will
allow a reduction in fuel
consumption.
When the SHIFT UP icon (
SHIFT)
is shown on the display, the GSI is
advising the driver to engage a
higher gear, while the SHIFT DOWN
(
SHIFT) icon advises the driver
to engage a lower gear.
IMPORTANT The indication in the
display remains on until the driver
shifts gear or the driving conditions
go back to a situation where
gearshifting is not required to
improve consumption.
148F1A1040
149F1A1041
120
KNOWING THE INSTRUMENT PANEL
Page 125 of 367
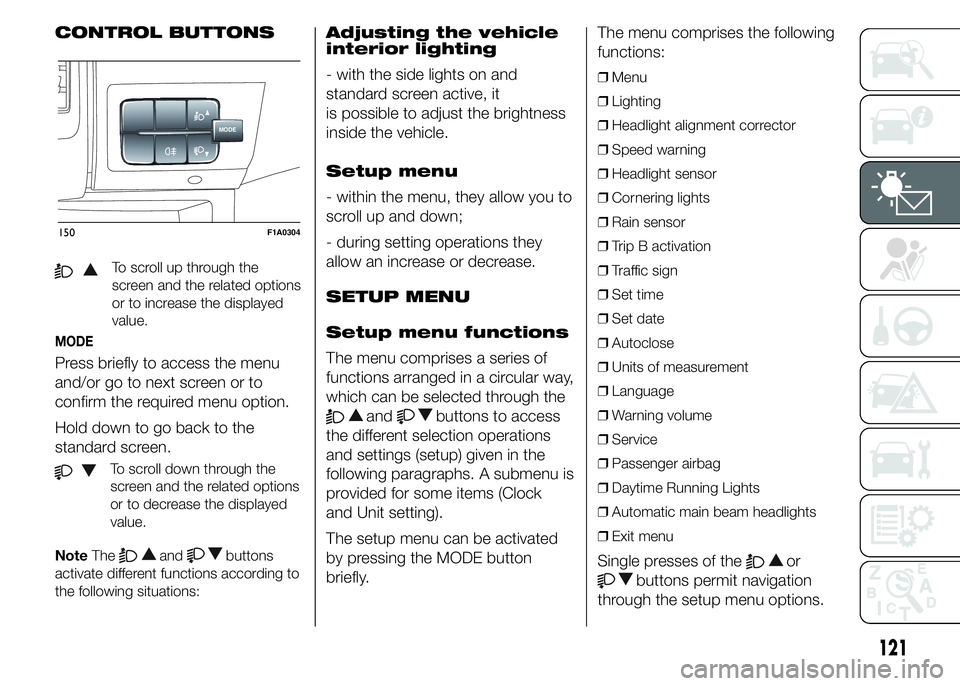
CONTROL BUTTONS
To scroll up through the
screen and the related options
or to increase the displayed
value.
MODE
Press briefly to access the menu
and/or go to next screen or to
confirm the required menu option.
Hold down to go back to the
standard screen.
To scroll down through the
screen and the related options
or to decrease the displayed
value.
NoteThe
andbuttons
activate different functions according to
the following situations:
Adjusting the vehicle
interior lighting
- with the side lights on and
standard screen active, it
is possible to adjust the brightness
inside the vehicle.
Setup menu
- within the menu, they allow you to
scroll up and down;
- during setting operations they
allow an increase or decrease.
SETUP MENU
Setup menu functions
The menu comprises a series of
functions arranged in a circular way,
which can be selected through the
andbuttons to access
the different selection operations
and settings (setup) given in the
following paragraphs. A submenu is
provided for some items (Clock
and Unit setting).
The setup menu can be activated
by pressing the MODE button
briefly.The menu comprises the following
functions:
❒Menu
❒Lighting
❒Headlight alignment corrector
❒Speed warning
❒Headlight sensor
❒Cornering lights
❒Rain sensor
❒Trip B activation
❒Traffic sign
❒Set time
❒Set date
❒Autoclose
❒Units of measurement
❒Language
❒Warning volume
❒Service
❒Passenger airbag
❒Daytime Running Lights
❒Automatic main beam headlights
❒Exit menu
Single presses of theor
buttons permit navigation
through the setup menu options.
MODE
150F1A0304
121
Page 133 of 367
❒briefly press the MODE button to
return to the submenu screen or hold
the button down to return to the
main menu screen without storing;
❒press the MODE button again to
return to the standard screen or
to the main menu according to the
menu items where you are in.
Automatic main beam
headlights
(for versions/markets, where
provided)
This function activates/deactivates
the automatic headlights.
Proceed as follows to activate or
deactivate this function:
❒briefly press the MODE button. The
display shows a submenu;
❒briefly press the MODE button. "On"
or "Off" flash on the display,
according to what has been
previously set;
❒press
orto make your
choice;
❒briefly press the MODE button to
return to the submenu screen or hold
the button down to return to the
main menu screen without storing;
❒press the MODE button again to
return to the standard screen or
to the main menu according to the
menu items where you are in.
Exit Menu
This is the last function that closes
the cycle of settings listed in the
menu screen.
Pressing the MODE button briefly
will return the display to the
standard screen without storing.
Press button
to return to the
first menu item (Speed Beep).
TRIP COMPUTER
IN BRIEF
The Trip computer is used to
display information on vehicle
operation when the ignition key is
turned to MAR-ON. This function
allows you to define two separate
trips, called "Trip A" and "Trip
B", for monitoring the "complete
mission" (journey) of the vehicle in
a reciprocally independent
manner. Both functions can be
reset (reset means start of a new
journey).
“Trip A” is used to display the
figures relating to:
❒Outside temperature
❒Range
❒Distance travelled A
❒Average consumption A
❒Instant fuel consumption
❒Average speed A
❒Trip time A (driving time).
❒Reset Trip A
129
Page 152 of 367
WARNING
98) Always drive at a speed appropriate to the traffic conditions, the weather and traffic regulations. The engine may be
stopped if the DPF light is on; however, repeated interruption of the regeneration process may result in premature
deterioration of the engine oil. For this reason, always wait until the warning light switches off before stopping the
engine as described above. It is not advisable to complete DPF regeneration with the vehicle stationary.
Warning lights on
panelWhat it means What to do
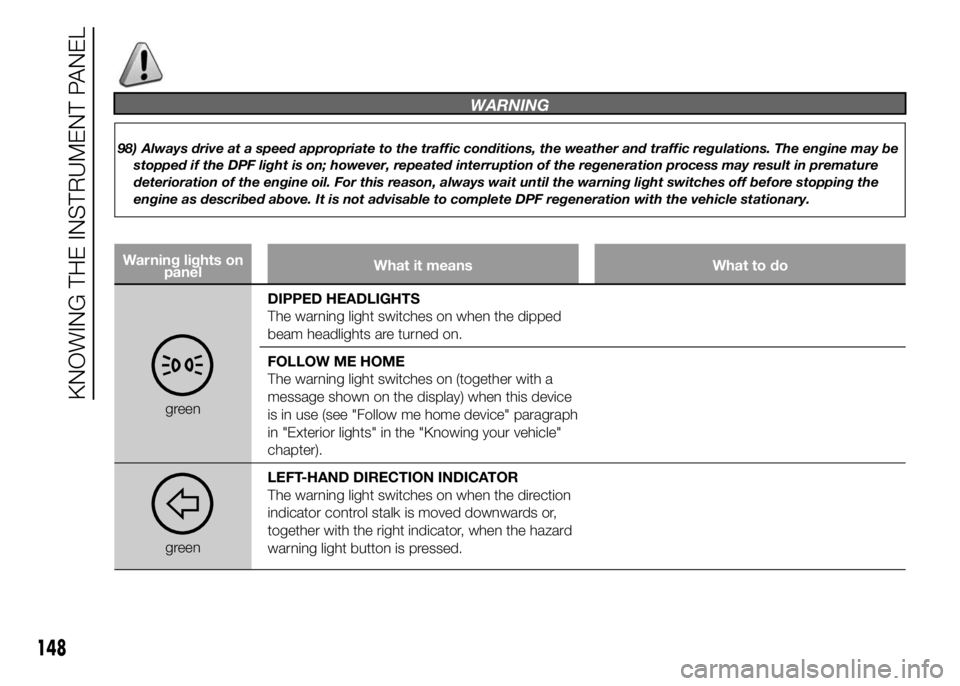
greenDIPPED HEADLIGHTS
The warning light switches on when the dipped
beam headlights are turned on.
FOLLOW ME HOME
The warning light switches on (together with a
message shown on the display) when this device
is in use (see "Follow me home device" paragraph
in "Exterior lights" in the "Knowing your vehicle"
chapter).
greenLEFT-HAND DIRECTION INDICATOR
The warning light switches on when the direction
indicator control stalk is moved downwards or,
together with the right indicator, when the hazard
warning light button is pressed.
148
KNOWING THE INSTRUMENT PANEL
Page 154 of 367
Warning lights on
panelWhat it means What to do
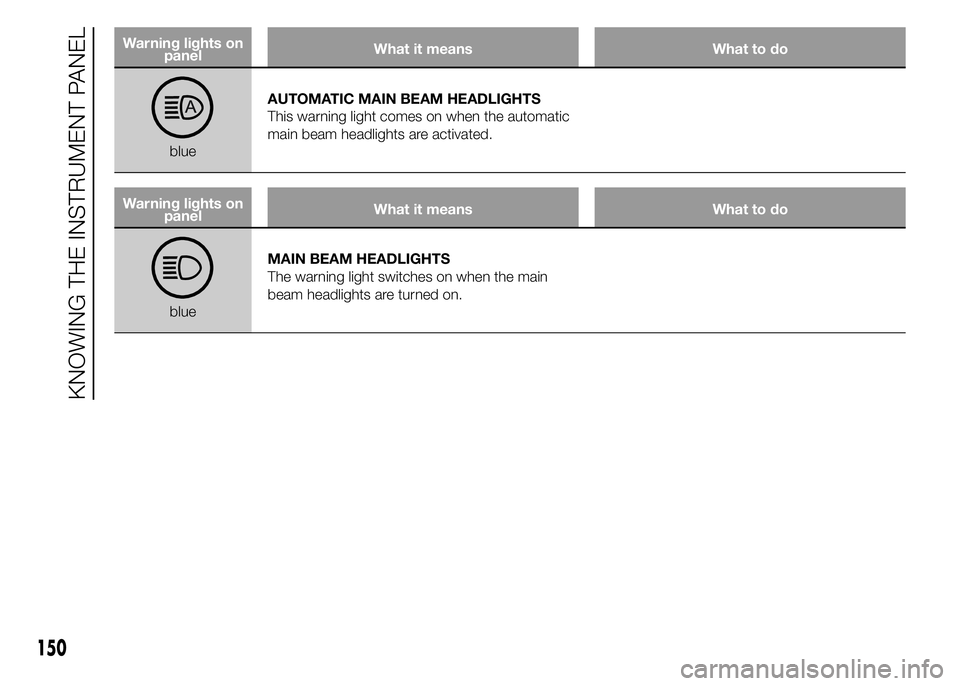
blueAUTOMATIC MAIN BEAM HEADLIGHTS
This warning light comes on when the automatic
main beam headlights are activated.
Warning lights on
panelWhat it means What to do
blueMAIN BEAM HEADLIGHTS
The warning light switches on when the main
beam headlights are turned on.
150
KNOWING THE INSTRUMENT PANEL
Page 156 of 367
What it means What to do
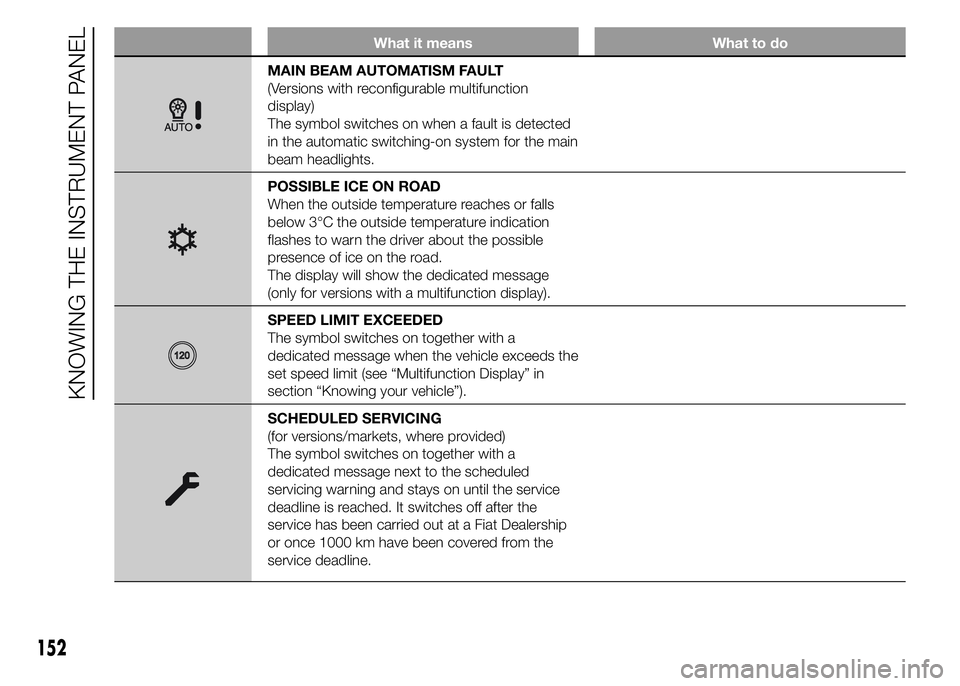
MAIN BEAM AUTOMATISM FAULT
(Versions with reconfigurable multifunction
display)
The symbol switches on when a fault is detected
in the automatic switching-on system for the main
beam headlights.
POSSIBLE ICE ON ROAD
When the outside temperature reaches or falls
below 3°C the outside temperature indication
flashes to warn the driver about the possible
presence of ice on the road.
The display will show the dedicated message
(only for versions with a multifunction display).
SPEED LIMIT EXCEEDED
The symbol switches on together with a
dedicated message when the vehicle exceeds the
set speed limit (see “Multifunction Display” in
section “Knowing your vehicle”).
SCHEDULED SERVICING
(for versions/markets, where provided)
The symbol switches on together with a
dedicated message next to the scheduled
servicing warning and stays on until the service
deadline is reached. It switches off after the
service has been carried out at a Fiat Dealership
or once 1000 km have been covered from the
service deadline.
152
KNOWING THE INSTRUMENT PANEL
Page 189 of 367
SAVING FUEL
Some useful tips are given below
for fuel saving and reducing harmful
emissions of CO2 and other
pollutants (nitrogen oxides, unburnt
hydrocarbons, Particulate Matter
(PM), etc.).
GENERAL
CONSIDERATIONS
The general factors that affect fuel
consumption are listed below.
Vehicle maintenance
Have checks and adjustments
carried out in accordance with the
“Scheduled Servicing Plan”.
Tyres
Check the tyre pressures at least
once every four weeks: if the
pressure is too low, consumption
levels increase as resistance to
rolling is higher.Unnecessary loads
Do not travel with an overloaded
luggage compartment. The weight
of the vehicle (especially when
driving in town) and its geometry
greatly affect fuel consumption and
stability.
Roof rack/ski rack
Remove the roof rack or the ski
rack from the roof after use. These
accessories decrease aerodynamic
penetration of the vehicle and
have a negative effect on fuel
consumption. When transporting
particularly large objects, use a
trailer if possible.
Electric devices
Use electrical devices only for the
amount of time needed. The heated
rear window, additional headlights,
windscreen/rear window wipers
and heater fan need a considerable
amount of energy, therefore
increasing fuel consumption (by up
to 25% in the urban cycle).Climate control
system
Air conditioning leads to higher fuel
consumption (on average up to
+20%). If the temperature outside
permits, try and use the ventilation
only.
Devices for
aerodynamic control
The use of non-certified spoilers
may adversely affect air drag and
fuel consumption.
DRIVING STYLE
The main driving styles that affect
fuel consumption are listed below.
Cranking
Do not warm up the engine at low
or high revs when the vehicle is
stationary; this causes the engine
to warm up more slowly, thereby
increasing fuel consumption and
emissions. It is therefore advisable
to move off immediately, slowly,
avoiding high speeds: in this way
the engine will warm up more
quickly.
185
Page 212 of 367
IMPORTANT
2) Replace the bottle containing the
sealant after the expiry date.
Dispose of the bottle and
the sealant properly. Have the
sealing fluid and the bottle
disposed of in compliance with
national and local regulations.
CHANGING A BULB
GENERAL
INSTRUCTIONS
45)
163) 164)
❒When a light is not working, check
that the corresponding fuse is intact
before changing a bulb. For the
location of fuses, refer to the
paragraph "Replacing fuses" in this
chapter.
❒before changing a bulb check the
contacts for oxidation;
❒burnt bulbs must be replaced by
others of the same type and power;
❒always check the headlight beam
direction after changing a bulb;
IMPORTANT A slight misting may
appear on the internal surface
of the headlight: this does
not indicate a fault and is caused
by low temperature and the degree
of humidity in the air. Misting will
rapidly disappear when the
headlights are switched on. The
presence of drops inside the
headlights indicates infiltration of
water. Contact a Fiat Dealership.
IMPORTANT
45) Halogen bulbs must be handled
by holding the metallic part only.
Touching the transparent part
of the bulb with your fingers may
reduce the intensity of the
emitted light and even reduce the
lifespan of the bulb. In the event
of accidental contact, wipe the
bulb with a cloth moistened with
alcohol and let the bulb dry.
WARNING
163) Modifications or repairs to the
electric system that are not
carried out properly or do not take
the system technical
specifications into account can
cause malfunctions leading to the
risk of fire.
164) Halogen bulbs contain
pressurised gas; in the case of
breakage they may burst.
208
IN AN EMERGENCY
Page 214 of 367
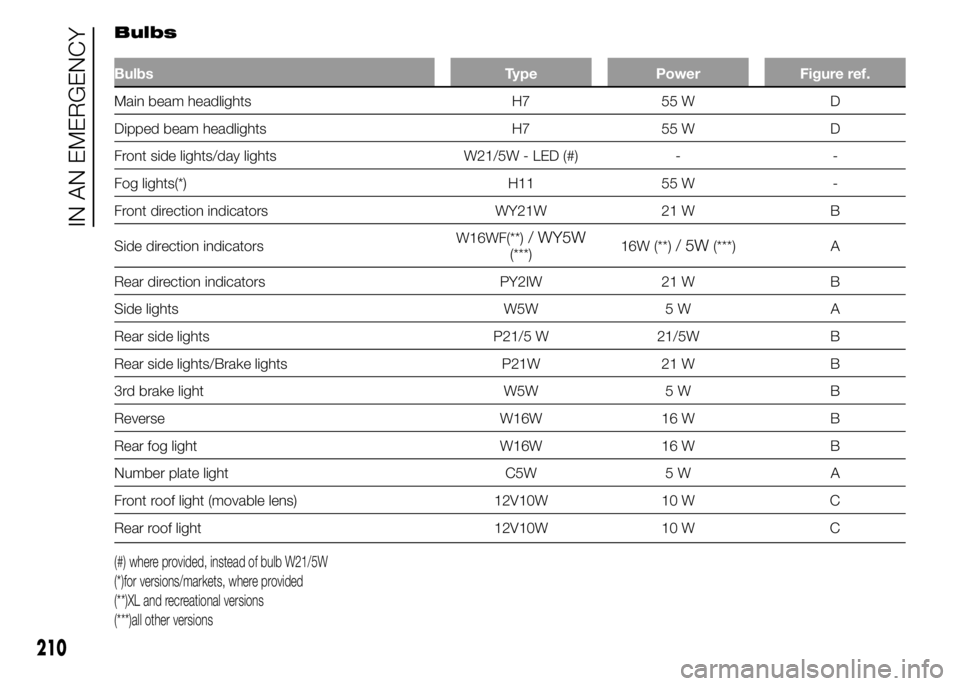
Bulbs
Bulbs Type Power Figure ref.
Main beam headlights H7 55 W D
Dipped beam headlights H7 55 W D
Front side lights/day lights W21/5W - LED (#) - -
Fog lights(*) H11 55 W -
Front direction indicators WY21W 21 W B
Side direction indicatorsW16WF(**)
/ WY5W(***)16W (**)/5W(***) A
Rear direction indicators PY2IW 21 W B
Side lights W5W 5 W A
Rear side lights P21/5 W 21/5W B
Rear side lights/Brake lights P21W 21 W B
3rd brake light W5W 5 W B
Reverse W16W 16 W B
Rear fog light W16W 16 W B
Number plate light C5W 5 W A
Front roof light (movable lens) 12V10W 10 W C
Rear roof light 12V10W 10 W C
(#) where provided, instead of bulb W21/5W
(*)for versions/markets, where provided
(**)XL and recreational versions
(***)all other versions
210
IN AN EMERGENCY
Page 215 of 367
REPLACING AN
EXTERIOR BULB
For the type of bulb and power
rating, see “Replacing a bulb”.
FRONT LIGHT
CLUSTERS
The front light clusters contain the
side lights and DRLs (where the
LED solution is not provided),
dipped beam, main beam and
direction indicator bulbs.
Bulbs must be replaced with the
headlight removed and placed on a
work surface.
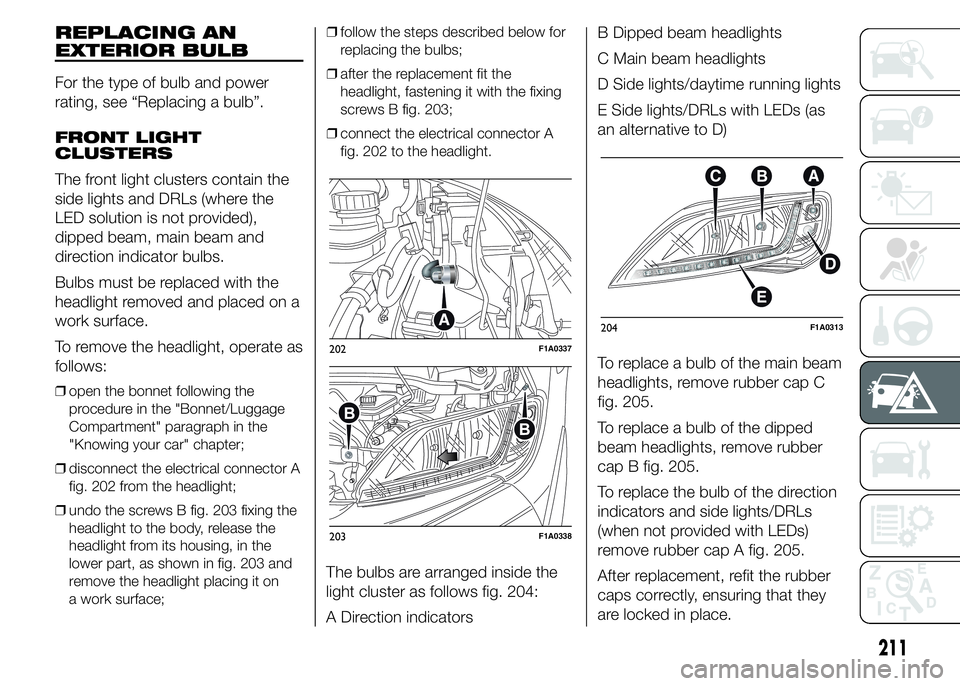
To remove the headlight, operate as
follows:
❒open the bonnet following the
procedure in the "Bonnet/Luggage
Compartment" paragraph in the
"Knowing your car" chapter;
❒disconnect the electrical connector A
fig. 202 from the headlight;
❒undo the screws B fig. 203 fixing the
headlight to the body, release the
headlight from its housing, in the
lower part, as shown in fig. 203 and
remove the headlight placing it on
a work surface;❒follow the steps described below for
replacing the bulbs;
❒after the replacement fit the
headlight, fastening it with the fixing
screws B fig. 203;
❒connect the electrical connector A
fig. 202 to the headlight.
The bulbs are arranged inside the
light cluster as follows fig. 204:
A Direction indicatorsB Dipped beam headlights
C Main beam headlights
D Side lights/daytime running lights
E Side lights/DRLs with LEDs (as
an alternative to D)
To replace a bulb of the main beam
headlights, remove rubber cap C
fig. 205.
To replace a bulb of the dipped
beam headlights, remove rubber
cap B fig. 205.
To replace the bulb of the direction
indicators and side lights/DRLs
(when not provided with LEDs)
remove rubber cap A fig. 205.
After replacement, refit the rubber
caps correctly, ensuring that they
are locked in place.
202F1A0337
203F1A0338
204F1A0313
211