light FIAT DUCATO BASE CAMPER 2015 Owner handbook (in English)
[x] Cancel search | Manufacturer: FIAT, Model Year: 2015, Model line: DUCATO BASE CAMPER, Model: FIAT DUCATO BASE CAMPER 2015Pages: 367, PDF Size: 19.73 MB
Page 31 of 367
IMPORTANT If the mirrors are
folded electrically, they should be
returned to the open position
electrically: do not try to return the
mirrors manually to driving position.
Manual folding
To fold the mirrors manually, move
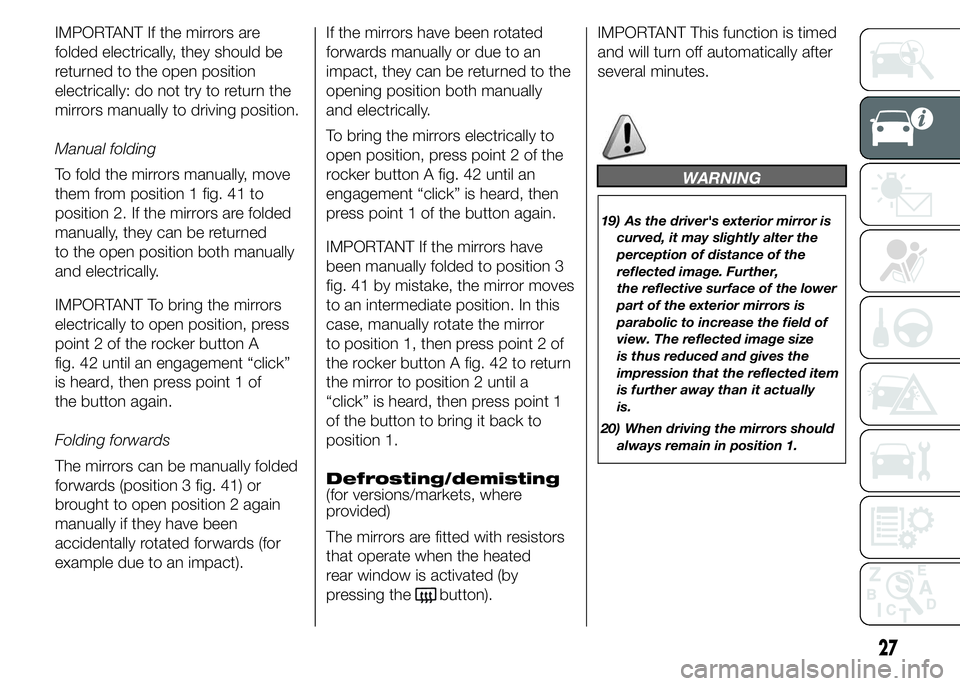
them from position 1 fig. 41 to
position 2. If the mirrors are folded
manually, they can be returned
to the open position both manually
and electrically.
IMPORTANT To bring the mirrors
electrically to open position, press
point 2 of the rocker button A
fig. 42 until an engagement “click”
is heard, then press point 1 of
the button again.
Folding forwards
The mirrors can be manually folded
forwards (position 3 fig. 41) or
brought to open position 2 again
manually if they have been
accidentally rotated forwards (for
example due to an impact).If the mirrors have been rotated
forwards manually or due to an
impact, they can be returned to the
opening position both manually
and electrically.
To bring the mirrors electrically to
open position, press point 2 of the
rocker button A fig. 42 until an
engagement “click” is heard, then
press point 1 of the button again.
IMPORTANT If the mirrors have
been manually folded to position 3
fig. 41 by mistake, the mirror moves
to an intermediate position. In this
case, manually rotate the mirror
to position 1, then press point 2 of
the rocker button A fig. 42 to return
the mirror to position 2 until a
“click” is heard, then press point 1
of the button to bring it back to
position 1.
Defrosting/demisting
(for versions/markets, where
provided)
The mirrors are fitted with resistors
that operate when the heated
rear window is activated (by
pressing the
button).IMPORTANT This function is timed
and will turn off automatically after
several minutes.
WARNING
19) As the driver's exterior mirror is
curved, it may slightly alter the
perception of distance of the
reflected image. Further,
the reflective surface of the lower
part of the exterior mirrors is
parabolic to increase the field of
view. The reflected image size
is thus reduced and gives the
impression that the reflected item
is further away than it actually
is.
20) When driving the mirrors should
always remain in position 1.
27
Page 34 of 367
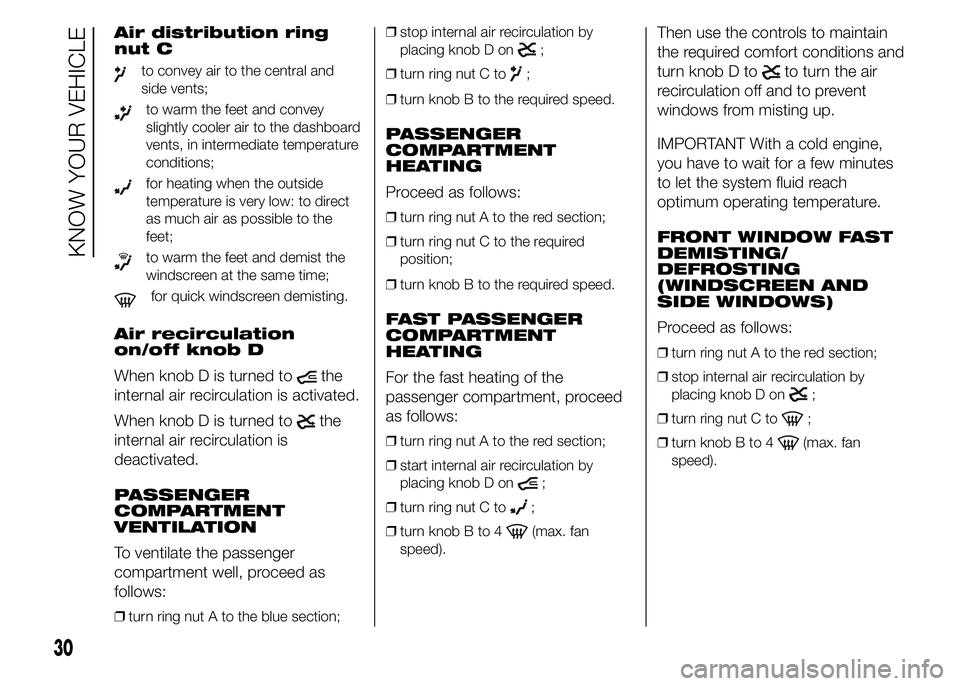
Air distribution ring
nut C
to convey air to the central and
side vents;
to warm the feet and convey
slightly cooler air to the dashboard
vents, in intermediate temperature
conditions;
for heating when the outside
temperature is very low: to direct
as much air as possible to the
feet;
to warm the feet and demist the
windscreen at the same time;
for quick windscreen demisting.
Air recirculation
on/off knob D
When knob D is turned to
the
internal air recirculation is activated.
When knob D is turned to
the
internal air recirculation is
deactivated.
PASSENGER
COMPARTMENT
VENTILATION
To ventilate the passenger
compartment well, proceed as
follows:
❒turn ring nut A to the blue section;❒stop internal air recirculation by
placing knob D on
;
❒turn ring nut C to
;
❒turn knob B to the required speed.
PASSENGER
COMPARTMENT
HEATING
Proceed as follows:
❒turn ring nut A to the red section;
❒turn ring nut C to the required
position;
❒turn knob B to the required speed.
FAST PASSENGER
COMPARTMENT
HEATING
For the fast heating of the
passenger compartment, proceed
as follows:
❒turn ring nut A to the red section;
❒start internal air recirculation by
placing knob D on
;
❒turn ring nut C to
;
❒turn knob B to 4
(max. fan
speed).
Then use the controls to maintain
the required comfort conditions and
turn knob D to
to turn the air
recirculation off and to prevent
windows from misting up.
IMPORTANT With a cold engine,
you have to wait for a few minutes
to let the system fluid reach
optimum operating temperature.
FRONT WINDOW FAST
DEMISTING/
DEFROSTING
(WINDSCREEN AND
SIDE WINDOWS)
Proceed as follows:
❒turn ring nut A to the red section;
❒stop internal air recirculation by
placing knob D on
;
❒turn ring nut C to
;
❒turn knob B to 4
(max. fan
speed).
30
KNOW YOUR VEHICLE
Page 35 of 367
IMPORTANT To guarantee rapid
demisting/defrosting, if an
additional heater is present (under
the front or rear seat on Panorama
and Combi versions), if activated,
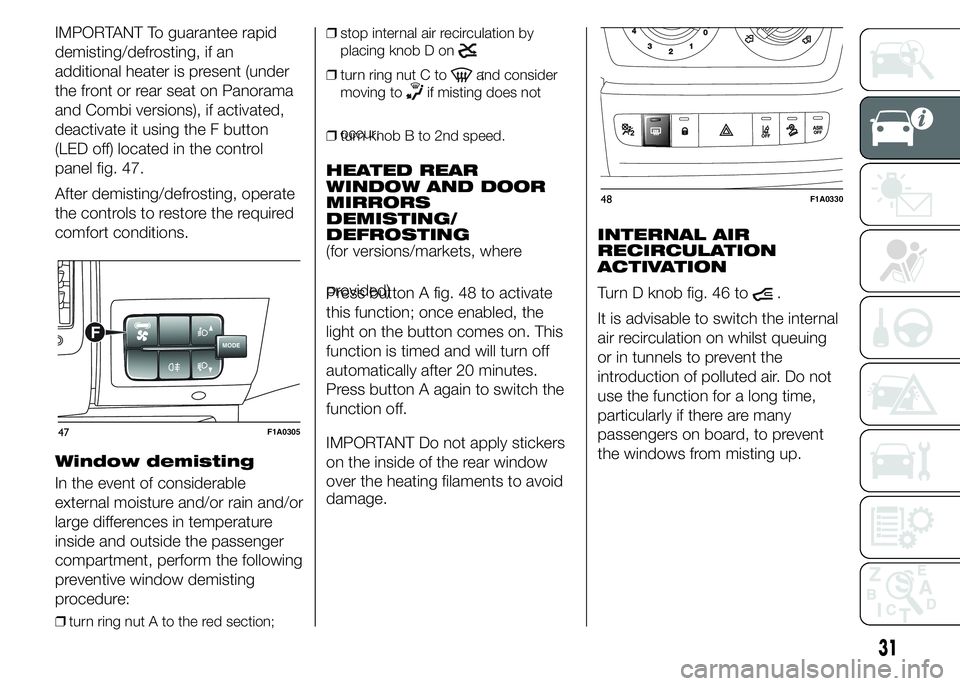
deactivate it using the F button
(LED off) located in the control
panel fig. 47.
After demisting/defrosting, operate
the controls to restore the required
comfort conditions.
Window demisting
In the event of considerable
external moisture and/or rain and/or
large differences in temperature
inside and outside the passenger
compartment, perform the following
preventive window demisting
procedure:
❒turn ring nut A to the red section;❒stop internal air recirculation by
placing knob D on
;
❒turn ring nut C toand consider
moving to
if misting does not
occur;
❒turn knob B to 2nd speed.
HEATED REAR
WINDOW AND DOOR
MIRRORS
DEMISTING/
DEFROSTING
(for versions/markets, where
provided)
Press button A fig. 48 to activate
this function; once enabled, the
light on the button comes on. This
function is timed and will turn off
automatically after 20 minutes.
Press button A again to switch the
function off.
IMPORTANT Do not apply stickers
on the inside of the rear window
over the heating filaments to avoid
damage.INTERNAL AIR
RECIRCULATION
ACTIVATION
Turn D knob fig. 46 to
.
It is advisable to switch the internal
air recirculation on whilst queuing
or in tunnels to prevent the
introduction of polluted air. Do not
use the function for a long time,
particularly if there are many
passengers on board, to prevent
the windows from misting up.
MODEF
47F1A0305
48F1A0330
31
Page 36 of 367
Do not use the air recirculation
function on rainy/cold days as it
would considerably increase the
possibility of the windows misting
inside.
MANUAL CLIMATE
CONTROL SYSTEM
(for versions/markets, where
provided)
CONTROLS
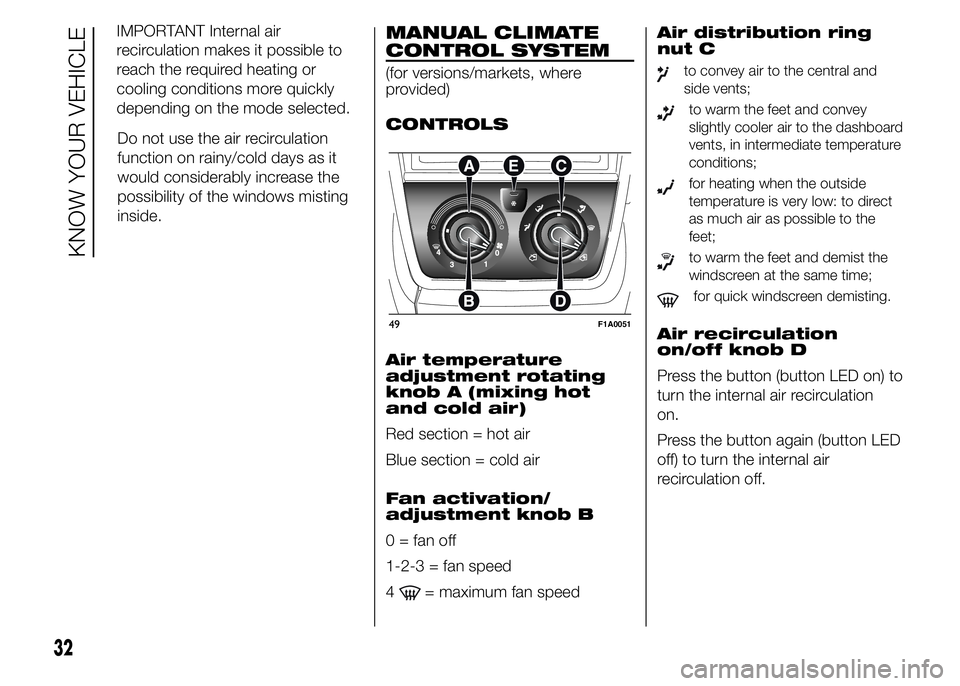
Air temperature
adjustment rotating
knob A (mixing hot
and cold air)
Red section = hot air
Blue section = cold air
Fan activation/
adjustment knob B
0 = fan off
1-2-3 = fan speed
4
= maximum fan speedAir distribution ring
nut C
to convey air to the central and
side vents;
to warm the feet and convey
slightly cooler air to the dashboard
vents, in intermediate temperature
conditions;
for heating when the outside
temperature is very low: to direct
as much air as possible to the
feet;
to warm the feet and demist the
windscreen at the same time;
for quick windscreen demisting.
Air recirculation
on/off knob D
Press the button (button LED on) to
turn the internal air recirculation
on.
Press the button again (button LED
off) to turn the internal air
recirculation off.49F1A0051
32
KNOW YOUR VEHICLE
IMPORTANT Internal air
recirculation makes it possible to
reach the required heating or
cooling conditions more quickly
depending on the mode selected.
Page 38 of 367
❒turn knob B to 4(max. fan
speed).
❒turn ring nut C to
;
❒stop internal air recirculation by
placing knob D on
;
IMPORTANT To guarantee rapid
demisting/defrosting, if an
additional heater/air conditioner is
present (under the front or rear seat
on Panorama and Combi
versions), if activated, deactivate it
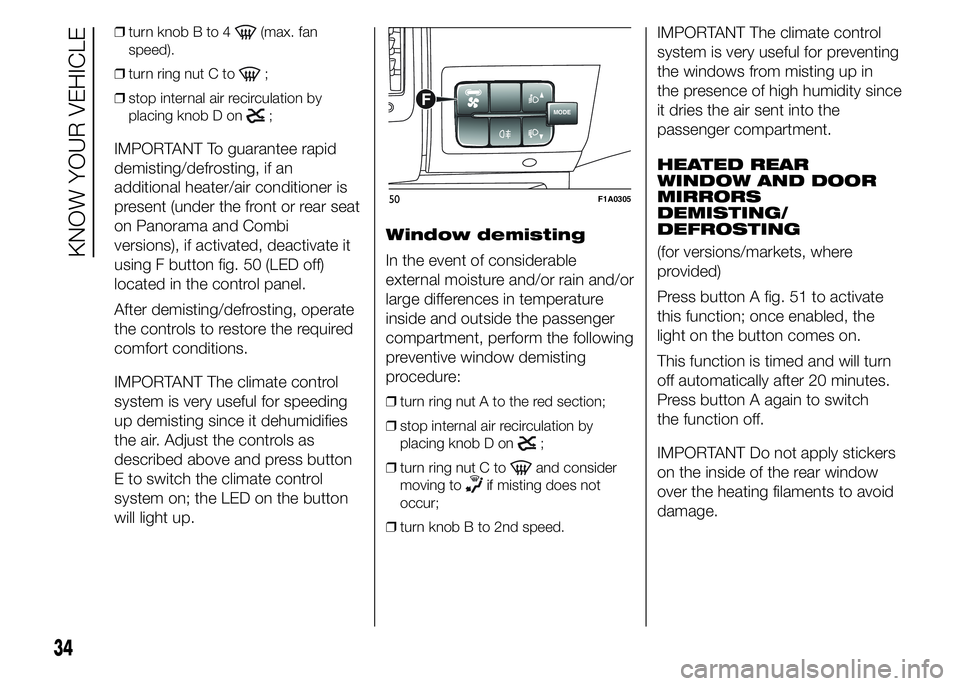
using F button fig. 50 (LED off)
located in the control panel.
After demisting/defrosting, operate
the controls to restore the required
comfort conditions.
IMPORTANT The climate control
system is very useful for speeding
up demisting since it dehumidifies
the air. Adjust the controls as
described above and press button
E to switch the climate control
system on; the LED on the button
will light up.Window demisting
In the event of considerable
external moisture and/or rain and/or
large differences in temperature
inside and outside the passenger
compartment, perform the following
preventive window demisting
procedure:
❒turn ring nut A to the red section;
❒stop internal air recirculation by
placing knob D on
;
❒turn ring nut C to
and consider
moving to
if misting does not
occur;
❒turn knob B to 2nd speed.
IMPORTANT The climate control
system is very useful for preventing
the windows from misting up in
the presence of high humidity since
it dries the air sent into the
passenger compartment.
HEATED REAR
WINDOW AND DOOR
MIRRORS
DEMISTING/
DEFROSTING
(for versions/markets, where
provided)
Press button A fig. 51 to activate
this function; once enabled, the
light on the button comes on.
This function is timed and will turn
off automatically after 20 minutes.
Press button A again to switch
the function off.
IMPORTANT Do not apply stickers
on the inside of the rear window
over the heating filaments to avoid
damage.
MODEF
50F1A0305
34
KNOW YOUR VEHICLE
Page 44 of 367
These operating conditions are
obtained by pressing air
recirculation button G in sequence.
IMPORTANT The engagement of
the air recirculation system makes it
possible to reach the required
heating or cooling conditions faster.
It is however inadvisable to use it
on rainy/cold days as it would
considerably increase the possibility
of the windows misting inside,
especially if the climate control
compressor is off.
To prevent the windows from
misting up, the recirculation is
forced off (i.e. air is drawn in from
the outside) when the outside
temperature is cold.
It is advisable not to use the air
recirculation function when the
outside temperature is low to
prevent the windows from rapidly
misting up.Climate control
compressor
enablement/off button
(F)
Press button
to switch the
climate control compressor off (if
on). The icon on the display will go
out.
Press the button when the LED is
off to restore automatic system
control of compressor activation.
The icon will light up on the display.
The system will switch recirculation
off when the compressor is
switched off to prevent windows
from misting up. Although the
system is capable of maintaining
the required temperature, the word
FULL will disappear from the
display. If, on the other hand, it is
no longer capable of maintaining
the temperature, the letters flash
and the word AUTO goes out.
IMPORTANT With the compressor
off, it is not possible to introduce air
cooler than ambient temperature
into the passenger compartment.
Furthermore, in certain conditions,
the windows could mist up rapidly
because the air is not dehumidified.The system remembers that the
compressor has been switched off,
even after the engine has stopped.
To restore automatic compressor
control, press thebutton again
(in this case, the system will only
work as a heater) or press the
AUTO button.
With the compressor switched off,
if the outside temperature is higher
than the one set, the system is
not capable of satisfying this
request. This is signalled by the
target temperature flashing, after
which the word AUTO goes out.
With the climate control
compressor off, the fan speed can
be set to zero manually (no bar
shown).
With the compressor enabled and
the engine started, the fan speed
may be reduced to the minimum
setting (only one bar shown).
40
KNOW YOUR VEHICLE
Page 48 of 367
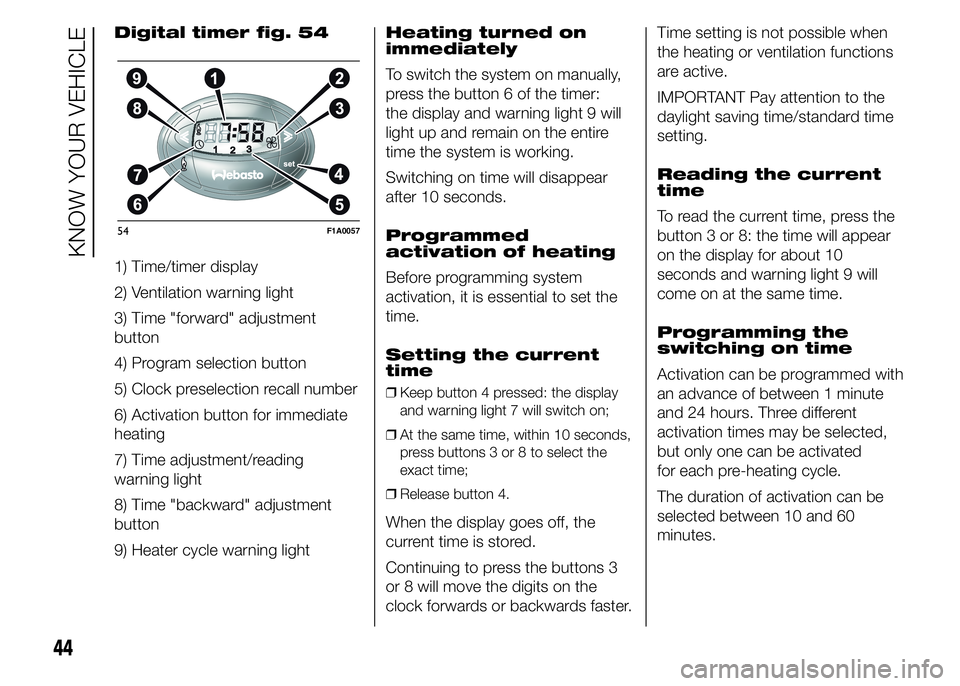
Digital timer fig. 54
1) Time/timer display
2) Ventilation warning light
3) Time "forward" adjustment
button
4) Program selection button
5) Clock preselection recall number
6) Activation button for immediate
heating
7) Time adjustment/reading
warning light
8) Time "backward" adjustment
button
9) Heater cycle warning lightHeating turned on
immediately
To switch the system on manually,
press the button 6 of the timer:
the display and warning light 9 will
light up and remain on the entire
time the system is working.
Switching on time will disappear
after 10 seconds.
Programmed
activation of heating
Before programming system
activation, it is essential to set the
time.
Setting the current
time
❒Keep button 4 pressed: the display
and warning light 7 will switch on;
❒At the same time, within 10 seconds,
press buttons 3 or 8 to select the
exact time;
❒Release button 4.
When the display goes off, the
current time is stored.
Continuing to press the buttons 3
or 8 will move the digits on the
clock forwards or backwards faster.Time setting is not possible when
the heating or ventilation functions
are active.
IMPORTANT Pay attention to the
daylight saving time/standard time
setting.
Reading the current
time
To read the current time, press the
button 3 or 8: the time will appear
on the display for about 10
seconds and warning light 9 will
come on at the same time.
Programming the
switching on time
Activation can be programmed with
an advance of between 1 minute
and 24 hours. Three different
activation times may be selected,
but only one can be activated
for each pre-heating cycle.
The duration of activation can be
selected between 10 and 60
minutes.
54F1A0057
44
KNOW YOUR VEHICLE
Page 49 of 367
❒press button 4: the symbol 10 or the
time set previously and the number 5
corresponding to the preselection
recalled will light up in the display for
10 seconds.
IMPORTANT If you wish to recall
other preselected times, press
button 4 from time to time within 10
seconds.
– within 10 seconds, press the
buttons 3 or 8 to select the desired
switching on time.
IMPORTANT The confirmation that
the time has been memorised is
given by:
❒the disappearance of the switching
on time;
❒the presence of the preselection
number 5;
❒the lighting of the display.
IMPORTANT When the boiler
comes on:
❒the flame warning light 9 switches on
in the display;
❒the preselection number 5 goes out.
Standard settings:
Preselected time 1: 6:00
Preselected time 2: 16:00
Preselected time 3: 22:00
IMPORTANT Factory pre-settings
are cancelled with a new setting.
Preselected times are stored until
the following change. If the clock is
detached from the on-board
network (e.g. if the battery
is disconnected), the factory
pre-settings are restored.
Deactivation of the
programmed
switching on time
To delete the programmed
activation time, press button 4
briefly: the display lighting will go off
and the number 5 relating to the
preselected time will disappear.
Recalling one of the
preselected
switching on times
Operate button 4 within 10
seconds until the program number
with the desired preselected time
is displayed.The preselected time you have
chosen to set is automatically
activated after about 10 seconds
without the need for any further
confirmation with another button.
Activate the preselected time taking
into account the safety instructions
for the operation of the
independent heating (for this
purpose consult the Owner's
Manual for use of independent
heating).
IMPORTANT Independent heating
switches on at the preselected
time, both with vehicle parked and
while driving.
IMPORTANT The programmed
switching on time can be altered or
cancelled by following the
instructions given previously.
Operation duration
setting
Hold the button pressed. At the
same time press button 3 or 8.
The time and warning light 7 are
displayed.
45
To program the activation time:
Page 50 of 367
Hold button 4 pressed again. At the
same time press button 3 or 8.
The preset activation duration
is displayed and warning light 9 or
2 flashes.
Set the activation duration with
button 3 or 8.
The set activation duration is stored
as soon as the text in the display
disappears, or pressing button 4.
Switching the heating
system off
Deactivation of the system,
depending on the type of activation
(automatic or manual), may be:
❒automaticwhen the programmed
duration is over; when the set time
is over, the display switches off.
❒manualpressing the “immediate
heating” button on the timer again
(flame button 6).
In both cases, the heating warning
light, the display lighting and the
passenger compartment heater fan
go off and burning stops.The fluid circulation pump
continues to work for around two
minutes to dissipate as much
heat as possible; the heater can be
turned back on during this stage.
22)
IMPORTANT The parking heater
goes off when battery voltage is low
to allow the vehicle to be started.
IMPORTANT Before turning on the
device, ensure that the fuel level
is above the reserve. Otherwise the
device could lock and require the
assistance of a Fiat Dealership.
❒Always turn off the heater when
refuelling and near service stations to
avoid the risk of explosion or fire
hazards.
❒Do not park the vehicle on
inflammable material such as paper,
grass or dry leaves: fire hazard!
❒The temperature near the heater
should not exceed 120°C (e.g. during
oven painting in a body shop). The
electronic control unit components
may be damaged at higher
temperatures.❒Whilst the heater is operating with the
engine switched off, it absorbs
energy from the battery; the engine
should therefore be left running
for a while to make sure that the
battery is properly recharged.
❒To check the coolant level, follow the
instructions in the "Vehicle
maintenance" chapter, "Engine
coolant system fluid" paragraph. The
water in the heating circuit must
contain a minimum percentage of
10% antifreeze.
❒For maintenance and repairs, consult
only a Fiat Dealership and use only
original parts.MAINTENANCE
Have the additional heater checked
regularly at a Fiat Dealership (and
always at the start of every winter).
This will guarantee safe and
economic operation of the heater
as well as a long duration.
46
KNOW YOUR VEHICLE
Page 52 of 367
IMPORTANT If the compressor on
the main air conditioner control
is turned on (operation of button E),
even if the additional air conditioner
fan is in position 0, the 1st speed
will automatically be activated
to prevent ice formation, with
possible damage to the
component.
WARNING
21) The heater burns fuel in the
same way as the engine, though
to a lesser extent. To prevent
poisoning and asphyxiation, the
additional heater must never
be turned on, not even for short
periods, in closed environments
such as a garage or workshops
without extraction fans for the
exhaust gases.22) The heater burns fuel in the
same way as the engine, though
to a lesser extent. To prevent
poisoning and asphyxiation, the
supplementary heater must never
be turned on, not even for short
periods, in closed environments
such as a garage or workshops
without extraction fans for the
exhaust gases.
EXTERNAL LIGHTS
IN BRIEF
The left stalk includes the controls
for the exterior lights.
The exterior lights can only be
switched on when the ignition key
is in the ON position.
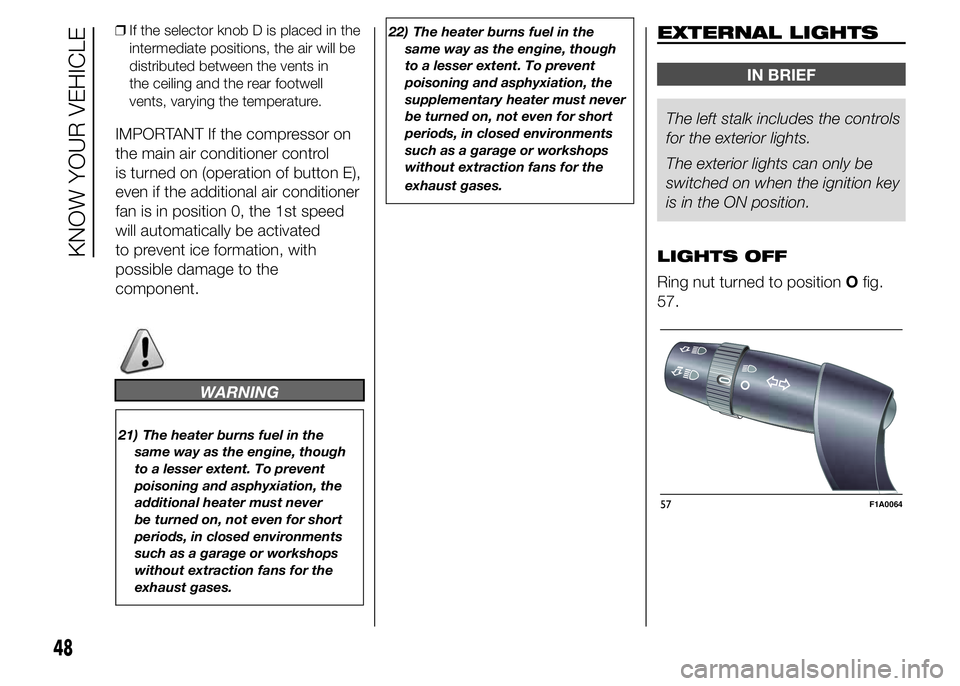
LIGHTS OFF
Ring nut turned to positionOfig.
57.
57F1A0064
48
KNOW YOUR VEHICLE
❒If the selector knob D is placed in the
intermediate positions, the air will be
distributed between the vents in
the ceiling and the rear footwell
vents, varying the temperature.