brake light FIAT DUCATO BASE CAMPER 2015 Owner handbook (in English)
[x] Cancel search | Manufacturer: FIAT, Model Year: 2015, Model line: DUCATO BASE CAMPER, Model: FIAT DUCATO BASE CAMPER 2015Pages: 367, PDF Size: 19.73 MB
Page 203 of 367
REPLACING A
WHEEL
GENERAL
INSTRUCTIONS
Wheel replacement and correct use
of the jack and spare wheel (for
versions/markets, where provided)
call for some precautions, which
are listed below.
141) 142) 143) 144) 145)
Please note that:
❒the jack weight is 4.5 kg;
❒the jack requires no adjustment;
❒the jack cannot be repaired: in the
event of a fault it must be replaced by
another original one;
❒no tool other than its cranking device
may be fitted on the jack.
146)
To change a wheel,
proceed as follows:
❒stop the vehicle in a position that is
not dangerous for oncoming traffic
where you can change the wheel
safely. The ground should be flat
if possible, and sufficiently firm;❒stop the engine and pull the
handbrake;
❒engage first gear or reverse;
❒put on the reflective safety jacket
(compulsory by law in certain
countries) before getting out of the
vehicle;
❒indicate that the vehicle has broken
down using the devices required by
the law in the current country (e.g.
warning triangle, hazard lights, etc.);
❒In the event of a wheel change on a
slope or on unsurfaced roads, put
any object as stop under the wheels;
❒take the tool bag under the
passenger seat (see “Compartment
under front passenger seat” in the
“Know your vehicle” section);
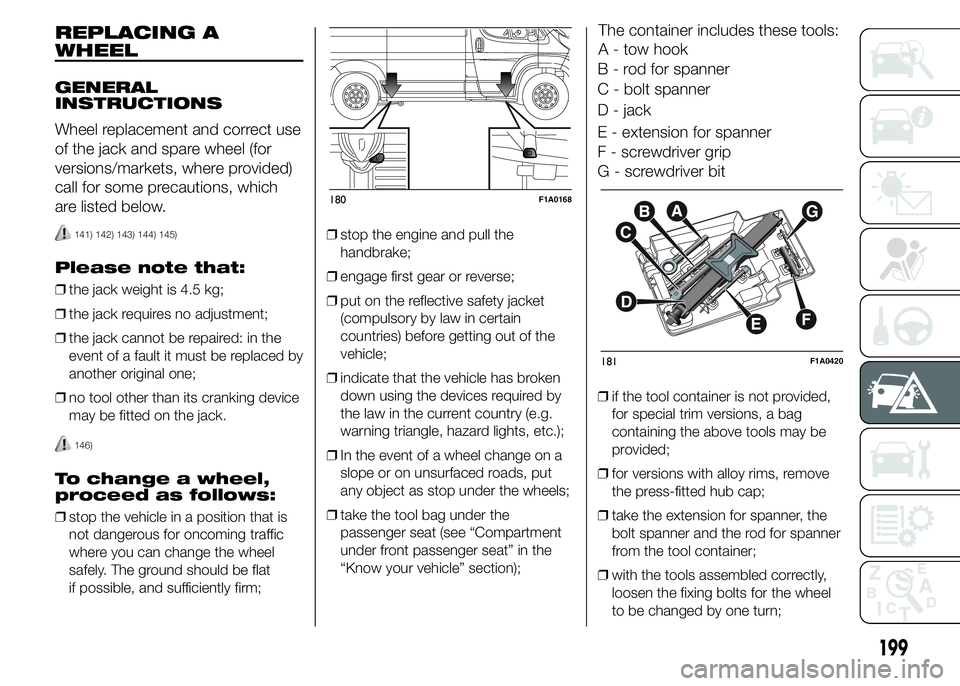
The container includes these tools:
A - tow hook
B - rod for spanner
C - bolt spanner
D - jack
E - extension for spanner
F - screwdriver grip
G - screwdriver bit
❒if the tool container is not provided,
for special trim versions, a bag
containing the above tools may be
provided;
❒for versions with alloy rims, remove
the press-fitted hub cap;
❒take the extension for spanner, the
bolt spanner and the rod for spanner
from the tool container;
❒with the tools assembled correctly,
loosen the fixing bolts for the wheel
to be changed by one turn;
180F1A0168
181F1A0420
199
Page 207 of 367
WARNING
141) Use your hazard lights, warning
triangle, etc. to show that your
vehicle is stationary according to
the regulations in force.
Passengers should get out of the
vehicle, particularly if it is heavily
loaded, and wait for the wheel
to be changed away from the
traffic. Apply the handbrake. in
the event of a wheel change on a
slope or on unsurfaced roads,
put any object as stop under the
wheels.
142) The spare wheel supplied (for
versions/markets, where
provided) is specific for your
vehicle. Therefore, it must not be
used on other models. Do not
use spare wheels of other models
on your vehicle. The wheel bolts
are specific for your vehicle: do
not use them on different models
and do not use bolts from other
models on your car.143) Have the wheel repaired and
refitted as soon as possible. Do
not apply grease to the bolt
threads before fitting: they could
come unscrewed.
144) Use the jack only to replace
wheels on the vehicle with which
it is supplied or on other vehicles
of the same model. Never use
the jack for other purposes, such
as lifting other car models. Never
use the jack to carry out repairs
under the vehicle. Incorrect
positioning of the jack may cause
the lifted vehicle to fall. Do not
use the jack for loads higher than
those shown on the label.
145) Never tamper with the inflation
valve. Never introduce tools of any
kind between rim and tyre. Check
tyre and spare wheel pressure
regularly, referring to the values
shown in the "Technical
specifications" section.
146) No tools other than the crank
provided should be used with
the spare wheel lifting device; it
should be operated by hand only.147) On versions equipped with
self-levelling air suspension, never
introduce the head or hands in
the wheel arch: the vehicle could
raise or lower automatically
depending on possible load or
temperature changes.
148) The device should only be
operated by hand, without using
any type of tool other than the
crank provided, like pneumatic or
electrical screwers.
149) The moving components of the
jack (screw and joints) can also
cause injuries: do not touch them.
If you come into contact with
lubricating grease, clean yourself
thoroughly.
150) At the end of the operation of
raising/locking the spare wheel,
after having checked the correct
positioning of the wheel under the
platform (yellow notch inside the
window on the device), the
spanner must be extracted, taking
care not to turn it in the wrong
direction (as in fig. 189) to
facilitate the extraction of the
spanner itself, to prevent the
attachment device from being
released and the wheel assembly
not being securely retained.
203
Page 214 of 367
Bulbs
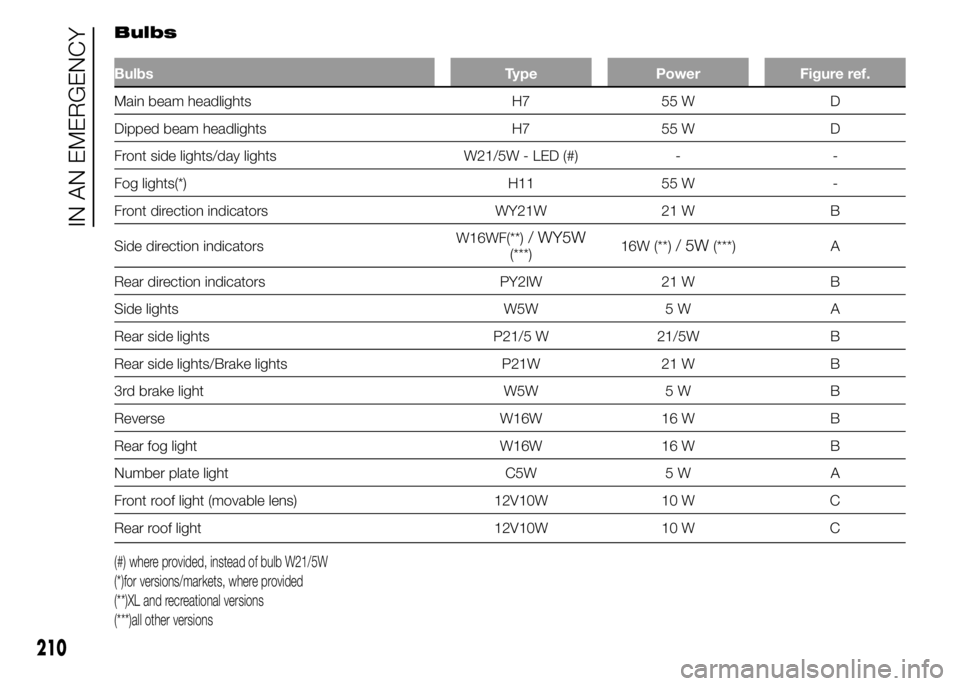
Bulbs Type Power Figure ref.
Main beam headlights H7 55 W D
Dipped beam headlights H7 55 W D
Front side lights/day lights W21/5W - LED (#) - -
Fog lights(*) H11 55 W -
Front direction indicators WY21W 21 W B
Side direction indicatorsW16WF(**)
/ WY5W(***)16W (**)/5W(***) A
Rear direction indicators PY2IW 21 W B
Side lights W5W 5 W A
Rear side lights P21/5 W 21/5W B
Rear side lights/Brake lights P21W 21 W B
3rd brake light W5W 5 W B
Reverse W16W 16 W B
Rear fog light W16W 16 W B
Number plate light C5W 5 W A
Front roof light (movable lens) 12V10W 10 W C
Rear roof light 12V10W 10 W C
(#) where provided, instead of bulb W21/5W
(*)for versions/markets, where provided
(**)XL and recreational versions
(***)all other versions
210
IN AN EMERGENCY
Page 218 of 367
REAR LIGHT
CLUSTERS
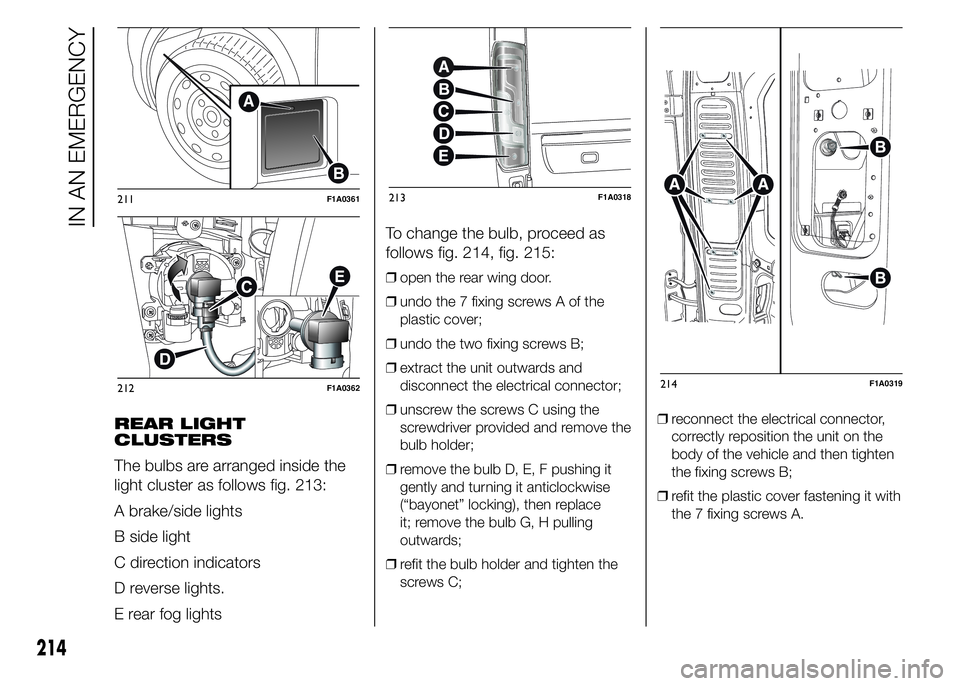
The bulbs are arranged inside the
light cluster as follows fig. 213:
A brake/side lights
B side light
C direction indicators
D reverse lights.
E rear fog lightsTo change the bulb, proceed as
follows fig. 214, fig. 215:
❒open the rear wing door.
❒undo the 7 fixing screws A of the
plastic cover;
❒undo the two fixing screws B;
❒extract the unit outwards and
disconnect the electrical connector;
❒unscrew the screws C using the
screwdriver provided and remove the
bulb holder;
❒remove the bulb D, E, F pushing it
gently and turning it anticlockwise
(“bayonet” locking), then replace
it; remove the bulb G, H pulling
outwards;
❒refit the bulb holder and tighten the
screws C;❒reconnect the electrical connector,
correctly reposition the unit on the
body of the vehicle and then tighten
the fixing screws B;
❒refit the plastic cover fastening it with
the 7 fixing screws A.
211F1A0361
212F1A0362
213F1A0318
214F1A0319
214
IN AN EMERGENCY
Page 219 of 367
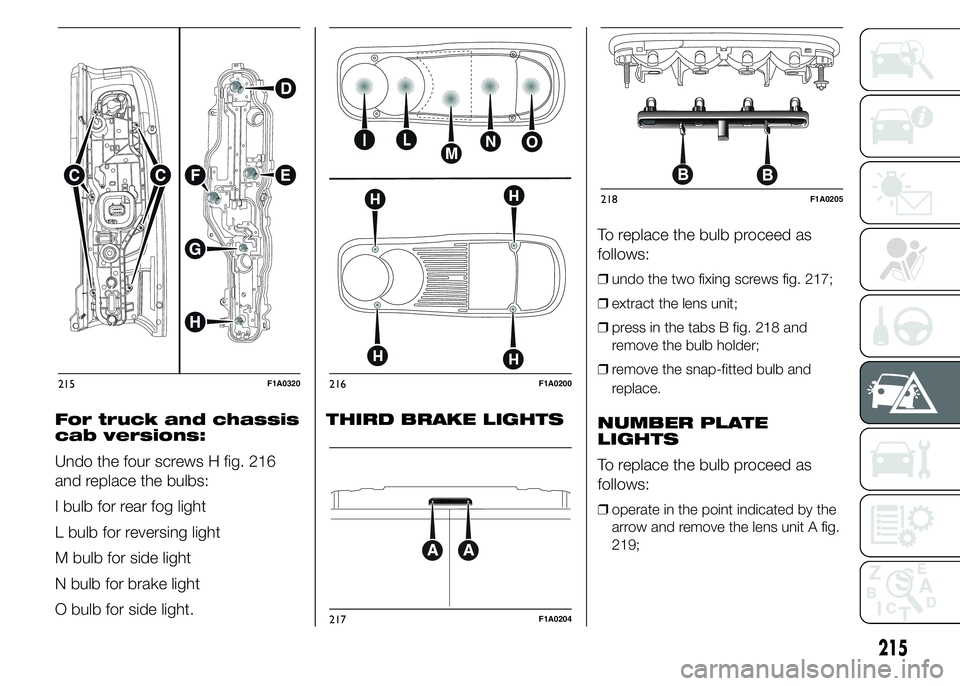
For truck and chassis
cab versions:
Undo the four screws H fig. 216
and replace the bulbs:
I bulb for rear fog light
L bulb for reversing light
M bulb for side light
N bulb for brake light
O bulb for side light.THIRD BRAKE LIGHTSTo replace the bulb proceed as
follows:
❒undo the two fixing screws fig. 217;
❒extract the lens unit;
❒press in the tabs B fig. 218 and
remove the bulb holder;
❒remove the snap-fitted bulb and
replace.
NUMBER PLATE
LIGHTS
To replace the bulb proceed as
follows:
❒operate in the point indicated by the
arrow and remove the lens unit A fig.
219;
215F1A0320216F1A0200
217F1A0204
218F1A0205
215
Page 225 of 367
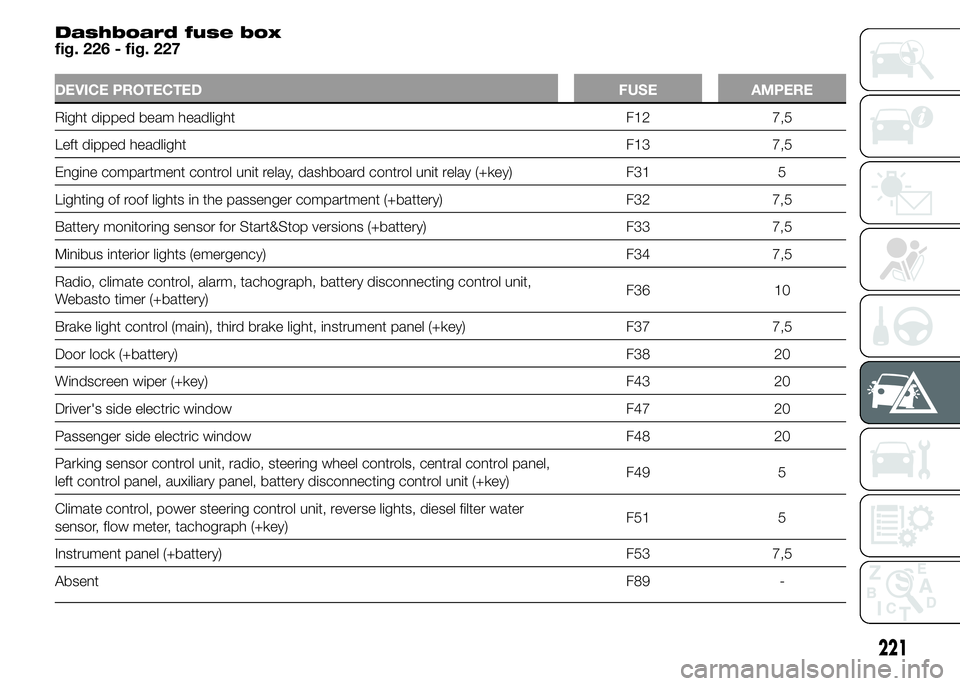
Dashboard fuse box
fig. 226 - fig. 227
DEVICE PROTECTED FUSE AMPERE
Right dipped beam headlight F12 7,5
Left dipped headlight F13 7,5
Engine compartment control unit relay, dashboard control unit relay (+key) F31 5
Lighting of roof lights in the passenger compartment (+battery) F32 7,5
Battery monitoring sensor for Start&Stop versions (+battery) F33 7,5
Minibus interior lights (emergency) F34 7,5
Radio, climate control, alarm, tachograph, battery disconnecting control unit,
Webasto timer (+battery)F36 10
Brake light control (main), third brake light, instrument panel (+key) F37 7,5
Door lock (+battery) F38 20
Windscreen wiper (+key) F43 20
Driver's side electric window F47 20
Passenger side electric window F48 20
Parking sensor control unit, radio, steering wheel controls, central control panel,
left control panel, auxiliary panel, battery disconnecting control unit (+key)F49 5
Climate control, power steering control unit, reverse lights, diesel filter water
sensor, flow meter, tachograph (+key)F51 5
Instrument panel (+battery) F53 7,5
AbsentF89 -
221
Page 235 of 367
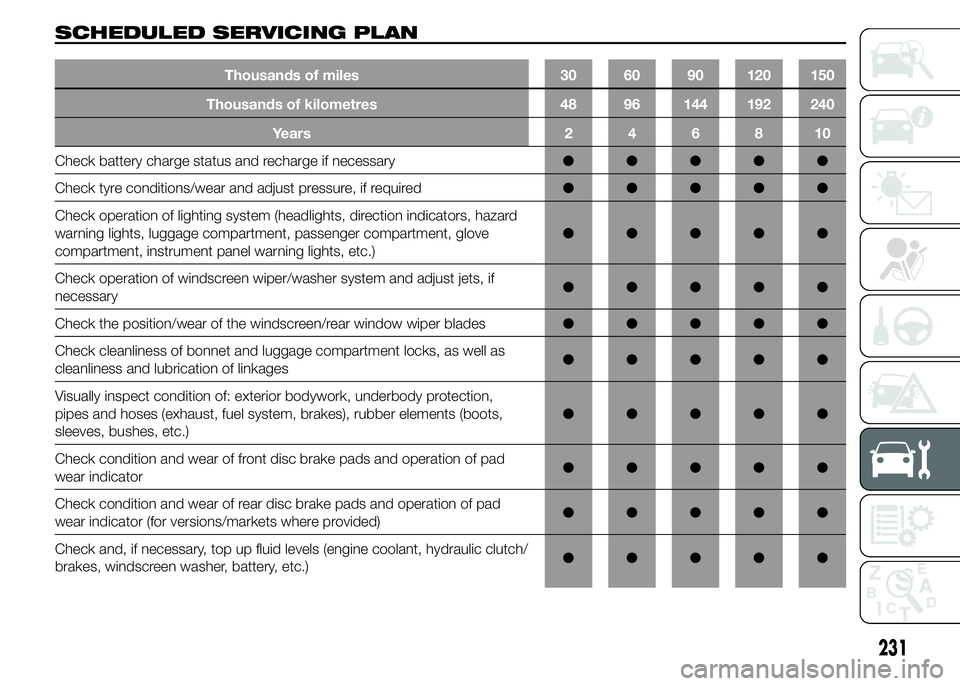
SCHEDULED SERVICING PLAN
Thousands of miles 30 60 90 120 150
Thousands of kilometres 48 96 144 192 240
Years246810
Check battery charge status and recharge if necessary●●●●●
Check tyre conditions/wear and adjust pressure, if required●●●●●
Check operation of lighting system (headlights, direction indicators, hazard
warning lights, luggage compartment, passenger compartment, glove
compartment, instrument panel warning lights, etc.)●●●●●
Check operation of windscreen wiper/washer system and adjust jets, if
necessary●●●●●
Check the position/wear of the windscreen/rear window wiper blades●●●●●
Check cleanliness of bonnet and luggage compartment locks, as well as
cleanliness and lubrication of linkages●●●●●
Visually inspect condition of: exterior bodywork, underbody protection,
pipes and hoses (exhaust, fuel system, brakes), rubber elements (boots,
sleeves, bushes, etc.)●●●●●
Check condition and wear of front disc brake pads and operation of pad
wear indicator●●●●●
Check condition and wear of rear disc brake pads and operation of pad
wear indicator (for versions/markets where provided)●●●●●
Check and, if necessary, top up fluid levels (engine coolant, hydraulic clutch/
brakes, windscreen washer, battery, etc.)●●●●●
231
Page 237 of 367
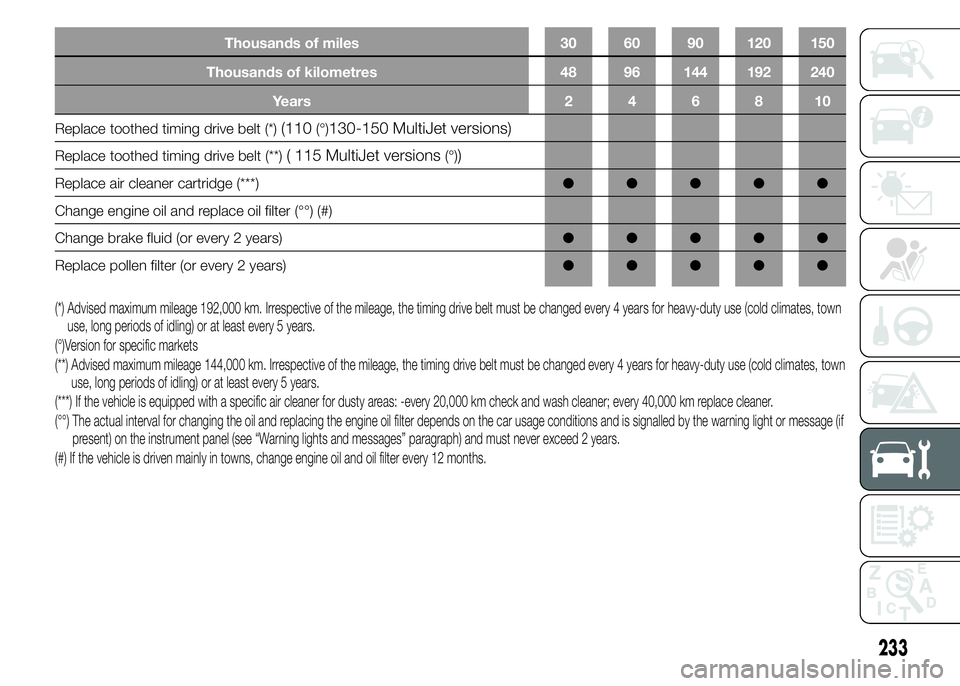
Thousands of miles 30 60 90 120 150
Thousands of kilometres 48 96 144 192 240
Years246810
Replace toothed timing drive belt (*)(110(°)130-150 MultiJet versions)
Replace toothed timing drive belt (**)( 115 MultiJet versions(°))
Replace air cleaner cartridge (***)●●●●●
Change engine oil and replace oil filter (°°) (#)
Change brake fluid (or every 2 years)●●●●●
Replace pollen filter (or every 2 years)●●●●●
(*) Advised maximum mileage 192,000 km. Irrespective of the mileage, the timing drive belt must be changed every 4 years for heavy-duty use (cold climates, town
use, long periods of idling) or at least every 5 years.
(°)Version for specific markets
(**) Advised maximum mileage 144,000 km. Irrespective of the mileage, the timing drive belt must be changed every 4 years for heavy-duty use (cold climates, town
use, long periods of idling) or at least every 5 years.
(***) If the vehicle is equipped with a specific air cleaner for dusty areas: -every 20,000 km check and wash cleaner; every 40,000 km replace cleaner.
(°°) The actual interval for changing the oil and replacing the engine oil filter depends on the car usage conditions and is signalled by the warning light or message (if
present) on the instrument panel (see “Warning lights and messages” paragraph) and must never exceed 2 years.
(#) If the vehicle is driven mainly in towns, change engine oil and oil filter every 12 months.
233
Page 238 of 367
PERIODIC CHECKS
Before long journeys, check and, if
necessary, restore:
❒engine coolant level;
❒brake fluid level;
❒windscreen washer fluid level;
❒tyre inflation pressure and condition;
❒operation of lighting system
(headlamps, direction indicators,
hazard warning lights, etc.);
❒operation of screen washer/wiper
system and positioning/wear of
windscreen/rear window wiper
blades.
To ensure that the vehicle is always
efficient and well maintained, it is
advisable to make sure that you
carry out the above operations
regularly (approximately every 1000
km and every 3000 km for
checking and topping up engine oil
is advisable).
DEMANDING
VEHICLE USE
If the vehicle is mostly used in one
of the following conditions:
❒towing a trailer or caravan;
❒dusty roads;
❒short, repeated journeys (less than
7-8 km) at sub-zero outside
temperatures;
❒engine often idling or driving long
distances at low speeds or long
periods of inactivity;
the following checks must be
carried out more often than
indicated in the Scheduled
Servicing Plan:
❒check front disc brake pad
conditions and wear;
❒check cleanliness of bonnet and boot
locks, cleanliness and lubrication of
linkage;❒visually inspect conditions of: engine,
gearbox, transmission, pipes and
hoses (exhaust - fuel system -
brakes) and rubber elements (boots -
sleeves - bushes - etc.);
❒check battery charge and battery
fluid level (electrolyte);
❒visually inspect condition of the
accessory drive belts;
❒check and, if necessary, change
engine oil and replace oil filter.
❒check and, if necessary, replace
pollen filter.
234
SERVICING AND MAINTENANCE
Page 254 of 367
IMPORTANT
55) Some car washes with old-style
blades and/or in a poor state of
repair can damage the paintwork,
facilitating the formation of lines
that give the paint a dull/misty
appearance, especially on dark
colours. If this happens, lightly
polish the paintwork with
appropriate products.
IMPORTANT
5) Detergents cause water pollution.
The vehicle should be washed in
areas equipped for collecting
and purifying the liquid used in
the washing process.
INTERIORS
Regularly check that water is not
trapped under the mats (due to
water dripping off shoes, umbrellas,
etc.), as this could cause oxidation
of the sheet metal.
198) 199)
SEATS AND FABRIC
PARTS
Remove dust with a soft brush or a
vacuum cleaner. It is advisable to
use a moist brush on velvet
upholstery.
Rub the seats with a sponge
moistened with a solution of water
and mild soap.
PLASTIC PARTS
It is advisable to clean interior parts
with a moist cloth and a solution
of water and non-abrasive mild
soap. Use specific products for
cleaning plastic, without solvents
and specifically designed to prevent
damage to the appearance and
colour of the treated parts, to
remove grease and tough stains.IMPORTANT Do not use alcohol,
petrols or derivatives to clean
the instrument panel glass.
LEATHER STEERING
WHEEL/GEAR
KNOB/HANDBRAKE
(for versions/markets, where
provided)
These components must be
cleaned with mild soap and water
only. Never use alcohol or
alcohol-based products.
Read the product label carefully
before using specific products for
cleaning the interiors: make sure
that the product does not contain
spirits or alcohol-based
substances.
If, when cleaning the windscreen
with special products, window
cleaner accidentally drips onto the
leather of the steering wheel/gear
lever knob/handbrake, wipe away
immediately and then wash the
affected area with mild soap and
water.
250
SERVICING AND MAINTENANCE