ECU FIAT DUCATO BASE CAMPER 2016 Owner handbook (in English)
[x] Cancel search | Manufacturer: FIAT, Model Year: 2016, Model line: DUCATO BASE CAMPER, Model: FIAT DUCATO BASE CAMPER 2016Pages: 387, PDF Size: 20.76 MB
Page 212 of 387

151) No tools other than the crank
provided should be used with
the spare wheel lifting device; it
should be operated by hand only.
152) On versions equipped with
self-levelling air suspension, never
introduce the head or hands in
the wheel arch: the vehicle could
raise or lower automatically
depending on possible load or
temperature changes.
153) The device should only be
operated by hand, without using
any type of tool other than the
crank provided, like pneumatic or
electrical screwers.
154) The moving components of the
jack (screw and joints) can also
cause injuries: do not touch them.
If you come into contact with
lubricating grease, clean yourself
thoroughly.155) At the end of the operation of
raising/locking the spare wheel,
after having checked the correct
positioning of the wheel under the
platform (yellow notch inside the
window on the device), the
spanner must be extracted, taking
care not to turn it in the wrong
direction (as in fig. 190) to
facilitate the extraction of the
spanner itself, to prevent the
attachment device from being
released and the wheel assembly
not being securely retained.
156) Each time the spare wheel is
moved, check that it is correctly
positioned in its housing under
the platform. If it is not correctly
positioned, this could adversely
affect safety.
157) The spare wheel lifting device
is equipped with a clutch safety
system for its own protection; this
could activated if an excessive
load is applied on the
maneuvering screw.FIX&GO
AUTOMATIC QUICK
TYRE REPAIR KIT
(for versions/markets, where provided)
The Fix & Go automatic quick tyre
repair kit is positioned at the front of the
vehicle passenger compartment and
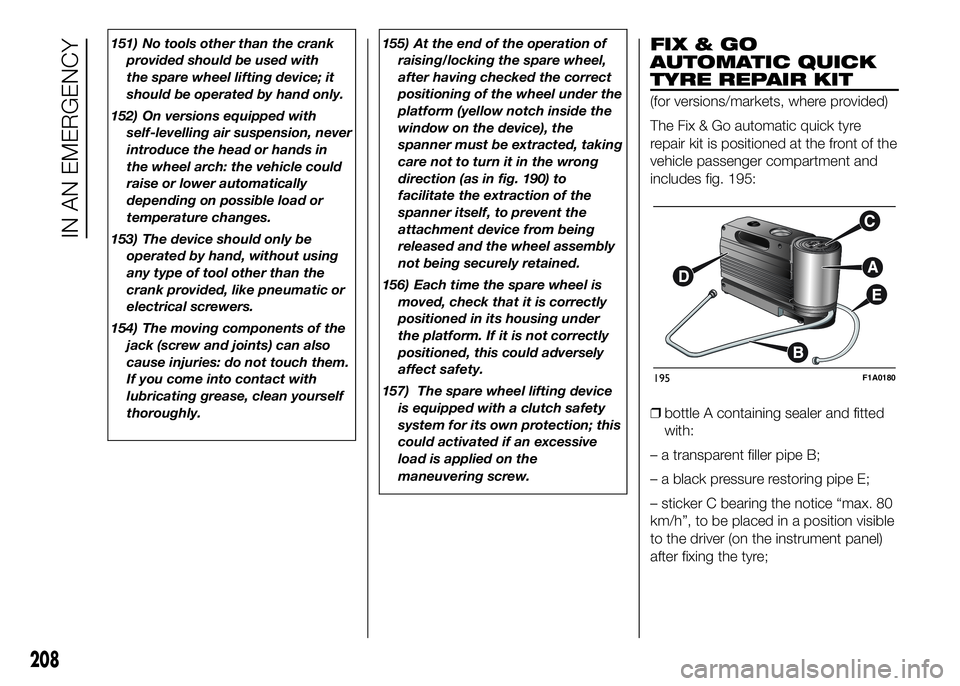
includes fig. 195:
❒bottle A containing sealer and fitted
with:
– a transparent filler pipe B;
– a black pressure restoring pipe E;
– sticker C bearing the notice “max. 80
km/h”, to be placed in a position visible
to the driver (on the instrument panel)
after fixing the tyre;
195F1A0180
208
IN AN EMERGENCY
Page 215 of 387

BOTTLE REPLACEMENT
PROCEDURE
To replace the bottle, proceed as
follows:
❒press button A fig. 202 to release the
part;
❒fit the new bottle and press until it is
automatically engaged.
WARNING
158) Give the instruction booklet to
the tyre repair workshop
personnel.
159) Punctures on the sides of the
tyre cannot be repaired. Do not
use the quick tyre repair kit if the
damage is due to running with flat
tyre.
160) If the wheel rim has been
damaged (bent so as to cause air
to leak), the wheel cannot be
repaired. Do not remove the
foreign body (screws or nails)
from the tyre.
161) Do not use the compressor for
more than 20 consecutive
minutes. Risk of overheating.
Tyres repaired with the quick tyre
repair kit must only be used
temporarily, as the kit is not
suitable for a definitive repair.162) The bottle contains ethylene
glycol. It contains latex that might
cause allergic reactions. It is
harmful if swallowed. It is irritant
for the eyes. It may cause
sensitisation if inhaled or on
contact. Avoid contact with eyes,
skin and clothes. In the event of
contact, wash immediately with
plenty of water. Do not induce
vomiting if swallowed. Rinse your
mouth and drink plenty of water.
Call a doctor immediately. Keep
out of the reach of children. The
product must not be used by
asthmatics. Do not breathe in the
vapours during insertion and
suction. Call a doctor immediately
if allergic reactions are noted.
Store the bottle in its proper
compartment, away from sources
of heat. The sealant has an expiry
date. Replace the bottle if the
sealant has expired.
163) Wear the protective gloves
provided together with the quick
tyre repair kit.
164) affix the adhesive label in an
easy-to-see position for the driver
as a reminder that the tyre has
been treated with the quick tyre
repair kit. Drive carefully,
particularly on bends. Do not
exceed 80 km/h. Do not
accelerate or brake suddenly.
202F1A0187
211
Page 225 of 387

NUMBER PLATE LIGHTS
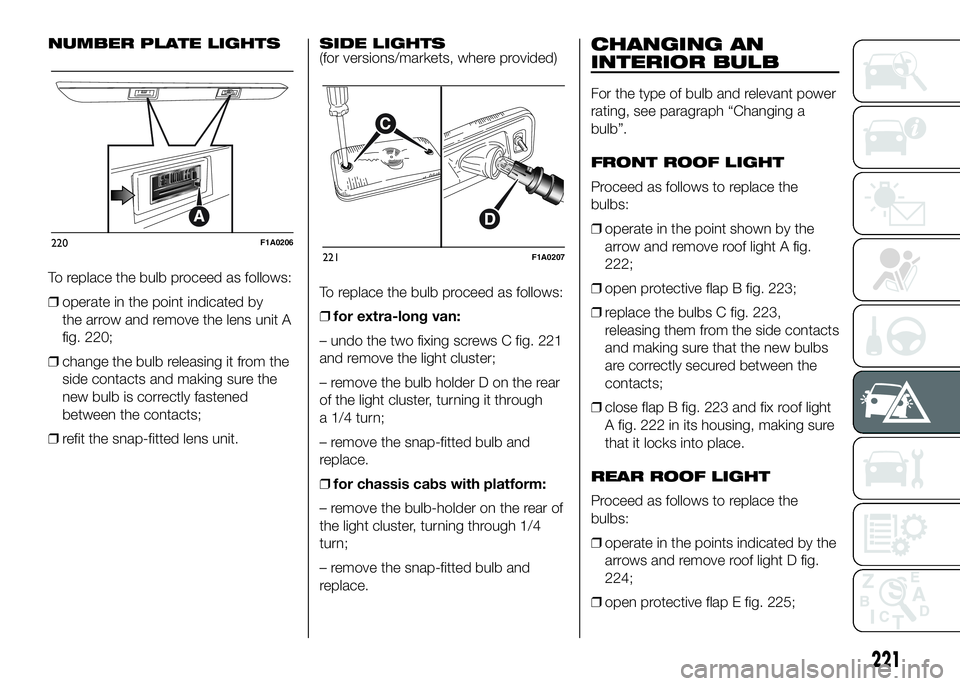
To replace the bulb proceed as follows:
❒operate in the point indicated by
the arrow and remove the lens unit A
fig. 220;
❒change the bulb releasing it from the
side contacts and making sure the
new bulb is correctly fastened
between the contacts;
❒refit the snap-fitted lens unit.SIDE LIGHTS
(for versions/markets, where provided)
To replace the bulb proceed as follows:
❒for extra-long van:
– undo the two fixing screws C fig. 221
and remove the light cluster;
– remove the bulb holder D on the rear
of the light cluster, turning it through
a 1/4 turn;
– remove the snap-fitted bulb and
replace.
❒for chassis cabs with platform:
– remove the bulb-holder on the rear of
the light cluster, turning through 1/4
turn;
– remove the snap-fitted bulb and
replace.CHANGING AN
INTERIOR BULB
For the type of bulb and relevant power
rating, see paragraph “Changing a
bulb”.
FRONT ROOF LIGHT
Proceed as follows to replace the
bulbs:
❒operate in the point shown by the
arrow and remove roof light A fig.
222;
❒open protective flap B fig. 223;
❒replace the bulbs C fig. 223,
releasing them from the side contacts
and making sure that the new bulbs
are correctly secured between the
contacts;
❒close flap B fig. 223 and fix roof light
A fig. 222 in its housing, making sure
that it locks into place.
REAR ROOF LIGHT
Proceed as follows to replace the
bulbs:
❒operate in the points indicated by the
arrows and remove roof light D fig.
224;
❒open protective flap E fig. 225;
220F1A0206221F1A0207
221
Page 253 of 387

BRAKE FLUID
191) 192)
50)
Undo cap E fig. 241 - fig. 242 - fig. 243
- fig. 244 and check that the liquid in
the reservoir is at the maximum level.
The fluid level in the reservoir must not
exceed the MAX mark.
Use the brake fluid shown in the "Fluids
and lubricants" table (see "Technical
Specifications").
NOTE Carefully clean the cap of the
reservoir and the surrounding surface.
Take great care to ensure that
impurities do not enter the reservoir
when the plug is opened.
For topping-up, always use a funnel
with integrated filter with mesh equal to
or lower than 0.12 mm.
IMPORTANT Brake fluid absorbs
moisture. For this reason, if the vehicle
is mainly used in areas with a high
degree of atmospheric humidity, the
fluid should be replaced at more
frequent intervals than specified in the
“Scheduled Servicing Plan”.IMPORTANT
47) When topping up, take care not
to mix up the various types of
fluids: they are not compatible
with each other and could
seriously damage the car.
48) The used engine oil and the filter
that has been replaced contain
substances that are harmful to
the environment. To change the
oil and filters, we advise you to
contact a Fiat Dealership.
49) PARAFLU
UPantifreeze is used in
the engine cooling system. Use
fluid of the same type as that
contained in the cooling system
for any top-ups. PARAFLU
UP
cannot be mixed with any other
type of fluid. If this happens, do
not start the engine and contact a
Fiat Dealership.
50) Avoid allowing brake fluid, which
is extremely corrosive, to come
into contact with painted areas.
Should it happen, wash
immediately with water.51) Do not press the power steering
end of travel lock for longer than 8
consecutive seconds with the
engine running because it will
cause noise and risk damaging
the system.
WARNING
185) Never smoke when performing
operations in the engine
compartment. Flammable gases
and fumes may be present and
risk igniting.
186) Be very careful when working in
the engine compartment when
the engine is hot: you may get
burned. Remember that the fan
may start up if the engine is hot:
this could injure you. Scarves, ties
and other loose clothing might
be pulled by moving parts.
187) The cooling system is
pressurised. If necessary, only
replace the plug with another
original one or the operation of
the system may be adversely
affected. Do not remove the
reservoir plug when the engine is
hot: risk of burns.
249