steering FIAT DUCATO BASE CAMPER 2017 Owner handbook (in English)
[x] Cancel search | Manufacturer: FIAT, Model Year: 2017, Model line: DUCATO BASE CAMPER, Model: FIAT DUCATO BASE CAMPER 2017Pages: 296, PDF Size: 14.44 MB
Page 118 of 296
16)If the engine fails to start with a gear
engaged, the potentially dangerous
situation due to the fact that the
transmission is automatically placed in
neutral will be signalled by a buzzer.
17)If the warning light
flashes for 60
seconds after starting or during an
extended towing period, this indicates a
problem in the glow plug preheating
system. Use the vehicle normally if the
engine starts, but contact a Fiat Dealership
as soon as possible.
18)Remember that the brake servo and
power steering are not operational until the
engine has been started, so you need to
apply much more force than usual to
the brake pedal and steering wheel.
19)Never bump start the engine by
pushing, towing or coasting downhill. This
could cause fuel to flow into the catalytic
converter and damage it beyond repair.
20)A quick burst on the accelerator before
stopping the engine serves no practical
purpose; it wastes fuel and is especially
damaging to turbocharged engines.
21)In some cases, when the engine
switches off, the fan could activate for max.
120 seconds.
WHEN PARKED
116)
22)
Proceed as follows when parking and
leaving the vehicle:
engage the gear (on a slope, engage
first gear if the vehicle is facing uphill
or reverse if it is facing downhill) and
leave the wheels steered;
stop the engine and engage the
handbrake;
always remove the ignition key.
If the vehicle is parked on a steep
slope, it is advisable to block the
wheels with a wedge or stone.
On versions equipped with automatic
transmission (Comfort matic), wait
for the letterPto appear on the display
before releasing the brake pedal.
IMPORTANTNEVERleave the vehicle
with the gearbox in neutral (or, on
versions equipped with automatic
(Comfort matic) transmission, before
putting the shift lever in thePposition).HANDBRAKE
Handbrake engagement:The
handbrake lever is located to the left of
the driver's seat. Pull the lever upwards
to engage the handbrake and ensure
that the vehicle does not move.
Handbrake disengagement:slightly
raise the lever, hold the button A
pressed and check that the
warning light switches off on the
instrument panel.
Press the brake pedal when carrying
out this operation to prevent the vehicle
from moving accidentally.
WARNING
116)Never leave children unattended in
the vehicle. Always remove the ignition key
when leaving the vehicle and take it out
with you.
WARNING
22)If the vehicle is equipped with
self-levelling air suspension, always check
that there is sufficient space above the roof
and around the vehicle when parking.
Indeed, the vehicle could raise (or lower)
automatically depending on load or
temperature changes.
116
STARTING AND DRIVING
Page 157 of 296
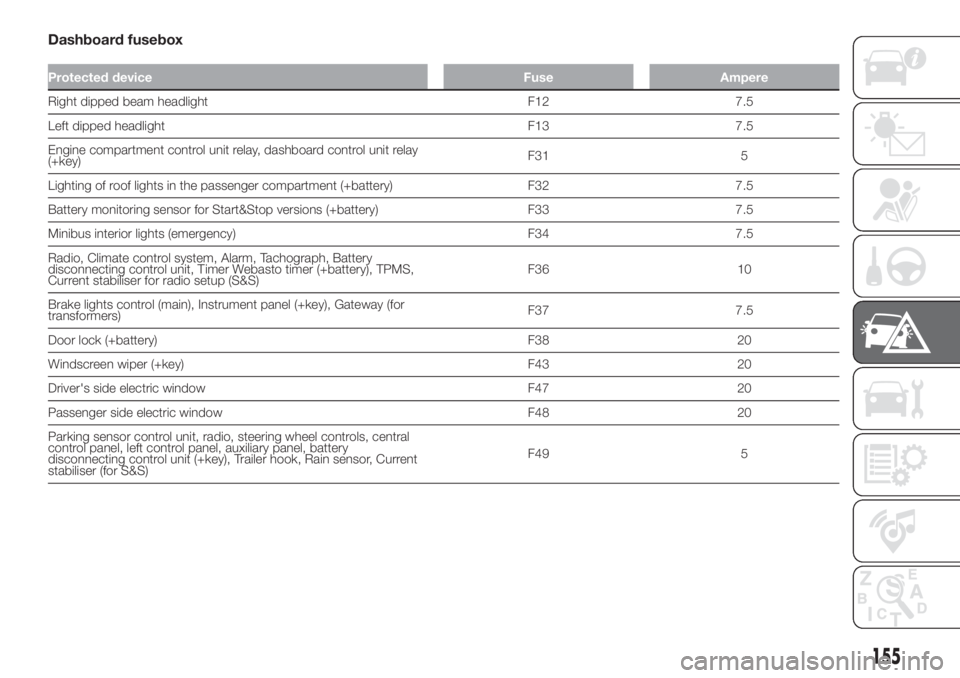
Dashboard fusebox
Protected device Fuse Ampere
Right dipped beam headlight F12 7.5
Left dipped headlight F13 7.5
Engine compartment control unit relay, dashboard control unit relay
(+key)F31 5
Lighting of roof lights in the passenger compartment (+battery) F32 7.5
Battery monitoring sensor for Start&Stop versions (+battery) F33 7.5
Minibus interior lights (emergency) F34 7.5
Radio, Climate control system, Alarm, Tachograph, Battery
disconnecting control unit, Timer Webasto timer (+battery), TPMS,
Current stabiliser for radio setup (S&S)F36 10
Brake lights control (main), Instrument panel (+key), Gateway (for
transformers)F37 7.5
Door lock (+battery) F38 20
Windscreen wiper (+key) F43 20
Driver's side electric window F47 20
Passenger side electric window F48 20
Parking sensor control unit, radio, steering wheel controls, central
control panel, left control panel, auxiliary panel, battery
disconnecting control unit (+key), Trailer hook, Rain sensor, Current
stabiliser (for S&S)F49 5
155
Page 158 of 296
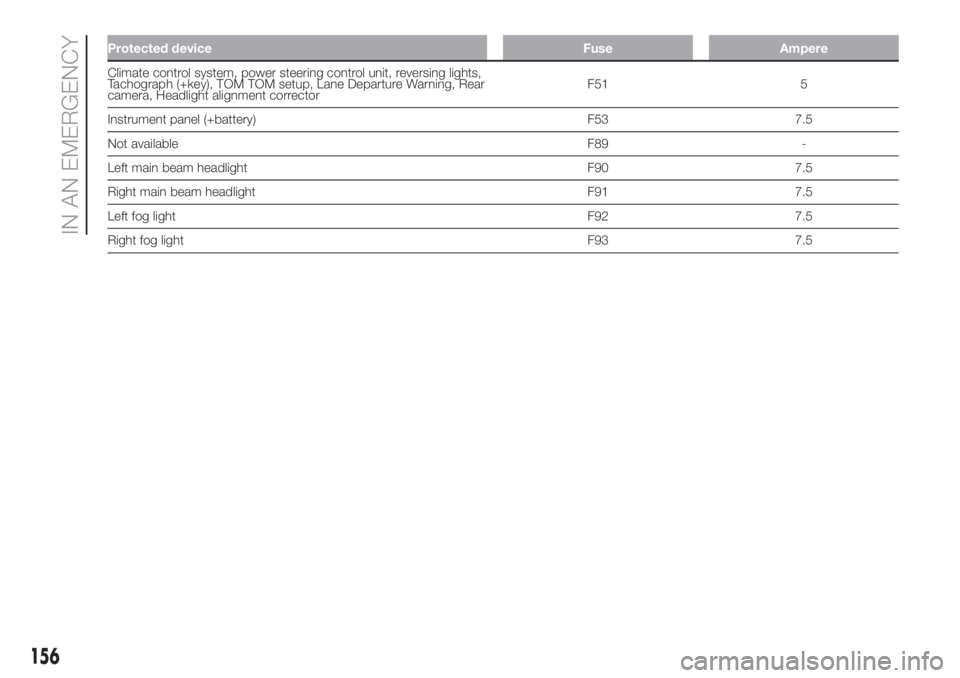
Protected device Fuse Ampere
Climate control system, power steering control unit, reversing lights,
Tachograph (+key), TOM TOM setup, Lane Departure Warning, Rear
camera, Headlight alignment correctorF51 5
Instrument panel (+battery) F53 7.5
Not available F89 -
Left main beam headlight F90 7.5
Right main beam headlight F91 7.5
Left fog light F92 7.5
Right fog light F93 7.5
156
IN AN EMERGENCY
Page 166 of 296
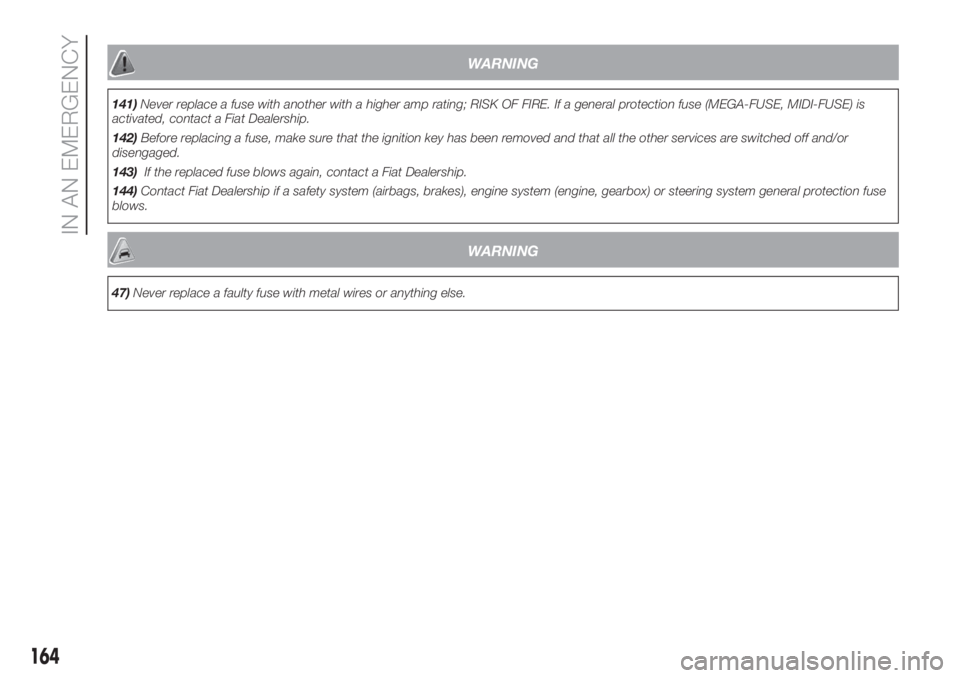
WARNING
141)Never replace a fuse with another with a higher amp rating; RISK OF FIRE. If a general protection fuse (MEGA-FUSE, MIDI-FUSE) is
activated, contact a Fiat Dealership.
142)Before replacing a fuse, make sure that the ignition key has been removed and that all the other services are switched off and/or
disengaged.
143)If the replaced fuse blows again, contact a Fiat Dealership.
144)Contact Fiat Dealership if a safety system (airbags, brakes), engine system (engine, gearbox) or steering system general protection fuse
blows.
WARNING
47)Never replace a faulty fuse with metal wires or anything else.
164
IN AN EMERGENCY
Page 183 of 296
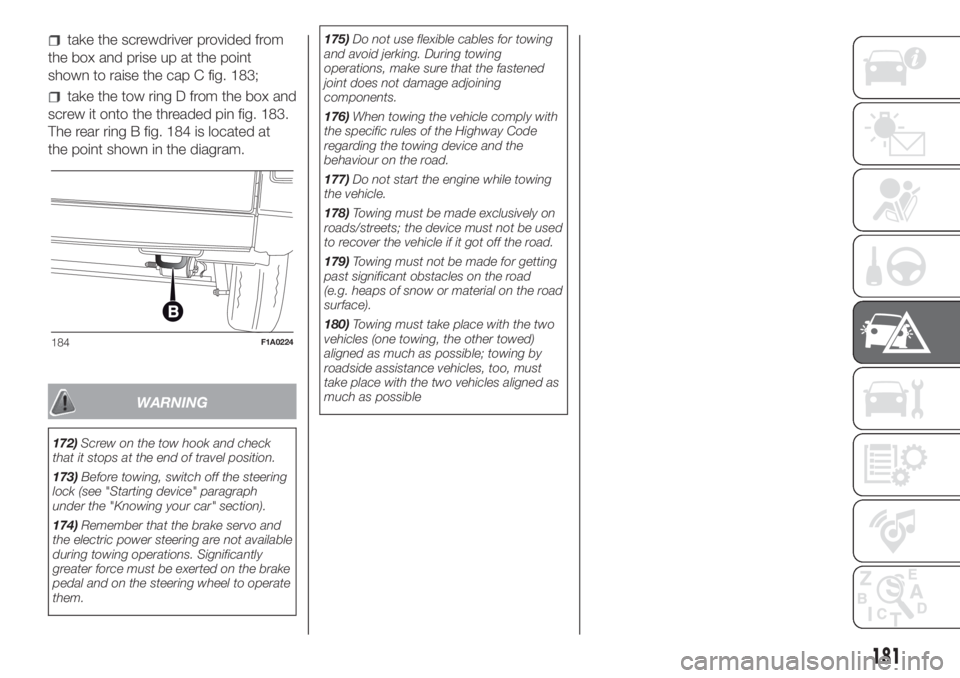
take the screwdriver provided from
the box and prise up at the point
shown to raise the cap C fig. 183;
take the tow ring D from the box and
screw it onto the threaded pin fig. 183.
The rear ring B fig. 184 is located at
the point shown in the diagram.
WARNING
172)Screw on the tow hook and check
that it stops at the end of travel position.
173)Before towing, switch off the steering
lock (see "Starting device" paragraph
under the "Knowing your car" section).
174)Remember that the brake servo and
the electric power steering are not available
during towing operations. Significantly
greater force must be exerted on the brake
pedal and on the steering wheel to operate
them.175)Do not use flexible cables for towing
and avoid jerking. During towing
operations, make sure that the fastened
joint does not damage adjoining
components.
176)When towing the vehicle comply with
the specific rules of the Highway Code
regarding the towing device and the
behaviour on the road.
177)Do not start the engine while towing
the vehicle.
178)Towing must be made exclusively on
roads/streets; the device must not be used
to recover the vehicle if it got off the road.
179)Towing must not be made for getting
past significant obstacles on the road
(e.g. heaps of snow or material on the road
surface).
180)Towing must take place with the two
vehicles (one towing, the other towed)
aligned as much as possible; towing by
roadside assistance vehicles, too, must
take place with the two vehicles aligned as
much as possible
184F1A0224
181
Page 194 of 296
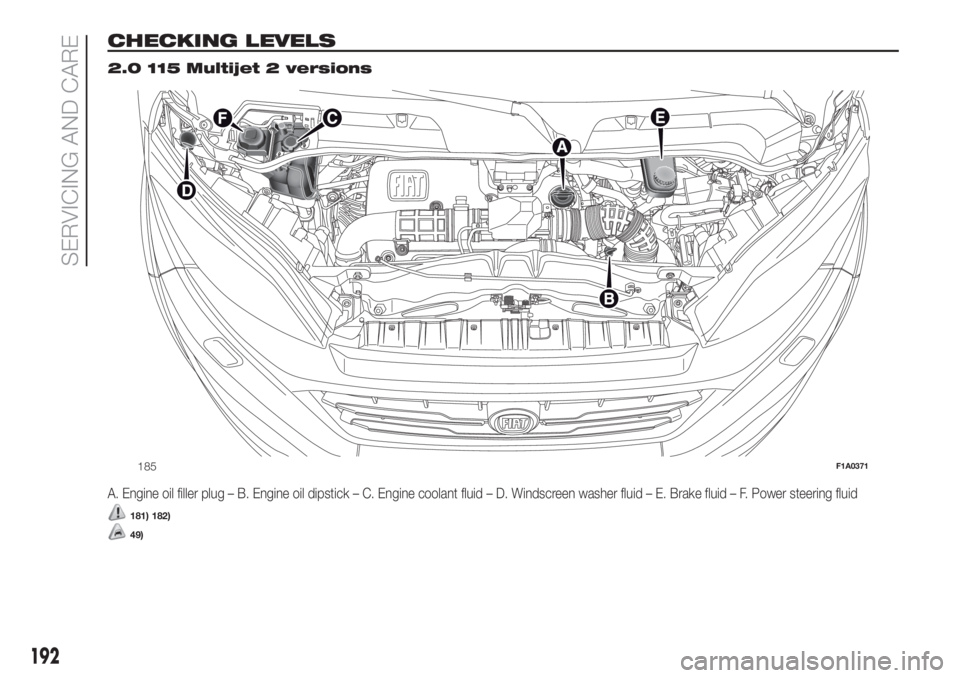
CHECKING LEVELS.
2.0 115 Multijet 2 versions
A. Engine oil filler plug – B. Engine oil dipstick – C. Engine coolant fluid – D. Windscreen washer fluid – E. Brake fluid – F. Power steering fluid
181) 182)
49)
185F1A0371
192
SERVICING AND CARE
Page 195 of 296
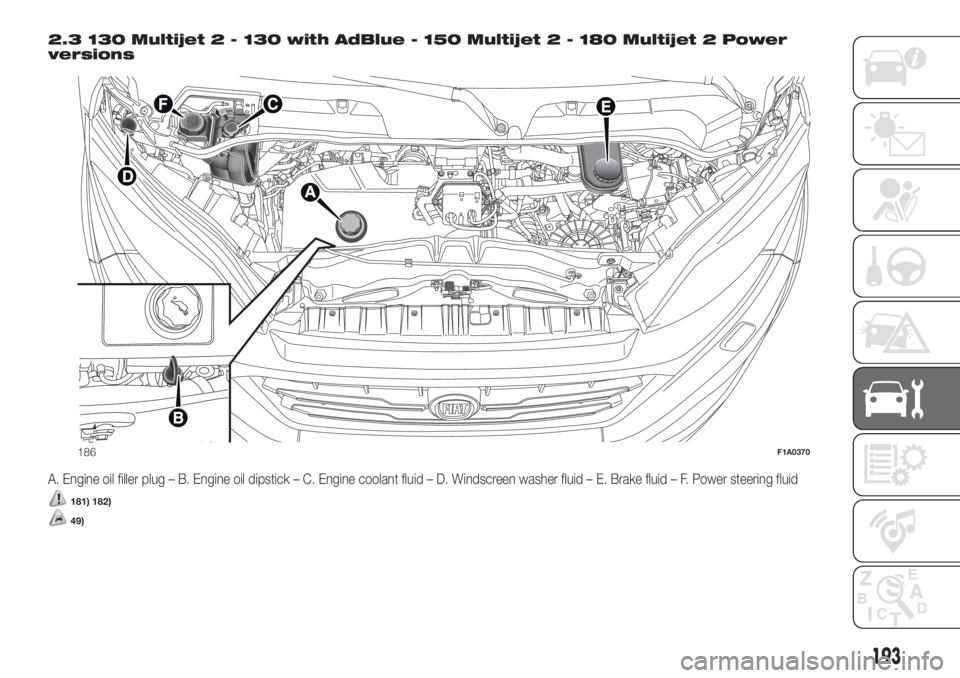
2.3 130 Multijet 2 - 130 with AdBlue - 150 Multijet 2 - 180 Multijet 2 Power
versions
A. Engine oil filler plug – B. Engine oil dipstick – C. Engine coolant fluid – D. Windscreen washer fluid – E. Brake fluid – F. Power steering fluid
181) 182)
49)
186F1A0370
193
Page 196 of 296
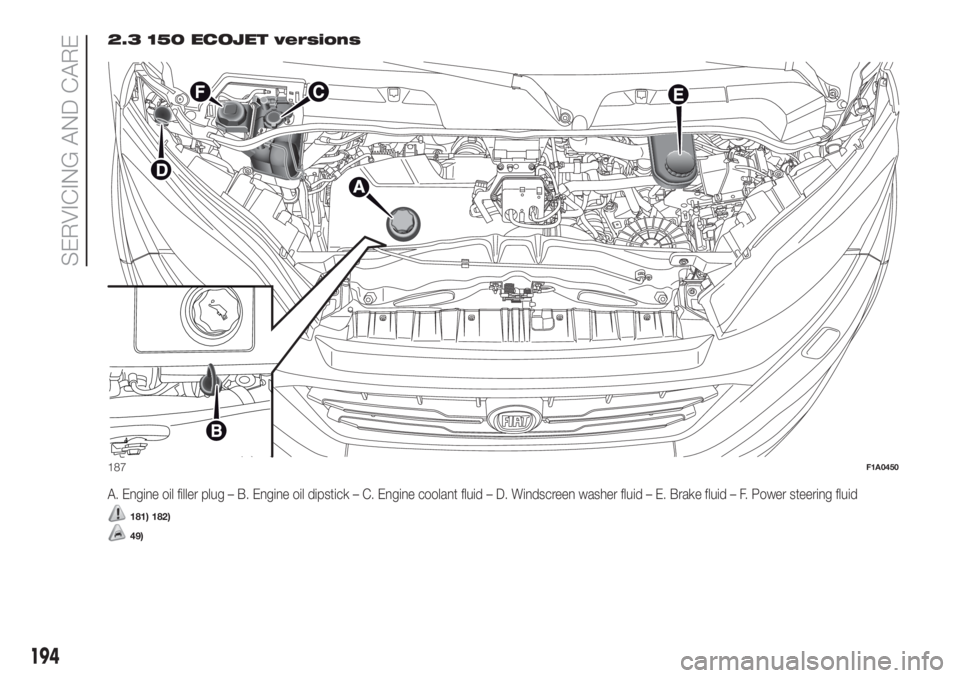
2.3 150 ECOJET versions
A. Engine oil filler plug – B. Engine oil dipstick – C. Engine coolant fluid – D. Windscreen washer fluid – E. Brake fluid – F. Power steering fluid
181) 182)
49)
187F1A0450
194
SERVICING AND CARE
Page 197 of 296
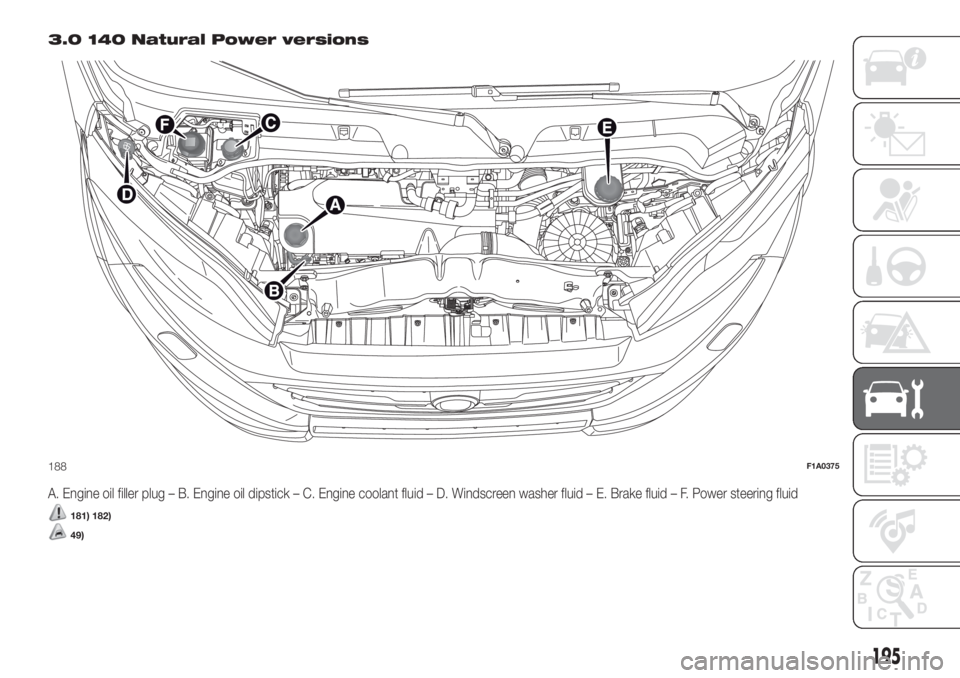
3.0 140 Natural Power versions
A. Engine oil filler plug – B. Engine oil dipstick – C. Engine coolant fluid – D. Windscreen washer fluid – E. Brake fluid – F. Power steering fluid
181) 182)
49)
188F1A0375
195
Page 198 of 296
ENGINE OIL
50)
Check the oil level a few minutes after
stopping the engine (about 5 minutes)
with the vehicle parked on level ground.
Check that the level is between the
MIN and MAX marks on the dipstick B
fig. 185 - fig. 186 - fig. 187 - fig. 188.
The range between the MIN and MAX
marks corresponds to about 1 litre
of oil.
If the oil level is near or under the MIN
mark, add oil through the filler A fig. 185
- fig. 186 - fig. 187 - fig. 188 using the
supplied filler pipe (for versions/markets
where provided), until it reaches the
MAX mark.
The oil level must never exceed the
MAX mark.
Engine oil consumption
The maximum engine oil consumption
is usually 400 grams every 1000 km.
When the vehicle is new, the engine
needs to be run in, therefore the engine
oil consumption can only be considered
stabilised after the first 5,000–6,000
km.
IMPORTANT The oil consumption
depends on driving style and the
conditions under which the vehicle is
used.IMPORTANT After adding or changing
the oil, let the engine turn over for a few
seconds and wait a few minutes after
turning it off before you check the level.
IMPORTANT Always top up using
engine oil of the same specifications as
that already in the engine.
ENGINE COOLANT
183)
51)
The coolant level must be checked
when the engine is cold and must
range between the MIN and MAX
marks on the reservoir.
If the level is to low, operate as follows:
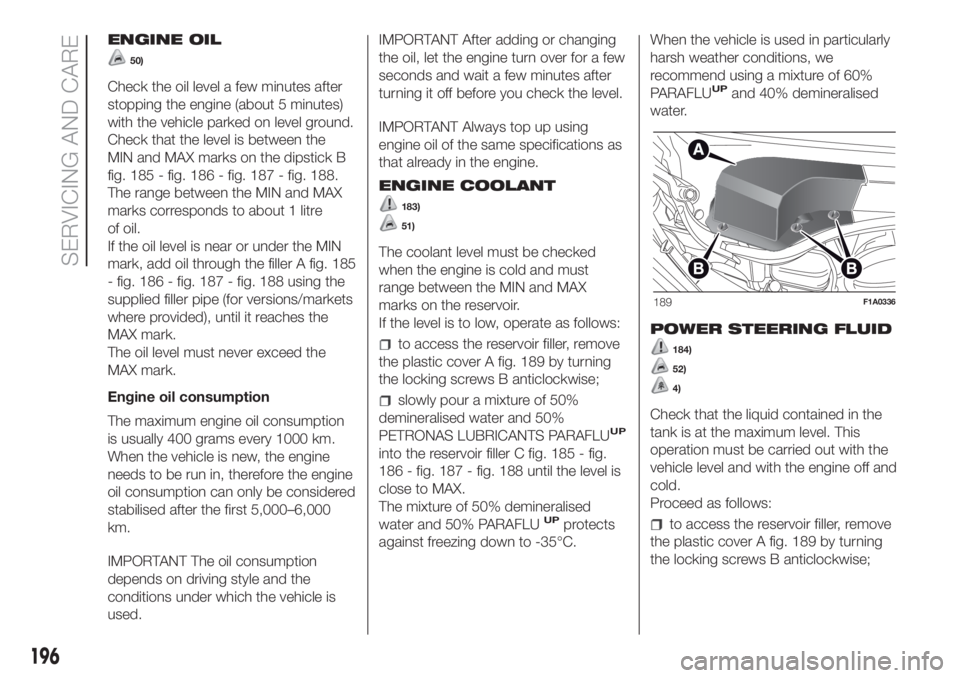
to access the reservoir filler, remove
the plastic cover A fig. 189 by turning
the locking screws B anticlockwise;
slowly pour a mixture of 50%
demineralised water and 50%
PETRONAS LUBRICANTS PARAFLU
UP
into the reservoir filler C fig. 185 - fig.
186 - fig. 187 - fig. 188 until the level is
close to MAX.
The mixture of 50% demineralised
water and 50% PARAFLU
UPprotects
against freezing down to -35°C.When the vehicle is used in particularly
harsh weather conditions, we
recommend using a mixture of 60%
PARAFLU
UPand 40% demineralised
water.
POWER STEERING FLUID
184)
52)
4)
Check that the liquid contained in the
tank is at the maximum level. This
operation must be carried out with the
vehicle level and with the engine off and
cold.
Proceed as follows:
to access the reservoir filler, remove
the plastic cover A fig. 189 by turning
the locking screws B anticlockwise;
189F1A0336
196
SERVICING AND CARE