start stop button FIAT DUCATO BASE CAMPER 2017 Owner handbook (in English)
[x] Cancel search | Manufacturer: FIAT, Model Year: 2017, Model line: DUCATO BASE CAMPER, Model: FIAT DUCATO BASE CAMPER 2017Pages: 296, PDF Size: 14.44 MB
Page 32 of 296
FRONT FOG
LIGHTS/REAR FOG
LIGHTS
(For 2.3 150 ECOJET versions)
With the dipped beam headlights on,
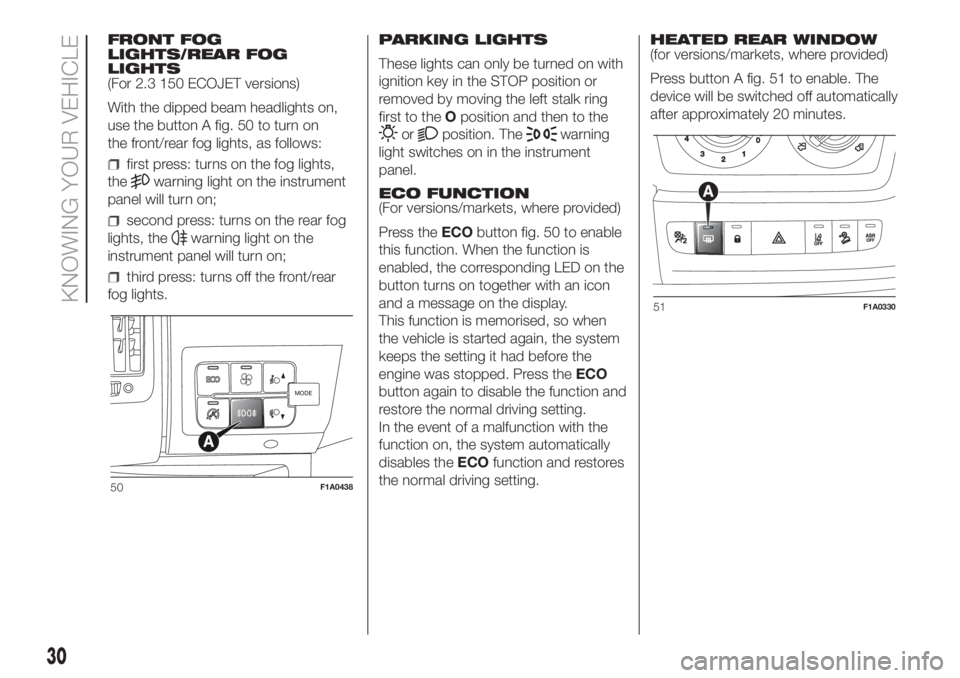
use the button A fig. 50 to turn on
the front/rear fog lights, as follows:
first press: turns on the fog lights,
the
warning light on the instrument
panel will turn on;
second press: turns on the rear fog
lights, the
warning light on the
instrument panel will turn on;
third press: turns off the front/rear
fog lights.PARKING LIGHTS
These lights can only be turned on with
ignition key in the STOP position or
removed by moving the left stalk ring
first to theOposition and then to the
orposition. Thewarning
light switches on in the instrument
panel.
ECO FUNCTION
(For versions/markets, where provided)
Press theECObutton fig. 50 to enable
this function. When the function is
enabled, the corresponding LED on the
button turns on together with an icon
and a message on the display.
This function is memorised, so when
the vehicle is started again, the system
keeps the setting it had before the
engine was stopped. Press theECO
button again to disable the function and
restore the normal driving setting.
In the event of a malfunction with the
function on, the system automatically
disables theECOfunction and restores
the normal driving setting.HEATED REAR WINDOW
(for versions/markets, where provided)
Press button A fig. 51 to enable. The
device will be switched off automatically
after approximately 20 minutes.
MODE
50F1A0438
51F1A0330
30
KNOWING YOUR VEHICLE
Page 42 of 296
In both cases, the heating warning light,
the display lighting and the passenger
compartment heater fan go off and
burning stops.
The fluid circulation pump continues to
work for around two minutes to
dissipate as much heat as possible; the
heater can be turned back on during
this stage.
IMPORTANT The parking heater goes
off when battery voltage is low to allow
the vehicle to be started.
IMPORTANT Before turning on the
device, ensure that the fuel level is
above the reserve. Otherwise the
device could lock and require
the assistance of a Fiat Dealership.
Always turn off the heater when
refuelling and near service stations to
avoid the risk of explosion or fire
hazards.
Do not park the vehicle on
inflammable material such as paper,
grass or dry leaves: fire hazard!
The temperature near the heater
should not exceed 120°C (e.g. during
oven painting in a body shop). The
electronic control unit components may
be damaged at higher temperatures.
Whilst the heater is operating with
the engine switched off, it absorbs
energy from the battery; the engine
should therefore be left running for
a while to make sure that the battery is
properly recharged.
To check the coolant level, follow the
instructions in the "Vehicle
maintenance" chapter, "Engine coolant
system fluid" paragraph. The water in
the heating circuit must contain a
minimum percentage of 10% antifreeze.
For maintenance and repairs,
consult only a Fiat Dealership and use
only original parts.
MAINTENANCE
Have the additional heater checked
regularly at a Fiat Dealership (and
always at the start of every winter). This
will guarantee safe and economic
operation of the heater as well as a long
duration.
ADDITIONAL REAR
HEATING (Panorama and
Combinato)
(for versions/markets, where provided)
The Panorama and Combi versions
are equipped with a main heating
system plus an additional system
(available on request) with controls in
the roof panel trim above the second
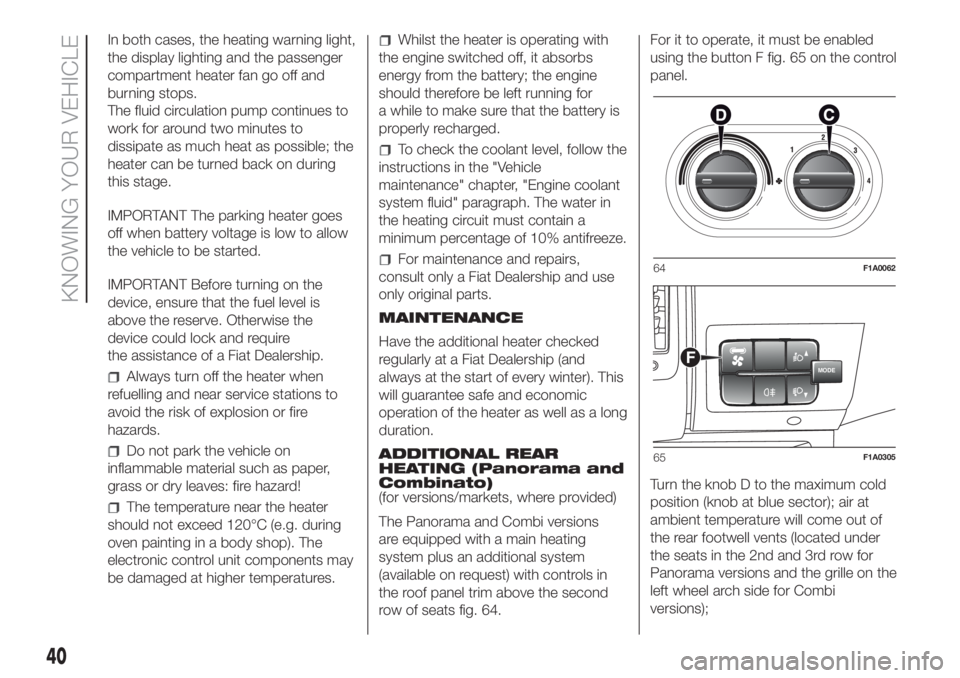
row of seats fig. 64.For it to operate, it must be enabled
using the button F fig. 65 on the control
panel.
Turn the knob D to the maximum cold
position (knob at blue sector); air at
ambient temperature will come out of
the rear footwell vents (located under
the seats in the 2nd and 3rd row for
Panorama versions and the grille on the
left wheel arch side for Combi
versions);64F1A0062
MODEF
65F1A0305
40
KNOWING YOUR VEHICLE
Page 79 of 296
What it means What to do
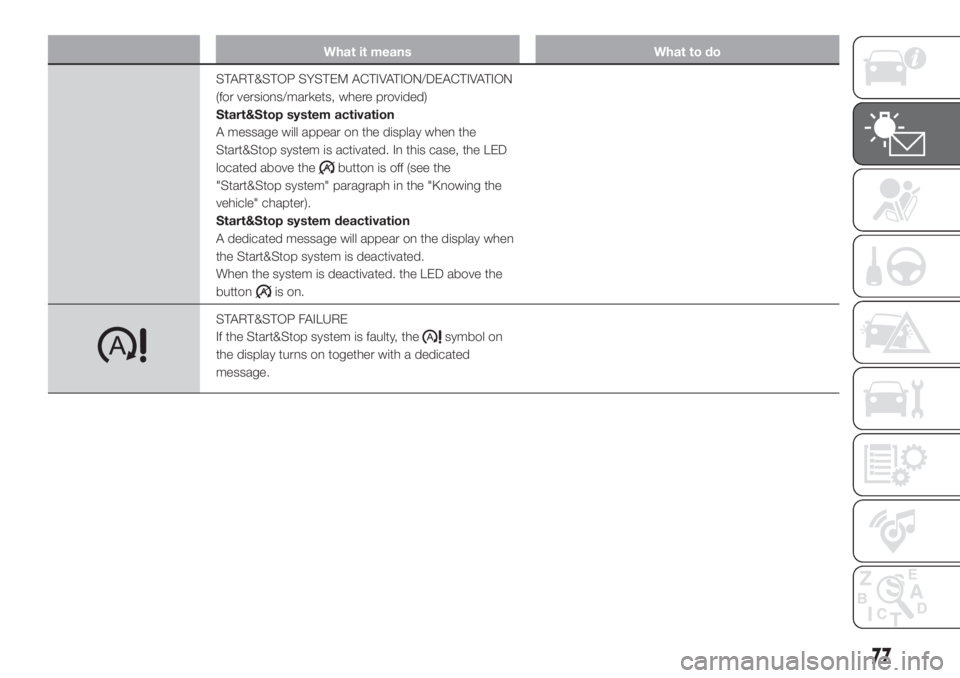
START&STOP SYSTEM ACTIVATION/DEACTIVATION
(for versions/markets, where provided)
Start&Stop system activation
A message will appear on the display when the
Start&Stop system is activated. In this case, the LED
located above the
button is off (see the
"Start&Stop system" paragraph in the "Knowing the
vehicle" chapter).
Start&Stop system deactivation
A dedicated message will appear on the display when
the Start&Stop system is deactivated.
When the system is deactivated. the LED above the
button
is on.
START&STOP FAILURE
If the Start&Stop system is faulty, the
symbol on
the display turns on together with a dedicated
message.
77
Page 92 of 296
vehicle direction getting constantly
closer to the lane demarcation lines (the
vehicle trajectory is within the lane
demarcation lines);
vehicle not constantly next to the
lane demarcation line.
ACTIVATING/
DEACTIVATING THE
SYSTEM
When the system is active, if the vehicle
gets close to one of the side
demarcation lines or one of the two
lane demarcation lines, the driver is
warned with an acoustic signal (coming
from the crossed line side if the vehicle
is equipped with the radio navigation
system) along with the corresponding
direction warning light (
or) lighting
up.
If the driver turns on the direction
indicator in order to change lanes or for
overtaking, then the system will switch
off the driver warning.
If the driver keeps deliberately with the
lane change manoeuvre, the system
interrupts the warning, remaining
enabled if the operating conditions are
not satisfied or active if the operating
conditions are exceeded (see the
dedicated paragraph).SWITCHING OFF THE
SYSTEM
Manual mode
The system can be switched off by
pressing button A fig. 85 on the
dashboard.
The LED on the button switches on and
a message appears on the display to
confirm that the system has been
switched off.
Automatic mode
If the Start&Stop is active the system
deactivates automatically. The system
will reactivate and check its operating
conditions again after the vehicle has
been started.
SYSTEM FAILURE
In the event of malfunction, the system
signals the fault to the driver with a
message on the display, an acoustic
warning and by turning on the
icon
on the display (for versions/markets,
where provided).
IMPORTANT NOTES
The Driving Advisor cannot operate due
to a not perfectly balanced and
excessive load.The operation of the system can be
adversely affected in some cases
by the morphology of the territory/road
being driven on (e.g. driving over
humps), poor visibility conditions (e.g.
fog, rain, snow), extreme light
conditions (e.g. glare of the sun,
darkness), lack of cleanliness
or damage, even partial, to the
windscreen in the area in front of the
camera.
The Driving Advisor cannot operate
following a malfunction of the following
safety systems: ABS, ESC, ASR and
Traction Plus.
The operation of the system can be
adversely affected by poor visibility
conditions (e.g. fog, rain, snow),
extreme light conditions (glare of the
sun, darkness), lack of cleaning or
damage, even partial, to the
windscreen in the area in front the
camera.
The area of the windscreen by the
camera must not be partly or totally
obscured by objects (e.g. stickers,
protective film, etc.).
90
SAFETY
Page 118 of 296
16)If the engine fails to start with a gear
engaged, the potentially dangerous
situation due to the fact that the
transmission is automatically placed in
neutral will be signalled by a buzzer.
17)If the warning light
flashes for 60
seconds after starting or during an
extended towing period, this indicates a
problem in the glow plug preheating
system. Use the vehicle normally if the
engine starts, but contact a Fiat Dealership
as soon as possible.
18)Remember that the brake servo and
power steering are not operational until the
engine has been started, so you need to
apply much more force than usual to
the brake pedal and steering wheel.
19)Never bump start the engine by
pushing, towing or coasting downhill. This
could cause fuel to flow into the catalytic
converter and damage it beyond repair.
20)A quick burst on the accelerator before
stopping the engine serves no practical
purpose; it wastes fuel and is especially
damaging to turbocharged engines.
21)In some cases, when the engine
switches off, the fan could activate for max.
120 seconds.
WHEN PARKED
116)
22)
Proceed as follows when parking and
leaving the vehicle:
engage the gear (on a slope, engage
first gear if the vehicle is facing uphill
or reverse if it is facing downhill) and
leave the wheels steered;
stop the engine and engage the
handbrake;
always remove the ignition key.
If the vehicle is parked on a steep
slope, it is advisable to block the
wheels with a wedge or stone.
On versions equipped with automatic
transmission (Comfort matic), wait
for the letterPto appear on the display
before releasing the brake pedal.
IMPORTANTNEVERleave the vehicle
with the gearbox in neutral (or, on
versions equipped with automatic
(Comfort matic) transmission, before
putting the shift lever in thePposition).HANDBRAKE
Handbrake engagement:The
handbrake lever is located to the left of
the driver's seat. Pull the lever upwards
to engage the handbrake and ensure
that the vehicle does not move.
Handbrake disengagement:slightly
raise the lever, hold the button A
pressed and check that the
warning light switches off on the
instrument panel.
Press the brake pedal when carrying
out this operation to prevent the vehicle
from moving accidentally.
WARNING
116)Never leave children unattended in
the vehicle. Always remove the ignition key
when leaving the vehicle and take it out
with you.
WARNING
22)If the vehicle is equipped with
self-levelling air suspension, always check
that there is sufficient space above the roof
and around the vehicle when parking.
Indeed, the vehicle could raise (or lower)
automatically depending on load or
temperature changes.
116
STARTING AND DRIVING
Page 121 of 296
START&STOP
SYSTEM
IN BRIEF
The Start&Stop device automatically
stops the engine each time the
vehicle is stationary and all the
conditions for automatic switch-off
have been met, and starts it again
when the driver wants to move off.
This improves the efficiency of the
vehicle by reducing fuel consumption,
the emission of harmful gases and
noise pollution.
OPERATING MODE
Stopping the engine
Versions with mechanical gearbox
With the vehicle stationary, the engine
stops with the gearbox in neutral and
the clutch pedal released.
Restarting the engine
Versions with mechanical gearbox
Depress the clutch pedal to restart
the engine.MANUAL ACTIVATION
AND DEACTIVATION OF
THE SYSTEM
To activate/deactivate the system
manually, press the
button on the
dashboard control panel.
24)
118) 119)
WARNING
24)If the vehicle is equipped with manual
climate control, if you want to favour
climate comfort, the Start&Stop system
can be deactivated for continuous climate
control system operation.
WARNING
118)The vehicle should always be
evacuated after the key has been removed
or turned to the STOP position. When
refuelling, make sure that the car is
switched off with the key in the STOP
position.
119)If the battery needs to be replaced,
always contact a Fiat Dealership. The
replacement battery should be of the same
type (L6 105Ah/850A) and should have
the same characteristics.
CRUISE CONTROL
(constant speed
regulator)
(for versions/markets, where provided)
IN BRIEF
This is an electronic driving aid that
allows you to drive at a speed of
above 30 km/h on long and straight
dry roads with few driving changes
(e.g. motorways) at a preset speed
without having to press the
accelerator pedal. It is therefore not
recommended to use this device
on extra-urban roads with traffic. Do
not use the device in town.
Turning the device on
Turn the ring A fig. 110 - fig. 111 to the
ON position or
(depending on the
version).
The Cruise Control cannot be engaged
in 1st or reverse gear. It is advisable
to engage it in 4th or higher gears.
When travelling downhill with the device
engaged, the vehicle speed may
slightly exceed the stored one.
119
Page 181 of 296
VERSIONS WITH
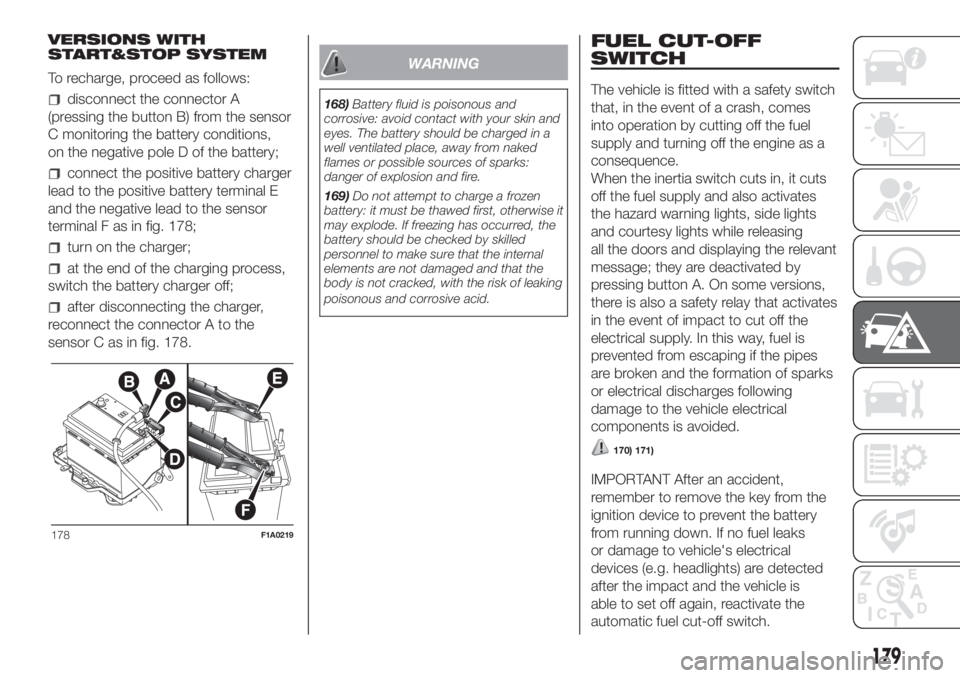
START&STOP SYSTEM
To recharge, proceed as follows:
disconnect the connector A
(pressing the button B) from the sensor
C monitoring the battery conditions,
on the negative pole D of the battery;
connect the positive battery charger
lead to the positive battery terminal E
and the negative lead to the sensor
terminal F as in fig. 178;
turn on the charger;
at the end of the charging process,
switch the battery charger off;
after disconnecting the charger,
reconnect the connector A to the
sensor C as in fig. 178.
WARNING
168)Battery fluid is poisonous and
corrosive: avoid contact with your skin and
eyes. The battery should be charged in a
well ventilated place, away from naked
flames or possible sources of sparks:
danger of explosion and fire.
169)Do not attempt to charge a frozen
battery: it must be thawed first, otherwise it
may explode. If freezing has occurred, the
battery should be checked by skilled
personnel to make sure that the internal
elements are not damaged and that the
body is not cracked, with the risk of leaking
poisonous and corrosive acid.
FUEL CUT-OFF
SWITCH
The vehicle is fitted with a safety switch
that, in the event of a crash, comes
into operation by cutting off the fuel
supply and turning off the engine as a
consequence.
When the inertia switch cuts in, it cuts
off the fuel supply and also activates
the hazard warning lights, side lights
and courtesy lights while releasing
all the doors and displaying the relevant
message; they are deactivated by
pressing button A. On some versions,
there is also a safety relay that activates
in the event of impact to cut off the
electrical supply. In this way, fuel is
prevented from escaping if the pipes
are broken and the formation of sparks
or electrical discharges following
damage to the vehicle electrical
components is avoided.
170) 171)
IMPORTANT After an accident,
remember to remove the key from the
ignition device to prevent the battery
from running down. If no fuel leaks
or damage to vehicle's electrical
devices (e.g. headlights) are detected
after the impact and the vehicle is
able to set off again, reactivate the
automatic fuel cut-off switch.
178F1A0219
179
Page 270 of 296
OPERATION
SWITCHING THE SYSTEM
ON/OFF
The system is switched on/off by
pressing the
button/knob.
The electronic volume adjustment
control rotates continuously (360°) in
both directions, without stop positions.
Turn the button/knob clockwise to
increase the radio volume or
anticlockwise to decrease it.
RADIO (TUNER) MODE
The system is equipped with the
following tuners: AM, FM and DAB (for
versions/markets, where provided).
Radio mode selection
Press the RADIO button on the front
panel to activate radio mode.
Selecting a frequency band
The different tuning modes can be
selected by pressing the RADIO button
on the front panel.
Displayed information
After the desired radio station is
selected on the display, the following
information is shown (INFO mode
activated):
In the upper part:the preset station,
the time and the other active radio
settings are highlighted (e.g.: TA).In the central part:the name of the
current station, the frequency and
the radio text information (if any) are
highlighted.
FM station list
Press the BROWSE ENTER button/
knob to display the complete list of the
FM stations that can be received.
TheA-B-Cbutton can be used,
depending on the chosen letter, to jump
alphabetically to the first of the
FM/DAB stations available for that
letter.
AM/FM radio station storage
(Where provided)
The preset stations are available in all
system modes and are selected by
touching one of the presetting buttons
1-2-3-4-5-6on the front panel.
If you are tuned to a radio station that
you wish to store, hold down the button
on the display which corresponds to
the desired preset until an acoustic
confirmation signal is emitted.
The system can store up to 18 radio
stations in each mode.AM/FM radio station selection
To search for the desired radio station
press the
orbuttons, use
the wheel on the steering wheel
controls
or turn the "BROWSE/
ENTER" knob.
Previous/next radio station search
Briefly press the
orbutton
or use the wheel on the steering wheel
controls
: when the button is
released the previous or next
radio station is displayed.
When searching forwards, if the system
reaches the end of the band, it will
automatically stop on the station where
the search has started from.
Previous/next radio station fast
search
Hold down the
orbutton to
start the fast search: when the button is
released, the first tunable radio is
played.
DAB station list
Press the BROWSE ENTER button/
knob to display:
the list of all DAB stations;
the list of stations filtered by
"Genres";
the list of stations filtered by
"Ensembles" (broadcast group).
268
MULTIMEDIA